Page is loading ...

Capture V2.0 Software Instruction Manual

General Introduction…………………………………… 3
1. Starting Interface……………………………………… 4
2. Windows……………………………………………………5
-2.1 Status Bar ………………………………………………5
-2.2 Control Bar ……………………………………………5
-2.3 Preview Window ……………………………………6
-2.4 Data Bar …………………………………………………6
-2.5 Image Bar ………………………………………………7
3. Capture………………………………………………………8
-3.1 Resolution………………………………………………8
-3.2 Exposure…………………………………………………8
-3.3 White Balance…………………………………………9
-3.4 Image Adjust…………………………………………10
-3.5 File Save…………………………………………………11
-3.6 Histogram………………………………………………12
-3.7 Background Correction…………………………13
-3.8 ROI………………………………………………………14
-5.1 Measure Tool…………………………………………26
-5.2 Calibration……………………………………………29
-5.3 Measure Layer………………………………………30
-5.4 Metric Flow……………………………………………31
-5.5 Manual Class Counting…………………………32
-5.6 Graphic Property……………………………………33
-5.7 Scale Property………………………………………34
-5.8 Ruler Property………………………………………35
-5.9 Grid Property…………………………………………35
6. Report………………………………………………………36
7. Display………………………………………………………37
8. Config………………………………………………………38
9. Info……………………………………………………………39
-9.1 Preferences……………………………………………39
-9.2 Help………………………………………………………39
-9.3 About……………………………………………………39
10. Customer Services…………………………………40
-3.9 Video Record …………………………………………15
-3.10 Delay Capture………………………………………16
-3.11 EDF(Live)………………………………………………16
-3.12 Imaging Stitching(Live)…………………………17
-3.13 Parameter Save……………………………………18
-3.14 Light Frequency …………………………………18
-3.15 Dark Field/Fluorescence Imaging…………19
-3.16 Gray Dye………………………………………………20
-3.17 Other Settings………………………………………20
4. Image………………………………………………………21
-4.1 Image Adjust…………………………………………21
-4.2 Fluorescence…………………………………………22
-4.3 Advanced computational imaging…………23
-4.4 Binaryzation…………………………………………24
-4.5 Smooth…………………………………………………24
-4.6 Filter/Extract/Inverse Color……………………25
5. Measure……………………………………………………26
Contents

General Introduction
Capture V2.0 is a set of powerful software that integrates the controlling the working of micro-imaging cameras, the calculating
imaging, the images processing and the flowing work of measuring and counting, from it, users can obtain much better operating
experiences;
Capture V2.0 is able to drive and control our cameras which are installed on the microscopes from different manufacturers, it helps to
bring you the best performance in your micro-imaging jobs.
When you need to make the best uses of the potentials of your microscopes and their cameras, Capture V2.0 is able to apply
accurately almost all the parameters you select, and it optimizes to these settings of these parameters through its user-friendly
designs.
Capture V.2.0 enables users to set up their customized desktops according to their actual applications. When user combine the
customized desktops with his customized working flows, there will be a distinct layout of the software working appearance, the user is
ensured the accuracy of his experiment results no matter the software is working with multi-tasks or under multi-users circumstances.
Capture V2.0 achieves senior quality images due to its powerful real-time calculating engine. The function of real-time stitching helps
you to obtain a super wide of FOV image which is the result of real-time auto-images-stitching, when you moving your mechanic stage
of the microscope. Real time EDF functions is able to offer you a combined picture of extened-depth-focusing(EDF) rapidly with less
than one second.
From the users’ points of view, assuring the best operating procedures, the developers of Capture V2.0 refined the all-new camera
operating workflow as Efficient image acquisition→Image edition→measurement→report by modularizing designs. This workflow,
acts in concert with the latest image processing algorithms, greatly saves the users’ operation time and then improves their working
efficiency.
› General Introduction
› Starting Interface
› Windows
› Image
› Measure
› Report
› Display
› Config
› Info
› Capture
› Customer Services
› Contents
3

Starting Interface
Note:
1) Speedy booting up of the software, within 10 seconds
2) If no cameras connected or not assigned cameras connected, warning
information will show up as the right figure(1) when user try to run the
software
3) If abruptly disconnected with camera when running, the software
will show up this warning information as the right figure(2)
(1) (2)
› General Introduction
› Starting Interface
› Windows
› Image
› Measure
› Report
› Display
› Config
› Info
› Capture
› Customer Services
› Contents
4

Windows
The main interface of Capture 2.0 software is consisted of the following 5 parts:
① Status Bar ② Control Bar ③ Preview Window ④Data Bar ⑤Image Bar
Main Interface
There are seven main modules in the status bar, they are Capture / Image / Measure /
Report / Display / Config / Info. Click on the certain bar, the software will switch to
related interface.
① Status Bar
② Control Bar
To display all the functions of the software work for the
camera, Click button to unfold all the functions display
Click button to fold up all the functions display
› General Introduction
› Starting Interface
› Windows
› Image
› Measure
› Report
› Display
› Config
› Info
› Capture
› Customer Services
› Contents
5

③ Preview Window
④ Data Bar
To display the real-time viewing and captured images;
Use the wheel of the mouse to zoom in and out of the image, show the magnified
area around the cursor in the middle of the screen
Hold down the left button / right button / scroll wheel m of ouse to drag the
image display area;
Click the control button at the edge of the window: , , ,
can expand or contract the corresponding operating bar;
Click the button to save the currently selected picture as another document,
then the following window will pop up. The software supports four image
formats for saving or saving as: [BMP] [JPEG] [TIFF] [PNG];
To show the measurement and statistics tables
Windows
› General Introduction
› Starting Interface
› Windows
› Image
› Measure
› Report
› Display
› Config
› Info
› Capture
› Customer Services
› Contents
6

⑤ Image Bar
a) Click the button to locate the saving path of the file,
select the path in which the image need to import or open,
the interface will switch to the following
Display all the thumbnails of
captured images, videos movies,
images from other saving paths.
Click on any thumbnail, the
main interface will switch to the
[Imaging] window for image
processing
· Select the files-saving path on the left side. Click the
button to close the window.
· The saving path and all the images under this path will
display on the right side of the window.
· Click the button to add the current saving path to the
favorites folder for the next time of speedy opening.
· Click the button to return to the upper directory.
· Right click on a image or on the blank
area of the interface to pop up the
operation menu, under which,
“Select All” “Deselect All” “Open”
“Delete” operations are able to performed.
b) Right click on one of the
image, the dialog box of
operations will pop up and
show the operations, such
as “Rename” “Close” “Close
all” for you to choose.
· Click on the icon of dialog
box of images to choose the
sizes of the image you want
to display
Windows
› General Introduction
› Starting Interface
› Windows
› Image
› Measure
› Report
› Display
› Config
› Info
› Capture
› Customer Services
› Contents
7

Capture
Resolution
Resolution Setting
Resolution: select the resolution of previewing.
Set the exposure time of camera and then the value of real-time frame per
Second(FPS)will show up.
Auto Exposure: check the blank in front of the [Auto Exposure], the software
automatically adjusts the exposure time according to the brightness of the image to
obtain an image with appropriate brightness. The automatic exposure time range is
300us~350ms by the factory setting.
Manual Exposure: Uncheck the [Auto Exposure], system switchs to [Manual
Exposure] mode ,user can manually input the exposure time into the blank
according to his actual demands for the image, then click [OK] button to apply, or
manually adjust the exposure time linearly through the slider. The manual exposure
time range is 130us~15s.
Gain: User can select the most suitable gear of gain according to his specific
applications and needs on images previewing. Greater gain brings the improvement
of the brightness, but with the increasing noise.
Default: Click the [default] button to restore this module's parameters to the
factory default ones. The default setting of exposure is the [auto exposure] .
Exposure
› General Introduction
› Starting Interface
› Windows
› Image
› Measure
› Report
› Display
› Config
› Info
› Capture
› Customer Services
› Contents
8

White Balance
User can adjust the parameters of white balance according to the actual light
source to obtain better image effects which closely meet the needs of his.
White balance: By adjusting the ratio of the three individual components of red,
green and blue, the camera is able to reflect the true image color under various
illuminating conditions. The default setting of the white balance of the camera is
Auto-white balance. User can uncheck [Lock White Balance] under the
environment with stable illuminating conditions, while the user can check [Lock
White Balance] to lock the current white balance setting under unstable
illuminating conditions.
Gray: Check to converts a color image to a monochrome image.
Red, Green, and Blue(Gain): Manually adjust the gain values of the red, green,
and blue channels for suitable white balance effect, adjusting range is 0~683
Color temperature(CCT): The current close color temperature can be achieved
by adjusting the three gains which are the above Red, Blue and Green. It can also
be manually adjusted and matched to the close color temperature according to
illuminating environment. By the way of calibrating the white balance will be more
accurately to achieve the correct color temperature. Color temperature setting
range is 2000K to 15000K.
Default: Click the [Default] button to restore this module's parameters to the
factory default ones. The default setting of white balance is [Auto-white balance].
Capture
› General Introduction
› Starting Interface
› Windows
› Image
› Measure
› Report
› Display
› Config
› Info
› Capture
› Customer Services
› Contents
9

Hue: The shade of the color, adjusting ranges from 0 to 360.
Saturation: the purity of the color, the higher the purity, the more vivid
performance, the lower the purity, the bleaker of the effect, setting range is 0~255
Light: the brightness and darkness of the image, setting range is 0~255
Contrast: the difference in brightness level between the brightest white and the
darkest black in the light and dark areas of an image, setting range is 0~63
Permeability: the enhancement effect of the image, setting range is 0~48
Image enhance save: User may check this frame to make the adjusted
parameters of details enhancing and noise reducing into effects to the images to be
captured later.
Details Enhance: The enhancements of the showing out of the more details
information in the image , setting range is 0~4
Denoise: Reduce noise in the image, setting range is 1~63
Default: Click the [Default] button to restore this module's parameters to the
factory default ones.
The factory default values of some parameters (settings) for image
capturing(acquisition) are as followed: Tone:180/Contract:33/
Saturation:64/Brightness:64/ Permeability:16/[Image Enhancement Save] on
uncheck/ Image Enhancement:1/Noise reduction:1
Image Adjust
Capture
› General Introduction
› Starting Interface
› Windows
› Image
› Measure
› Report
› Display
› Config
› Info
› Capture
› Customer Services
› Contents
10

File Save
Capture the currently needed data from the real-time video data stream and record
it into image format for later development and analysis.
Click the button to capture a live previewing image
File name: The name of the file to be saved is named as "TS" format by default,
and it allows to name the file personally by user.
The software supports the format of "custom +
time-stamp" for naming. There are five formats
of time-stamp naming.
Format: The image formats could be saved as JPG\TIF\PNG\DICOM. The default
format is TIF. These four image formats can be checked separately or simultaneously.
The captured images in different formats will be displayed at together when their
saving formats are selected to be simultaneously.
1) JPG: it is an information-losing and compressed image saving format, its image
size is small, but the final quality of the image is degraded compared with the
original captured image because of the image data- losing during being saved.
2) TIF: a Lossless image saving format, which can save all the data transmitted from
the camera to your saving device without losing, this format is good for the saving
and converting of images with high image quality requirements.
3) PNG: Portable network graphics is a lossless but compressed bit-image format
that uses the way of lossless data compressing algorithm derived from LZ77 with a
high compressing ratio and a small file size.
4) DICOM: Digital imaging and communication of Medical, an international standard
format for medical images and related information. It defines a medical image
format that can be used for data exchanging and meet the requiring of clinical
practices and applications.
Path: To save the image files to the folder that is under the certain of defined path.
User can click the [Browse] button to change the saving paths. The default saving
path is C:/Users/Administrator/Desktop/Image.
Capture
› General Introduction
› Starting Interface
› Windows
› Image
› Measure
› Report
› Display
› Config
› Info
› Capture
› Customer Services
› Contents
11

Histogram
User can try the software function of color level Adjusting to obtain more realistic
images for observation and analysis.
The color level adjusting means to redefine the R\G\B color levels in each channel and
then re-allocate of the pixel values in among. Adjust the color level (gradation) to
increase the range of the highlight area in the image, image becomes brighter, or
using the contrary way to make the bright image darker. User can also adjust the
components of the RGB three channels separately to change the image color of the
corresponding channel.
Manual Color Level: User can manually adjust the image's dark tone (left gradation),
the gamma and highlight brightness level (right color gradation) on the histogram to
regulate the image's tones, such as the contrast, shading and image layers, then
obtain the correct balance of the whole image.
Auto Color Level: Check [Auto Min] and [Auto Max] to automatically adjust the
brightest and darkest pixels in each channel as white and black, and then re-allocate
the pixel values in proportion.
Gamma : adjust the median of the color level, setting range is 0.64 to 2.55;
Default: Click [Default] button to restore the module's parameters to the factory
default ones. The default of color level adjusting is manual , and the default gamma
value is 2.10.
Note: a) The composing and displaying of the histogram curve is the result of the
software’s running real-time data statistics, so some the sources of the software will
be occupied. When this module applied, the camera frame rate may be slightly
affected to drop. When the module stop working, the data statistics are turned off
and the frame rate of the camera is able to reach to the maximum. b) After cancelling
the automatic color level adjusting, the level value will stay in the value as it was.
Capture
› General Introduction
› Starting Interface
› Windows
› Image
› Measure
› Report
› Display
› Config
› Info
› Capture
› Customer Services
› Contents
12

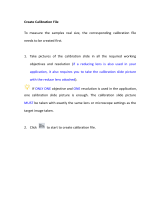
Background Correction
(1)
(2)
Flat Field Calibration: In actual microscope applications, the images captured by
the camera may be uneven or carry color patches, due to the problems of
microscopes’ light sources, optical path systems, or the dirty spots on the
microscope eyepieces and objectives. With flat field correction, those types of
defects could be effectively reduced, the imaging effects will be more uniform, and
the color reproduction of the images is smoother and more realistic.
Operations:
a) Click [Flat Field Calibration Wizard] to move the viewing field of camera to a blank
background, as shown in the right figure (1);
b) Click [Next] to move the first background to another new blank background, click
[OK] to apply the Flat Field Calibration function, as shown in the right figure(2);
c) Select [ uncheck] to exit the flat field correction mode. If you need to apply it
again, re-check it, no need for repeating the wizard procedures again.
Note:
a) The Flat Field Calibration requires the manually setting of the exposure time, so
that the image brightness will not overflow up or down, and all the pixel values are
range from 64DN to 254DN.
b) The brightness of other areas of the two backgrounds which are used for
references of correction should be almost the same except that there are some
moving spots on the two backgrounds. These two background should not be those of
"significantly inconsistent".
c) To standardize the background for the flat field correction, it is recommended to
use plastic, ceramic or professional white balance paper as the standard samples.
d) Flat Field Correction requires that the background it use as reference to be a blank
one and the light illumination on it is uniform. The correction should be conduct
again if the camera or the microscope changed their lens or objective.
DPC: The ability to reduce the dead pixels on the image, setting range is 0~3.
Capture
› General Introduction
› Starting Interface
› Windows
› Image
› Measure
› Report
› Display
› Config
› Info
› Capture
› Customer Services
› Contents
13

ROI
ROI (Region of interest) is an application that user runs the software to define a
window area of interest within the effective and sensitive detecting area of the
camera sensor and just allow the image information within this defined window to
be read out and then show out a localized area of image. A smaller ROI area reduces
the amount of information and tasks of image transferring and computer processing,
which results in increased frame rate of the camera.
Select regions of interest (ROI): Using a computer mouse. Check on the ROI frame,
then move the computer mouse to the previewing image to define the window area
you would like it to be your ROI, this window area will display the coordinate value
and resolution of the current running point. Click on the [√] below the cursor to
apply the ROI settings into effect.
Setting the area and coordinates of the region of interest(ROI): Manually
entering the starting point coordinate value and the resolution size to define the
exact ROI area. Enter the actual point offset position of the rectangular area as well
as the width and height, then click [OK] to apply the ROI settings into effect.
Capture
› General Introduction
› Starting Interface
› Windows
› Image
› Measure
› Report
› Display
› Config
› Info
› Capture
› Customer Services
› Contents
14

Video Record
Click on[Video Record], Save the image data into video formats for playing back to
observe the process of the samples’ live movements.
Encoder: The software provides two compressing formats: [Full frame (No
compression)] and [MPEG-4], the video sizes generated by different compressing
formats are inconsistent, and the user may choose either one format according to his
actual needs.
Total Frame: Capture images according to how many frames was set to be captured,
setting range is 1~9999 frames
Total Time(s): The length of time of capturing images based on how long the time
was set to, setting range is 1~9999 seconds
Save to Hard Disk: Instant loading and writing in. The image data is being loaded and
written into the hard drive of the computer during the image capturing process. In this
mode, the transmission speed from the camera to computer will reduce due to the
computer’s loading and writing in images data into its hard drive, so this mode is not
suitable for capturing the images of quickly changing scenes or backgrounds, but it is
suitable for long-time period of capturing.
Save to RAM: The image data is saved in the RAMof the computer temporarily, after
the image capturing, all the image data is transferred to the hard drive of the computer
to save. Select Save to RAM and enable the RAM to save images. The maximum
numbers of images that can be saved by RAM and display will be shown out. This saving
mode allows the camera to maintain a high transmission speed of the images when
capturing and avoid data losing due to a low transmission speed. This saving mode is
limited by the volume of the computer's RAM, so it is not suitable for long-time period
or huge volume of capturing.
Default: Click the [Default] button to restore the module's parameters to the factory
default ones. The default saving mode is the compressed mode with full resolution
frame, with the total number of frames to be 10 frames, and the total default capturing
time is 10 seconds, image data default to be saved to the local hard drive.
Capture
› General Introduction
› Starting Interface
› Windows
› Image
› Measure
› Report
› Display
› Config
› Info
› Capture
› Customer Services
› Contents
15

Delay Capture
Total Frame: Capture images according to how many frames was set to, system
default to be 10 frames, setting range is 1~9999 frames
Interval Time(ms): The time interval is 1000ms by default, the minimum value is
zero, which means capturing images without intervals.
Capture Frame: Capture and save multiple frames of images continuously
according to the preset parameters, Click [Stop] to terminate the continuously
capturing before the capturing task is finished.
Capture si Video: Capture multiple frames of images according to preset
parameters and convert them into a movie directly. Click [Stop] to terminate the
continuously capturing before the capturing task is finished.
EDF(Live)
EDF makes it possible to stack and merge the images acquired by microscope with
different focused panels or positions on a certain thick specimen or sample. The new
stacked and merged image is able to present the clear full forms and information of
the specimen or sample.
Quality: The higher quality level of the new image requires, the slower speed in its
merging, but results in coming out of image with better quality.
Click the [ Start EDF ] button to run. Continuously turn the fine knob of the
microscope to focus on one plane to next other, the software is able to merge the
obtained plane images instantly and show out a live and clearest image.
Click the [Stop EDF] button to end the stacking and merging application, a new
merged image including all the depth focusing information will be generated in the
image gallery.
Capture
› General Introduction
› Starting Interface
› Windows
› Image
› Measure
› Report
› Display
› Config
› Info
› Capture
› Customer Services
› Contents
16

Imaging Stitching(Live)
The model of real-time image stitching supports to acquire several individual images with
adjoining positions on the specimen or sample, and to have them combined into a stitched
image which present the whole form of the specimen.
Stitching Speed: Two options: High Speed and High Quality. the default is High Speed.
Background Color: The default background color of the invalid area on the stitched-to-
composed image is black , but you can change it. Click on to select the desired color in
the palette. And it will effective after stitching is completed.
Start Stitching: Click on it , the prompt of operation such as right figure (1) will pop up;
The cache memory of the computer will be used to save image data within the stitching
procedure. The right figure (2) shows the real-time displaying window while stitching.
Move the specimen to another new position (no more than ¾ away from the former position)
and then stop, the navigation bar in the stitching window will show green(means normal to
begin), as shown in the right figure (3), the software conducted a stitching, move the
specimen again to another new position (still following the distance principle mentioned
above, no more thatn 3/4), stop and let the software to process another stitching. Repeat the
above operation until the whole live-stitched image meets your expectation. If the navigation
bar turns red, as shown in the right figure (4), it means that this present position is out of the
limitation area to be able to do the stitching, so you need to move the specimen back to the
last position for effective stitching.
Click [Stop Stitching] to end the stitching, and a stitched and composited image will be
generated in the image gallery.
Note: a) It is recommended to conduct a white balance correction and flat field correction
before starting the stitching to ensure to achieve the best quality images.
b) Since the stitched images are in huge sizes and will surly occupy massive memory of the
computer, so it is recommended to conduct the stitching operations through a computer
with sufficient memory volume. The operating system software which is 32-bit could not run
the stitching software module.
c) When the processing of stitching taking up 70% of the computer memory volume, the
stitching module will stop working automatically.
(1)
(2)
(3)
(4)
Capture
› General Introduction
› Starting Interface
› Windows
› Image
› Measure
› Report
› Display
› Config
› Info
› Capture
› Customer Services
› Contents
17

Parameter Save
This software supplies the function of managing the groups of experiment parameters
for the users’ conveniences using the camera in different applications or platforms.
User can save and re-load the set parameters from different experiment statuses and
then apply them to the new experiments projects, this function will surely save the
users’ time, develop the working efficiency and ensure the reproducibility of the
experiment results.
The parameter group saver allows the users to save all the software functions and
modules mentioned above (exception is the flat field correction module).
Copying and loading the files of parameter group to other computer platforms can
realize the cross-platform applications of these parameters, so the user's
experimental conditions are ensured to be as uniform as possible;
The name of the parameter group: To name the parameter group, input the name you
desired and load it, the window's context menu will display those parameter groups
which have been saved or loaded.
Load: Load the parameter group to current working status;
Export: Save the files of the parameter groups to specified folder documents;
Reset all: Restore to the factory default settings will delete all the files of parameter
groups set and saved by the users before
Save: To save the current parameters into a named parameter group file
Delete: To delete the currently selected files of parameter group
Import: To load the selected files of parameter group from the selected folder
Light Frequency
Users can select the corresponding light source frequency according to the actual
applications or conditions. Suitable frequency of light source is good for the
normality of the live images and excludes the phenomenon of stroboscopic on the
live images. The default light source frequency is the frequency of direct current.
Capture
› General Introduction
› Starting Interface
› Windows
› Image
› Measure
› Report
› Display
› Config
› Info
› Capture
› Customer Services
› Contents
18

Dark Field/Fluorescence Imaging
User can adjust the black balance parameters of the live image according to his actual
working conditions or requirements to achieve better image quality.
2x2 Bin: increase the output speed while reduce resolution
3D Denoise Save: Apply this module to reduce the noise in the image
Bitdepth Shift: The images displayed on the computer screen are all 16-bit data
images. Capture software allows the user to select different bit of data to display and
preview according to his actual needs.
Black Balance Setting: The setting of color leveling, means to reset the ratio pixel
values of R/B color in each channel
Parameter Name: Before saving the R/B ratio pixel values set by the user, user may
create a name for the file of parameters group to save these parameters and the file
name may be used to direct the user to reload these settings for the next application
a) Save: Save the current settings parameters group into the named file above
b) Load: Load the saved parameters group to apply for the current status
c) Delete: Delete the current saved parameters group file
Capture
› General Introduction
› Starting Interface
› Windows
› Image
› Measure
› Report
› Display
› Config
› Info
› Capture
› Customer Services
› Contents
19

The original images captured by mono-camers are monochrome. For this reason,
User can change the color mapping whatever he like. He can use the pseudo color
palette to select the color he wants to map on the target image, or he can take the
advantages of the Fluorochrome Bank to define the color on his target image by
click on the [Apply] button after selecting the fluorochrome he used in the specimen
from the fluorochrome bank. Through color mapping, the final image is able to be as
lifelike as that from the eyepieces of the microscope. Click on [Cancel] to remove the
color mapping.
Current : This window displays the currently available
colors that can be selected by the user, there are the
seven commonly colors. Click on to make the full
color palette appear, from which, user has many more
choices of color to pick. After the color selecting, click
on [Add to New Dye] to add the selected color as a new
character after the above seven color. Click on [Delete]
to delete the color added by the user before;
Dye Type: It is the fluorochrome bank, user can find out the fluorochrome he used
in the specimen and map the corresponding color on the monochrome image.
Gray Dye
Other Settings
Negative: Change the color of the current image to its inverse color.
HDR: Click to achieve higher dynamic range and more image details for better
image quality.
Capture
› General Introduction
› Starting Interface
› Windows
› Image
› Measure
› Report
› Display
› Config
› Info
› Capture
› Customer Services
› Contents
20
/