Page is loading ...

PORTABLE BLUETOOTH SPEAKER CLOCK
WITH WIRELESS CHARGING
RADIOSVEGLIA BLUETOOTH CON RICARICA WIRELESS
TRAGBARER BLUETOOTH-LAUTSPRECHER MIT WECKER
UND KABELLOSER LADEFUNKTION
HORLOGE PORTABLE AVEC ENCEINTE BLUETOOTH
À CHARGEMENT SANS FIL
RELOJ ALTAVOZ BLUETOOTH PORTÁTIL
CON CARGA INALÁMBRICA
ART.NO.: BCC1001
IT
ISTRUZIONI PER L’USO ................
DE
BEDIENUNGSANLEITUNG ...........
EN
INSTRUCTION MANUAL ...............2
MODE D‘EMPLOI
FR
MANUAL DE INSTRUCCIONES
ES
....
........................
9
16
23
30

ABOUT THIS INSTRUCTION
MANUAL
These operating instructions are to be
considered a component of the device.
Please read the safety instructions and the
operating instructions carefully before use.
Keep these instructions for renewed use at a later
date. When the device is sold or given to someone
else, the instruction manual must be provided to
the new owner/user of the product. The device
is intended only for indoor use.
2
GENERAL WARNINGS
• Risk of electric shock — This device contains
electronic components. Only use the device as
described in the manual; otherwise, you run the
risk of an electric shock.
• Choking hazard — Children should only use the
device under adult supervision. Keep packaging
material, like plastic bags and rubber bands,
out of the reach of children, as these materials
pose a choking hazard.
• Risk of chemical burn — Keep batteries out of
the reach of children! Make sure you insert the
batteries correctly. Leaking battery acid can
lead to chemical burns. Avoid contact of battery
acid with skin, eyes and mucous membranes.
In the event of contact, rinse the affected region
immediately with a plenty of water and seek
medical attention.
•
— Do not expose the
device to high temperatures. Use only the
recommended batteries. Do not short-circuit
trigger a short-circuit, a fire, or an explosion.
the device or batteries, or throw them into a fire.
Excessive heat or improper handling could
• Do not disassemble the device. In the event
of adefect, please contact your dealer. The
dealer will contact the Service Centre and can
send the de vice in to be repaired, if necessary.
• Use only the recommended batteries. Always
replace weak or empty batteries with a new,
complete set of batteries at full capacity. Do
not usebatteries from different brands or with
differentcapacities. The batteries should be
removed from the unit if it has not been used
for a long time.
Do not submerge the device in water or attempt
to disassemble the device.
Do not use this product in an aircraft.
Device may be warm while with power supply
through an adaptor. It is normal.
SCOPE OF DELIVERY
Wireless speaker clock, Operating instructions,
Micro USB charging cable.
•
•
•

EN
IT
DE
FR
ES
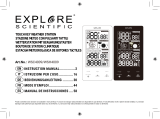
PRODUCT OVERVIEW
1.Press [] to lower volume. While in Bluetooth
mode, press and hold to go to previous track.
2.Press [ ] to increase volume. While in Blue
tooth mode, press and hold to go to next track.
Remarks: While in Aux-in mode, the track could
only be changed through your device.
3.When playing music, press [ ] to pause or play.
When you receive a call, press to answer or
press and hold to reject the call.
When you are on the phone through Bluetooth
mode, press to end. When the call ends, music
will resume playing. At Bluetooth mode, press
twice to dial number of last call.
4.Press [ ] to switch mode. Press and hold to
enter or exit the standby status.
5.Press [ ] to switch setting between screen
brightness, clock, alarm 1 and alarm 2.
6.While in setting mode, press [ ] to decrease
brightness or numbers.
7.While in setting mode, press [ ] to increase
brightness or numbers.
8.Wireless charging location.
9.Wireless charging indicator
Green: wireless charging in progress.
10.LED indicator
Red: Speaker in turned on.
Off: Speaker off / Standby.
11.Power on/off
12.DC input 5V 1.5A
13.Auxiliary Line-in Port
14.USB Charging Port - Output 5V 1A
3
DC 5V USB
1 2 3 4 5
6
7
9 10
8
11 12 13 14

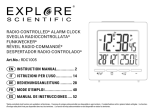
LCD DISPLAY
1.
4
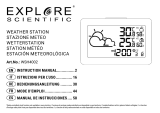
BUTTON
MODE
Standard
mode
PRESS
Decrease
volume
HOLD
Time
setting
mode
PRESS _______
HOLD _______ _______
Alarm
setting
mode
PRESS _______ _______
HOLD _______ _______
Previous
track
Increase
volume
_______
Next track
_______
_______
_______
_______
_______
_______
_______
_______
Play or pause
Answer or
end call
Redial
(Press twice)
Reject call
Disconnect
Bluetooth
connection
Switch between
AUX and
Bluetooth mode
Stop the alarm
Enter or exit
the standby
status
Switch
setting
between
screen
brightness,
clock,
alarm 1 and
alarm 2
Go to next
parameter
Decrease
_______
_______
_______
_______
_______
_______
Go to next
parameter
_______
_______
Brightness
setting
mode
PRESS
HOLD
_______
_______
_______
_______
_______
_______
_______
_______
_______
_______ _______ _______
Decrease
_______
Decrease
Increase
Increase
Increase
_______
_______
Time / alarm time display
[ ] Bluetooth signal
[ ] Alarm 1 ON
[ ] Snooze activated
[ ] Alarm 2 ON
[ ] AUX mode ON
[ ] USB

EN
IT
DE
FR
ES
GETTING STARTED
POWER SUPPLY
1. Insert the Micro USB Charging cable (included)
to the DC 5V input port located at the rear of the
unit. Insert the other end into a suitably rated
wall outlet.
2. Push the Power switch to the ON position to
turn on the device. The time will be displayed.
3. Press and hold the [ ] to enter or exit standby
status.
NOTE: To turn off the device and the screen, push
the Power switch to OFF position.
INTERNAL BATTERY
The speaker contains 2 sets of 2200mAh batteries
in the speaker. When fully charged, the speaker
can operate without a power supply and become
portable.
NOTE: The charge time is around 3 hours.
PLAYING MUSIC
PAIRING / DISCONNECTING VIA BLUETOOH
1. Place your device nearby. Press the [ ] till
the [ ] flashes.
2. Search for Bluetooth according to your device’s
instructions.
3.The speaker is named “BCC1001”, enter the
PIN “0000” if needed.
4. The speaker will beep when complete pairing.
The [ ] stays on.
NOTE: To disconnect the Bluetooth, press and
hold [ ].
AUX
1. Plug the 3.5mm audio cable into the audio input
connector and automatically switch from
Bluetooth mode to AUX mode. To switch the
mode manually, press [ ] to switch between
AUX and Bluetooth mode.
2. Unplug the 3.5mm audio cable from AUX and
the speaker returns to Bluetooth status auto-
matically.
BRIGHTNESS ADJUSTMENT
1.Press [ ] once, all icons will flash.
2.To set the brightness of display, short press
[ ] or [ ].
3.Wait for 3 seconds. The brightness you set
would be saved automatically and exit bright-
ness setting.
CLOCK
SET AUTOMATICALLY
The time will be automatically adjusted by the
Bluetooth connection of an iPhone.
NOTE: Not applicable to Android phone.
SET THE CLOCK MANUALLY
1. Press [ ] twice to enter time setting mode.
2. The setting parameter will flash.
3. Press and hold [ ] button to confirm setting
and enter to next parameter.
4. Press [ ] or [ ] to set the required data.
5. Sequence of setting: Hour -> Minute ->
24Hr/12Hr
6. If there is no action in 3 seconds, the setting
will be saved and will exit the setting mode.
5
WIRELESS CHARGING
1. Place the equipment to be charged on the top
circle of the stereo.
2. Device will now start charging.
NOTE: Please make sure your device supports
wireless charging.
USB CHARGING
1. To charge a device, connect with a USB charging
cable to this USB charging port [ ] at the
rear.
2. Device will now start charging.
NOTE: When using the wireless charging and USB
charging at the same time, USB charging would be
disabled for the purpose of keeping the maximum
output capacity within safe level.

ALARM
SETTING / ADJUSTING ALARM TIME
1.Press [ ] triple to enter alarm 1 setting mode.
The [ ] will be on. (Press four times to enter
alarm 2 setting mode. The [ ] will be on.)
2. The setting parameter will flash.
3. Press and hold [ ] button to confirm setting
and enter to next parameter.
4. Press [ ] or [ ] to set the required data.
5. Sequence of setting: Hour -> Minute -> Alarm
OFF/ON
6. If there is no action in 3 seconds, the setting
will be saved and will exit the setting mode.
OPERATION
1. At the set time, alarm signal rings.
2. The alarm lasts 1 minute.
3. To stop the alarm, press [ ].
4. During the alarm, press any other button to
delay the alarm by 5 minutes.
5. The alarm will start again at the next alarm
time, unless you switch off the alarm function.
NOTE:
a. The alarm will automatically turn off after 4
times of snooze.
b. The screen will be turned on when the alarm
rings during Power OFF.
6
EC DECLARATION OF
CONFORMITY
Hereby, Explore Scientific GmbH declares
that theequipment type with part number:
BCC1001 is in compliance with
Directive: 2014/53/EU. The full text of the EU
declaration of conformity is available at the
following internet address: www.bresser.de/
download/BCC1001/CE/BCC1001_CE.pdf
SPECIFICATIONS
Dimensions (Main unit):
204x79x109mm (LxWxH)
Weight (Main unit):
820 g (Exclude batteries)
Power:
Micro USB charging cable, DC 5V, 1.5A
Bluetooth standard:
5.0
Output Power:
5W * 2
Batteries:
2200mAh*2
NOTES ON CLEANING
• Remove the batteries before cleaning.
• Only use a dry cloth to clean the exterior of the
device. To avoid damaging the electronics, do
not use any cleaning fluid.
• Protect the device from dust and moisture.
RCM DECLARATION OF
CONFORMITY
The product complies with electrical
safety, EMC and radio spectrum regulatory
requirements for products supplied to
the Australia or New Zealand market.
Wireless Charging Power:
5W
Output Voltage:
5V
Output Current:
1A

EN
IT
DE
FR
ES
WARRANTY & SERVICE
The regular guarantee period is 2 years and
begins on the day of purchase. To benefit from
an extended voluntary guarantee period as stated
on the gift box, registration on our website is
required.
You can consult the full guarantee terms as well
as information on extending the guarantee period
and details of our services at www.bresser.de/
warranty_terms.
Would you like detailed instructions for this
product in a particular language? Then visit our
website via the link below (QR code) for available
versions.
Alternatively you can also send an email to
[email protected] or leave a message on
+49 (0) 28 72 – 80 74-220*. Please always state
your name, precise address, a valid phone number
and email address, as well as the article number
and name.
*Number charged at local rates in Germany (the amount you
will be charged per phone call will depend on the tariff of your
phone provider); calls from abroad will involve higher costs.
Errors and technical changes reserved.
MANUAL DOWNLOAD:
www.bresser.de/download/BCC1001
SERVICE AND WARRANTY:
www.bresser.de/warranty_terms
7
DISPOSAL
Dispose of the packaging materials properly,
according to their type, such as paper or card
board. Contact your local waste-disposal
service or environmental authority for information
on the proper disposal.
Do not dispose of electronic devices in the
household garbage!
As per the Directive 2002/96/EC of the
European Parliament on waste electrical and
electronic equipment and its adaptation into
German law, used electronic devices must be
collected separately andrecycled in an environ-
mentally friendly manner.
In accordance with the regulations concern
ing batteries and rechargeable batteries,
disposing of them in the normal household
waste is explicitly forbidden. Please make sure to
dispose of your used batteries as required by law
— at a local collection point or in the retail market.
Disposal in domestic waste violates the Battery
Directive. Batteries that contain toxins are marked
with a sign and a chemical symbol.
¹ ² ³
1
battery contains cadmium
2
battery contains mercury
3
battery contains lead

INFORMAZIONI SUL MANUALE DI
ISTRUZIONI
Il presente manuale è parte integrante del
prodotto.
Non azionare il dispositivo prima di aver letto
attentamente le istruzioni di sicurezza e le istruzioni
per l'uso in esso contenute.
Il manuale deve essere conservato in modo che sia
possibile consultarlo anche in seguito. Nel caso
in cui il dispositivo venga venduto o ceduto a terzi,
dovrà essere fornito al nuovo possessore del
dispositivo.
AVVERTENZE GENERALI
• RISCHIO DI FOLGORAZIONE — Questo
apparecchio contiene componenti elettronici
azionati da una sorgente di corrente (alimentatore
e/o batterie). L’utilizzo deve avvenire in stretta
conformità con quanto prescritto nel presente
manuale. In caso contrario, non sarà possibile
escludere il rischio di infortuni elet- trici.
• PERICOLO DI SOFFOCAMENTO — I bambini
possono utilizzare il dispositivo solo sotto la
vigilanza di un adulto. I materiali di imballaggio,
i sacchetti di plastica e le fasce in gomma
possono causare soffocamento e, pertanto,
devono essere conservati in modo che i bambini
non riescano a raggiungerli.
• RISCHIO DI USTIONE CHIMICA — Tenere le
batterie fuori dalla portata dei bambini.
Accertarsi di installare le batterie nel modo
corretto. La fuoriu scita di acido dalle batterie
può causare ustioni chimiche. Evitare che
l’acido venga a contatto con pelle, occhi e
mucose. In caso, lavare immedia tamente le
parti interessate con un’abbondante quantità
di acqua e rivolgersi a un medico.
• RISCHIO DI INCENDIO/ESPLOSIONE — Non
esporre il dispositivo a temperature elevate.
Utilizzare solo le batterie consigliate. Evitare
che possano verificarsi corto-circuiti a carico
del dispositivo o delle batterie. Non gettare il
dispositivo o le batterie nel fuoco. Il surriscal-
damento o l’impiego inappropriato potrebbe
generare un cortocircuito, un incendio o un'e-
splosione.
• Non smontare il dispositivo. Qualora dovesse
rilevarsi difettoso, rivolgersi al proprio rivendi
tore autoriz- zato. Il rivenditore provvederà a
contattare il Centro assistenza e, se necessario,
spedirà il dispositivo in riparazione.
• Utilizzare solo le batterie consigliate. Le batterie
scariche o esaurite devono essere sempre
sostituite con una serie completa di batterie
nuove di capacità massima. Non utilizzare
batterie di marche o capacità diverse. Rimuovere
le batterie dall’unità se questa rimarrà inutilizzata
per un periodo prolungato.
• Non immergere il dispositivo in acqua e non
tentare di smontarlo.
• Non utilizzare questo prodotto in aereo.
• Il dispositivo potrebbe scaldarsi mentre è ali-
mentato tramite un adattatore. Ciò è normale.
CONTENUTO DELLA CONFEZIONE
Radiosveglia wireless, manuale di istruzioni, cavo
di ricarica micro USB.
8

EN
IT
DE
FR
ES
9
DESCRIZIONE DEL PRODOTTO
1. Premere [ ] per abbassare il volume. In
modalità Bluetooth, tenere premuto per passare
alla traccia precedente.
2. Premere [ ] per aumentare il volume. In
modalità Bluetooth, tenere premuto per passare
alla traccia successiva.
Note: In modalità Aux-in, la traccia può essere
modificata solo tramite il dispositivo.
3. Durante la riproduzione di musica, premere
[ ] per interrompere o riprodurre la traccia.
Quando si riceve una chiamata, premere per
rispondere o tenere premuto per rifiutare la
chiamata. Se si sta utilizzando il telefono in
modalità Bluetooth, premere per terminare.
Al termine della chiamata, la riproduzione audio
riprende. In modalità Bluetooth, premere due volte
per comporre il numero dell’ultima chiamata.
4. Premere [ ] per passare a un’altra modalità.
Tenere premuto per accedere o uscire dallo
stato di standby.
5. Premere [ ] per alternare le impostazioni di
luminosità dello schermo, orologio, sveglia 1 e
sveglia 2.
6. In modalità di impostazione, premere [ ] per
diminuire la luminosità o i numeri.
7. In modalità di impostazione, premere [ ] per
aumentare la luminosità o i numeri.
8. Punto di ricarica wireless.
9. Indicatore di ricarica wireless
Verde: ricarica wireless in corto.
10. Indicatore LED
Rosso: altoparlante acceso.
Spento: altoparlante spento/in standby.
11. Accensione/spegnimento
12. Ingresso CC da 5 V 1,5 A
13. Presa di ingresso ausiliaria
14. Presa di ricarica USB - Uscita da 5 V 1 A
DC 5V USB
1 2 3 4 5
6
7
9 10
8
11 12 13 14

DISPLAY A LED
1. Orologio/orario allarme
[ ] Segnale Bluetooth
[ ] Sveglia 1 attiva
[ ] Posticipo sveglia attivo
[ ] Sveglia 2 attiva
[ ] Modalità AUX attiva
[ ] Indicatore di USB
10
PULSANTE
MODALITÀ
Modalità
normale
PRESSIONE
SINGOLA
PRESSIONE
PROLUNGATA
Modalità
impostazione
orologio
_______
_______ _______
Modalità
impostazione
sveglia
_______ _______
_______ _______
_______
_______
_______
_______
_______
_______
_______
_______
_______
Sequenza
luminosità
schermo,
orologio,
sveglia 1
e sveglia 2
Parametro
successivo
_______
_______
_______
_______
_______
_______
Parametro
successivo
_______
_______
Modalità
impostazione
luminosità
_______
_______
_______
_______
_______
_______
_______
_______
_______
_______ _______ _______
_______
Diminuzione
del valore
Aumento
del valore
_______
_______
PRESSIONE
SINGOLA
PRESSIONE
PROLUNGATA
PRESSIONE
SINGOLA
PRESSIONE
PROLUNGATA
PRESSIONE
SINGOLA
PRESSIONE
PROLUNGATA
Diminuzione
del valore
Traccia
precedente
Aumento
del
valore
Traccia
successiva
Riproduzione
o pausa
Risposta
o fine
chiamata
Riselezione
(premere
due volte)
Rifiuto
chiamata
Fine
connessione
Bluetooth
Passaggio
da modalità
AUX a
Bluetooth
e viceversa
Disattivazione
sveglia
Ingresso
o uscita
modalità
standby
Diminuzione
del valore
Diminuzione
del valore
Aumento
del valore
Aumento
del valore

EN
IT
DE
FR
ES
11
OPERAZIONI PRELIMINARI
ALIMENTAZIONE
1. Inserire il cavo di ricarica micro USB (incluso) nella
presa di ingresso CC da 5 V sul retro dell’unità.
Inserire l’altra estremità in una presa di corrente di
potenza idonea.
2. Spostare l’interruttore sulla posizione di accensione
(ON) per accendere l’apparecchio. Viene visualizzata
l’ora.
3.Tenere premuto [ ] per accedere/uscire dalla
modalità di standby.
NOTA: per spegnere il dispositivo e lo schermo,
spostare l’interruttore sulla posizione di spegnimento
(OFF).
BATTERIA INTERNA
L’altoparlante contiene 2 batterie da 2200 mAh.
Quando è completamente carico, può essere utilizzato
senza alimentatore diventando portatile.
NOTA: il tempo di ricarica è circa 3 ore.
RICARICA WIRELESS
1. Mettere l’apparecchio da ricaricare sul cerchio
superiore dello stereo.
2. Il dispositivo inizia a ricaricarsi.
NOTA: assicurarsi che il dispositivo supporti la ricar-
ica wireless.
RICARICA USB
1. Per ricaricare un dispositivo, collegarlo con un cavo
di ricarica USB a questa presa di ricarica USB
[ ]sul retro.
2. Il dispositivo inizia a ricaricarsi.
NOTA: Se si utilizza simultaneamente la ricarica wir
eless e la ricarica USB, quest’ultima verrà disattivata
in modo da mantenere la capacità di uscita massima
entro un livello di sicurezza.
RIPRODUZIONE DI MUSICA
ABBINAMENTO/DISCONNESSIONE
TRAMITE BLUETOOH
1. Collocare il dispositivo nelle vicinanze. Premere
[ ] finché [ ] lampeggia.
2. Cercare la connessione Bluetooth seguendo le
istruzioni del dispositivo.
3. Il nome del dispositivo è “BCC1001”. Inserire il
PIN “0000”, se necessario.
4. Al termine dell’abbinamento, l’altoparlante em-
ette un segnale acustico. [ ] rimane illuminato.
NOTA: per disconnettere il Bluetooth, tenere pre-
muto [ ].
AUX
1. Inserire il cavo audio da 3,5 mm nel connettore
di ingresso audio e passare automaticamente
dalla modalità Bluetooth a AUX. Premere [ ]
per alternare le modalità AUX e Bluetooth.
2. Scollegare il cavo audio da 3,5 mm da AUX per
ritornare automaticamente in modalità Bluetooth.
REGOLAZIONE DELLA LUMINOSITÀ
1. Premere [ ]: tutte le icone lampeggiano.
2. Per impostare la luminosità del display, premere
[ ] o [ ].
3. Attenere 3 secondi. L’impostazione verrà salvata
e si uscirà automaticamente dalla modalità di
impostazione della luminosità.

DICHIARAZIONE DI CONFORMITÀ
CE IT
Con la presente Explore Scientific
GmbH dichiara che il tipo di
apparecchiatura identificato con il
codice BCC1001 è conforme alla direttiva
2014/53/UE. Il testo integrale della dichiarazione
di conformità UE è disponibile all’indirizzo Internet:
www.bresser.de/download/BCC1001/CE/
BCC1001_CE.pdf
NOTE SULLA PULIZIA
• Prima di pulire il dispositivo, rimuovere le batterie.
• Per pulire le superfici esterne del dispositivo,
servirsi solo di un panno asciutto. Per evitare
di danneggiare i componenti elettronici, non
utilizzare alcun tipo di fluido detergente.
• Tenere il dispositivo al riparo da polvere e
umidità.
12
OROLOGIO
IMPOSTAZIONE AUTOMATICA
L’ora verrà regolata automaticamente per mezzo
della connessione Bluetooth di un iPhone.
NOTA: non si applica ai telefoni Android.
IMPOSTAZIONE MANUALE DELL'OROLOGIO
1. Premere [ ] due volte per accedere alla mod-
alità di impostazione.
2. Il parametro da impostare lampeggia.
3. Tenere premuto [ ] per confermare l'impost-
azione e passare al parametro successivo.
4. Premere [ ] o [ ] per impostare il valore
desiderato.
5. Sequenza dei parametri: Ora -> Minuto ->
24Hr/12Hr
6. Se non si esegue alcuna azione entro 3 secondi,
l'impostazione è salvata e si esce dalla modalità
impostazione.
SVEGLIA
IMPOSTAZIONE/REGOLAZIONE DELL’ORARIO
DELLA SVEGLIA
1. Premere [ ] tre volte per accedere alla mod-
alità di impostazione della sveglia 1. [ ] si
accende. (Premere quattro volte per accedere alla
modalità di impostazione della sveglia 2. [ ]
si accende.
2. Il parametro da impostare lampeggia.
3. Premere il pulsante [ ] per confermare l'imp-
ostazione e passare al parametro successivo.
4. Premere [ ] o [ ] per impostare il valore richiesto.
5. Sequenza dei parametri: Ora-> Minuto-> Sveglia
OFF/ON
6. Se non si esegue alcuna azione entro 3 secondi,
l'impostazione è salvata e si esce dalla modalità
impostazione.
FUNZIONAMENTO
1. All'orario impostato, la sveglia suonerà.
2. La sveglia dura 1 minuto.
3. Per arrestare la sveglia, premere [ ].
4. Mentre la sveglia suona, premere un pulsante
qualsiasi per posticiparla di 5 minuti.
5. La sveglia suonerà nuovamente all’ora successiva
impostata, a meno che non si disattivi la relativa
funzione.
NOTA:
a. La sveglia si disattiva automaticamente dopo
averla posticipata 4 volte.
b. Se la sveglia si attiva quando l’apparecchio è
spento, lo schermo si accende.
SPECIFICHE TECNICHE
Dimensioni (unità principale):
204x79x109mm (Lun. x Lar. x Alt.)
Peso (unità principale):
820g (batterie escluse)
Alimentazione:
Cavo di ricarica micro USB, CC da 5 V 1,5 A
Standard Bluetooth:
5.0
Potenza in uscita:
5 W * 2
Batterie:
2200 mAh * 2
Potenza ricarica wireless:
5 W
Tensione in uscita:
5 V
Corrente in uscita:
1 A

EN
IT
DE
FR
ES
SMALTIMENTO
I materiali di imballaggio devono essere
smaltiti nel modo appropriato, a seconda
del tipo, ad esempio carta o cartone.
Contattare il servizio di smaltimento rifiuti locale
o l’autorità ambientale per informazioni su come
eseguire correttamente lo smaltimento.
Non smaltire gli apparecchi elettronici nei
rifiuti domestici. Ai sensi della direttiva
2002/96/CE del Parlamento europeo sullo
smaltimento di apparecchiature elettriche ed
elettroniche, così come recepita nelle legislazioni
locali, i dispositivi elettronici usati devono essere
smaltiti separatamente e riciclati nel rispetto
dell’ambiente.
Le normative riguardanti le batterie e le
batterie ricaricabili ne vietano espressamente
lo smaltimento tra i normali rifiuti domestici.
Assicurarsi di smaltire le batterie usate in accordo
alle disposizioni vigenti, servendosi di un punto
di raccolta locale o avvalendosi del canale
commerciale al dettaglio. Lo smaltimento nei
rifiuti domestici viola la direttiva sulle batterie.
Le batterie in cui sono inclusi elementi tossici
sono contraddistinte da un segno e un simbolo
chimico.
1
Batteria contenente cadmio
2
Batteria contenente mercurio
3
Batteria contenente piombo
¹ ² ³
GARANZIA E ASSISTENZA
Il normale periodo di garanzia è di due anni con
decorrenza dal giorno dell’acquisto. Per beneficiare
indicato sulla confezione regalo,
è necessaria la registrazione nel sito Web del
Produttore. È possibile consultare le condizioni di
garanzia nella loro interezza, le informazioni sulla
.
proroga del periodo di garanzia e i dettagli sui
servizi offerti dal Produttore all’indirizzo www.bresser.de/
warranty_terms. Se si desidera ricevere istruzioni
particolareggiate su questo prodotto in una lingua
specifica, accedere al sito Web
.
del Produttore servendosi del collegamento sotto
stante (codice QR) per le versioni disponibili. In
alternativa, è possibile inviare un’e-mail a manuals
@bresser.de o lasciare un messaggio al numero
+49 (0) 28 72 - 80 74-220*. È importante comunicare
sempre il proprio nome, l’indirizzo esatto, un numero
di telefono valido e un indirizzo e-mail, nonché il
codice e il nome dell’articolo
.
*
Number charged at local rates in Germany (the amount you
will be charged per phone call will depend on the tariff of your
phone provider); calls from abroad will involve higher costs.
MANUAL DOWNLOAD:
www.bresser.de/download/BCC1001
SERVICE AND WARRANTY
:
www.bresser.de/warranty_terms
13

ALLGEMEINE WARNHINWEISE
• GEFAHR eines STROMSCHLAGS! — Dieses Gerät
beinhaltet Elektronikteile. Die Nutzung darf nur
erfolgen, wie in der Anleitung beschrieben,
andernfalls besteht die GEFAHR eines
STROMSCHLAGS!
• ERSTICKUNGSGEFAHR! — Kinder sollten das Gerät
nur unter Aufsicht benutzen. Verpackungsmaterialien
(Plastiktüten, Gummibänder, etc.) von Kindern
fernhalten! Es besteht ERSTICKUNGSGEFAHR!
• VERÄTZUNGSGEFAHR! — Batterien außer Reichweite
von Kindern aufbewahren! Achten Sie beim Einlegen
der Batterie auf die richtige Polung. Ausgelaufene
Batteriesäure kann zu Verätzungen führen!
Vermeiden Sie den Kontakt von Batteriesäure mit
Haut, Augen und Schleimhäuten. Spülen Sie bei
Kontakt mit der Säure die betroffenen Stellen sofort
mit reichlich klarem Wasser ab und suchen Sie
einen Arzt auf.
ÜBER DIESER ANLEITUNG
Diese Betriebsanleitung ist als Bestandteil
des Gerätes zu betrachten. Bitte lesen Sie vor
der Nutzung des Geräts die Sicherheitshinweise und
die Bedienungsanleitung aufmerksam durch.
Bewahren Sie diese Bedienungsanleitung für die
erneute Verwendung zu einem späteren Zeitpunkt
auf. Bei Verkauf oder Weitergabe des Gerätes ist
die Bedienungsanleitung an den nachfolgenden
Besitzer/Benutzer des Produkts weiterzugeben.
Das Gerät ist nur für den Betrieb in Innenräumen
bestimmt!
• BRAND-/EXPLOSIONSGEFAHR! —Setzen Sie das
Gerät keinen hohen Temperaturen aus. Benutzen
Sie nur die empfohlenen Batterien. Gerät und
Batterien nicht kurzschließen oder ins Feuer werfen!
Durch übermäßige Hitze und unsachgemäße
Handhabung können Kurzschlüsse, Brände und
sogar Explosionen ausgelöst werden!
• Bauen Sie das Gerät nicht auseinander! Wenden
Sie sich im Falle eines Defekts bitte an Ihren
Fachhändler. Er nimmt mit dem Service-Center
Kontakt auf und kann das Gerät ggf. zur Reparatur
einschicken.
• Benutzen Sie nur die empfohlenen Batterien.
Ersetzen Sie schwache oder verbrauchte Batterien
immer durch einen komplett neuen Satz Batterien
mit voller Kapazität. Verwenden Sie keine Batterien
unterschiedlicher Marken, Typen oder unterschiedlich
hoher Kapazität. Entfernen Sie die Batterien aus
dem Gerät, wenn es längere Zeit nicht benutzt wird!
• Tauchen Sie das Gerät nicht in Wasser und versu-
chen Sie nicht, das Gerät zu zerlegen.
• Benutzen Sie dieses Produkt nicht in einem
Flugzeug.
• Das Gerät kann warm werden, wenn es über einen
Adapter mit einer Stromquelle verbunden ist.
Dies ist normal.
LIEFERUMFANG
Kabelloser Lautsprecher mit Wecker, Bedienungsanl-
eitung, Mikro-USB-Ladekabel.
14

EN
IT
DE
FR
ES
15
PRODUKTÜBERSICHT
1. Drücken Sie [ ], um die Lautstärke zu reduzie-
ren. Halten Sie die Taste im Bluetooth-Modus
gedrückt, um zum vorherigen Titel zu springen.
2. Drücken Sie [ ], um die Lautstärke zu erhöhen.
Halten Sie die Taste im Bluetooth-Modus gedr-
ückt, um zum nächsten Titel zu springen.
Anmerkungen: Im Aux-in-Modus kann der Titel nur
über das angeschlossene Gerät geändert werden.
3. Drücken Sie während der Musikwiedergabe [ ],
um die Wiedergabe zu unterbrechen oder fortz-
usetzen. Wenn Sie einen Anruf erhalten, drücken
Sie die Taste, um den Anruf anzunehmen, oder
halten Sie die Taste gedrückt, um den Anruf
abzulehnen. Wenn Sie über den Bluetooth-Modus
das Telefon benutzen, drücken Sie die Taste, um
das Gespräch zu beenden.
Wenn der Anruf beendet wurde, wird die Musik-
wiedergabe fortgesetzt. Drücken Sie im Blueto-
othModus die Taste zweimal, um die Rufnummer
des letzten Anrufs zu wählen.
4. Drücken Sie [ ], um den Modus zu wechseln.
Halten Sie die Taste gedrückt, um in den Stand
-by-Modus zu schalten oder den Stand-by-Modus
zu beenden.
5. Drücken Sie [ ], um zwischen den Einstellun-
gen Display-Helligkeit, Uhrzeit, Wecker 1 und
Wecker 2 zu wechseln.
6. Drücken Sie im Einstellmodus [ ], um die
Helligkeit oder die Zahlen zu verringern.
7. Drücken Sie im Einstellmodus [ ], um die
Helligkeit oder die Zahlen zu erhöhen.
8. Kabellose Ladeposition.
9. Kabellose Ladeanzeige
Grün: kabelloser Ladevorgang läuft.
10. LED-Anzeige
Rot: Lautsprecher ist eingeschaltet.
Aus: Lautsprecher ist aus/im Stand-by.
11. Ein-/Ausschalten
12. DC-Eingang 5V 1,5A
13. AUX-Eingang
14. USB-Ladeanschluss - Ausgang 5V 1A
DC 5V USB
1 2 3 4 5
6
7
9 10
8
11 12 13 14

16
LED-DISPLAY
1.
Uhrzeit/Weckzeit-Anzeige
[ ] Bluetooth-Signal
[ ] Wecker 1 EIN
[ ] Snooze aktiviert
[ ] Wecker 2 EIN
[ ] AUX-Modus EIN
[ ] USB-Anzeige
TASTE
MODUS
Standard-
modus
DRÜCKEN
GEDRÜCKT
HALTEN
Zeiteinstell-
modus
_______
_______ _______
Wecker-
Einstellmodus
_______ _______
_______ _______
_______
_______
_______
_______
_______
_______
_______
_______
_______
Zwischen den
Einstellungen
Display-
Helligkeit,
Uhrzeit,
Weckzeit 1 und
Weckzeit
2 wechseln.
_______
_______
_______
_______
_______
_______
_______
_______
Helligkeit-
seinstell-
modus
_______
_______
_______
_______
_______
_______
_______
_______
_______
_______ _______ _______
_______
_______
_______
Lautstärke
verringern
Vorheriger
Titel
Lautstärke
erhöhen
Nächster
Titel
Wiedergabe
oder Pause
Anruf
annehmen
oder beenden
Wahlwieder-
holung
(Zweimal
drücken)
Anruf
ablehnen
Bluetooth-
Verbindung
trennen
Zwischen
AUX- und
Bluetooth-
Modus
wechseln
Wecker
ausschalten
In den
Stand-by-
Modus
schalten
oder beenden
DRÜCKEN
GEDRÜCKT
HALTEN
DRÜCKEN
GEDRÜCKT
HALTEN
DRÜCKEN
GEDRÜCKT
HALTEN
Zum nächsten
Einstellwert
gehen
Zum nächsten
Einstellwert
gehen
Verringern
Verringern
Verringern
Erhöhen
Erhöhen
Erhöhen

MUSIKWIEDERGABE
VERBINDUNG VIA BLUETOOTH
HERSTELLEN/TRENNEN
1. Stellen Sie Ihr Gerät in die Nähe des Lautsprechers.
Drücken Sie [ ], bis [ ] blinkt.
2. Suchen Sie gemäß den Anleitungen Ihres Geräts
nach dem Bluetooth-Lautsprecher.
3. Der Name des Lautsprechers ist “BCC1001“. Geben
Sie gegebenenfalls die PIN “0000“ ein.
4. Wenn die Verbindung hergestellt ist, erzeugt der
Lautsprecher ein akustisches Signal. [ ] bleibt
eingeschaltet.
HINWEIS:
Um die Bluetooth-Verbindung zu trennen,
halten Sie [ ] gedrückt.
AUX
1. Verbinden Sie das 3,5-m-Audiokabel mit dem Aud-
ioeingang. Der Lautsprecher schaltet automatisch
vom Bluetooth-Modus in den AUX-Modus. Um den
Modus manuell zu wechseln, drücken Sie [ ],
um zwischen dem AUX- und Bluetooth-Modus zu
wechseln.
2. Wenn Sie das 3,5-mm-Audiokabel vom AUX-Eingang
trennen, wechselt der Lautsprecher automatisch
zurück in den Bluetooth-Modus.
HELLIGKEITSREGULIERUNG
1. Drücken Sie einmal [ ], daraufhin blinken alle
Symbole.
2. Um die Helligkeit des Displays einzust-ellen, drücken
Sie kurz [ ] oder [ ].
3. Warten Sie 3 Sekunden. Die von Ihnen eingestellte
Helligkeit wird automatisch gespeichert und der
Helligkeits-Einstellmodus wird beendet.
EN
IT
DE
FR
ES
17
INBETRIEBNAHME
STROMVERSORGUNG
1. Verbinden Sie das Mikro-USB-Ladekabel (inbegriffen)
mit dem 5V DC-Eingang an der Rückseite des Geräts.
Verbinden Sie das andere Ende mit einer geeigneten
Wandsteckdose.
2. Stellen Sie den Betriebsschalter auf ON, um das Gerät
einzuschalten. Die Uhrzeit wird angezeigt.
3. Halten Sie [ ] gedrückt, um in den Stand-by-Modus
zu schalten oder den Stand-by-Modus zu beenden.
HINWEIS:
Um das Gerät und das Display auszuschalten,
stellen Sie den Betriebsschalter auf OFF.
INTERNER AKKU
Der Lautsprecher enthält zwei 2.200mAh Akkusätze.
Wenn der Lautsprecher vollständig aufgeladen ist, kann
der Lautsprecher ohne Stromquelle betrieben werden
und ist somit mobil.
HINWEIS:
Die Ladezeit beträgt ca. 3 Stunden.
KABELLOSES LADEN
1. Stellen Sie das Gerät, das Sie laden möchten auf den
Kreis oben auf dem Lautsprecher.
2. Das Gerät wird nun geladen.
HINWEIS:
Ihr Gerät muss kabelloses Laden unterstützen.
USB-LADEN
1. Um ein Gerät zu laden, verbinden Sie ein USB-
Ladekabel mit diesem USB-Ladeanschluss [ ]
an der Rückseite.
2. Das Gerät wird nun geladen.
HINWEIS:
Wenn Sie das gleichzeitig kabellos und per
USB laden, wird die USB-Ladefunktion deaktiviert, um
die maximale Ausgangsleistung auf einer sicheren
Stufe zu halten.

EG-KONFORMITÄTSERKLÄRUNG
Hiermit erklärt die Explore Scientific GmbH,
dass der Gerätetyp mit der Artikelnummer:
BCC1001 der folgenden Richtlinie
entspricht: 2014/53/EU. Der vollständige Text
der EG-Konformitätserklärung ist unter der
folgenden Internetadresse verfügbar:
www.bresser.de/download/BCC1001/CE/
BCC1001_CE.pdf
HINWEISE ZUR REINIGUNG
• Entfernen Sie die Batterien vor der Reinigung.
• Reinigen Sie das Gerät äußerlich nur mit einem
trockenen Tuch. Um eine Beschädigung der
Elektronik zu vermeiden, verwenden Sie keine
Reinigungsflüssigkeit.
• Schützen Sie das Gerät vor Staub und
Feuchtigkeit.
18
UHRZEIT
AUTOMATISCHE EINSTELLUNG
Die Uhrzeit wird automatisch über die Bluetooth-Verbin-
dung mit einem iPhone eingestellt.
HINWEIS:
Nicht auf Android-Smartphones anwendbar.
UHRZEIT UND KALENDER MANUELL EINSTELLEN
1. Drücken Sie zweimal [ ], um den Uhrzeit-Einstell-
modus zu öffnen.
2. Der einzustellende Wert blinkt.
3. Halten Sie die Taste [ ] gedrückt, um die Einstellung
zu bestätigen und zum nächsten Wert zu springen.
4. Drücken Sie [ ] oder [ ], um die gewünschten
Daten einzugeben.
5. Reihenfolge der einzustellenden Werte: Stunde ->
Minute ->24h/12h
6. Wenn 3 Sekunden lang keine Taste gedrückt wird,
wird die Einstellung gespeichert und der Einstellmodus
beendet.
WECKER
WECKZEIT EINSTELLEN
1. Drücken Sie dreimal [ ], um den Einstellmodus für
Wecker 1 zu öffnen. [ ] leuchtet. (Drücken Sie
viermal, um den Einstellmodus für Wecker 2 zu öffnen.
[ ] leuchtet.)
2. Der einzustellende Wert blinkt.
3. Halten Sie die Taste [ ] gedrückt, um die Einstell-
ung zu bestätigen und zum nächsten Wert zu springen.
4. Drücken Sie [ ] oder [ ], um die gewünschten
Daten einzugeben.5. Reihenfolge der einzustellenden
Werte:
Stunde -> Minute -> Wecker AUS/EIN
6. Wenn 3 Sekunden lang keine Taste gedrückt wird, wird
die Einstellung gespeichert und der Einstellmodus
beendet.
BETRIEB
1. Zur eingestellten Weckzeit ertönt der Alarmton.
2. Der Weckton ist 1 Minute lang zu hören.
3. Um den Wecker ausschalten, drücken Sie [ ].
4. Wenn der Alarmton ertönt, drücken Sie eine beliebige
andere Taste, um den Weckton für 5 Minuten zu unt-
erbrechen.
5. Der Wecker wird zur gleichen Weckzeit wieder ausg-
elöst, sofern die Weckfunktion nicht ausgeschaltet
wurde.
HINWEIS:
a. Der Wecker schaltet sich automatisch aus, nachdem
der Weckton viermal aktiviert wurde (Snooze).
b. Das Display schaltet sich ein, wenn der Wecker ertönt,
während das Gerät ausgeschaltet ist.
TECHNISCHE DATEN
Abmessungen (Haupteinheit):
204 x 79 x 109 mm (LxBxH)
Gewicht (Haupteinheit):
820 g (ohne Batterien)
Spannungsversorgung:
Mikro-USB-Ladekabel, DC-Eingang 5 V 1,5 A
Bluetooth-Standard:
5.0
Ausgangsleistung:
5W * 2
Batterien:
2.200mAh * 2
Kabellose Ladeleistung:
5W
Ausgangsspannung:
5V
Ausgangsstrom:
1A

EN
IT
DE
FR
ES
GARANTIE & SERVICE
Die reguläre Garantiezeit beträgt 2 Jahre und
beginnt am Tag des Kaufs. Um von einer
verlängerten, freiwilligen Garantiezeit wie auf dem
Geschenkkarton angegeben zu profitieren, ist eine
Registrierung auf unserer Website erforderlich.
Die vollständigen Garantiebedingungen sowie
Informationen zu Garantiezeitverlängerung und
Serviceleistungen können Sie unter www.bresser.
de/garantiebedingungen www.bresser.de/warranty
_terms einsehen.
Sie wünschen eine ausführliche Anleitung zu
diesem Produkt in einer bestimmten Sprache?
Dann besuchen Sie unsere Website über
nachfolgenden Link (QR Code) für verfügbare
Versionen. Alternativ können Sie uns auch eine
E-Mail an die Adresse [email protected]
schicken oder eine Nachricht unter +49 (0) 28 72
– 80 74-220* hinterlassen. Bitte geben Sie stets
Ihren Namen, Ihre genaue Adresse, eine gültige
Telefonnummer und E-Mail-Adresse sowie die
Artikelnummer und -bezeichnung an.
*Lokale Rufnummer in Deutschland (Die Höhe der Gebühren je
Telefonat ist abhängig vom Tarif Ihres Telefonanbieters); Anrufe
aus dem Ausland sind mit höheren Kosten verbunden.
Errors and technical changes reserved.
MANUAL DOWNLOAD:
www.bresser.de/download/BCC1001
SERVICE AND WARRANTY:
www.bresser.de/warranty_terms
ENTSORGUNG
Entsorgen Sie die Verpackungsmaterialien
sortenrein. Beachten Sie bitte bei der
Entsorgung des Geräts die aktuellen
gesetzlichen Bestimmungen. Informationen zur
fachgerechten Entsorgung erhalten Sie bei den
kommunalen Entsorgungsdienstleistern oder dem
Umweltamt.
Werfen Sie Elektrogeräte nicht in den
Hausmüll!
Gemäß der Europäischen Richtlinie
2002/96/EG über Elektro- und Elektronik-Altgeräte
und deren Umsetzung in nationales Recht, müssen
verbrauchte Elektrogeräte getrennt gesammelt
und einer umweltgerechten Wiederverwertung
zugeführt werden.
Gemäß den Vorschriften für Batterien und
Akkus ist die Entsorgung im normalen
Hausmüll ausdrücklich verboten. Bitte
entsorgen Sie Ihre gebrauchten Batterien wie
gesetzlich vorgeschrieben - an einer lokalen
Sammelstelle oder im Einzelhandel. Die Entsorgung
über den Hausmüll verstößt gegen die Batterie-
Richtlinie. Batterien, die Giftstoffe enthalten, sind
mit einem Zeichen und einem chemischen Symbol
gekennzeichnet.
1
Batterie enthält Cadmium
2
Batterie enthält Quecksilber
3
Batterien enthalten Blei
¹ ² ³
19

A PROPOS DE CE MODE D'EMPLOI
Ce mode d’emploi fait partie intégrante de
l’appareil. Veuillez lire les consignes de
sécurité et le mode d’emploi attentivement avant
utilisation.Conservez ce mode d’emploi pour
consultation ultérieure. Lorsque l’appareil est
vendu ou donné à un tiers, le mode d’emploi doit
être fourni au nouveau propriétaire/utilisateur
du produit.
AVERTISSEMENTS -
GÉNÉRALITÉS
• Risque d’électrocution — Cet appareil contient
des composants électroniques qui fonctionnent
via une alimentation électrique (bloc secteur et/
ou piles). Les enfants ne peuvent utiliser cet
appareil que sous la surveillance d’un adulte.
N’utilisez l’appareil que de la façon décrite dans
le manuel, autrement vous encourez le risque de
subir une électrocution.
• Risque de suffocation — Les enfants ne peuvent
utiliser cet appareil que sous la surveillance d’un
adulte. Veuillez conserver le matériel d’emballage,
tel que les sacs en plastiques et les élastiques,
hors de portée des enfants, car ces matériaux
présentent un risque de suffocation.
• Risque de brûlure chimique — Gardez les piles
hors de portée des enfants ! Veuillez à insérer les
piles correctement. Des piles qui fuient peuvent
entraîner des brûlures chimiques. Evitez le contact
entre l’acide des piles et la peau, les yeux et les
muqueuses. En cas de contact, rincez immédia-
tement la partie touchée avec beaucoup d’eau et
contactez un médecin.
• Risque d’incendie/explosion — N’exposez pas
l’appareil à des températures élevées. Utilisez
uniquement les piles recommandées. Ne court-
circuitez pas l’appareil ou les piles et ne les jetez
pas au feu. Une chaleur excessive ou une
manipulation inappropriée peut entraîner un court-
circuit, un incendie ou une explosion.
• Ne démontez pas l’appareil. En cas de
dysfonctionnement, contactez votre revendeur.
Le revendeur prendra contact avec le service
technique et enverra l’appareil pour réparation le
cas échéant.
• Utilisez uniquement les piles recommandées.
Veuillez toujours remplacer des piles faibles ou
usagées par un jeu complet de piles neuves
pleinement chargées. N’utilisez pas des piles
de marques ou de capacités différentes. Les piles
doivent être retirées de l’appareil si celui-ci n’est
pas utilisé pendant une période prolongée.
• Ne plongez pas l’appareil dans l’eau et n’essa-
yez pas de le démonter.
• N’utilisez pas cet appareil dans un avion.
• L’appareil peut devenir chaud lorsqu’il est ali-
menté par un adaptateur. Cela est normal.
CONTENU DE LA LIVRAISON
Horloge avec enceinte sans fil, mode d’emploi,
câble de chargement micro USB.
20
/