
MAKING YOUR WATER BETTER!
WWW.POINTFOUR.COM
103 - 16 Fawcett Road
Coquitlam BC V3K 6X9
CANADA
Toll Free: 1 800 267 9936
Phone: 1 604 759 2114
Fax: 1 604 759 2115
Email: [email protected]
Oxygenation and Water Management Specialists - Making your water better!
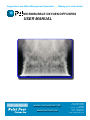
MICROBUBBLE OXYGEN DIFFUSERS
USER MANUAL

1
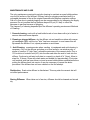
INSTRUCTIONS FOR USE
Safety Precautions and Good Practice
It is essential that distributors ensure users of the Point Four diffusers are
informed both verbally and in writing about the safe and correct use of diffusers.
WARNING: THE DIFFUSER MUST ONLY BE OPERATED WHEN SUBMERGED.
When the diffuser is under pressure substantial potential energy is stored in it. Should
the porous ceramic fail due to over pressure it may burst with possible injury to anyone
close by if the diffuser is not submerged.
WARNING: USING OXYGEN
Oil, grease and other hydrocarbons when combined with oxygen, become highly
combustible and should never be used on any part of the oxygen cylinder, valve,
regulator, diffuser fitting or other equipment used with oxygen. If using O
2
, supply lines,
regulators, flowmeters etc. must be CLEAN FOR OXYGEN SERVICE
Use of pressure regulators and flow meters. Wherever possible use a pre-set
pressure regulator, pre-set to 50 psig (345 kPa), in conjunction with a flowmeter. A
flowmeter is highly recommended in almost all cases. Use only rotameter type
flowmeters (floating ball in a tube).
Do not use an adjustable regulator with bourdon gauge flow indicator. Because of
back pressure (25 to 35 psig) in the supply line to the diffusers, the indicated flow will
be wrong and very misleading, and may even result in over pressuring of the diffuser.
Use Pressure Relief Valve in the gas supply line if an adjustable regulator is
used. It is strongly recommended that a pressure relief valve be installed just after
the pressure regulator to protect the flow meter and diffuser/s from over
pressurization- use 55 or 60 psig rated pressure relief valve.
Water in diffuser. If the diffuser is left submerged with no pressure applied to it water
will seep through the porous ceramic and enter the air plenum. To prevent this from
happening, turn on the oxygen and apply a slight pressure to the diffuser as the tank
begins to fill with water. Once the diffuser is pressurized, the oxygen can be turned
off. If water does enter the air plenum, it will be forced out by the oxygen but it will
take several minutes for an even bubble pattern to form.
• DO NOT allow diffusers to become contaminated with oil.
• AVOID physical shock.

2
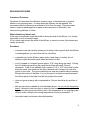
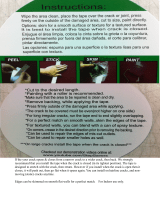
INSTALLATION
To avoid bubble coalescence, place the
diffuser horizontally and do not obstruct
the surface with protective screens. The
deeper the diffuser is placed in the water
the more effective it will be. Secure
diffuser to a flat surface using "Velcro"
strips, silicone or screws. Do not over
tighten. Use ¼" (6 mm) ID hose and brass
or plastic fittings. Use Teflon tape on
threaded pipe joints. Any number of
diffusers can be connected to a common
supply line. For flow distribution manifolds
and fittings consult your supplier. Supply
pressure must not exceed 50 psi (3.5 bar).
Use a preset pressure regulator (set to 50
psi) and back pressure compensated
flowmeter with needle valve to control flow
Alternatively, but not recommended, if an
adjustable pressure regulator is used to
control now, then this MUST BE USED in
conjunction with a 50 psi pressure relief
valve.
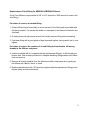
OPERATION
Ensure that the supply pressure at the
diffuser cannot exceed 50 psi (3.5 bar).
Pressurize the diffuser only when
submerged. Turn the gas on and control
flow via the needle valve on flowmeter. If an adjustable pressure regulator is being used
to control flow, ensure that the regulator is in the "Off" position i.e adjustment knob fully
screwed out (anti-clockwise) before turning on the gas supply. Slowly increase pressure
to the desired level, usually 20 to 30 psi (1.5 to 2 bar), by turning adjustment knob
clockwise. There will be a small delay before the diffuser responds to flow adjustments,
especially if the diffuser's air plenum has filled with water.
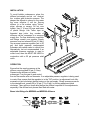
Brass inlet fittings for MBD600 and MBD300 diffusers

3
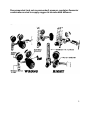
Recommended (and not recommended) pressure regulator-flowmeter
combinations used to supply oxygen to microbubble diffusers

4
MAINTENANCE AND CARE
The only maintenance required is periodic cleaning to maintain an even bubble pattern
over the full surface of the diffuser. Diffuser fouling or plugging manifests itself by a
noticeable decrease in flow at the original flowmeter and pressure regulator settings.
Pall-off in flow due to gradual plugging can be compensated for by increasing the supply
pressure Do not increase the line pressure beyond 50 psi (3.5 bar) to offset the
decrease in gas flow because of plugging.
The frequency of cleaning depends upon the diffusers' operating environment Methods
of Cleaning:
1. General cleaning: scrub with a hard bristle brush or hose down with a jet of water to
remove slime and loose deposits.
2. Cleaning a plugged diffuser: dry the diffuser out and sand the surface with coarse
grit sandpaper (#40) until the top "skin" has been removed. In most cases this will
rejuvenate the diffuser If not, repeat procedure or acid clean.
3. Acid Cleaning: occasions arise when sanding is inadequate and acid cleaning is
necessary. Dry out the diffuser and place on a level surface, use window putty or
similar to create a %" high "dam" around the perimeter of the ceramic plate. Pour a
10% solution of muriatic acid (HCI) into the dam and allow the acid to soak into the
diffuser. Continue to add acid until plate is covered to a depth of'/s" (3mm). Allow to
stand for 12 hours. Rinse with clean water and bubble for approximately 15 minutes
until residual acid has been blown out and an even bubble pattern established before
putting the diffuser back into service It may be necessary to repeat the whole
procedure if the diffuser has not been cleared on the first attempt.
Disinfection: Soak entire diffuser in disinfectant. This may stain the ceramic but will
not affect performance.
Storing Diffusers: When taken out of service, diffusers should be cleaned and stored
dry

5
REPAIRING DIFFUSERS
Cracks and Fractures:
Occasions do arise when the diffusers’ ceramic cracks or fractures due to physical
abuse or over pressurization. In many cases the diffusers can be repaired. We
recommend that the diffusers are returned to Point Four for repair. There are cases
where it might be advantageous to repair at the customer’s or distributor’s site.
Here are the guidelines to follow:
What’s fixable and what’s not!
If the crack is lengthwise down the middle or along the side of the diffuser, it is virtually
impossible to do a successful repair.
If it is a short crack across the width of the diffuser, or across a corner, then repairs are
usually successful.
Procedure:
correctly locate the crack by drawing a line along it with a pencil while the diffuser
is submerged and you can follow the line of bubbles.
completely dry out the diffuser (place under a heat lamp or similar), do not
attempt to glue the broken parts when the ceramic is wet.
cut a V shaped or U shaped groove approx. 5/16" deep along the crack. Cutting
the V/U shaped grove along the crack can be done with small “Dremel”
grindstone. If this is not available, drill a series of 1/8" to 3/16" holes side by side
along the crack, then break out the bits in between with a sharp tool such as a
gyproc or tile cutter. The groove should go as deep as possible without breaking
through the bottom of the plate. It is not enough to just make a superficial repair;
the broken parts of the plate must be fully joined at the crack.
clean out grove properly with compressed air. Groove should be dry and free of
dust.
Mix two part epoxy available in most hardware shops - do not use the fast setting
brand - the epoxy must have time to seep into the ceramic before it sets. Poor
liquid epoxy into groove and allow to set. If the temperature is too cold then place
diffuser under a lamp but the curing temperature should not exceed 40
̊
C.
test under water and observe the bubble pattern

6
Replacement of End Fitting for MBD300 & MBD600 Diffusers
(Point Four diffusers require either a 5/8" or 3/4" imperial or SAE wrench to remove the
end fitting.)
Procedure to remove a cracked fitting:
1. Clamp diffuser frame horizontally in a vice as near to the fitting end as possible with
tile facing upward - be certain the widest or lower part of the channel is between the
vice jaws.
2. A steady even pull with proper wrench will usually remove fitting without breaking.
3. Coat new fitting with a good grade of pipe dope and replace, being careful not to over
tighten.
Procedure to remove the remains of an end fitting that has broken off leaving
threads in the diffuser end-piece:
4. Use the modified drill bit, (supplied with the replacement fittings), to drill through the
broken stub. With a sharp pointed tool, collapse remaining fitting material into drilled
hole and remove.
5. Remove all foreign material from the drilled area with compressed air or gently tap
the diffuser on a bench, block, or wood.
6. Restore threaded end with 1/8" pipe tap (supplied with the replacement fittings), and
replace fitting as instructed above.

7
WARRANTY
Point Four Systems Inc. warrants its equipment under normal use against any and all
defects from the date of purchase for a period of one (1) year. Any failure resulting from
defective parts or faulty workmanship, as determined during evaluation by Point Four
Systems Inc., will be repaired or replaced under warranty.
Point Four Systems Inc.’s obligation under the warranty is conditional upon:
a) such equipment being installed, consistently used and maintained in accordance
with Point Four Systems Inc.’s written instructions, specifications and safeguards.
b) the defect(s) not being the result of misuse, neglect, accident or improper
application nor of any user attempts at modification or repair.
c) the purchaser reporting to Point Four Systems Inc. any defect within seven (7)
days of its occurrence. Point Four Systems Inc. may request that the equipment in
question be returned to Point Four Systems Inc.’s premises at the purchaser’s cost
within two (2) weeks of notification. Point Four may also require a written report by the
purchaser of the circumstances in which the defect occurred.
d) the purchaser certifies acceptance of the warranty as set out.
LIMITS OF LIABILITY
Point Four Systems Inc.’s obligations specifically exclude any liability whatsoever for
claims by the purchaser or user or any other persons or parties:
a) in respect of merchantability or fitness for a particular purpose.
b) for any special, indirect, incidental or consequential damages resulting from the
use, or as a result of a malfunction of the equipment.
c) for personal injury or any medical or disability claims or for compensation arising
therefrom.
This warranty and the conditions, limitations and exclusions is accepted by the
purchaser as the only authorized and applicable warranty and that there are no other
warranties or conditions, oral or written, expressed or implied.
-
 1
1
-
 2
2
-
 3
3
-
 4
4
-
 5
5
-
 6
6
-
 7
7
-
 8
8


Ask a question and I''ll find the answer in the document
Finding information in a document is now easier with AI
Other documents
-
 Stepsaver PRODUCTS 07050 Operating instructions
-
Rosemount 3000 User manual
-
-
-
-
-
-
-
Emerson oxymitterdr hazardous area in-siu oxygen probe User manual
-
