GE Appliances
General Electric Company
Louisville, Kentucky 40225
31-9163
27-in. Built-In
Wall Ovens
JKS10
JKP30
JKP35
JKP55
JKP70
JKP75
JKP90
PK916
PK956
ZEK938
ZEK958
Technical Service Guide
June 2008
GE Consumer & Industrial

– 2 –
IMPORTANT SAFETY NOTICE
The information in this service guide is intended for use by
individuals possessing adequate backgrounds of electrical,
electronic, and mechanical experience. Any attempt to repair a
major ap pli ance may result in personal injury and property
damage. The man u fac tur er or seller cannot be responsible for the
in ter pre ta tion of this in for ma tion, nor can it assume any liability in
connection with its use.
WARNING
To avoid personal injury, disconnect power before servicing
this prod uct. If electrical power is required for diagnosis or test
purposes, disconnect the power immediately after performing the
necessary checks.
RECONNECT ALL GROUNDING DEVICES
If grounding wires, screws, straps, clips, nuts, or washers used to
complete a path to ground are removed for service, they must be
returned to their original position and properly fastened.
GE Consumer & Industrial
Technical Service Guide
Copyright © 2008
All rights reserved. This service guide may not be reproduced in whole or in part
in any form without written permission from the General Electric Company.

– 3 –
Table of Contents
Auxiliary Control Board ..................................................................................................................................................38
Bake Element ......................................................................................................................................................................42
Broil Element .......................................................................................................................................................................34
Component Locator Views ...........................................................................................................................................25
Control Board Testing .....................................................................................................................................................56
Control Compartment Access .....................................................................................................................................36
Control Features ................................................................................................................................................................06
Control Panel Assembly .................................................................................................................................................37
Control Voltage ..................................................................................................................................................................50
Convection Bake Element .............................................................................................................................................36
Convection Fan Blade .....................................................................................................................................................35
Convection Fan Motor ....................................................................................................................................................45
Cooling Fan ..........................................................................................................................................................................43
Diagnostics and Service Information ......................................................................................................................50
Door Assembly ...................................................................................................................................................................29
Door Hinge Receivers ......................................................................................................................................................44
Electronic Oven Control (EOC) .....................................................................................................................................47
Error Codes ..........................................................................................................................................................................55
Introduction .........................................................................................................................................................................04
Key Panel Test ....................................................................................................................................................................52
Lock Assembly ...................................................................................................................................................................39
Meat Probe and Outlet ...................................................................................................................................................45
Nomenclature .....................................................................................................................................................................
0
5
Operational Notes ............................................................................................................................................................24
Oven Component Access Chart ................................................................................................................................28
Oven Components ............................................................................................................................................................29
Oven Light Assembly.......................................................................................................................................................46
Oven Removal ....................................................................................................................................................................32
Oven Separation (JKP90 Only) ....................................................................................................................................33
Oven Sensor and Door Switch Test ..........................................................................................................................54
Oven Temperature Sensor ............................................................................................................................................34
Sales Mode ...........................................................................................................................................................................24
Schematics and Wiring Diagrams ............................................................................................................................58
Thermal Line Break Thermal Cutout (TCO) ...........................................................................................................44
Thermal Switches ..............................................................................................................................................................41
Vent Tube/Smoke Eliminator .......................................................................................................................................35
Warranty ...............................................................................................................................................................................65

– 4 –
Introduction
The new 27-in. wall ovens have superior style and performance. These ovens feature electronic controls
that utilize the precision of modern digital technology. Additional features include:
Convection Bake (Multi-Rack) ― Provides ideal convection baking for multiple racks of food, ensuring •
superb results
Convection Roast ― Provides even cooking and consistent results, roasting meats up to 25% faster than •
a conventional oven
Glass Touch Oven Controls ― Feature a smooth glass •
design that is both easy-to-operate and easy-to-clean
Self-Clean Oven ― Conveniently cleans oven cavity •
without the need for scrubbing

– 5 –
The nomenclature plate is located on the front
left behind the oven door in both the single
and double confi gurations.
The mini-manual is located in the control
compartment. It is taped to the left side wall.
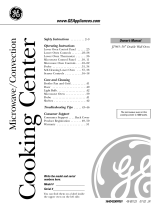
Feature Pack
Designates features–the higher
the number, the more features.
GE Cooking Product
ZE = Monogram Electric
P = Profi le
J = GE Series
Confi guration
K = 27-in. Wall Oven
Product Color
SS = Stainless Steel
Indicator for Engineering and
Product Service Only
Model Year Designator
J K P 5 5 S M 1 S S
Nomenclature
Nomenclature The letter des ig nat ing
the year re peats every
12 years.
Example:
T - 1974
T - 1986
T - 1998
Model Number
Single Wall Oven
Glass Color
S = Integrated Stainless
GE Confi guration only
P = Self-Clean Oven
S = Standard Oven
Serial Number
The fi rst two characters of the serial number
identify the month and year of manufacture.
Example: AR123456S = January, 2008
A - JAN 2008 - R
D - FEB 2007 - M
F - MAR 2006 - L
G - APR 2005 - H
H - MAY 2004 - G
L - JUN 2003 - F
M - JUL 2002 - D
R - AUG 2001 - A
S - SEP 2000 - Z
T - OCT 1999 - V
V - NOV 1998 - T
Z - DEC 1997 - S

– 6 –
Control Features
Tones
Features
f
1 BAKE. Press to select the bake function.
2 BROIL HIGH/LOW. Press to select the
broil function.
3 CONV BAKE/MULTI. Press to select baking
with convection on multiple racks.
4 CONV BAKE/1 RACK. Press to select
baking with convection on one rack.
5 CONV ROAST. Press to select roasting with
convection.
6 WARM/PROOF. Press once for warming or
twice for proofing. See the How to Set the
Oven for Warming section and the How to
Set the Oven for Proofing section.
7 START. Must be pressed to start any
cooking or cleaning function.
8 DISPLAY. Shows the operations you have
selected, the time of day and the cooking
or cleaning status.
9 COOK TIME. Use for Timed Bake, Timed
Convection Bake and Timed Convection
Roast operations.
10 DELAY START. Use along with the
COOK TIME or SELF CLEAN STD/LOW
pads to set the oven to start and stop
automatically at a time you select.
11 SELF CLEAN STD/LOW. Press to select
the self-cleaning function. See the Using
the Self-Cleaning Oven section.
12 PROBE. Press when using the probe to
cook food.
13 OVEN LIGHT ON/OFF. Press to turn the
oven lights on or off.
14 CLEAR/OFF. Press to cancel any oven
operation except the clock and timer.
15 TIMER ON/OFF. Press to select the
timer function. The timer does not control
oven operations. The timer can time up to
9 hours and 59 minutes.
16 NUMBER PADS. Use to set any function
requiring numbers—for example, the time
of day on the clock, the timer, the oven
temperature, the internal food temperature,
the starting and length of cooking time for
Timed Bake and the starting and length of
cleaning time for Self-Clean.
17 CLOCK. Press to enter the time of day.
If “F – and a number or letter” flash in the
display and the oven control signals, this
indicates function error code. Press the
CLEAR/OFF pad. Allow oven to cool for
one hour. Put the oven back into operation.
If function error code repeats, disconnect
power to the oven and call for service.
Double oven control shown. (Appearance may vary.)
The control has a series of tones that will sound
at different times. These tones may sound while
you set the control for an oven function or at
the end of the oven function. They will also
alert you when an incorrect time or
temperature has been entered or if
there is a problem with the oven.
When you press a touch pad, you will hear a
beep. This beep will let you know you have placed
enough pressure on the pad to activate it.
When you set an oven temperature, the
oven automatically starts to heat. When the
temperature inside the oven reaches your
set temperature, a tone will sound to let you
know to place the food in the oven.
An attention tone will sound if you set an
invalid function or try to set an additional
function. The tone can be quickly identified
by watching the display messages.
7
Models ZEK938 and ZEK958
(Continued next page)

– 7 –
Bake Pad
Press to select the bake function.
Broil Hi/Lo Pad
Press to select the broil function.
Convection Bake Pad
Press to select baking with the convection
function.
Convection Roast Pad
Press to select roasting with the convection
function.
Start Pad
Must be pressed to start any cooking or
cleaning function.
Display
Shows the time of day, oven temperature,
whether the oven is in the bake, broil or
self-cleaning mode and the times set for
the timer or automatic oven operations.
If “F– and a number or letter” flash in the display and
the oven control signals, this indicates a function
error code. Press the Clear/Off pad. Allow the oven to
cool for one hour. Put the oven back into operation. If the
function error code repeats, disconnect the power to the
oven and call for service.
If your oven was set for a timed oven operation
and a power outage occurred, the clock and all
programmed functions must be reset.
The time of day will flash in the display when there
has been a power outage.
Self Clean Std/Low Pad
Press to select self-cleaning function. See
the Using the self-cleaning oven section.
Oven Light On/Off Pad
Press to turn the oven light on or off.
Delay Start Pad
Use along with Cooking Time or
Self Clean Std/Low pads to set the
oven to start and stop automatically at a
time you set.
Cooking Time Pad
Press and then press the number pads to set
the amount of time you want your food to
cook. The oven will shut off automatically
when the cooking time has run out, unless
the Cook and Hold feature was set.
Clear/Off Pad
Press to cancel ALL oven operations except
the clock and timer.
Clock Pad
Press before setting the clock.
Number Pads
Use to set any function requiring numbers
such as the time of day on the clock, the
timer, the oven temperature, the internal
food temperature, the start time and
length of operation for timed baking
and self-cleaning.
Kitchen Timer On/Off Pad
Press to select the timer feature.
Probe Pad
Press when using the probe to cook food.
Warm Pad
Press to keep hot, cooked foods warm.
Proof Pad
Press to select a warm environment useful
for rising yeast-leavened products.
5
Oven Control, Clock and Timer Features and Settings
Double oven control shown.
Models PK956 and PK916
(Continued next page)

– 8 –
Bake Pad
Press to select the bake function.
Broil Hi/Lo Pad
Press to select the broil function.
Convection Bake Pad
Press to select baking with the convection
function.
Convection Roast Pad
Press to select roasting with the convection
function.
Start Pad
Must be pressed to start any cooking or
cleaning function.
Display
Shows the time of day, oven temperature,
whether the oven is in the bake, broil or
self-cleaning mode and the times set for
the timer or automatic oven operations.
If “F– and a number or letter” flash in the display and
the oven control signals, this indicates a function
error code. Press the Clear/Off pad. Allow the oven to
cool for one hour. Put the oven back into operation. If the
function error code repeats, disconnect the power to the
oven and call for service.
If your oven was set for a timed oven operation
and a power outage occurred, the clock and all
programmed functions must be reset.
The time of day will flash in the display when there
has been a power outage.
Self Clean Pad
Press to select self-cleaning function. See
the Using the self-cleaning oven section.
Oven Light On/Off Pad
Press to turn the oven light on or off.
Delay Start Pad
Use along with Cooking Time or Self Clean
pads to set the oven to start and stop
automatically at a time you set.
Cooking Time Pad
Press and then press the number pads to set
the amount of time you want your food to
cook. The oven will shut off automatically
when the cooking time has run out, unless
the Cook and Hold feature was set.
Clear/Off Pad
Press to cancel ALL oven operations except
the clock and timer.
Clock Pad
Press before setting the clock.
Number Pads
Use to set any function requiring numbers
such as the time of day on the clock, the
timer, the oven temperature, the internal
food temperature, the start time and
length of operation for timed baking
and self-cleaning.
Kitchen Timer On/Off Pad
Press to select the timer feature.
Oven Control, Clock and Timer Features and Settings
Double oven control shown.
Throughout this manual, features and appearance may vary from your model.
(Continued next page)

– 9 –
6
Oven Control, Clock and Timer Features and Settings
Bake Pad
Press this pad to select the bake function.
Broil Hi/Lo Pad
Press this pad to select the broil function.
Self Clean Pad
Press this pad to select the self-cleaning
function. See the Using the self-cleaning oven
section.
Start Pad
Must be pressed to start any cooking or
cleaning function.
Display
Shows the time of day, oven temperature,
whether the oven is in the bake, broil or self-
cleaning mode and the times set for the
timer or automatic oven operations.
If “F — and a number or letter” flash in the display
and the oven control signals, this indicates a
function error code. Press the Clear/Off pad. Allow the
oven to cool for one hour. Put the oven back into operation. If
the function error code repeats, disconnect the power to the
oven and call for service.
If your oven was set for a timed oven operation and
a power outage occurred, the clock and all programmed
functions must be reset.
The time of day will flash in the display when there
has been a power outage.
Oven Light On/Off Pad
Press this pad to turn the oven light on or off.
Delay Start Pad
Use along with Cooking Time or Self Clean
pads to set the oven to start and stop
automatically at a time you set.
Cooking Time Pad
Press this pad and then press the Hour and
Min + and – pads to set the amount of time
you want your food to cook. The oven will
shut off automatically when the cooking time
has run out unless the Cook and Hold
feature was set.
Clear/Off Pad
Press this pad to cancel ALL oven
operations except the clock and timer.
Temp + and – Pads
Press these pads to set the cooking
temperature you want to use.
Clock Pad
Press this pad before setting the clock.
Hour and Min + and – Pads
Press these pads to set times up to 9 hours
and 59 minutes—for example, the time of
day on the clock, the timer, the starting and
length of cooking time for timed bake and
the starting and length of cleaning time
for self-clean.
Kitchen Timer On/Off Pad
Press this pad to select the timer feature.
Double oven control shown
Lower Oven Control Settings on models with a knob
OVEN Knob
Turn this knob to
the temperature
setting you want.
The Oven Cycle light glows until the oven reaches your
selected temperature, then goes off and on with the oven
element(s) during cooking.
Throughout this manual, features and appearance may vary from your model.
(Continued next page)

– 10 –
Model JKP90
Lower Oven Control, Clock and
T
Display
Shows the time of day, oven temperature,
whether the oven is in the bake, broil or
self-cleaning mode and the times set for
the timer or automatic oven operations.
NOTE: The time on the lower oven display is
shown in hours and minutes (1:30 is one hour,
30 minutes). On the microwave oven, time is
shown in minutes and seconds (1:30 is one
minute, 30 seconds).
If “F– and a number or letter” flash in the
display and the oven control signals, this
indicates a function error code. Press the
Clear/Off pad. Allow the oven to cool for one
hour. Put the oven back into operation. If the
function error code repeats, disconnect the power
to the oven and call for service.
If your oven was set for a timed oven
operation and a power outage occurred, the
clock and all programmed functions must be reset.
The time of day (may be incorrect) will flash
in the display when the there has been a
power outage.
Broil Hi/Lo Pad
Press to select the broil function.
Bake Pad
Press to select the bake function.
Self Clean Pad
Press to select the self-cleaning function.
See the Using the self-cleaning lower oven
section.
Oven Light Pad
Press to turn the oven light on or off.
Number Pads
Use to set any function requiring
numbers such as the time of day on the
clock, the timer, the oven temperature,
the start time and length of operation for
timed baking and self-cleaning.
Clear/Off Pad
Press to cancel ALL oven operations
except the clock and timer.
Start Pad
Must be pressed to start any cooking or
cleaning function.
Kitchen Timer On/Off Pad
Press to select the timer feature.
Delay Start Pad
Use along with Cooking Time or Self Clean
pads to set the oven to start and stop
automatically at a time you set.
Cooking Time Pad
Press and then press the number pads
to set the amount of time you want your
food to cook. The oven will shut off
automatically when the cooking time
has run out, unless the Cook and Hold
feature was set.
Clock Pad
Press before setting the clock.

– 11 –
How to Set the Oven for Baking or Roasting
Press the Bake pad.
On models with number pads, press
them in order to set the desired
temperature.
On models with Temp + and –pads,
press them to increase or decrease the
set desired temperature.
Press the Start pad.
Check food for doneness at minimum
time on recipe. Cook longer if necessary.
Press the Clear/Off pad when cooking is
complete.
NOTE: On some models, the lower oven is controlled
with a knob. To set the oven for baking, turn the knob
to the desired setting or temperature. Turn the knob
to OFF when baking is complete.
For 27 ″Ovens: If baking four cake layers at the
same time, place two layers on rack A and two
layers on rack C.
For 30 ″Ovens: If baking four cake layers at the
il l kBd
Rack Position
Type of Food 27” Oven 30” Oven
Frozen pies B or C C or D
(on cookie sheet)
Angel food cake A A or B
Bundt or pound cakes A A or B
Biscuits, muffins, B or C C or D
brownies, cookies,
cupcakes, layer
cakes, pies
Casseroles B or C C or D
How to Set the Oven for Broiling
Close the door. Always broil with the door
closed.
Place the meat or fish on a broiler
grid in a broiler pan.
Follow suggested rack positions in
the Broiling Guide.
The size, weight, thickness, starting temperature
and your preference of doneness will affect
broiling times. This guide is based on meats
at refrigerator temperature.
Press the Broil Hi/Lo pad once for
HI Broil.
To change to LO Broil, press the
Broil Hi/Lo pad again.
Press the Start pad.
When broiling is finished, press the
Clear/Off pad.
NOTE: On some models, the lower oven is
controlled with a knob. To set the oven for broiling,
turn the knob to BROIL. Turn the knob to OFF
when broiling is complete.
Close the door. Always broil
with the door closed.
If your oven is connected to 208
volts, rare steaks may be broiled by
preheating the broiler and positioning
the oven rack one position higher.

– 12 –
Using the clock and timer. ge.com
To Set the Clock
The clock must be set to the correct time
of day for the automatic oven timing
functions to work properly. The time of
day cannot be changed during a timed
baking or self-cleaning cycle.
Press the Clock pad.
On models with number pads, press
them in order to set the correct time
of day.
On models with Hour and Min +
and –pads, press them to set the
correct time of day.
Press the Start pad.
Make sure the clock is set to the
correct time of day.
To Set the Timer
Press the Kitchen Timer On/Off pad.
On models with number pads, press
them until the amount of time you
want shows in the display. For
example, to set 2 hours and 45
minutes, press 2, 4 and 5 in that
order.
On models with Hour and Min +
and –pads, press them until the
amount of time you want shows in
the display. The maximum time you
can enter in minutes is 59. Cooking
times more than 59 minutes should
be changed to hours and minutes.
For example, enter 90 minutes as
1 hour, 30 minutes.
If you make a mistake, press Kitchen
Timer On/Off and begin again.
Press the Start pad.
After pressing the Start pad, SET disappears;
this tells you the time is counting down, although
the display does not change until one minute
has passed. Seconds will not be shown in the
display until the last minute is counting down.
When the timer reaches :00, the
control will beep 3 times followed
by one beep every 6 seconds until
the Kitchen Timer On/Off pad
is pressed.
The 6-second tone can be canceled by following
the steps in the Special features of your oven
control section under Tones at the End of a
Timed Cycle.
The timer is a minute timer only.
The timer does not control oven
operations. The maximum setting on
the timer is 9 hours and 59 minutes.
To Reset the Timer
If the display is still showing the time
remaining, you may change it by pressing
the Kitchen Timer On/Off pad, then press
the number pads (on some models) or
the Hour and Min + or –pads (on some
models) until the time you want appears
in the display.
If the remaining time is not in the display
(clock, delay start or cooking time are in
the display), recall the remaining time by
pressing the Kitchen Timer On/Off pad and
then pressing the number pads (on some
models) or the Hour and Min + or –pads
(on some models) to enter the new time
you want.
To Cancel the Timer
Press Kitchen Timer On/Off pad twice.

– 13 – (Continued next page)
10
How to Set the Oven For Roasting When Using the Probe
Insert the probe into the meat.
Plug the probe into the outlet in the
oven. Make sure it’s pushed all the
way in. Close the oven door.
Press the Probe pad.
Press the number pads to set the
desired internal food or meat
temperature. The maximum
internal temperature for the food
that you can set is 200°F.
Press the Bake pad.
Press the number pads to set the
desired oven temperature.
Press the Start pad.
The display will flash if the probe is inserted
into the outlet and you have not set a probe
temperature and pressed the Start pad.
When the oven starts to heat, the word
LO will be in the display.
After the internal temperature of the
meat reaches 100°F, the changing
internal temperature will be shown
in the display.
When the internal temperature of
the meat reaches the number you
have set, the probe and the oven
turn off and the oven control
signals. To stop the signal, press
the Clear/Off pad. Use hot pads to
remove the probe from the food.
Do not use tongs to pull on it—
they might damage it.
To change the oven temperature during
the Roast cycle, press the Bake pad and
then the number pads to set the new
temperature.
■If the probe is removed from the food before
the final temperature is reached, a tone will
sound and the display will flash until the probe
is removed from the oven.
■You can use the timer even though you cannot
use timed oven operations.
Using the probe.
For many foods, especially roasts and poultry, internal food temperature is the best test for doneness. The
temperature probe takes the guesswork out of roasting by cooking foods to the exact doneness you want.
NOTE: Double oven models have a probe in the
upper oven only.
Use of probes other than the one
provided with this product may result in
damage to the probe.
Use the handles of the probe and plug
when inserting and removing them from
the meat and outlet.
■ To avoid damaging your probe, do not use
tongs to pull on the cable when removing it.
■ To avoid breaking the probe, make sure food is
completely defrosted before inserting.
■ To prevent possible burns, do not unplug
the probe from the outlet until the oven
has cooled.
■ Never leave your probe inside the oven during
a self-cleaning cycle.
■ Do not store the probe in the oven.
The temperature probe has a
skewer-like probe at one end and a
plug at the other end that goes into
the outlet in the oven.
After preparing the meat and placing
it on a trivet or on a broiler pan grid,
follow these directions for proper probe
placement.
Lay the probe on the outside of the
meat along the top or side and mark
with your finger where the edge of
the meat comes to on the probe.
The point should rest in the center
of the thickest meaty part of the
roast.
Insert the probe completely into the
meat, up to the handle. It should
not touch bone, fat or gristle.
For roasts with no bone, insert the probe
into the meatiest part of the roast. For
bone-in ham or lamb, insert the probe
into the center of the lowest large muscle
or joint.
Insert the probe into the center of dishes
such as meat loaf or casseroles. When
cooking fish, insert the probe from just
above the gill into the meatiest area,
parallel to the backbone.
Insert the probe into the meatiest part of
the inner thigh from below and parallel
to the leg of a whole turkey.
Cable
Handles
Probe
Plug

– 14 – (Continued next page)
How to Set the Oven for Convection Roasting when Using the Probe
The display will flash PROBE and the oven
control will signal if the probe is inserted
into the outlet, and you have not set a
probe temperature and pressed the
Start pad.
Place the rack in the lowest position
(A). Insert the probe into the meat.
Plug the probe into the outlet in the
oven. Make sure it is pushed all the
way in. Close the oven door.
Press the Convection Roast pad.
Press the number pads to set the
desired oven temperature.
Press the Probe pad.
Press the number pads to set the
desired internal meat temperature.
Press the Start pad.
When the oven starts to heat, the word
LO will be in the display.
After the internal temperature of the meat
reaches 100°F, the changing internal
temperature will be shown in the display.
When the internal temperature of
the meat reaches the number you
have set, the probe and the oven
turn off and the oven control
signals. To stop the signal, press
the Clear/Off pad. Use hot pads to
remove the probe from the food.
Do not use tongs to pull on it—
they might damage it.
CAUTION: To prevent possible burns, do not
unplug the probe from the oven outlet until the
oven has cooled. Do not store the probe in
the oven.
NOTE:
■If the probe is removed from the food before
the final temperature is reached, a tone will
sound and the display will flash until the probe
is removed from the oven.
■You will hear a fan while cooking with this
feature. The fan will stop when the door is
opened, but the heat will not turn off.
■You can use the timer even though you cannot
use timed oven operations.
■On double oven models, you will not be able to
use the probe in the upper oven during timed
oven operations. This is because, with the
probe, you are cooking by temperature rather
than time.
For best results when roasting large
turkeys and roasts, we recommend
using the probe included in the
convection oven.

– 15 – (Continued next page)
Using the convection oven.
NOTE: The convection fan will cycle on and off
while cooking to best distribute hot air in the
oven.
The convection oven fan shuts off when the oven
door is opened. DO NOT leave the door open for
long periods of time while using convection
cooking or you may shorten the life of the
convection heating element.
In a convection oven, a fan circulates hot air
over, under and around the food.
This circulating hot air is evenly distributed
throughout the oven cavity. As a result, foods
are evenly cooked and browned—often in less
time with convection heat.
■Ideal for evenly browned baked foods cooked
on multiple racks.
■Good for large quantities of baked foods.
■Good results with cookies, biscuits, muffins,
brownies, cupcakes, cream puffs, sweet rolls,
angel food cake and bread.
The convection fan circulates the heated
air evenly over and around the food.
When convection baking with only 1 rack,
follow the rack positions recommended in
the Using the oven section.
Because heated air is circulated evenly
throughout the oven, foods can be
baked with excellent results using
multiple racks.
Multi-rack baking may increase cook
times slightly for some foods but the
overall result is time saved. Cookies,
muffins, biscuits and other quickbreads
give very good results with multi-rack
baking.
For 30 ″Ovens: When baking on 3 racks,
place one rack in the second (B)
position, one in the fourth (D) position
and one in the sixth (F) position.
For two-rack baking, place one rack
in the second (B) rack position. Place
the other rack in the fourth (D) rack
position.
For 27 ″Ovens: When baking on 3 racks,
place one rack in the first (A) position,
one in the third (C) (offset) position
and one in the fourth (D) position.
For two-rack baking, place one rack
in the first (A) rack position. Place
the other rack in the third (C) rack
position.
Multi-Rack Convection Baking
Multi-rack position
Convection Bake
How to Set the Oven for Convection Baking or Roasting
Press the Convection Bake pad
or the Convection Roast pad.
Press the number pads to set the
desired oven temperature.
Press the Start pad.
To change the oven temperature, press
the Convection Bake or Convection Roast
pad and then the number pads to set
the new temperature.
When the oven starts to heat, the
changing temperature, starting at 100°F,
will be displayed. When the oven reaches
the temperature you set, 3 beeps will
sound.
Press the Clear/Off pad when
finished.
■You will hear a fan while cooking with
convection. The fan will stop when the door is
opened, but the heat will not turn off.
■You may hear the oven clicking during baking.
This is normal.
OR

– 16 –
How to Set a Delayed Start and Automatic Stop
You can set the oven control to delay-start the oven,
cook for a specific length of time and then turn off
automatically.
Make sure the clock shows the correct time
of day.
Press the
Convection
Bake or
Convection Roast
pad.
Press the number pads to set the desired
oven temperature.
Press the Cooking Time pad.
NOTE: If your recipe requires preheating, you may
need to add additional time to the length of the
cooking time.
Press the number pads to set the desired
cooking time.
Press the Delay Start pad.
Press the number pads to set the time
of day you want the oven to turn on
and start cooking.
If you would like to check the times you have set, press
the Delay Start pad to check the start time you have
set, or press the Cooking Time pad to check the
length of cooking time you have set.
Press the Start pad.
NOTE: An attention tone will sound if you are using
timed baking or roasting and do not press the Start
pad after entering the baking or roasting temperature.
When the oven turns on at the time of day
you have set, the display will show the
changing temperature (starting at 100°F) and
the cooking time. The display starts changing
once the temperature reaches 100°F.
NOTE: On double oven models, when using both ovens
at the same time, the times showing in the display will
be for the last oven set. To display the time set for the
first oven set, press the Delay Start or Cooking Time
pad for that oven.
The oven will continue to cook for the
programmed amount of time, then shut
off automatically, unless the Cook and Hold
feature was set. See the Special features of your
oven control section.
Press the Clear/Off pad to clear the
display if necessary. Remove the food
from the oven. Remember, even though
the oven shuts off automatically, food
left in the oven will continue cooking
after the oven turns off
.
Using the timed features for convection cooking. ge.com
On double oven models, you can use timed baking or roasting in one oven while using self-clean in the other; you can
also use timed baking or roasting in both ovens at the same time.
You will hear a fan while cooking with these features. The fan will stop when the door is opened, but the heat will not
turn off.
NOTE: Foods that spoil easily—such as milk, eggs, fish, stuffings, poultry and pork—should not be allowed to sit for
more than 1 hour before or after cooking. Room temperature promotes the growth of harmful bacteria. Be sure
that the oven light is off because heat from the bulb will speed harmful bacteria growth.
How to Set an Immediate Start and Automatic Stop
The oven will turn on immediately and cook for a
selected length of time. At the end of the cooking time,
the oven will turn off automatically.
Make sure the clock shows the correct time
of day.
Press the
Convection
Bake or
Convection Roast
pad.
Press the number pads to set the desired
oven temperature.
Press the Cooking Time pad.
NOTE: If your recipe requires preheating, you may
need to add additional time to the length of the
cooking time.
Press the number pads to set the desired
length of cooking time. The minimum
cooking time you can set is 1 minute.
The oven temperature that you set and
the cooking time that you entered will be
in the display.
Press the Start pad.
The display will show the changing
temperature (starting at 100°F) and the
cooking time. The display starts changing
once the temperature reaches 100°F.
NOTE: On double oven models, when using both
ovens at the same time, the times showing in the
display will be for the last oven set. To display the
time set for the first oven set, press the Cooking
Time pad for that oven.
The oven will continue to cook for the
programmed amount of time, then shut
off automatically, unless the Cook and Hold
feature was set. See the Special features of your
oven control section.
Press the Clear/Off pad to clear the
display if necessary. Remove the food
from the oven. Remember, even though
the oven shuts off automatically, food left
in the oven will continue cooking after
the oven turns off.
15

– 17 –
Adjust the oven thermostat—Do it yourself!
You may find that your new oven cooks differently than the one it replaced. Use your new oven for a few weeks to become more
familiar with it. If you still think your new oven is too hot or too cold, you can adjust the thermostat yourself.
Do not use thermometers, such as those found in grocery stores, to check the temperature setting of your oven. These
thermometers may vary 20–40 degrees.
NOTE: This adjustment will only affect baking and roasting temperatures; it does not affect broiling, convection or self-cleaning
temperatures. The adjustment will be retained in memory after a power failure.
To Adjust the Oven Thermostat (on some models)
Press the Bake and Broil Hi/Lo pads (on
double oven models, use the upper oven
controls) at the same time for 3 seconds
until the display shows SF. Then proceed
with steps 2 through 4, using the pads
for the upper or lower oven.
Press the Bake pad. A two-digit number
shows in the display.
On models with number pads,
press Bake again to alternate between
increasing and decreasing the oven
temperature.
The oven temperature can be adjusted
up to (+) 35°F hotter or (-) 35°F cooler.
On models with number pads, press
them the same way you read them.
For example, to change the oven
temperature 15°F, press 1 and 5.
On models with Temp + and –pads,
press them to increase or decrease the
temperature in 1 degree increments.
When you have made the adjustment,
press the Start pad to go back to the
time of day display. Use your oven as
you would normally.
To Adjust the Oven Thermostat (on some models)
Pull the OVEN knob off the shaft, look at the
back of the knob and note the current setting
before making any adjustment. The knob is
factory set with the top screw directly under
the pointer.
Pull off the OVEN knob.
Loosen both screws on back of
the knob.
Hold both parts of the knob as shown in
the illustration of the back of the OVEN
knob and turn so the lower screw moves
in the desired direction.
You will hear and feel the notches as you turn
the knob. Each notch changes temperature
about 10° Fahrenheit.
Tighten the screws.
Return the OVEN knob to the oven.
Re-check oven performance before making any
additional adjustments.
Turn the disk counterclockwise to
increase the oven temperature.
Turn the disk clockwise to decrease
the oven temperature.
or
(depending on model)
+

– 18 –
Using the self-cleaning oven. (on some models) ge.co
m
The oven door must be closed and all controls must be set correctly for the cycle to work properly.
Before a Clean Cycle
We recommend venting your kitchen
with an open window or using a
ventilation fan or hood during the
first self-clean cycle.
Remove any broiler pan, broiler grid, all
cookware and any aluminum foil from
the oven.
The oven racks can be self-cleaned, but
they will darken, lose their luster and
become hard to slide.
Do not use abrasives or oven cleaners.
Clean the top, sides and outside of the
oven door with soap and water.
Make sure the oven light bulb cover
(on some models) is in place and the
oven light is off.
IMPORTANT: The health of some birds
is extremely sensitive to the fumes given
off during the self-cleaning cycle of any
oven. Move birds to another well
ventilated room.
■On models with press pad controls
for both ovens, you can set a clean
cycle in both ovens at the same time.
The last oven set will automatically
delay its start until the end of the
first oven’s clean cycle.
■On models with press pad controls for
both ovens, you can use timed baking
in one oven and self-clean the other at
the same time.
■On models with a knob, the lower
oven does not have the self-clean
feature.
CAUTION: Never place cooking utensils or any
other items on the oven floor. There is a heating
element beneath the oven floor. Placing items on
the oven floor may cause the oven to overheat,
resulting in damage to the oven and risk of
damage or fire to cabinets.
Wipe up heavy soil on the oven
bottom. (appearance may vary)
How to Set the Oven for Cleaning
Press the Self Clean pad once for
a 4-hour clean time or twice for
a 3-hour clean time.
A 3-hour self-clean time is
recommended for use when
cleaning small, contained spills. A
self-clean time of 4 hours or longer
is recommended for a dirtier oven.
If a time other than 4 hours or
3 hours is needed, use the number
pads (on some models) or the Hour
and Min + or –pads (on some
models) and enter the desired
clean time.
You can change the clean time to any
time between 3 hours and 5 hours,
depending on how dirty your oven is.
Press the Start pad.
The door locks automatically. The display
will show the clean time remaining. It will
not be possible to open the oven door
until the temperature drops below the
lock temperature and the LOCKED light
goes off.
When the LOCKED light goes off, you will
be able to open the door.
■The word LOCK will flash and the oven
control will signal if you set the clean
cycle and forget to close the oven door.
■To stop a clean cycle, press the
Clear/Off pad. When the LOCKED light
goes off indicating the oven has cooled
below the locking temperature, you
will be able to open the door.
or
(depending on model)
*
* 5 hours on some models

– 19 –
Special features of your oven control. ge.com
Your new press pad control has additional features that you may choose to use. The following are the features
and how you may activate them.
The special feature modes can only be activated while the display is showing the time of day. They remain
in the control’s memory until the steps are repeated.
When the display shows your choice, press the Start pad. The special features will remain in memory after
a power failure, except for the Sabbath feature, which will have to be reset.
12-Hour Shut-Off
With this feature, should you forget and leave the
oven on, the control will automatically turn off the
oven after 12 hours during baking functions or
after 3 hours during a broil function.
If you wish to turn OFF this feature, follow
the steps below.
Press the Bake and Broil Hi/Lo pads
(on double oven models, use the upper
oven controls)
at the same time for
3 seconds until the display shows SF.
Press the Delay Start pad until
no shdn (no shut-off) appears in the
display.
Press the Start pad to lock in the
no shdn (no shut-off) feature and
leave the control set in this special
features mode.
NOTE:
■On models with press pad controls for both
ovens, this activates this special feature for
both ovens.
■On models with oven knob(s), this feature is
not available for the lower oven.
Fahrenheit or Celsius Temperature Selection
Your oven control is set to use the Fahrenheit
temperature selections but you may change this
to use the Celsius selections.
Press the Bake and Broil Hi/Lo pads
(on double oven models, use the upper
oven controls)
at the same time for
3 seconds until the display shows SF.
Press the Broil Hi/Lo and Cooking
Time pads at the same time. The
display will show F(Fahrenheit).
Press the Broil Hi/Lo and Cooking
Time pads again at the same time.
The display will show C(Celsius).
Press the Start pad.
NOTE:
■On models with press pad controls for both
ovens, the new setting will be displayed for
both ovens.
■On models with oven knob(s), this feature is
not available for the lower oven.
Tones at the End of a Timed Cycle
At the end of a timed cycle, 3 short beeps will
sound followed by one beep every 6 seconds until
the Clear/Off pad is pressed. This continuous
6-second beep may be canceled.
To cancel the 6-second beep:
Press the Bake and Broil Hi/Lo pads
(on double oven models, use the upper
oven controls)
at the same time for
3 seconds until the display shows SF.
Press the Kitchen Timer On/Off
pad. The display shows CON BEEP
(continuous beep). Press the
Kitchen Timer On/Off pad again. The
display shows BEEP. (This cancels the
one beep every 6 seconds.)
Press the Start pad.
NOTE:
■On models with press pad controls for both
ovens, this cancels the end of cycle tone for
both ovens.
■On models with oven knob(s), this feature is
not available for the lower oven.
17
+
+
+
+

– 20 –
18
12-Hour, 24-Hour or Clock Black-Out
Your control is set to use a 12-hour clock.
If you would prefer to have a 24-hour
military time clock or black out the clock
display, follow the steps below.
Press the Bake and Broil Hi/Lo pads
(on double oven models, use the upper
oven controls)
at the same time for
3 seconds, until the display shows SF.
Press the Clock pad once. The
display will show 12 hr. If this is
the choice you want, press the
Start pad.
Press the Clock pad again to change
to the 24-hour military time clock.
The display will show 24 hr. If this
is the choice you want, press the
Start pad.
Press the Clock pad again to black
out the clock display. The display
will show OFF. If this is the choice
you want, press the Start pad.
NOTE: If the clock is in the black-out mode, you
will not be able to use the Delay Start function.
Tone Volume (on some models)
This feature allows you to adjust the tone
volumes to a more acceptable volume. There are
three possible volume levels.
Press the Bake and Broil Hi/Lo pads
(on double oven models, use the
upper oven controls) at the same
time for 3 seconds, until the display
shows SF.
Press the Oven Light On/Off pad. The
display will show 2 BEEP. This is the
middle volume level.
Press the Oven Light On/Off pad again.
The display will show 3 BEEP. This is
the loudest volume level.
Press the Oven Light On/Off pad again.
The display will show 1 BEEP. This is
the quietest volume level.
For each time the level is changed,
a tone will sound to provide an
indication of the volume level.
Choose the desired sound level
(1 BEEP, 2 BEEP, 3 BEEP).
Press the Start pad to activate the
desired level shown.
NOTE:
■On double oven models, this activates this
special feature for both ovens.
■On models with oven knob(s), this feature is
not available for the lower oven.
Cook and Hold
Your new control has a cook and hold feature that
keeps cooked foods warm for up to 3 hours after
Timed Baking or Roasting is finished.
NOTE: This feature can only be programmed to
work with Timed Baking or Roasting. (See the
Using the timed baking and roasting features
section.) After Timed Baking or Roasting has
automatically stopped, the programmed Cook
and Hold will automatically start.
To activate this feature for use after
Timed Baking or Roasting, follow the
steps below.
Press the Bake and Broil Hi/Lo pads
(on double oven models, use the
upper oven controls) at the same
time for 3 seconds until the display
shows SF. Then proceed with steps
2 through 3, using the pads for the
upper or lower oven.
Press the Cooking Time pad. The
display will show Hld OFF.
Press the Cooking Time pad again to
activate the feature. The display will
show Hld ON.
Press the Start pad to activate the
cook and hold feature and leave the
control set in this special features
mode.
NOTE: On models with oven knob(s), this feature
is not available for the lower oven.
+
+
+
Page is loading ...
Page is loading ...
Page is loading ...
Page is loading ...
Page is loading ...
Page is loading ...
Page is loading ...
Page is loading ...
Page is loading ...
Page is loading ...
Page is loading ...
Page is loading ...
Page is loading ...
Page is loading ...
Page is loading ...
Page is loading ...
Page is loading ...
Page is loading ...
Page is loading ...
Page is loading ...
Page is loading ...
Page is loading ...
Page is loading ...
Page is loading ...
Page is loading ...
Page is loading ...
Page is loading ...
Page is loading ...
Page is loading ...
Page is loading ...
Page is loading ...
Page is loading ...
Page is loading ...
Page is loading ...
Page is loading ...
Page is loading ...
Page is loading ...
Page is loading ...
Page is loading ...
Page is loading ...
Page is loading ...
Page is loading ...
Page is loading ...
Page is loading ...
Page is loading ...
Page is loading ...
/