7 When installation is complete, you see this screen:
To install EPSON Software
TM
Film Factory,
TM
click
EPSON Software Film Factory, then click Install.
Follow the on-screen instructions. When installation
is complete, click Back.
If you’re using Adobe
®
Photoshop
®
6, 7 or Adobe
Photoshop Elements 1 or 2, click P.I.M. II Plug-In,
then click Install. Follow the on-screen instructions.
When installation is complete, click Back.
To add a link to EPSON PhotoCenter,
SM
click EPSON PhotoCenter Link, then click Add.
Click Back.
8 When you’re done installing software, click Exit. The registration screen appears.
9 Follow the on-screen instructions to register your printer.
10 When you see a message telling you to restart your computer, click OK.
Remove the CD, then restart your computer.
NOTE: Be sure to restart your computer to enable all of your printer software features.
You’re ready to print! See section 6, “Print.”
Macintosh
®
1 Connect your printer to your computer: connect the square end of your USB cable
to the printer and the flat end of the USB cable to your computer.
(You can connect to any open port.)
2 Turn on your Macintosh and wait for it to start up.
3 Insert the EPSON CD-ROM in your drive.
4 Double-click the CD-ROM icon, if necessary,
then double-click EPSON.
5 Read the license agreement that appears
and click AGREE.
You see the Install Menu.
6 Click Install Printer Driver and Utilities and follow
the on-screen instructions. (In OS X, you will need to
enter your Administrator password for each item.)
7 When prompted, click Restart to restart your computer.
8 When your system restarts, double-click the CD-ROM
icon, if necessary, then double-click EPSON.
9 Click Install EPSON Print CD, then click Install
and follow the on-screen instructions.
10 Click Install Optional Software.
You see the following menu:
11 To install EPSON Software Film Factory, click EPSON Software Film Factory,
then click Install. Follow the on-screen instructions. When installation is complete,
click Back.
If you’re using Adobe Photoshop 6, 7 or Adobe Photoshop Elements 1 or 2, click P.I.M. II
Plug-In, then click Install. Follow the on-screen instructions. When installation is complete,
click Back.
To add a link to EPSON PhotoCenter, click EPSON PhotoCenter Link, then click Add.
Click Back, then click Back again.
12 From the Install Menu, click Install Printer Manual to install your on-screen
Reference Guide.
13 When you’re done installing software, click Exit. The registration screen appears.
14 Follow the on-screen instructions to register your printer.
Go to the section for your operating system to finish setting up your printer.
Mac OS X 10.x
1
Open the Applications folder, then open the Utilities folder and select Print Center.
You see the Printer List window.
If the Stylus Photo R300 appears in the printer list, go to step 2. If you don’t see it, make
sure your printer is turned on and connected. Then click Add or Add Printer, and select
EPSON USB at the top of the screen and Stylus Photo R300 below. Then go to step 3.
2 Click the Stylus Photo R300 printer name and
then click the Add or Add Printer button.
You see another window listing your printer.
If it isn’t already selected, choose EPSON USB.
3 Click the printer name, then open the Page Setup
menu at the bottom of the screen and select All.
4 Click the Add button. You see the Printer List
again with the printer features available.
5 Close Print Center.
You’re ready to print! See section 6, “Print.”
NOTE: To print from Macintosh Classic
applications in OS X, restart your Macintosh
in OS 9 and follow the “Install Software”
steps again.
Macintosh OS 8.6 to 9.x
Open the Chooser from the Apple
®
menu, then select these options:
• SP R300 Series
•Your USB port
•Background printing (on or off)
Close the Chooser.
You’re ready to print! See section 6, “Print.”
Install Software
Install Software
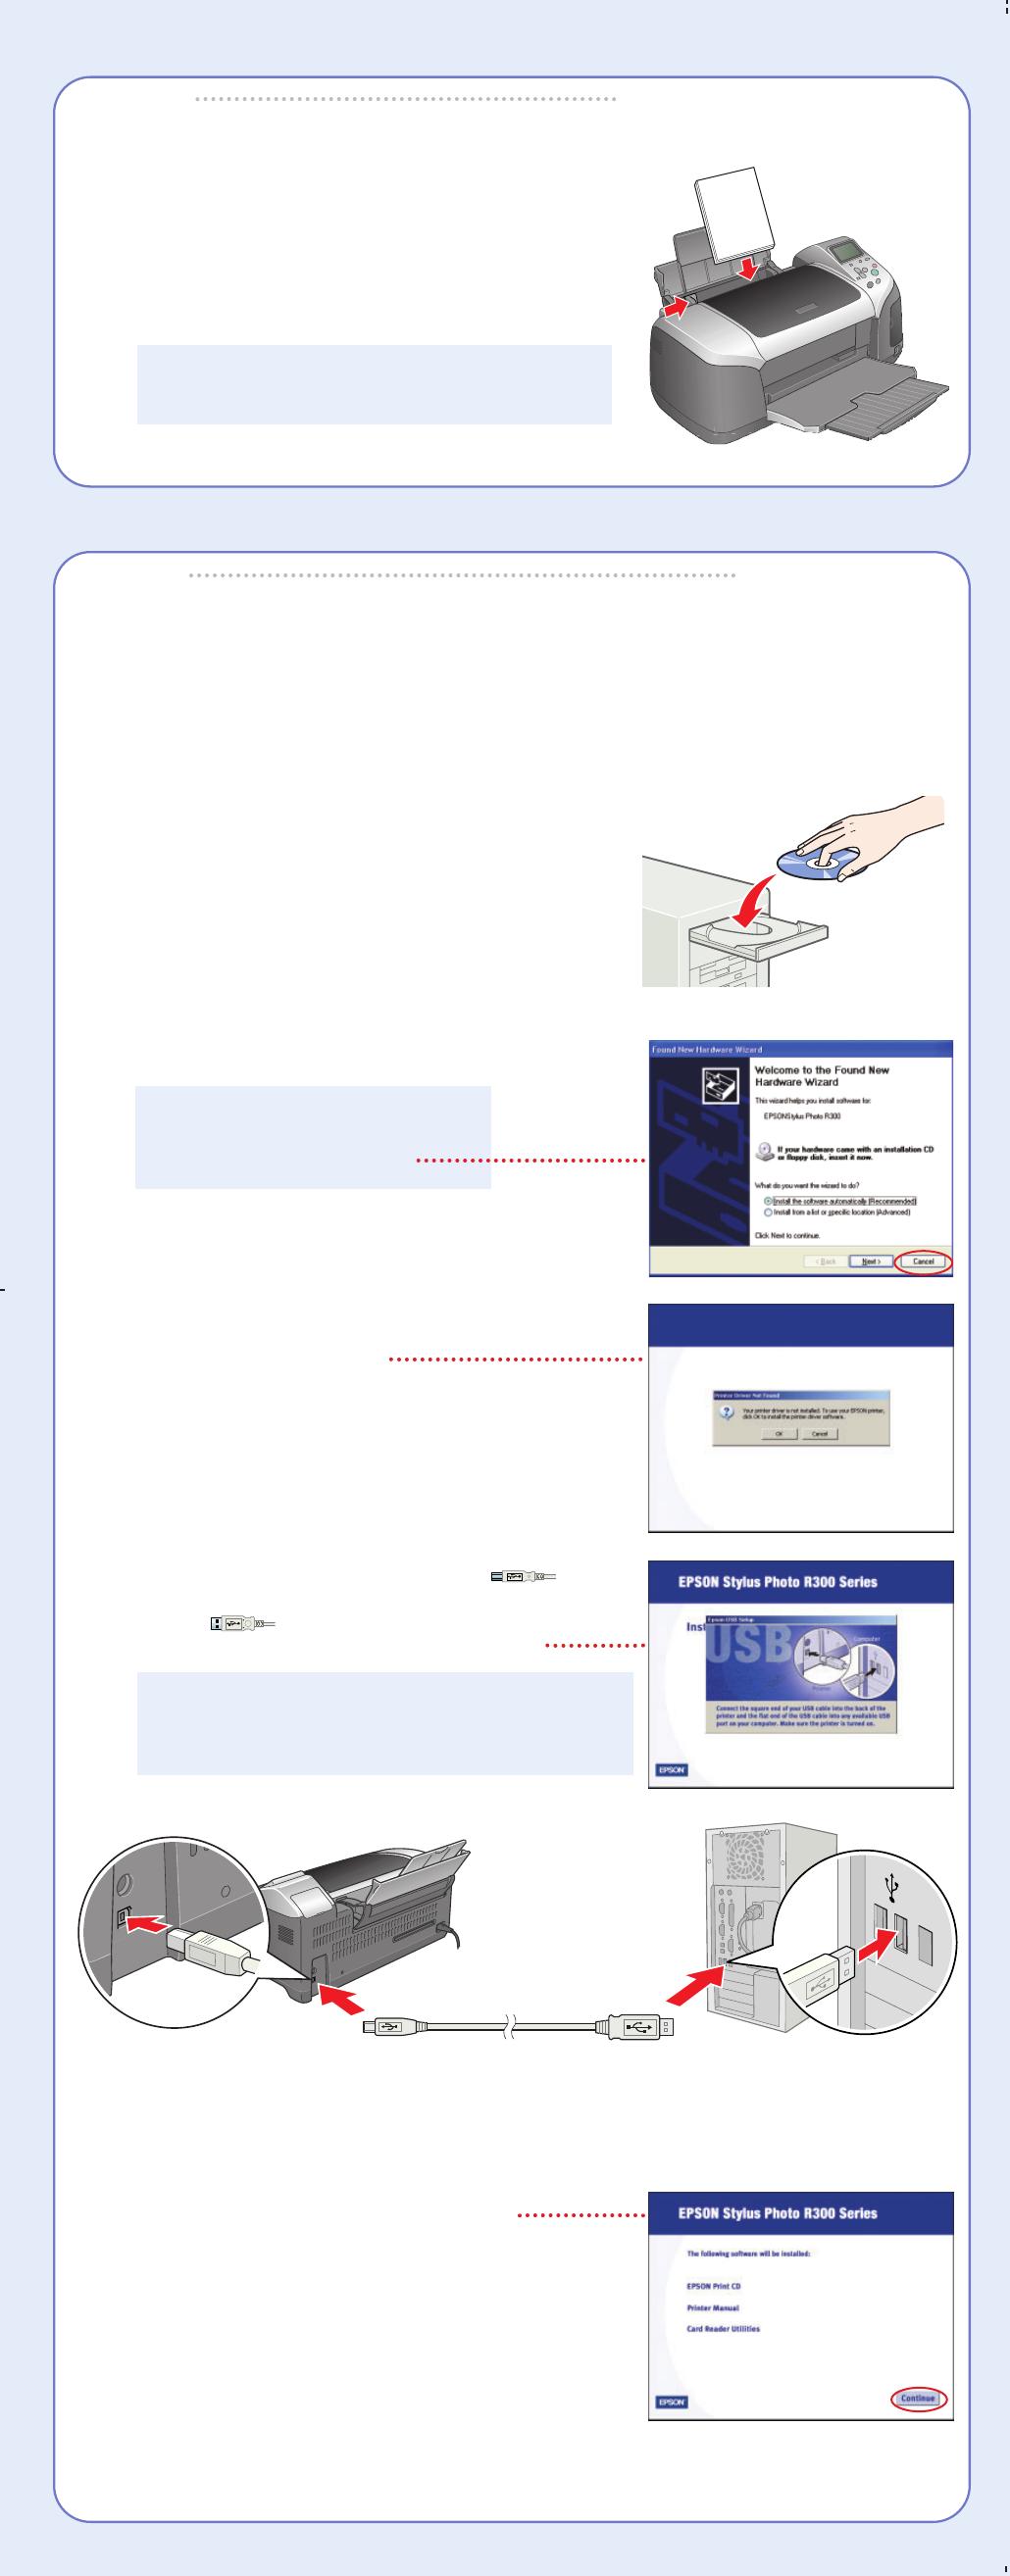
Windows
®
Make sure your printer is NOT connected to your computer, then follow the steps below.
1 Turn on your computer. Wait for the system
to start up, then insert the EPSON
®
CD-ROM
in your drive.
NOTE: If you see a screen like this,
click Cancel and disconnect the
printer from your computer.
2 Read the license agreement that appears
and click Agree.
3 You see a message like this:
Click OK to begin installing your printer driver.
4 When you see this screen, connect the
square end of your USB cable to the back of the printer
and the flat end of the USB cable to your
computer. (You can connect to any open port.)
NOTE: For Windows XP, if you don’t have USB 2.0,
you see a message. Click the Close button to close
the message.
Wait while Windows detects your hardware.
5 When you see this screen, click Continue.
6 Follow the on-screen instructions to
install your software.
Print
Print
Now you’re ready to print. For instructions, use these resources:
• Your User’s Guide
Learn about loading paper, printing, maintaining your printer,
solving problems, and contacting EPSON.
• Your Quick Reference card
See how easy it is to print without a computer.
• Your on-screen Reference Guide
Double-click the SPR300 Reference Guide icon on your desktop
to view more information about your printer.
EPSON and EPSON Stylus are registered trademarks of SEIKO EPSON CORPORATION.
EPSON Software is a trademark and EPSON PhotoCenter is a service mark of Epson America, Inc.
General Notice: Other product names are for identification purposes only and may be trademarks of their respective owners.
EPSON disclaims any and all rights in those marks.
© 2003 Epson America, Inc. 9/03
6
6
5
5
Square end
Flat end
Square end
Flat end
Printed in XXXXXX XX-XX.XX
Load Paper
Load Paper
4
4
1 Fan a few sheets of paper and load them against
the right side of the sheet feeder.
2 Slide the left edge guide against the paper.
NOTE: For instructions on loading and printing
on CDs or DVDs, see your User’s Guide.
continue
continue


