Epson Stylus CX8400 User guide

Category
Inkjet printers
Type
User guide
Epson Stylus CX8400 Series
Quick Guide
Basic Copying, Printing, and Scanning
Maintaining Your All-in-One
Solving Problems
®
cx7400_cx8400_qg.book Page 1 Friday, March 28, 2008 6:04 PM
2 Contents
Contents
Loading Paper . . . . . . . . . . . . . . . . . . . . . . . . . . . . . . . . . . . . . . . . . 5
Using Special Papers . . . . . . . . . . . . . . . . . . . . . . . . . . . . . . . . . . . . . . . . 7
Copying a Document or Photo . . . . . . . . . . . . . . . . . . . . . . . . . . 9
Placing the Original on the Glass . . . . . . . . . . . . . . . . . . . . . . . . . . . . . . . 9
Copying a Document . . . . . . . . . . . . . . . . . . . . . . . . . . . . . . . . . . . . . . 10
Copying a Photo . . . . . . . . . . . . . . . . . . . . . . . . . . . . . . . . . . . . . . . . . 11
Restoring Photos . . . . . . . . . . . . . . . . . . . . . . . . . . . . . . . . . . . . . . . . . 12
Printing From a Memory Card or Digital Camera . . . . . . . . . 14
Printing From a Memory Card . . . . . . . . . . . . . . . . . . . . . . . . . . . . . . . . 14
Printing From a Digital Camera . . . . . . . . . . . . . . . . . . . . . . . . . . . . . . . 21
Printing From Your Computer . . . . . . . . . . . . . . . . . . . . . . . . . . 23
Printing in Windows . . . . . . . . . . . . . . . . . . . . . . . . . . . . . . . . . . . . . . 23
Printing With a Macintosh . . . . . . . . . . . . . . . . . . . . . . . . . . . . . . . . . . 25
Selecting the Correct Paper Type . . . . . . . . . . . . . . . . . . . . . . . . . . . . . . 27
Scanning a Document or Photo . . . . . . . . . . . . . . . . . . . . . . . . 28
Basic Scanning . . . . . . . . . . . . . . . . . . . . . . . . . . . . . . . . . . . . . . . . . . . 28
Restoring and Correcting Photos . . . . . . . . . . . . . . . . . . . . . . . . . . . . . . 29
Maintaining Your All-in-One . . . . . . . . . . . . . . . . . . . . . . . . . . . 30
Checking the Print Head Nozzles . . . . . . . . . . . . . . . . . . . . . . . . . . . . . . 30
Cleaning the Print Head . . . . . . . . . . . . . . . . . . . . . . . . . . . . . . . . . . . . 31
Checking Ink Levels . . . . . . . . . . . . . . . . . . . . . . . . . . . . . . . . . . . . . . . 32
Purchasing Epson Ink Cartridges . . . . . . . . . . . . . . . . . . . . . . . . . . . . . . 32
Replacing Ink Cartridges . . . . . . . . . . . . . . . . . . . . . . . . . . . . . . . . . . . . 33
cx7400_cx8400_qg.book Page 2 Friday, March 28, 2008 6:04 PM
3
Solving Problems . . . . . . . . . . . . . . . . . . . . . . . . . . . . . . . . . . . . . 36
Checking for Software Updates . . . . . . . . . . . . . . . . . . . . . . . . . . . . . . . 36
Error Indicators . . . . . . . . . . . . . . . . . . . . . . . . . . . . . . . . . . . . . . . . . . 37
Problems and Solutions . . . . . . . . . . . . . . . . . . . . . . . . . . . . . . . . . . . . . 38
Where To Get Help . . . . . . . . . . . . . . . . . . . . . . . . . . . . . . . . . . . . . . . 39
Notices. . . . . . . . . . . . . . . . . . . . . . . . . . . . . . . . . . . . . . . . . . . . . . . 41
cx7400_cx8400_qg.book Page 3 Friday, March 28, 2008 6:04 PM
4
Introduction
After you have set up your Epson Stylus
®
CX8400 Series all-in-one as described
on the Start Here sheet, turn here to:
Load paper
Make a copy of a document or photo
Print from a memory card or digital camera
Get the basic steps for printing from your computer
Scan a document or photo and restore or correct the color
Perform routine maintenance
Solve simple problems
This book tells you how to do most of these things without ever turning on your
computer! Of course, your CX8400 Series can do a lot more when you connect it
to your Windows
®
or Macintosh
®
computer. For additional instructions, see the
on-screen User’s Guide by double-clicking the icon for it on your desktop.
Please follow these guidelines as you read your CX8400 Series instructions:
Warning:
Warnings must be followed carefully to avoid bodily injury.
Caution:
Cautions must be observed to avoid damage to your equipment.
Note:
Notes contain important information about your CX8400 Series.
Tip:
Tips contain hints for better copying, scanning, and printing.
cx7400_cx8400_qg.book Page 4 Friday, March 28, 2008 6:04 PM
Loading Paper 5
Loading Paper
You can print documents and photos on a variety of paper types and sizes. For
details, see page 7.
1. Open the paper support and flip up the extension. Then open the output tray
and pull out the extensions.
2. Flip the feeder guard up, then press in the tab on the edge guide and slide it
left.
cx7400_cx8400_qg.book Page 5 Friday, March 28, 2008 6:04 PM
6 Loading Paper
3. Insert the paper, glossy or printable side up, against the right side and beneath
the tab. (Load letterhead or pre-printed paper top edge first.)
You can load up to 120 sheets of plain paper, 80 sheets of matte, or 20 sheets
of photo paper. Load other special papers one sheet at a time.
Note:
The type of paper you choose affects the way your printout looks. If you are just
making a copy or printing a rough draft, plain paper is fine. However, for the best
results, you’ll want to use one of Epsons special ink jet papers designed for your
printer. For example, your photos will look great printed on Epson Premium Photo
Paper Glossy (see page 7 for more information).
4. Slide the edge guide against the paper, but not too tightly. Then flip the feeder
guard down.
Note:
For instructions on loading envelopes, see your on-screen User’s Guide.
Always load paper short
edge first, even for
landscape printing.
cx7400_cx8400_qg.book Page 6 Friday, March 28, 2008 6:04 PM
Using Special Papers 7
Using Special Papers
Epson
®
offers a wide array of high quality papers, making it easy to maximize the
impact of your photos, presentations, and creative projects.
You can purchase genuine Epson ink and paper at Epson Supplies Central
SM
at
www.epson.com/ink3 (U.S. sales) or www.epson.ca (Canadian sales). You can
also purchase supplies from an Epson authorized reseller. To find the nearest one,
call 800-GO-EPSON (800-463-7766).
Paper type Size
Part
number
Sheet
count
Epson Ultra Premium Photo Paper
Glossy
Borderless 4 × 6 inches S041934
S042181
S042174
50
60
100
Borderless 5 × 7 inches S041945 20
Letter (8.5 × 11 inches) S041935
S042182
S042175
20
25
50
Epson Premium Photo Paper
Glossy
Borderless 4 × 6 inches S041808
S041727
40
100
Borderless 5 × 7 inches S041464 20
Borderless 8 × 10 inches S041465 20
Letter (8.5 × 11 inches) S041286
S042183
S041667
20
25
50
Epson Premium Photo Paper
Semi-gloss
Borderless 4 × 6 inches S041982 40
Letter (8.5 × 11 inches) S041331 20
Epson Photo Paper Glossy Borderless 4 × 6 inches S041809
S042038
50
100
Letter (8.5 × 11 inches) S041141
S041649
S041271
20
50
100
Epson Bright White Paper Letter (8.5 × 11 inches) S041586 500
Epson Premium Presentation
Paper Matte
Borderless 8 × 10 inches S041467 50
Letter (8.5 × 11 inches) S041257
S042180
50
100
cx7400_cx8400_qg.book Page 7 Friday, March 28, 2008 6:04 PM
8 Loading Paper
Epson Premium Presentation
Paper Matte Double-sided
Letter (8.5 × 11 inches) S041568 50
Epson Presentation Paper Matte Letter (8.5 x 11 inches) S041062 100
Legal (8.5 x 14 inches) S041067 100
Epson Photo Quality Self-adhesive
Sheets
A4 (8.3 × 11.7 inches) S041106 10
Epson Iron-on Cool Peel Transfer
Paper
Letter (8.5 x 11 inches) S041153 10
Paper type Size
Part
number
Sheet
count
cx7400_cx8400_qg.book Page 8 Friday, March 28, 2008 6:04 PM
Copying a Document or Photo 9
Copying a Document or Photo
Follow the instructions in this section to position your originals correctly on the
glass and make color or black and white copies.
Placing the Original on the Glass
1. Open the document cover and place your original face-down on the glass,
with the top facing into the front right corner.
Move the photo or document slightly away from the edges.
2. Close the cover gently so you dont move the original.
cx7400_cx8400_qg.book Page 9 Friday, March 28, 2008 6:04 PM
10 Copying a Document or Photo
Copying a Document
You can copy documents onto letter- or A4-size plain paper or Epson special paper
just like you would on a copy machine.
1. Press the P
On button to turn on the CX8400 Series.
2. Load letter- or A4-size plain paper or Epson special paper in the sheet feeder
(see page 5).
3. Place your original document on the document table (see page 9).
4. Press the
Copy button to enter copy mode.
5. To print more than 1 copy, press
+ or to select the
number (up to 99).
6. Press l or r to select
Color or B&W copies.
7. Press d, then press r to change the layout.
Select
With Border to leave a small margin around
the image or select
Borderless to expand the
image all the way to the edge of the paper (slight
cropping may occur).
Note:
The layout setting must be set to With Border to
select Plain Paper.
8. To change any of the other print settings, press
Menu and select your settings (see page 13 for
details). When youre done, press
OK.
9. Press
x Start to begin copying.
To cancel copying, press
y Stop/Clear Settings.
cx7400_cx8400_qg.book Page 10 Friday, March 28, 2008 6:04 PM
Copying a Photo 11
Copying a Photo
You can copy photos onto 4 × 6-inch, 5 × 7-inch, letter-size, or A4-size Epson
photo paper (various types available) for instant photo reprints. You can also print
with or without borders and convert color photos to black and white.
1. Press the P
On button to turn on the CX8400 Series.
2. Load 4 × 6-inch, 5 × 7-inch, letter-, or A4-size Epson photo paper in the sheet
feeder (see page 5).
3. Place your original photo on the document table (see page 9).
4. Press the
Copy button.
5. To print more than 1 copy, press
+ or to select the number (up to 99).
6. Press l or r to select
Color or B&W copies.
7. Press d, then press r to change the layout.
Select
With Border to leave a small margin around the image or select
Borderless to expand the image all the way to the edge of the paper
(slight cropping may occur).
Note:
The layout setting must be set to With Border to select Plain Paper.
8. To change any other print settings, press Menu
and select your settings (see page 13 for details).
When youre done, press
OK.
9. Press x
Start to begin copying.
To cancel copying, press
y Stop/Clear Settings.
cx7400_cx8400_qg.book Page 11 Friday, March 28, 2008 6:04 PM
12 Copying a Document or Photo
Restoring Photos
You can restore old, faded 4 × 6-inch and 5 × 7-inch photos to their original
brilliance. You can also make copies or edits of single or multiple photos.
1. Press the P
On button to turn on the CX8400 Series.
2. Load 4 × 6-inch, 5 × 7-inch, A4- or letter-size Epson photo paper.
3. Place your original photo on the document table.
Note:
You can copy up to 2 photos at the same time. Place
them 0.2 inches (5 mm) apart.
4. Press the Restore button, and press OK.
5. To turn on
Color Restoration, press r and select
On and press OK. (If your photo is not faded, do
not turn on
Color Restoration.)
6. Press
OK again to prescan your photo. You see these
settings over a preview of your photo:
7. To print more than 1 copy, press
+ or to select the
number.
8. If you want to crop your photos and enlarge the
resulting image area to fit onto your paper, press
Display/Crop.
To resize the image area, press + or .
To move the image area, use the arrow buttons.
To check the zoomed image, press OK.
After you are done cropping your photo, press
OK.
9. To change print settings, press Menu and select
your settings (see page 13). When youre done,
press
OK.
10. Press x
Start to begin copying.
To cancel copying, press
y Stop/Clear Settings.
cx7400_cx8400_qg.book Page 12 Friday, March 28, 2008 6:04 PM
Restoring Photos 13
Copy and Restore Mode Print Settings
To adjust the copy size, select Zoom (reduction/enlargement) and choose
Actual (to select a percentage using + or ) or Auto Fit Page
(to automatically size the image to fit your paper).
To change the paper type, select Paper Type and choose the type of paper
you loaded.
To change the paper size, select Paper Size and choose the size you loaded.
Note:
Paper Size options depend on the Paper Type you choose.
To change the print quality, select Quality and choose Draft, Standard, or
Best.
Note:
For photos, the default setting for Quality is Standard.
To adjust the darkness or lightness of the print, select Density and choose a
higher (darker) or lower (lighter) setting.
To adjust the amount of image expansion when printing borderless photos,
select
Expansion and choose Standard, Min, or Mid.
Note:
You may see white borders on your printed photo if you use the Min setting.
Paper type Paper Type setting
Plain paper Plain Paper
Epson Bright White Paper
Epson Presentation Paper Matte
Epson Premium Presentation Paper Matte Matte
Epson Premium Photo Paper Glossy Prem. Glossy
Epson Premium Photo Paper Semi-gloss
Epson Ultra Premium Photo Paper Glossy Ultra Glossy
Epson Photo Paper Glossy Photo Paper
cx7400_cx8400_qg.book Page 13 Friday, March 28, 2008 6:04 PM
14 Printing From a Memory Card or Digital Camera
Printing From a Memory Card
or Digital Camera
The Epson Stylus CX8400 Series all-in-one lets you print photos from:
Your digital cameras memory card (see below)
Your camera itself (see page 21)
Printing From a Memory Card
The CX8400 Series lets you print color photos directly from your digital cameras
memory card; just insert it into one of the memory card slots and you’re ready to
print.
If your digital camera supports DPOF
(Digital Print Order Format), you can
pre-select the photos you want to print while the card is still in the camera.
Then, when you insert the card in the CX8400 Series, you can print them.
See these sections:
“Compatible Cards and Image Formats” on page 15
“Inserting the Card” on page 16
“Selecting Individual Photos for Printing” on page 17
“Selecting All Photos for Printing” on page 17
“Printing Photos From an Index Sheet” on page 18
“Printing Photos Pre-selected in Your Camera (DPOF)” on page 20
“Memory Card Mode Print Settings” on page 20
See the User’s Guide for instructions on copying memory card files between your
CX8400 Series and a computer; printing photos by date; and printing photos
from a slide show.
cx7400_cx8400_qg.book Page 14 Friday, March 28, 2008 6:04 PM
Printing From a Memory Card 15
Compatible Cards and Image Formats
You can use the following types of cards with your CX8400 Series:
The CX8400 Series supports image files that meet the following requirements:
* DCF is the “Design rule for Camera File system” standard
Note:
You can print only in color when printing directly from a memory card; you cannot print
in black and white.
Media format DCF version 1.0 or 2.0 compliant*
File format JPEG
Supports Exif version 2.21
Image size 80 × 80 pixels to 9200 × 9200 pixels
Number of files Up to 999
Right slot
* Adapter required
Slot Type of card
Right slot CompactFlash
®
Type I and II
Microdrive™
Left slot SD™
SDHC™
miniSD™*
miniSDHC*
microSD*
microSDHC*
MultiMediaCard™
Memory Stick™
Memory Stick Duo™*
Memory Stick PRO™
Memory Stick PRO Duo™*
Memory Stick Micro*
MagicGate™ Memory Stick
MagicGate Memory Stick Duo™*
xD-Picture Card™
xD-Picture Card Type H
xD-Picture Card Type M
Left slot
cx7400_cx8400_qg.book Page 15 Friday, March 28, 2008 6:04 PM
16 Printing From a Memory Card or Digital Camera
Inserting the Card
1. Make sure the CX8400 Series is turned on.
Note:
When you print directly from a memory card, it is best if the CX8400 Series is not
connected to your computer or the computer is turned off. If you see a message on
your computer screen when you insert a card, cancel the operation and close the
screen.
2. Insert your card into the correct slot as shown:
The memory card access light flashes and stays lit. Now you can:
View your photos on the LCD display screen and print them (page 17)
Print an index sheet so you can select which photos to print (see page 18)
When you want to remove the card, make sure the memory card access light is not
flashing, then pull the card straight out of its slot.
Caution:
Do not remove the card or turn off the CX8400 Series while the memory card access
light is flashing; you may lose data on the card.
Memory card
access light
Insert just one card at a time (it won’t go in all the way)
Left slot
Right slot
cx7400_cx8400_qg.book Page 16 Friday, March 28, 2008 6:04 PM
Printing From a Memory Card 17
Selecting Individual Photos for Printing
You can select individual photos for printing as you view them on the LCD
display screen.
1. Press the
Memory Card button. You see this screen:
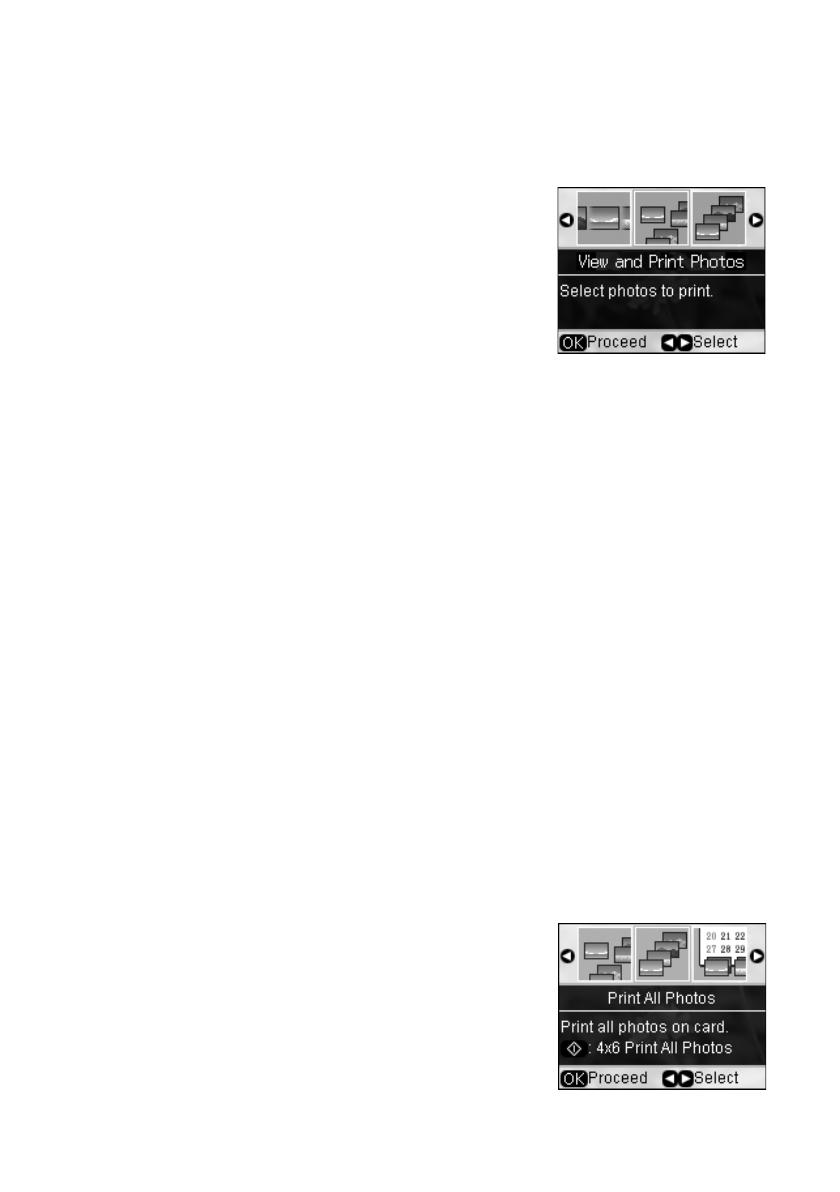
2. Press
OK to select View and Print Photos.
3. Press l or r to move through your photos and
display one that you want to print.
4. Press the
+ or button to select the number of
copies you want of that photo.
5. If you want to crop your photo and enlarge the resulting image area to fit onto
your paper, press
Display/Crop.
To resize the image area, press + or .
To move the image area, use the arrow buttons.
To check the zoomed image, press OK.
To rotate the image area, press Menu.
After you finish cropping your photo, press
OK.
6. Repeat steps 3 through 5 to select more photos, if you want.
7. To change any of the print settings displayed on the screen, press
Menu and
select your settings (see page 20). When youre done, press
OK.
8. When youre ready to print, press x
Start. To cancel printing,
press y
Stop/Clear Settings.
Selecting All Photos for Printing
You can quickly select to print all of the photos on your memory card.
1. Press l or r to select
Print All Photos, then press
OK.
2. To print one copy of all the photos on 4 × 6-inch
Epson photo paper (various types available), press
x
Start and go to step 5.
To select multiple copies with different print
settings, press
OK and continue with step 3.
cx7400_cx8400_qg.book Page 17 Friday, March 28, 2008 6:04 PM
18 Printing From a Memory Card or Digital Camera
3. To print more than 1 copy, press + or to select the
number.
4. To change any of the other print settings, press
Menu (see page 20). When youre done, press OK.
5. When youre ready to print, press x
Start.
To cancel printing, press y
Stop/Clear Settings.
Printing Photos From an Index Sheet
You can print an index sheet containing small versions of all the photos on your
memory card. Then you can select the photos you want by marking them on the
sheet and scanning the sheet. The CX8400 Series automatically prints them.
Note:
When you print directly from a memory card, it is best if the CX8400 Series is not
connected to your computer or the computer is off. If you see a message on your
computer screen when you insert a card, cancel the operation and close the screen.
Printing an Index Sheet
1. Load several sheets of plain letter- or A4-size paper (see page 5).
2. Insert a memory card in a memory card slot
(see page 16).
3. Press the
Memory Card button to enter memory
card mode.
4. Press l or r to select
Print Index Sheet.
5. Press
OK, then select the index sheet options you
want and press
OK again.
To select the photos to include in the index
sheet, choose
Select, then select All Photos or
Latest 30 (beginning with the last photo by
file name).
To print the date or file name of each photo on
the index sheet, select
Information and choose
Date or File Name.
cx7400_cx8400_qg.book Page 18 Friday, March 28, 2008 6:04 PM
Printing From a Memory Card 19
6. Press x
Start to print the index sheet. The most recent photos are printed on
the first index sheet. (If you need to cancel printing, press y
Stop/Clear
Settings
.)
Now you can select the photos you want to print (see the next section).
Printing Photos From The Index Sheet
Once you have printed an index sheet (see page 18), you can mark the photos you
want to print right on the sheet, scan the sheet, and print the photos
automatically.
1. Use a dark pen or pencil to fill in the
circles on the sheet.
Select the paper type and size
you loaded.
Select Borderless or With
Border
layout.
If you want to print the date the photo was taken on each photo, fill in
the
Print date on photos circle.
Fill in one circle beneath each photo you want to print. The numbers
indicate how many copies you want of that photo. If you want to print
one copy of all the photos on the index sheet, fill in the
All circle at the
top.
2. Open the document cover. Then place the index sheet face-down on the glass,
in the lower right corner so that the top of the sheet is aligned against the right
edge of the glass. Close the document cover.
Incorrect:
Correct:
cx7400_cx8400_qg.book Page 19 Friday, March 28, 2008 6:04 PM
20 Printing From a Memory Card or Digital Camera
3. Load the type of paper on which you want to print your photos, either plain
or photo paper.
4. Make sure your memory card is still inserted and the LCD display screen
shows
Print Photos from Index Sheet highlighted.
5. Press
OK, then press x Start to start scanning and printing. Wait until
printing finishes before printing from any additional index sheets.
If you need to cancel printing, press the y
Stop/Clear Settings button.
Printing Photos Pre-selected in Your Camera
(DPOF)
If your camera supports DPOF (Digital Print Order Format), you can select the
photos you want to print while your memory card is still in your camera. Then
you can insert the card in the CX8400 Series and quickly print them.
Note:
See your camera manual for instructions on selecting photos with DPOF.
1. Insert a memory card containing photos selected with DPOF in a memory
card slot (see page 16).
2. Press
OK.
3. To change any of the print settings displayed on
the screen, press
Menu and select your settings
(see page 20). When youre done, press
OK.
4. Press x
Start to print your photos.
Note:
If you need to cancel printing, press
y Stop/Clear Settings.
Memory Card Mode Print Settings
To change the paper type, select Paper Type and choose the type of paper
you loaded (see page 13).
To change the paper size, select Paper Size and choose the size of paper you
loaded.
Note:
Paper Size options depend on the Paper Type you choose.
cx7400_cx8400_qg.book Page 20 Friday, March 28, 2008 6:04 PM
1 / 1

Epson Stylus CX8400 User guide

Category
Inkjet printers
Type
User guide

Ask a question and I''ll find the answer in the document

Finding information in a document is now easier with AI

Ask the document