American Range ARR-244 User manual

Category
Cookers
Type
User manual
USE AND CARE MANUAL FOR
GAS RANGES
MODEL NUMBERS: ARR-244, ARR-304, ARR-636, ARR-436GD, ARR-GR, ARR-486GD, ARR-486GR,
ARR-484GDGR, ARR-4842GD, ARR-484X2GR, ARR-6062GD, ARR-606X2GR, ARR-606GDGR
PROFESSIONAL QUALITY COOKING EQUIPMENT
R70000 030811
13592 Desmond St., Pacoima, CA 91331 818.897.0808 888.753.9898 tel www.americanrange.com
RETAIN THIS MANUAL FOR FUTURE REFERENCE
Table of Contents
IMPORTANT FOR YOUR SAFETY ................................ 3
BEFORE YOU USE YOUR RANGE ............................... 4
PARTS LIST .................................................................... 4
SHIPPING DAMAGE CLAIM PROCEDURE .................. 5
INSTALLATION INSTRUCTIONS .................................. 5
CABINET PREPARATION .............................................. 5
GENERAL INSTRUCTIONS ........................................... 6
INSTALLING THE ANTI-TIP DEVICE ............................ 7
ELECTRICAL CONNECTION ......................................... 8
GAS CONNECTION ........................................................ 8
PRESSURE REGULATOR ............................................. 8
GAS REQUIREMENTS ................................................... 9
FLEXIBLE COUPLINGS, CONNECTORS, CASTERS .. 9
SAFETY INSTRUCTIONS ............................................. 10
CAUTIONS .................................................................... 10
OPERATING INSTRUCTIONS FOR THE COOK TOP 12
TO START: LIGHTING THE BURNERS ...................... 12
COOKWARE: ................................................................ 13
USING THE GRILL ....................................................... 14
USING THE GRIDDLE .................................................. 15
USING THE OVEN(S) ................................................... 16
TO USE THE BROILER: ............................................... 21
KEEP YOUR RANGE CLEAN: ..................................... 22
INSTALLATION DIAGRAMS….………………APPENDIX
Before beginning, please read all instructions carefully.
Not doing so may void the warranty.
Please observe all local and national codes and
ordinances.
Do not remove any permanent warning labels or plates
from this product.
Please ensure that this product is properly grounded.
Consumers should retain these instructions for local
inspectors and for future use.
WARNING: If the information in this manual is not
followed exactly, a fire or explosion may result causing
damage, personal injury or death
INSTALLATION AND SERVICE MUST BE
PERFORMED BY A QUALIFIED INSTALLER, SERVICE
AGENCY OR THE GAS SUPPLIER
Do not store or use gasoline or other flammable vapors
and liquids in the vicinity of this or any other appliance
WHAT TO DO IF YOU SMELL GAS
o Do not try to light any appliance.
o Do not touch any electrical switch; do not use any
phone in your building.
o Immediately call your gas company. Follow the gas
supplier instructions.
o If you cannot reach your gas supplier, call the fire
department.
Anti-tip device must be installed prior to operating the
respective range
4
IMPORTANT FOR YOUR SAFETY
This manual has been prepared for personnel qualified to install gas
equipment, who should perform the initial field start-up and adjustments
of the equipment covered by this manual.
BEFORE YOU USE YOUR RANGE
Remove all wrapping and packing materials
Remove any tape or protective plastic
Remove and save this manual for future reference
Check and make sure you have all the necessary parts listed below
PARTS LIST
Parts to this range include:
Grill
Grates
Stainless Steel radiant
Sealed Cook Top Burners
4 or 6 burner head assemblies
4 or 6 burner caps and grates
Parts to this range oven(s) include;
36 inch, 30 inch & 24 inch Oven 18 Inch Oven
2 fixed rack guides 2 fixed rack guides
2 oven racks 2 oven racks
Anti –Tip Device Kit
This kit includes;
Anti-tip device Installation instructions
(2) Anchor cords
(2) Butterfly anchors
(4) screws
5
SHIPPING DAMAGE CLAIM PROCEDURE
The equipment is inspected and crafted carefully by skilled personnel before
leaving the factory.
The transportation company assumes full responsibility for safe delivery of this
equipment after it leaves our factory.
What to do if shipment arrives damaged:
Visible loss or damage: Make note on the freight bill or express delivery
and have it signed by the delivery person. File a claim for damages
immediately regardless of the extent of the damages.
Concealed loss or damage: If damage is noticed after unpacking, notify
the transportation company immediately and file a “Concealed Damage”
claim with the transportation company. This should be done within fifteen
(15) days of the delivery to you.
Retain container for inspection.
INSTALLATION INSTRUCTIONS
Cooking appliances must be connected only to the type of gas identified on
the rating plate
1. Make a written record of the information on the rating plate located
underneath the heat deflector at the front of the oven. (28” from the floor).
2. Open the oven door to access and read the rating plate.
3. This plate contains the model and serial number of this unit.
4. Write the information on the front cover of this manual for easy reference
should the need to communicate with this company ever occur.
5. The rating plate also contains BTU/hr output of the burners, operating gas
pressure in inches W.C.P and identifies the orifice for natural or L.P. gas
use.
6. Pilot lighting instructions (ovens only) are also located in the same area.
7. Installation of this range should be performed by qualified, certified and
licensed persons.
8. Service should be performed by persons who are familiar with American
Range equipment.
CABINET PREPARATION:
This range is a free standing unit.
The range can be placed in various positions with respect to the cabinet
front, with the front either flush or projecting, depending on the countertop
width.
6
The range is zero-clearance safe against non-combustible surfaces.
The maximum depth of overhead cabinets installed on either side of the
hood is 13”.
Any openings in the wall behind the range and in the floor under the range
must be sealed.
When there is less than 12” clearance between combustible material and
the back edge of the range above the cooking surface, a backguard must
be installed.
When clearance to combustible material is over 12” no backguard is
necessary
Back guards must be ordered separately. To order, measure the space
that the back guard must have and order accordingly.
CAUTION: Ranges equipped with casters on two (2) or more legs are for
installation on 1/3 inch thick commercial grade vinyl composition floor
finishing materials or the equivalent.
GENERAL INSTRUCTIONS:
1. Always keep the range area clear and free from combustible materials,
gasoline and other flammable vapors and liquids.
2. Do not use the venting area at the back of the cooktop as a storage area
or shelf as items will be subjected to high temperatures and could be
damaged.
3. For proper operation of the range do not obstruct the flow of air and
ventilation needed for the proper combustion in the range.
4. For proper ventilation, American Range suggests installing the range
under an exhausting, ventilating hood with the proper filters and drip
troughs (Consult local building codes for construction information).
5. Proper clearance must be provided in front of the range for ease of use
and servicing.
7
6. The complete installation must comply with local codes or in the absence
of local codes, with National Fuel Gas code ANSI Z223.1/NFPA54, or The
National Propane Gas Installation Code CSA B149.1 as applicable.
VENTILATION REQUIREMENTS AND RECOMMENDATIONS
Ventilation unit Standard Counter Island Installation
Hood Size 24” Deep x Unit Width 30” Deep x unit width
Blower Size 48” Range
800-1200 CFM
800-1200 CFM
36” Range
600-800 CFM
600-1200 CFM
30” Range
500 CFM
500CFM
When installing a range with a grill, select a blower on the high end of the
recommendation.
Hood blower speeds should be variable to reduce noise and loss of
heated or air conditioned air.
The elimination of smoke and cooking vapors is best when the hood is
installed 30” to 36” above the range cooktop.
Wood covered hoods should be installed 36” above the range cooktop.
o For Sauté / Step-Up models, clearance to combustible surfaces
above the range top is 32”
Consult a professional heating and ventilating contractor for local code
information on single and double wall ducting requirements.
INSTALLING THE ANTI-TIP DEVICE
FOLLOW ENCLOSED SEPARATE INSTRUCTIONS
1. All ranges must have an anti-tip device correctly installed as instructed
by the manufacturer
2. If you pull the range out from the wall for any reason, make sure that
the anti-tip device is properly engaged when you push the range back
against the wall.
3. There is the possible risk of the range tipping over and causing injury if
the open oven door is leaned on when the anti-tip device is not
engaged. Never lean, stand or sit on an open oven door.
When Installation is complete, check to be sure that the range installation is
correct by checking the anti-tip device. Grasp the back of the range and carefully
attempt to tilt the range forward.
8
ELECTRICAL CONNECTION
The Range must be electrically grounded in compliance with local
codes or, in the absence of local codes, with the National Electrical
Code, ANSI/NFPA70.
This range requires a 120 volt supply to operate the ignition system.
The supply cord provided on the range is equipped with a 3 prong
(grounding) plug for protection against shock.
The electrical service in the building must be equipped with properly
grounded 3 prong receptacle.
Do not cut or remove grounding prong from this plug.
POWER REQUIREMENTS FOR THIS RANGE
120 VAC, 60Hz, single phase
ARR-24,-30:10 AMP. Max.
ARR-36, 10 AMP Max.
ARR-48, 10 AMP. Max.
ARR-60, 10AMP. Max.
Always disconnect electric supply cord from the wall outlet before
servicing.
CAUTION: Do not attempt to operate the range in the event of a
power failure.
GAS CONNECTION
Use at least a ½“commercial flex hose to connect range to the gas supply
(service line).
A manual gas shut off valve must be installed, in easy access in front of
the gas supply (service line) and ahead of the range for safety and ease
of future service.
All valves must be in the off position before connecting to the gas supply
line.
PRESSURE REGULATOR
1. The regulator installed in the range is adjusted at the factory for 5” WC
(natural gas) or 10” WC (L.P.) depending on the customer’s request.
Regulators must not be removed.
2. The regulator can withstand a maximum pressure of ½ PSI (14” WC). If
the line pressure is beyond this limit, a step down regulator will be
required. The inlet pressure shall be at least 7” WC for natural gas and
11” WC for L.P. gas.
3. Any adjustment to regulators must be made ONLY BY QUALIFIED service
personnel with proper test equipment.
9
GAS REQUIREMENTS
Verify the type of gas being supplied to the unit Natural gas or LP
(propane)
This Unit can be converted from Natural gas to Propane (check with
American Range or authorized dealer for the correct conversion kit)
Natural gas connection is 1/2” P.T. minimum 5/8” diameter flex line.
Pressure to measure 7” to 10” W.C.
Propane gas connection is 1/2” N.P.T. Minimum 5/8 diameter flex line
Pressure to measure 11” to 14” W.C.
A regulator is required at the LP (Propane) source to limit a maximum of
14” W.C. pressure to work with the regulator provided with the LP range.
Check that all gas connections are properly sealed with a suitable joint
compound
Test all joints with a soapy water solution before lighting the burners
FLEXIBLE COUPLINGS, CONNECTORS AND CASTERS
Ranges installed with flexible couplings and or quick-disconnect fittings
must be heavy duty, CSA/UL design certified commercial flexible
connector of at least ½ NPT 9 with suitable strain relief’s.
The flexible connector must comply with the standard for Connectors for
Movable Gas Appliances, ANSIZ21.69-CSA 6.16 and any Quick-
Disconnect Devices for use with Gas Fuel should comply with ANSIZ21.41
CSA 6.9.
All connections must be sealed with joint compound suitable for LP gas
and all connections must be tested with a soapy water solution before
lighting pilot lights.
When disconnection of the restraint is necessary, make sure to reconnect
restraint after the range has been returned to its originally installed
position.
Caution! What to do if you smell gas.
Do not light any appliance
Do not touch any electrical switch
Do not use the telephone
Immediately call your gas supplier from your neighbor’s telephone
Follow the gas supplier’s instructions
If you cannot reach your gas supplier; call the fire department
WARNING: The range and its individual shut-off valve must be
disconnected from the gas supply piping system during any pressure testing of
the supply piping. The range must be isolated from the gas supply.
10
SAFETY INSTRUCTIONS
1. Do not use aluminum foil or oven liners to line the oven bottom or sides
of the oven. Excess heat accumulates under the foil and could cause
damage to the finish.
2. Never cover any slots or holes inside the oven.
3. Covering the vents or openings inside the oven will result in poor
baking performance.
4. The range must have adequate ventilation and fresh air so that the by
products of incomplete combustion such as formaldehyde and
benzene can be eliminated if a gas leak should occur.
5. This range must be installed by a qualified technician or licensed
plumber who has read and is familiar with the instructions in this
manual.
6. Do not store or use corrosive chemicals, vapors, flammables, or non
food products in or near this appliance.
7. This appliance was designed to heat and cook food. Other uses such
as heating a corrosive chemical or material will damage the range and
could result in personal injury.
8. Never use the oven to heat a room because of possible carbon
monoxide emissions and soot.
9. Overheating the oven for long periods of time could cause damage to
the range materials. Do not use the oven as storage. Store broil pan
outside of the oven for safety.
10. Use a 2 piece broil pan when broiling to prevent grease fires in the
oven.
11. If a fire occurs in the oven, turn off the oven and don’t open the door.
Have a CLASS ABC fire extinguisher close by and know how to use it. After
calling the fire department, you can use a fire extinguisher and fight the fire
with your back to the exit while you move backwards towards the exit.
CAUTIONS
1. To prevent burns, always use a dry pot holder for moving a hot pan or
skillet.
2. Do not touch a hot burner.
3. Do not move a flaming pan from the cook top burner
This Range has been designed to be safe and reliable for household use
only and is not approved for outdoor use. Read the manual and
instructions for use and follow basic safety precautions carefully.
Contact an authorized repair technician if this range is not working
properly. Do not use the range if it has been damaged.
11
4. A small fire on top of the range or grill flare up can be smothered with a
metal pan lid or cookie sheet or with baking soda; never use water.
5. For top of the range fires in a pan or skillet, smother flames with a tight
fitting lid, cookie sheet or metal tray. Be careful to not burn yourself. If
the flames do not go out immediately, evacuate the premises and call
the fire department.
6. Never use water to put out a grease fire; never use a wet rag or towel
to smother a fire.
7. Do not wear clothes with loose fitting sleeves around an open flame.
8. Cooking with high heat should always be attended; do not leave the
range unattended. Food can boil over and hot grease in a pan can
ignite.
9. Caution should be used with small children around the range
while cooking. Treats and toys should not be stored around or in
the range. This could attract children to climb on or around the
range to reach the item. Children should not climb, stand or sit on
open oven doors or on any part of the range.
12
OPERATING INSTRUCTIONS FOR THE COOK TOP
Welcome to an exciting cooking adventure with your new American Range. You
can enjoy the experience of cooking on a true restaurant quality range with all of
its advantages in your own kitchen.
BEFORE YOU USE YOUR NEW COOKTOP
Before using the cook top for the first time, wash the outside area with
soap and water to remove any residue from the factory finish.
Your new professional range is equipped with burners that are similar to
those used in restaurants. The large grates are designed in sections and
are easy to remove and clean. The grates are made of cast iron with a
porcelain coating. The burner grates will remain hot after the burner is
turned off and create a residual heat for continued cooking. Use caution
when handling.
The burner heads are large and designed to spread the heat out from the
perimeter of the head to ensure an even heat distribution for better
cooking. The burner head should always be in place during any cooking
and the range should not be operated without the burner heads.
The burners have an electronic spark ignition that eliminates the need for
a continuously burning pilot light. If the flame should go out from a boil-
over or a strong draft when the burner is on, the burner will automatically
reignite.
TO START: LIGHTING THE BURNERS
Select a burner and the matching knob.
Push knob in and turn knob counterclockwise (left) to the MAX position
until there is a clicking sound and the burner ignites.
Each burner or knob has a corresponding blue indicator light that remains
lit when the burner is on.
There are infinite flame settings between MAX, the highest setting, and
SIMMER, the lowest setting.
If the flame appears uneven or ignition does not occur; check to make sure
the burner head is seated on the groves in the burner base.
1. The burner head must click into the receiving grooves on the burner
base.
2. To turn off the burner, turn the knob clockwise to the off position or
until the knob stops turning.
3. The flame height should be only high enough to touch the bottom of
the pan. The heat should be directed into the pan from the bottom
only.
13
4. Do not cook with a high flame that curls up the sides of the pan. A
high flame that curls up the sides of the pan could melt or burn the
pan handles.
5. High flames curling up the sides of a pan are a waste of energy and
dangerous to the cook.
COOKWARE:
1. Use a low or medium flame if using glass - ceramic utensils.
2. Cast iron skillets conduct heat slowly but when hot are very efficient
and food can burn easily if the flame is too high. A low to medium
flame is suggested for cast iron skillets.
3. Any sturdy pan can be used on this range, but good quality
professional pans are recommended.
4. A pan should have a flat bottom and be the size that best matches
the size of the burner. The flames should touch only the bottom of
the pan.
5. Use caution when using pans with plastic or composite handles,
because high heat can burn or bubble the material.
Always reduce flame height to the minimum height necessary for food to cook.
An excessively high flame can cause food to scorch and stick to the bottom of
the pan.
To heat a large pot of water, use a high flame setting to bring contents to a rapid
boil and then lower the flame to maintain the proper boil.
A high rolling boil evaporates water and other foods quickly. Use our chart as a
guideline.
The following temperature settings are meant to be only a guideline for cooking.
You may need to vary the information to accommodate your own choices when
cooking.
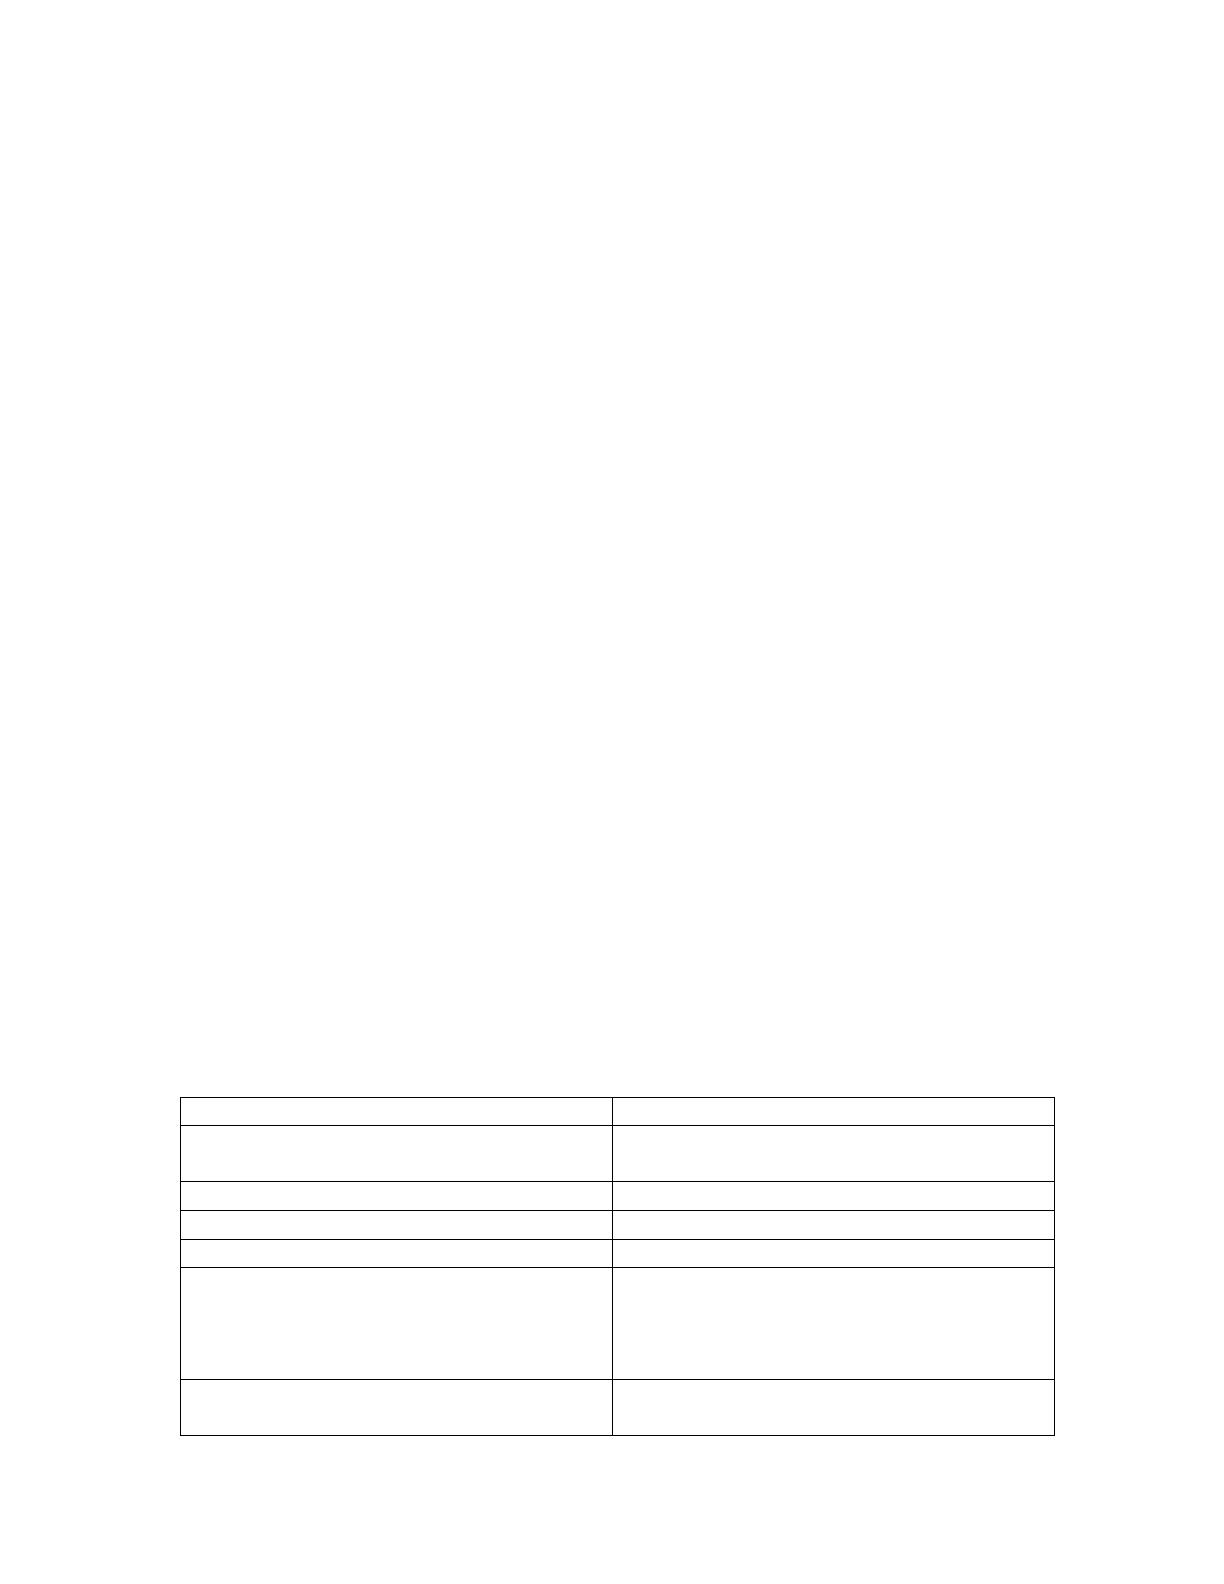
Suggested Burner Settings:
Heat Settings Use
Simmer Melting small quantities of butter
simmer grains, rice, oatmeal
Low Poaching eggs, fish, poultry
Low – Medium Fry eggs, heat milk, cream sauces
Medium Puddings and custards, gravies
Medium High Sauté vegetables, braise meats, soups
and stews, deep fat frying, boiling
Water/pasta, blanching, vegetables,
searing meats
High Large quantity of water to boil, large
quantity frying and cooking
14
USING THE GRILL
Before starting to cook, check that stainless steel radiant, grease collector
and grill grates are in place.
This gas grill may cook slightly faster, so adjust preheat and grilling times
to allow for less cooking time than expected.
Push in the control knob and turn to High. Rotate the knob counter-clock
wise. You will hear a puffing sound as the burner ignites and a blue light
will indicate that the burner is lit.
Turn on the exhaust fan above your range.
Preheat the grill for 2 to 5 minutes. The longer preheat time ensures
darker grill marks on the food.
Turn knob to medium high or low before adding any food.
Fatty foods or any excess fat used to marinate can cause minor flare-ups
or puffs of flame. A small amount of flare up is normal.
If the flare up is high, turn off the burner and remove the food until the flare
up subsides. Cover the grill with an American Range grill cover, cookie sheet,
or metal tray to put out the flame and return food to the grill.
For The Best Cooking Results on Your Grill
1. The intense radiant heat from the grill vaporizes protein juices and
flavors your respect protein.
2. Add any barbeque sauces during the last few minutes of cooking. Long
enough to caramelize the sauce.
3. For best results turn food with tongs or a flat spatula to avoid piercing
meat or poultry.
4. Turn meat once when juices rise to the surface. Turning meat more
than once results in the loss of meat juices.
5. Before cooking steaks or chops, trim most of the outside fat to prevent
excessive flare ups. Slash into the edges of steaks or chops to keep
meat flat on the grill.
6. Fish should be cooked at the lowest: setting 8 to 10 minutes for every
inch of thickness, measured at the thickest end of the fish.
15
Grill Chart
FOOD ITEM
HEAT SETTING TIME
Hamburgers
1/2” to 3/4"
Medium 8 to 10 min.
Steaks 1” to
1 1/2”
Rare 140° Medium-High 10--20min
Steaks 1” to
1 1/2”
Medium 160° Medium-High 12--25 min
Pork chops
3/4” to 1“
Medium 15-25 min.
Lamb chops High 12 -15 min
Poultry
pieces
170° Low-med. 25-35 min
Fish 1” thick Medium 8 to10 min
Allow grill to cool completely before cleaning. Remove the grates, grease
collector and stainless steel radiant and place them in hot soapy water. Clean the
grill with hot soapy water and a soft grill brush. Do not apply any water or
cleaner directly on the infrared burner.
USING THE GRIDDLE
The built-in griddle is made of polished steel to provide a smooth cooking
surface.
1. The griddle is held in place by one rear screw and two front screws.
The screws are positioned to keep the griddle from shifting in transit.
2. The griddle plate is not designed to be removed during normal use.
3. A griddle drip pan is included.
SEASON THE GRIDDLE
1. The griddle has a factory applied coating that must be washed off
before using for the first time.(See Cleaning the Griddle)
2. Pour 1 tablespoon of vegetable oil (not corn or olive) and rub on the
entire surface of the griddle using a rough towel.
3. Push the griddle control knob in and turn to a medium setting (350°F)
4. Heat until griddle begins to smoke. Turn off griddle and allow it to cool.
5. Repeat the process one more time.
CLEANING THE GRIDDLE:
1. The griddle is not to be removed for cleaning.
2. First, clean griddle after using by scraping with a flat spatula to remove
food particles.
3. Clean the griddle thoroughly with hot soapy water and a rough towel.
4. Rinse with a mixture of 1 quart water and 1 cup white vinegar.
16
5. To clean further, pour 1 teaspoon vegetable oil in the center of the
griddle and rub the entire surface with a clean rough towel or scrub
with a nylon scrubbing pad. Wipe with a damp paper towel.
6. Clean the griddle drip pan and trough after each use with hot soapy
water and a sponge.
7. It is normal for the griddle to darken with age and use.
To Start Cooking:
1. Push knob in and turn the knob clockwise to the MAX position.
2. Preheat griddle for 2 to 3 minutes and turn knob to a medium to low
cook setting.
3. The blue indicator light comes on and stays on until the desired setting
is reached and then turns off and on with the heating cycle.
4. For best results, add a small amount of fat to cook food properly, such
as butter, oil, or a cooking spray. Fatty meats like bacon and sausage
do not need extra fat.
The following temperature settings are meant to be used only as a guide. You
may need to vary the settings when making your own choices.
Griddle cooking chart
FOOD TEMPERATURE KNOB SET
Eggs 225°F to 250°F LOW
Bacon, Ham, Hot dogs 300°F to 325°F MED LOW
Sausage, Grilled Cheese
Sandwiches
325°F to 350°F MED
Pancakes, French Toast 350°F to 375°F MED
Hash Brown Potatoes,
Grilled Onions
400°F to 425°F MED HIGH
USING THE OVEN(S)
The oven bake and broil burners have an infrared glow igniter and safety system
that lights the gas. There is a 4 second delay for the gas to ignite after the knob
is pushed in and set.
Before baking or broiling:
Independently, turn the oven and broiler burners on for 2-hours and 20-minutes
respectively. This will burn off the manufacturing oils used by the factory.
Turn the selector knob to Bake and set the thermostat knob to 450°F. Run
the oven for 2-hours.
Allow the oven to cool for 10-minutes.
Upon completely the oven cycle, turn the selector knob to Broil. Turn the
thermostat knob to broil and allow the broiler to run for 20-minutes.
There may be an odor during these respective functions
17
All oven models have three cooking methods available:
INNOVECTION
® -CONVECTION
Traditional Bake
Broil
Fan – Cool Down (utilized to cool your oven temperature rapidly)
WHAT IS THE CONVECTION COOKING PROCESS?
Convection is the process of cooking with heat being mechanically
circulated with a fan in a continuous pattern around the food
Cooking results can be faster than cooking charts suggest and food
should be checked for doneness 5 - 15 minutes prior to suggested
cooking time.
Oven temperatures should be set lower than suggested cooking
recommendation. In most cases by 25°F.
Multiple racks of food can be cooked at the same time with even browning
and cooking.
Other Features:
This oven can also be used at low temperatures to dehydrate food, warm
plates or for very slow cooking at a low heat.
Utilize the oven’s ‘Fan’ mode and turn on the oven lights to defrost frozen
foods.
The thermostat on every oven is factory checked for
accuracy.
AMERICAN RANGE PROFESSIONAL RESIDENTIAL INNOVECTION-
CONVECTION
INNOVECTION® -CONVECTION is the unique convection system created
by American Range engineers.
INNOVECTION
® -CONVECTION uses two fans at the back of the oven to
circulate hot air more evenly around the oven. Air is also vented into the
oven through side vents to create a more uniform and fast cooking
process. Circulating hot air reaches all areas of the oven and eliminates
any hot or cold spots.
The 30“oven is 30,000 BTU/hr, and the broil-only element is 15,500
BTU/hr.
The 18” oven is 22,000 BTU/hr and the broil-only element is 13,000
OVEN FEATURES:
Your new Professional Range is equipped with a separate bake and a
separate infrared broil burner.
The ovens have two electric glow igniters that light the gas in each oven.
18
Each oven has its own temperature control knob that cycles the burners
off and on to maintain the proper heat.
All models have 6 rack positions and the large 30 “oven includes 2 racks.
The 18” oven on some models has 6 rack positions and 2 racks.
When cooking with INNOVECTION® -CONVECTION, any rack is suitable.
HOW TO COOK WITH INNOVECTION-CONVECTION:
1. INNOVECTION
® -CONVECTION fan-circulated hot air browns all food
surfaces quickly.
2. The circulating hot air seals in the juices in meats and vegetables.
3. This cooking process eliminates the need to baste with additional fat or
juices.
4. Meat and poultry are roasted in an uncovered shallow pan that allows the
circulating hot air to quickly brown all food surfaces.
5. This roasting process enhances flavors and keeps the inside of food moist
and juicy.
6. Some recipes or meats adapted to INNOVECTION® -CONVECTION will
cook faster than the expected time in a recipe or chart and should be
checked about 5 to 10 minutes early.
7. For best results when cooking with INNOVECTION® -CONVECTION we
recommend that low sided pans be used.
8. Circulating hot air needs to reach all sides of the food for the best cooking
results.
9. It is suggested that the oven temperature be lowered 25° for all recipes
and to reduce the cooking time by 10 to 15%.
10. Multiple racks of food can be successfully cooked at one time such as
three racks of cookies or breads.
11. A meal of meat and vegetables, cooked on different racks, all at the same
time saves time and conserves energy.
12. For best results always preheat the oven before INNOVECTION® -
CONVECTION baking.
13. There is always a condensation that occurs during cooking and water
could appear on the cooler panel outside of the oven.
14. Caution should be used when opening the oven door during the cooking
TO BEGIN COOKING
1. Adjust the racks for the best cooking position before turning on the oven.
2. Insert rack with the back safety rail in the up position towards the rear of
the oven. Lift and slide the rack into the desired position.
3. Push in and turn the Oven Selector Knob to the, bake, convection or broil
position. This will activate the electrical ignition and the gas flow.
4. Turn the temperature setting knob clockwise to the correct oven
temperature.
19
5. The blue indicator light on the oven panel glows indicating the burner is on
and cycles off when the oven is at the correct temperature.
Turn the oven temperature knob and the selector switch
knobs to the off position when finished cooking; be sure
the two knobs are completely in the off position
TO COOK WITH TRADITIONAL BAKE:
Traditional Bake is the standard way to bake and is best when one rack of
food is cooked at a time.
Any food item can be baked in the traditional manner but some foods can
only be baked in the traditional way for the best results.
Traditional baking is best for foods that need to be covered and or cooked
for a long time, such as casseroles, and slow cooked roasts in liquid.
Traditional bake is best for custard pies such as pumpkin, quiches, or nut
pies such as pecan.
Traditional baking is also best for recipes that call for very high
temperatures, such as meringue toppings.
For best results use a single rack for traditional baking. Large ovens
can accommodate a full professional sheet pan.
Before turning on the oven, position the oven racks to the best baking
position for the food being cooked.
Most single rack baking of cakes, pies and cookies will be in the center of
the oven or rack two or three starting to number from the bottom rack
position which is one.
Most roasting will be at rack position one or two depending on the size
and quantity of food being roasted.
A cake will usually be baked on rack three or in the center rack position of
the oven.
20
Baking Chart
Food Traditional
temp
Traditional
time
Innovection
convection
temp
Innovection
Convection
time
Yeast bread 375°F 30-35 min. 350°F 25-35 min.
Quick Bread 375°F 30-35 min. 350°F 20-25 min.
Muffins 375°F 15-20 min. 350°F 12-15 min.
Angel Food
Cake
375°F 35-45 min. 350°F 30-35 min.
Bundt Cake 350°F 45-50 min. 325°F 35-40 min.
Sheet layer
9x13
350°F 40-50 min. 325°F 30-35 min.
Cake ,layer
round 8”or 9”
350°F 30-35 min. 325°F 25-30 min.
Cookie/choc
chip
375°F 10-12 min. 350°F 8-10 min.
Pie shell 425°F 10-12 min. 400°F 7-9 min.
2 crust fruit
pie
375°F 55-60 min. 350°F 50-55 min.
Custard 350°F 35-40 min Not
recommended
Baked potato 375°F 60-75 min. 350°F 50-55 min.
Lasagna 375°F 55-60 min. 350°F 45-50 min.
Soufflé 350°F 45-50 min. 325°F 35-45 min.
Quiche 400°F 25-30 min Not
recommended
  • Page 1 1
  • Page 2 2
  • Page 3 3
  • Page 4 4
  • Page 5 5
  • Page 6 6
  • Page 7 7
  • Page 8 8
  • Page 9 9
  • Page 10 10
  • Page 11 11
  • Page 12 12
  • Page 13 13
  • Page 14 14
  • Page 15 15
  • Page 16 16
  • Page 17 17
  • Page 18 18
  • Page 19 19
  • Page 20 20
  • Page 21 21
  • Page 22 22
  • Page 23 23
  • Page 24 24
  • Page 25 25
  • Page 26 26
  • Page 27 27

American Range ARR-244 User manual

Category
Cookers
Type
User manual

Ask a question and I''ll find the answer in the document

Finding information in a document is now easier with AI