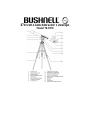
Bushnell Voyager - 789470 User manual
- Category
- Telescopes
- Type
- User manual
This manual is also suitable for

470 x 60 Zoom Refractor Telescope
Model 78-9470

STANDARD EQUIPMENT
• Refractor Telescope Assembly
• Exclusive Metal Easy Track® Mount
• Variable Height-Aluminum Tripod
• Exclusive Penta Mirror Assembly
• Revolutionary ZOOM Eyepiece, 8mm, and 15mm
focal length - Eyepieces.
• Red Dot Finderscope
• Accessory Tray
• 2.5x Barlow
• Hardware Packet—(3) Tripod Bolts with Wing Nuts,
(3) Short Accessory Tray Bolts with Wing Nuts, (3)
Tripod Leg Lock Screws
TELESCOPE ASSEMBLY
1. Remove all components from the carton and identify all components. It is a good idea to lay
all the parts out in front of you before assembly. READ THROUGH ASSEMBLY INSTRUCTION
BEFORE YOU ASSEMBLE YOUR TELESCOPE. The only tool required in setting up your
telescope is a slotted or Phillips blade screwdriver. Since your telescope is a precision
optical system the parts require careful handling--particularly the telescope, eyepieces, and
various accessory lenses.
2. Set-Up Tripod
• Select one tripod leg. Loosen Tripod Leg Lock Screw (9) and extend the Tripod Leg Middle Section
(6). For a moment, do not extend the leg fully...a shorter leg is less awkward to work with during
set-up. Tighten the Tripod Leg lock Screw so that the Middle Section is securely in place. Repeat
for the remaining two legs.
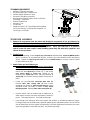
3. Attach Telescope and Finderscope
• Note: Before assembling tripod legs to Easy Track® Mount,
make sure the Accessory Tray Braces (7) face inward.
Loosen long bolts at the top of Tripod Leg (5). Position the
mount over the Tripod Leg as shown (fig. 2). and secure
Easy Track® Mount to Tripod Leg. Repeat on the
remaining two Tripod Legs. Once you have attached all
Tripod Legs to the mount, securely tighten all wing nuts in
place.
• Locate the pre-assembled Telescope Main Tube (2).
Remove Main Tube Locking Nuts (3) from screws
extending from bottom of Telescope Main Tube (2). Insert
extended screws into holes in cradle of Easy Track®
Mounting System. Refasten Main Tube Locking Nuts (3).
• Remove plastic insert on bottom side of finderscope to
allow battery to make connection with battery contact for
power. Turn power switch on. See finderscope page.
• Look through main telescope tube at low power and establish a well-defined stationary target.
Looking through red dot finderscope, alternate tightening each adjustment wheel (at rear and left
side of finderscope) until the red dot of finderscope is precisely aligned and centered on the same
object being viewed in main telescope tube. See finderscope page.
Fig. 1
Fig. 2

4. Attach Accessory Tray
Locate the Accessory Tray (8). Using the accessory tray bolts, wingnuts and washers connect the
Accessory Tray to the Accessory Tray Braces (7). Start with one tripod leg and attach wingnuts.
Wingnuts should be positioned beneath the accessory tray. Do not tighten wingnuts until all
Accessory Tray Braces are attached as some adjustments may be required.
5. Attach Eyepiece Accessories
Attach accessories as suggested in Intended Use Diagram. For example insert penta mirror
assembly into focusing tube, then insert desired eyepiece into penta mirror assembly.
6. Remove Lens Cover from 60mm Objective Lens
Your Bushnell Voyager Telescope is now ready to be used. To obtain the fullest
enjoyment from your telescope, please refer to the additional information below.
HOW TO USE YOUR NEW TELESCOPE
Using the Penta Mirror Assembly:
1. A Basic Description: Bushnell is proud to present the
Exclusive Penta Mirror Technology. This Penta Mirror
Assembly provides the benefit of a convenient 90 degree
viewing angle commonly associated with diagonal
mirrors. However, the Penta Mirror provides something
that diagonal mirrors cannot provide--right to left correct
views of the any object viewed through the telescope.
Unlike traditional diagonal mirrors that provide backward
images of objects seen on land and in the night sky, the
Penta Mirror allows correct images to be viewed. The
groundbreaking benefit of this technology is that when
viewing and locating objects through the telescope, when
you want to move to the left, you move it to the left
intuitively instead of fumbling around the sky becoming
increasingly frustrated that you can’t move the telescope
the way your intuition tells you that you need to move it.
Objects on land at great distances can be seen naturally (and readable) as if you were many times
closer to the object. Objects in the sky appear as they appear in most star charts. For the first time
ever, you will be able to see what you would expect resulting in excellent viewing satisfaction. In
addition, the penta mirror has a special insert that is easily removed by backing out the eyepiece set
screw and removing the insert to yield a 1.25” optical format receiver.
2. How-To-Use: Just like any
traditional diagonal mirror, place the
eyepieces directly into the rear of the
Penta Mirror Assembly then place the
Penta Mirror directly into the back of
the telescope focusing tube, erecting
lens or Barlow lens (See Intended
Configuration Diagram).
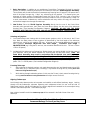
Using the ZOOM Eyepiece Assembly:
Fully Correct Image
Reversed Image
Upside-Down Image
Upside-Down & Reversed Image
Insert
Penta Mirror
Zoom Eyepiece
Power Change Ring

1. Basic Description: In addition to our revolutionary Penta Mirror Technology, Bushnell is proud to
present yet another pioneering feature with this telescope--Bushnell’s ZOOM Eyepiece Assembly.
This assembly will provide the benefit of instantaneously zooming from 50 power to 150 power with a
twist of the power change ring. Little if any refocusing will be required. This feature gives your
telescope an infinite number of magnification levels from 50x to 150x. Not only is this a convenient
new feature to the astronomical community but it also provides an erect (or “right-side-up”) image. As
a result, astronomers, birdwatchers, nature enthusiasts and many others can enjoy the convenient
and intuitive images seen through this telescope.
2. How-To-Use: Place the ZOOM Eyepiece Assembly directly into the rear of the Penta Mirror
Assembly with grooved insert, then place the Penta Mirror directly into the back of the telescope
focusing tube. (See Intended Configuration Diagram). CAUTION: DO NOT USE THE ZOOM
EYEPIECE WITH THE ERECTING LENS OR BARLOW IN ANY POSSIBLE CONFIGURATION
Selecting an Eyepiece:
1. You should always start viewing with the lowest power eyepiece, which in this case is the 15 mm
lens. Note: the base power of each eyepiece is determined by the focal length of the telescope
objective lens, which for this model is 750 mm. A formula can be used to determine the power of
each eyepiece: telescope OBJECTIVE lens focal length EYEPIECE focal length =
MAGNIFICATION (e.g. Using the 15 mm lens, the calculation would look like this: 750 mm ÷ 15mm
= 50x or 50 power.)
2. Included with this telescope is a Barlow lens. Barlow lenses are used to double or triple the power of
your telescope. Place your Barlow between the focusing tube and the penta mirror. Note: The
Penta Mirror Assembly when used in conjunction with the Barlow Lens and Eyepiece as
shown in the Intended Configuration Diagram will yield an effective doubling power of the
magnification already acheived with the Barlow and Eyepiece configuration alone. The
magnification calculation would look like this: 750 mm ÷ 20mm = 38 power. 38 power x 3=114
power. 38 x 3 x 2=228 power. (See Intended Configuration Diagram).
Focusing Telescope:
1. After selecting the desired eyepiece, aim main telescope tube at a land-based target at least 200
yards away (e.g. A telephone pole or building). Fully extend focusing tube by turning Rack and
Pinion Focusing Mechanism (13).
2. While looking through selected eyepiece (in this case the 20 mm), slowly retract focusing tube by
turning Rack and Pinion Focusing Mechanism until object comes into focus.
Aligning Finderscope:
Look through main telescope tube at low power and establish a well-defined stationary target. Looking
through red dot finderscope, alternate tightening each adjustment wheel (at rear and left side of
finderscope) until the red dot of finderscope is precisely aligned and centered on the same object being
viewed in main telescope tube. See finderscope page.
Now, objects located first with the Finderscope (16) will be centered in the field of view of the main
telescope.
Never Look Directly At The Sun With Your Telescope
Permanent Damage To Your Eyes May Occur

Please find below an image depicting how to attach the red dot finderscope and an image
depicting a fully-attached unit.
How-To-Attach: Place Finderscope Cylindrical Groove over Cylindrical Finderscope Mount Post
until it clicks into place.
Aligning and Using Red Dot Finderscope
Remove plastic insert on bottom side of finderscope to allow battery to make connection with
battery contact for power. Turn power switch on.
Look through main telescope tube at low power and establish a well-defined stationary target.
Looking through red dot finderscope, alternate tightening each adjustment wheel (at rear and
left side of finderscope) until the red dot of finderscope is precisely aligned and centered on the
same object being viewed in main telescope tube.
Plastic Insert
Adjustment
Wheels

Enjoying Your New Telescope
1. First determine your targeted object. Any bright object in the night sky is a good starting point. One
of the favorites in astronomy is the moon. This is an object sure to please any budding astronomer or
experienced veteran. When you have developed proficiency at this level, other objects become good
targets. Saturn, Mars, Jupiter, and Venus are good second steps to take.
2. The first thing you need to do after assembling the telescope as planned is center the desired object
in the finderscope's cross hairs. Provided you did a reasonable job aligning the finderscope, a quick
look through the main telescope tube at low power should reveal the same image. With the lowest
power eyepiece (the one with the largest number printed on it) you should be able to focus the same
image that you saw through the finderscope. Avoid the temptation to move directly to the highest
power. The low power eyepiece will give you a wider field of view, and brighter image--thus making it
very easy to find your target object. At this point with a focused image in both scopes, you've passed
the first obstacle. If you don't see an image after attempting to focus it in, you might consider aligning
your finderscope again. Once you pass this step, you'll enjoy the time spent ensuring a good
alignment. Every object you center in the finderscope will be easily found in the main telescope tube,
which is important for continuing your exploration of the night sky.
3. The low power eyepieces are perfect for viewing the full moon, planets, star clusters, nebulae, and
even constellations. These should build your foundation. However, for more detail, try bumping up in
magnification to higher power eyepieces on some of these objects. During calm and crisp nights, the
light/dark separation line on the moon (called the "Terminator") is marvelous at high power. You can
see mountains, ridges and craters jump out at you due to the highlights. Similarly, you can move up
to higher magnifications on the planets and nebulae. Star clusters and stars are best viewed through
the low power no matter what.
4. The recurring astronomical theater we call the night sky is an ever-changing billboard. In other
words, not the same movie plays all the time. Rather, the positions of the stars change not only
hourly as they seem to rise and set, but also throughout the year. As the earth orbits the sun our
perspective on the stars changes on a yearly cycle about that orbit. The reason the sky seems to
move daily just as the sun and the moon "move" across our sky, is that the earth is rotating about its
axis. As a result you may notice that after a few minutes or a few seconds depending on what power
you are viewing at, the objects in your telescope will move. At higher magnifications especially, you
will notice that the moon or Jupiter will "race" right out of the field of view. To compensate, just move
the fine adjustment controls on your telescope to "track" it in the necessary path.
Helpful Hints
1. Your telescope is a very sensitive instrument. For best results and fewer vibrations set your
telescope up on a level location on the ground rather than your concrete driveway or your wooden
deck. This will provide a more stable foundation for viewing, especially if you've drawn a crowd with
your new telescope.
2. If possible view from a location that has relatively few lights. This will allow you to see much fainter
objects. You'd be surprised how much more you'll see from your local lake or park when compared to
a backyard in the city.
3. Using your telescope out a window is NEVER recommended.
4. View objects that are high in the sky if possible. Waiting until the object rises well above the horizon
will provide a brighter and crisper image. Objects on the horizon are viewed through several layers of
earth's atmosphere. Ever wonder why the moon appears orange as it sets on the horizon. It's
because you are looking through a considerable more amount of atmosphere than you would directly
overhead. (Note: If objects high in the sky are distorted or wavy, you are probably viewing on a very
humid night.) During nights of unstable atmosphere, viewing through a telescope can be frustrating if
not impossible. Astronomers refer to crisp, clear nights as nights of "good seeing."

Where do I start?
Your Bushnell telescope can bring the wonders of the universe to your eye. While this manual is
intended to assist you in the set-up and basic use of this instrument, it does not cover everything you
might like to know about astronomy. The first thing you need to do is get a very simple star chart and a
flashlight with a red bulb or red cellophane over the end. For objects other than stars and constellations,
a basic guide to astronomy is a must. Some recommended sources appear on our website at
www.bushnell.com. Also on our website will be current events in the sky for suggested viewing. But,
some of the standbys that you can see are:
The Moon--a wonderful view of our lunar neighbor can be enjoyed with any magnification. Try viewing at
different phases of the moon. Lunar highlands, lunar Maria (lowlands called "seas" for their dark
coloration), craters, ridges and mountains will astound you.
Saturn--even at the lowest power you should be able to see Saturn's rings and moons. This is one of the
most satisfying objects in the sky to see simply because it looks like it does in pictures. Imagine seeing
what you've seen in textbooks or NASA images from your backyard!
Jupiter--the largest planet in our solar system is spectacular. Most noted features are its dark stripes or
bands both above and below its equator. These are the north and south equatorial belts. Also interesting
are Jupiter's four major moons. Pay close attention to their positions from night to night. They appear to
be lined up on either side of Jupiter.
Mars--The Great Red Planet appears as a reddish-orange disk. Look at different times of the year and try
to catch a glimpse of the white polar ice caps.
Venus--just like the moon, Venus changed phases from month to month. Some views of brilliant Venus
appear as if you were looking at a distant crescent moon.
Nebulae--The Great Orion Nebula is a very well known night sky object. This and many others are
brought to you by this telescope.
Star Clusters--View millions of stars densely packed in a cluster that resembles a ball.
Galaxies--One of the greatest and most interesting galaxies is our neighbor the Andromeda Galaxy.
Enjoy this and many others.
Much, much, more!
For further questions or additional information please contact:
Bushnell Sports Optics Worldwide
9200 Cody
Overland Park, KS 66214
www.bushnell.com

ANSWERS TO COMMONLY ASKED QUESTIONS
1. The image I see in the telescope is upside
down?
• An upside-down image is a common
characteristic of most astronomical telescopes.
However, as described above, the ZOOM
Eyepiece will provide erect images allowing
objects that you see to be right-side-up.
2. How do I determine the power my telescope? • The power of your telescope can be
determined by dividing the focal length of the
objective lens by the focal length of the
eyepiece. The eyepiece focal length is the
number printed on the eyepiece. (For
example: 1000 ÷ 25 = 40X)
3. Where do I find the Telescope Focal Length • The telescope focal length is the same focal
length as the objective focal length. For this
telescope it is 750mm. Telescope focal lengths
range from 600mm to 910mm on Bushnell
telescopes.
4. What can I see with my telescope? • Telescopes with power ranging from 25X to
50X can be used to view Star Clusters and
Nebulae. 90X to 120X telescopes can view
galaxies. Most planets can be seen at 150X
and higher.
5. What do the numbers on the eyepiece
mean?
• The numbers on the eyepiece represents the
“focal Length” of the eyepiece.
TROUBLESHOOTING GUIDE
If after you have set-up your new telescope you are unable to see any objects, use this Quick
Reference guide to help you to understand the cause of the problem and quickly determine a remedy
1. I’ve completed the set-up yet I cannot see
anything
• Check to see if objective lens cover has been
removed.
• Try to view an object that is 200 or more yards
away.
• If there is more than one eyepiece included
with the telescope, use the lowest power
(highest number) eyepiece to begin viewing.
• Use the Rack & Pinion Focusing Mechanism (3)
to bring the object you are trying to view into
focus

Intended Configuration Diagram
-
 1
1
-
 2
2
-
 3
3
-
 4
4
-
 5
5
-
 6
6
-
 7
7
-
 8
8
-
 9
9


Bushnell Voyager - 789470 User manual
- Category
- Telescopes
- Type
- User manual
- This manual is also suitable for
Ask a question and I''ll find the answer in the document
Finding information in a document is now easier with AI
Related papers
-
Bushnell 78-9440 User manual
-
-
-
-
-
-
-
Bushnell Voyager - 789675 User manual
-
-
Other documents
-
Winners Only BTB1009 Assembly Instructions
-
Celestron PowerSeeker Sq. 60 Quick Setup
-
 Bausch & Lomb 78-0045 User manual
-
Rio MINM Datasheet
-
Sharper Image Smartphone Astronomical Telescope Owner's manual
-
-
Celestron Scope 90 User manual
-
Celestron XLT Series User manual
-
Celestron Astro Master 90az User manual
-
