Name Explanation
1
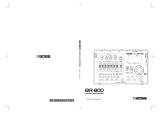
DC IN jack
Accepts connection of an AC Adaptor (PSA series; sold separately). By using an AC
Adaptor, you can play without being concerned about how much battery power
you have left.
* We recommend that you keep batteries installed in the unit even though you’ll
be powering it with the AC adaptor. That way, you’ll be able to continue a
performance even if the cord of the AC adaptor gets accidentally disconnected
from the unit.
* Use only the specied AC adaptor (PSA-series).
* If the AC adaptor is connected while power is on, the power supply is drawn
from the AC adaptor.
2
CHECK indicator
Combination indicator that shows the eect’s on/o status, tempo (in Tempo
mode), and Battery Check function. The indicator is lit when the eect is on,
thereby allowing you to check whether the eect is on or o.
The indicator lights when an eect is ON.
* If the indicator dims when the eect is on or when the tempo is being displayed,
it means that the battery is running out of reserve; when this occurs, replace
with fresh batteries.
& “Changing the Battery”
3
OUTPUT jack Connect an amplier to this jack.
4
INPUT jack
This jack accepts input signals coming from a guitar, some other musical
instrument, or another eects unit.
* The INPUT jack also functions as a power switch. When a plug is inserted into
the INPUT jack, the power will be turned on. When the plug is pulled out, the
power will be turned o. When you are not using the unit, pull the plug out of
the INPUT jack.
Before using this unit, carefully read the sections entitled: “USING THE UNIT SAFELY” and “IMPORTANT NOTES” (supplied on a separate sheet).
After reading, keep the document(s) where it will be available for immediate reference.
Panel Descriptions
Owner’s Manual
Name Explanation
5
EXP/CTL jack
Accepts connection of an expression pedal (EV-30, Roland EV-5; sold separately)
or momentary- type foot switch (FS-5U; sold separately). Use the EV-30 or EV-5 to
change the RATE continuously. Setting tempos is easy with the FS-5U.
& “Using the EXP/CTL Jack”
* Use only the specied expression pedal (EV-30, FV-500H, FV-500L, and Roland
EV-5; sold separately). By connecting any other expression pedals, you risk
causing malfunction and/or damage to the unit.
6
Pedal Switch
Used for switching eects on/o, and for inputting the tempo.
When the eect is on, be sure to start any changes with the lter at the lowest
setting.
& “Setting the Tempo with the PH-3’s Pedal Switch”
7
Thumbscrew
When this screw is loosened, the pedal will open, allowing you to change the
battery.
& “Changing the Battery”
8
[RATE] knob
Adjusts the speed at which the lter changes.
When set to MIN, the lter remains o.
9
[DEPTH] knob
Adjusts the depth of the lter change.
The lter eect stops when this is set to MIN with the STAGE switch set to anything
besides FALL or RISE.
10
[RES] knob
Adjusts the strength of the lter eect. The eect sound becomes stronger the
further the knob is turned clockwise.
* Raising the RES setting (turning it clockwise) makes it easier for the sound
to become distorted. If it appears that the sound is becoming distorted, try
lowering the RES setting.
11
[STAGE] switch
Selects the number of phase steps and the phase type. The higher the number, the
more depth the phaser eect has.
4 4-stage phaser; a light, vintage phaser eect with a classic feel.
8 8-stage phaser that gives a balanced phaser sound.
10 10-stage phaser providing a deep phaser eect.
12
12-stage phaser, with two sixstage phasers connected in series for a
powerful phaser eect.
FALL Phase eect featuring a continuously falling sensation.
RISE Phase eect that imparts a continuously rising sensation.
STEP
Phase eect whereby lter modications occur in a non-consecutive
manner. This can provide some really unique, illusional eects.
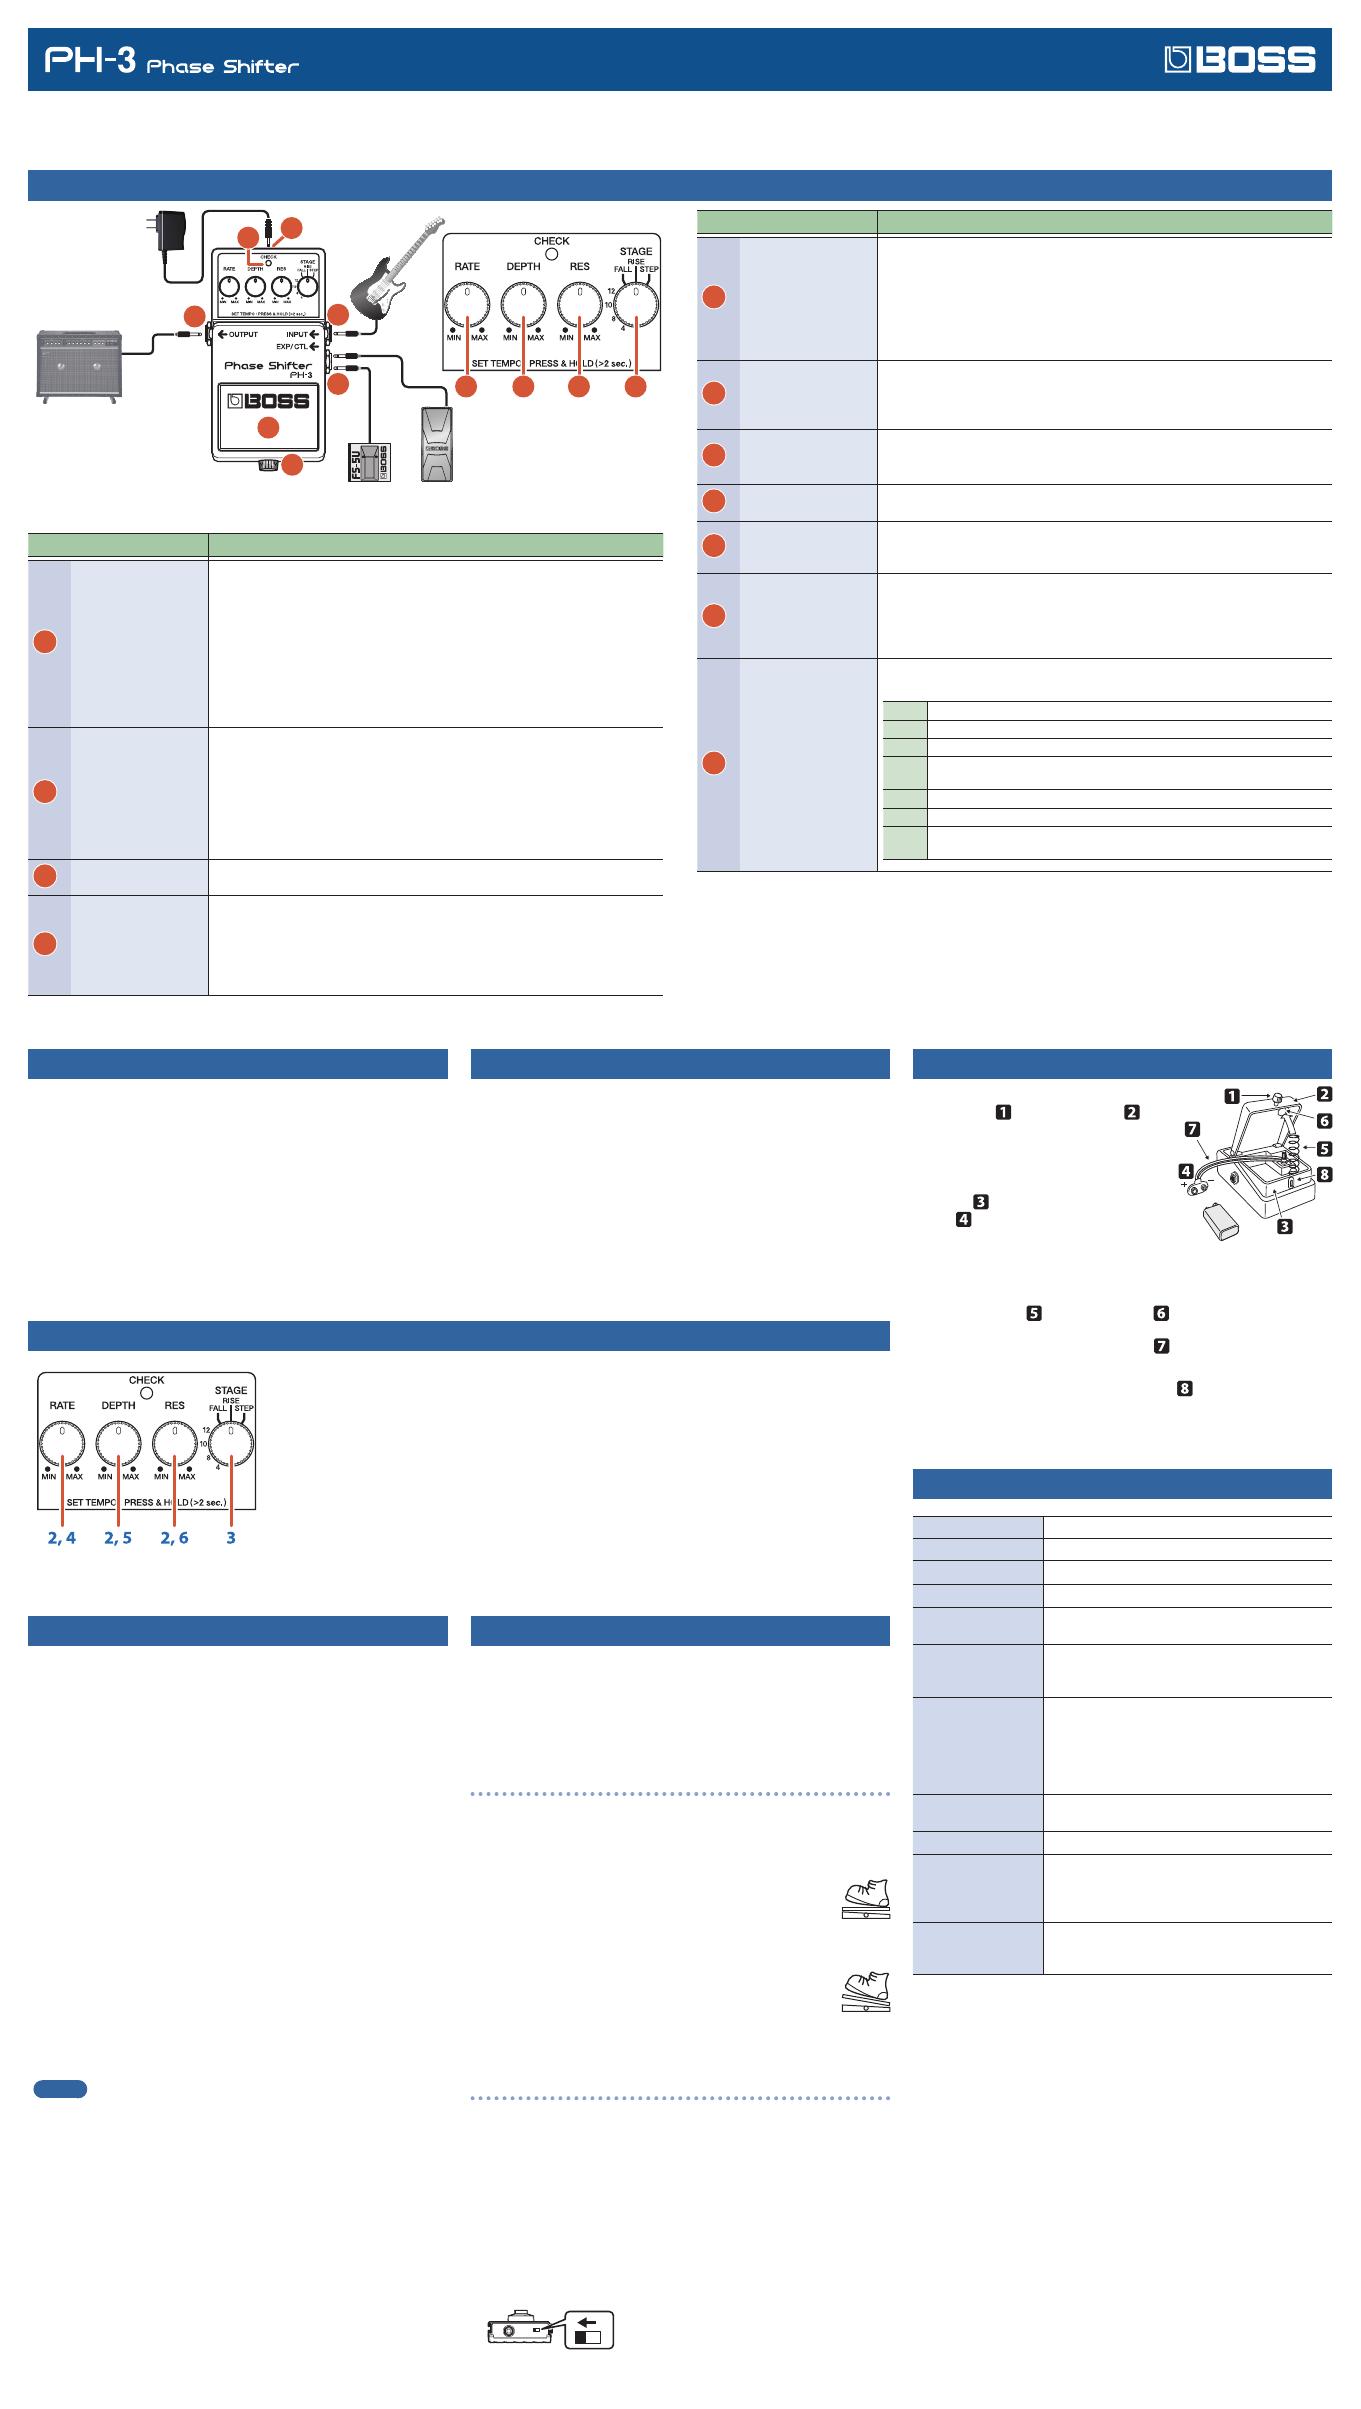
Changing the Battery
1. Hold down the pedal and loosen the
thumbscrew , then open the pedal
upward.
* The pedal can be opened without detaching
the thumbscrew completely.
2. Remove the old battery from the battery
housing
, and remove the battery
snap
connected to it.
3. Connect the battery snap to the new
battery, and place the battery inside the
battery housing.
* Be sure to carefully observe the battery’s polarity (+ versus -).
4. Slip the coil spring
onto the spring base on the back of the pedal, and
then close the pedal.
* Carefully avoid getting the battery snap cord
caught in the pedal, coil spring,
and battery housing.
5. Insert the thumbscrew into the guide bush hole
and tighten it securely.
Main Specications
Nominal Input Level -20 dBu
Input Impedance 1 MΩ
Nominal Output Level
-20 dBu
Output Impedance 1 kΩ
Recommended Load
Impedance
10 kΩ or greater
Power Supply
Alkaline battery (9 V, 6LR61)
Carbon-zinc battery (9 V, 6F22)
AC adaptor (PSA series: sold separately)
Current Draw
40 mA
* Expected battery life under continuous use:
Alkaline: 9.5 hours
Carbon: 3.5 hours
These gures will vary depending on the actual
conditions of use.
Dimensions
73 (W) x 129 (D) x 59 (H) mm
2-7/8 (W) x 5-1/8 (D) x 2-3/8 (H) inches
Weight 415 g /15 oz (including battery)
Accessories
Owner’s Manual
Leaet (“USING THE UNIT SAFELY,” “IMPORTANT
NOTES,” and “Information”)
Alkaline battery (9 V, 6LR61)
Options
(sold separately)
AC adaptor: PSA series
Expression pedal: EV-30/FV-500H/FV-500L, Roland EV-5
Footswitch (momentary-type): FS-5U/FS-6/FS-7
* 0 dBu = 0.775 Vrms
* This document explains the specications of the product at the time that the
document was issued. For the latest information, refer to the Roland website.
9 V Battery
© 2018 Roland Corporation
Setting the Tempo with the PH-3’s Pedal Switch
* RATE cycles for use with the tempo settings can be made in the range of
0.2–16 seconds.
1. Step on, and continue depressing the PH-3’s pedal switch for at
least two seconds.
If the pedal switch is pressed when the eect is on, the CHECK
indicator goes out, and the eect is turned o for two seconds.
If the pedal switch is pressed when the eect is o, the CHECK
indicator turns red, and the eect is turned on for two seconds.
* For switching without the normal stress and hassle of turning eects on and o,
when you go into the tempo setting mode while the eect is on, the eect is rst
switched o for two seconds, and the PH-3 switches to tempo setting mode.
The CHECK indicator then ashes in red and green, and the tempo
can then be set with the eect on.
Here, the tempo is indicated by the value set with the [RATE] knob.
2. Press the PH-3’s pedal switch in timing with the tempo.
The CHECK indicator then ashes in red and green in time with the
tempo.
* When the pedal switch is pressed, the lter is completely lowered (except when
set to RISE or FALL). When using this, even if the RATE (as shown by the ashing
CHECK indicator) is o slightly from the tempo, you can match the RATE to the
tempo with one step on the PH-3’s pedal.
MEMO
Setting the RATE near the desired tempo beforehand allows you to
make faster and more natural tempo settings.
3. Press and continue holding the PH-3’s pedal switch for two
seconds or longer to nish setting the tempo.
The eect goes on, and instead of ashing in red and green, the
CHECK indicator will light steadily in red.
* When you have nished setting the tempo, the RATE changes to the value for
the tempo setting made with the pedal, so the value will dier from the value
indicated by the [RATE] knob.
* When changed with the [RATE] knob, the tempo is then the same as the value
for the [RATE] knob.
Using the EXP/CTL Jack
* When an EV-30 or FS-5U is connected to the EXP/CTL jack, the PH-3’s own
pedal switch then only turns the eect on and o.
* When disconnecting from the EXP/CTL jack, the RATE (tempo) settings
used up to that point are cleared, with the [RATE] knob setting then
becoming eective.
When Connecting the EV-30 (sold separately)
The RATE settings can be adjusted with the EV-30.
You can change from the minimum RATE value set by the EV-30’s Minimum
Value to the value set with the PH-3’s [RATE] knob.
1. Connect the EV-30 to the EXP/CTL jack, and press the
pedal completely forward.
The adjustment made with the RATE knob in this
condition determines the maximum RATE value when
controlled with the EV-30.
2. Return (raise) the pedal completely back so the heel
is down.
The adjustment made with the EV-30’s Minimum Value
at this point determines the minimum RATE value
when controlled with the EV-30.
When Connecting the FS-5U (sold separately)
The tempo can be set with the FS-5U.
Concerning how to make the tempo settings, refer to steps 2 under ”Setting
the Tempo with the PH-3’s Pedal Switch.” Simply substitute “FS-5U” where it
says “PH-3’s pedal switch.”
5 The PH-3’s pedal switch switches the eect on and o. When the eect is on, the
CHECK indicator ashes alternately in red and green.
5 If you turn the RATE after setting the tempo with the FS-5U, the [RATE] knob
value is then adjusted.
5 You can also make the tempo settings with the eect o.
5 Set the polarity switch of the connected the FS-5U as shown in the gure below.
1
Guitar Amplier
Expression Pedal
(EV-30, FV-500H, FV-500L, and Roland EV-5;
sold separately)
Electric Guitar
AC adaptor
PSA series
(sold separately)
2
3
4
5
6
7
Footswitch
(FS-5U; sold
separately)
or
10
9
11
8
Operating the Unit
1. When you have nished making the
connections, press the pedal switch to
turn the eect on.
(the CHECK indicator is lit).
2. Set the [RATE], [DEPTH], and [RES] knobs
at the center position.
3. Use the [STAGE] switch to select the
stage type.
4. With the [RATE] knob, adjust the speed
of the lter change.
* When set to MIN, the lter remains o.
5. With the [DEPTH] knob, adjust the depth
of the lter change.
* The lter eect stops when this is set to MIN with
the [STAGE] switch set to anything besides FALL
or RISE.
6. With the [RES] knob, adjust the strength
of the lter eect.
* Raising the RES setting (turning it clockwise) makes
it easier for the sound to become distorted. If it
appears that the sound is becoming distorted, try
lowering the RES setting.
English
Precautions When Connecting
5 To prevent malfunction and equipment failure, always turn down the volume,
and turn o all the units before making any connections.
5 Once you’ve gotten hooked up correctly, be sure to observe the following order when
switching on the power to your equipment. By turning on devices in the wrong order,
you risk causing malfunction and/or damage to speakers and other devices.
When powering up: Turn on the power to your guitar amp last.
When powering down: Turn o the power to your guitar amp rst.
5 Before turning the unit on/o, always be sure to turn the volume down. Even
with the volume turned down, you might hear some sound when switching the
unit on/o. However, this is normal and does not indicate a malfunction.
Use of Battery
5 A battery was installed in the unit before it left the factory. The life of this battery
may be limited, however, since its primary purpose was to enable testing. If
operating this unit on batteries, please use alkaline batteries.
5 If you handle batteries improperly, you risk explosion and uid leakage. Make sure
that you carefully observe all of the items related to batteries that are listed in
“USING THE UNIT SAFELY” and “IMPORTANT NOTES” (supplied on a separate sheet).