Polti CINDERELLA AS 310E Owner's manual
- Category
- Vacuum cleaners
- Type
- Owner's manual
Page is loading ...
Page is loading ...
Page is loading ...
Page is loading ...
Page is loading ...
Page is loading ...
Page is loading ...
Page is loading ...
Page is loading ...
Page is loading ...
Page is loading ...
Page is loading ...
Page is loading ...
Page is loading ...
Page is loading ...
Page is loading ...
Page is loading ...
Page is loading ...
Page is loading ...
Page is loading ...
Page is loading ...
Page is loading ...

CC
CC
OO
OO
RR
RR
RR
RR
EE
EE
CC
CC
TT
TT
UU
UU
SS
SS
EE
EE
OO
OO
FF
FF
TT
TT
HH
HH
II
II
SS
SS
PP
PP
RR
RR
OO
OO
DD
DD
UU
UU
CC
CC
TT
TT
This appliance is intended for use as a vacuum for solids in accordance with the
descriptions and instructions in this manual.
ENGLISH
Polti S.p.A. reserves the right to change
equipment or accessory specification without
prior notice.
This unit conforms with EC-directives 89/336 as amended by 93/68
(EMC) and 73/23 as amended by 93/68 (low voltage).
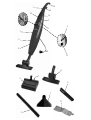
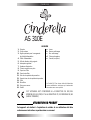
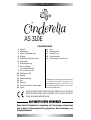
a) Lance
b) Multipurpose brush
c) Multipurpose nozzle
d) Extension tube
e) Carpet sweeper (optional)
1. Handle
2. Motor
3. Rotating hooks for cable storage
4. Power supply cable
5. Handle locking screw
6. Mains ON/OFF switch
7. Suction variator
8. "Full bag" red indicator light
9. Cover of bag/filter housing
10. Microfilter cover
11. Dust bag
12. Dust bag support
13. Motor filter
14. Microfilter
15. Socket for carpet sweeper accessory
16. Eyelet
AS 310E
KEY

PP
PP
RR
RR
EE
EE
PP
PP
AA
AA
RR
RR
AA
AA
TT
TT
II
II
OO
OO
NN
NN
FF
FF
OO
OO
RR
RR
UU
UU
SS
SS
EE
EE
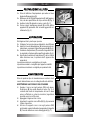
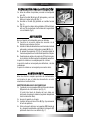
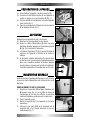
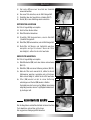
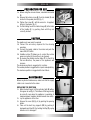
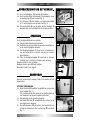
1.a Before using the vacuum cleaner, assemble the handle
(1)
2.a Remove the locking screw (5) from the handle (1) and
locate it in the power plant (2) (fig. 1)
3.a Tighten the screw (5) with the wrench n. 6 supplied,
turning it clockwise (fig. 2)
4.a Fix the rotating hooks for cable storage (3) in the holes
of the handle (1) by pushing them until they are
correctly located.
SS
SS
UU
UU
CC
CC
TT
TT
II
II
OO
OO
NN
NN
The appliance is now ready to operate
1.b Connect the accessory required for the cleaning
operation.
2.b Connect the supply cable to the mains and push the
mains ON/OFF switch
3.b Variable suction (7) allows you to control the suction
power according to the surface to be cleaned.
4.b By moving the variable suction slider (7) to the left in
the max direction, the power of the appliance will
increase
The minimum position is suggested for curtains.
The medium position is suggested for carpets and upholstery.
The maximum position is suggested for hard floors.
MM
MM
AA
AA
II
II
NN
NN
TT
TT
EE
EE
NN
NN
AA
AA
NN
NN
CC
CC
EE
EE
Before any kind of maintenance, make sure that the supply
cable is not connected to the mains.
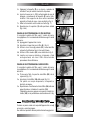
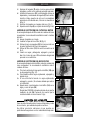
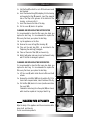
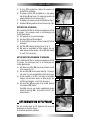
REPLACING THE DUST BAG
1.c When the dust bag is full, the indicator light (8) will go
from green to red (fig. 5). The fullness of the bag can only
be correctly seen when the appliance is operating at
maximum power (regulator turned towards max mark).
2.c Lay the appliance on the floor.
3.c Remove the cover (9) (fig. 6) by pushing the opening
button.
4.c Take out the dust bag support (12) by pushing it
backwards and then lift it by holding the flap (Z), paying
attention not to damage it.
ENGLISH
Fig. 1
Fig. 2
Fig. 3
Fig. 4
Fig. 5
Fig. 6
7
6

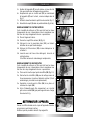
5.c Fold the flap (Z) on itself so as to fill the hole and avoid
dust leakage.
6.c Insert the new dust bag (11) adapting it to the housing
and keeping the flap (Z) upwards, insert the opposite
side of the flap in the grooves at the bottom of the
housing , as shown in fig. 8.
7.c Insert the sleeve in the hole of the bag.
8.c Put the cover (9) back in its position
CLEANING OR REPLACING THE MOTOR FILTER
It is recommended to clean the filter every two times you
replace the dust bag. It is recommended to replace the
filter every five times you replace the dust bag.
1.d Lay the appliance on the floor
2.d Remove the cover of bag/filter housing (9)
3.d Take out the dust bag (11) , as described in the
"Replacing the dust bag" paragraph.
4.d Take out the motor filter (13) as shown in fig.
5.d Wash it with water and soap, rinse it and leave it to dry
well. If the filter is damaged, replace it.
CLEANING OR REPLACING THE MICROFILTER
It is recommended to clean the filter every two times you
replace the dust bag. It is recommended to replace the
filter every five times you replace the dust bag.
1.e Lift the cover (9) which holds the microfilter and it will
unhook.
2.e Remove the microfilter (14) from its position (fig. 11) to
clean it with soap and water, rinse it and leave it to dry.
3.e Put the filter (14) back in its correct position and close
the cover (10).
Cinderella can be hung from the eyelet (16) on a hook,
which must be capable of carrying at least 5 kg.
CC
CC
LL
LL
EE
EE
AA
AA
NN
NN
II
II
NN
NN
GG
GG
TT
TT
HH
HH
II
II
SS
SS
AA
AA
PP
PP
PP
PP
LL
LL
II
II
AA
AA
NN
NN
CC
CC
EE
EE
Wipe the body of the appliance and the accessories with a
damp cloth and then dry.
Do not use abrasive products.
ENGLISH
Fig. 6 bis
Fig. 7
Fig. 8
Fig. 9
Fig. 10
Fig. 11
Z

ENGLISH
PP
PP
RR
RR
EE
EE
CC
CC
AA
AA
UU
UU
TT
TT
II
II
OO
OO
NN
NN
SS
SS
Attention! Do not use the appliance without reading the instructions.
• In case of damage or malfunction, do not attempt to disassemble the appliance but
contact the nearest Polti Authorised Service Centre.
• Do not allow children to use the machine or any others who may not know how to
operate it .
• Do not touch the appliance with wet hands or feet when it is plugged into the mains.
• In order not to compromize the safety of the appliance, only use original spare parts
and accessories, approved by the manufacturer.
• Do not use the appliance if the supply cable or other important parts of the unit are
damaged.
• If the supply cable is damaged, it must be replaced by the manufacturer or by its
authorized Service Centre.
• Do not suck up undiluted acids or solvents, which may cause serious damage to the
appliance and especially do not suck up explosive liquids, inflammable gases, explosive
powders, benzines, paints, fuel oil, which may cause explosions if they come in contact
with the sucked up air.
• Do not use the appliance outdoor or on wet surfaces or to suck up liquids.
• Do not suck up hard or sharp objects, hot cinders or lit cigarettes or similars.
• Do not use the appliance in environments where there is danger of explosion.
• Do not suck up objects on fire or that are hot.
• Never immerse the appliance in water.

ENGLISH
GG
GG
UU
UU
AA
AA
RR
RR
AA
AA
NN
NN
TT
TT
EE
EE
EE
EE
The CINDERELLA AS310 is guaranteed to the original purchaser for one year from
purchase date against manufacturing or raw material defects.The guarantee is not valid
if the appliance has been misused in any way. Unauthorised alterations or repairs to the
machine will automatically invalidate this guarantee.
• Polti declines liability for any damage or accident derived from any use of
CINDERELLA AS 310 which is not in conformity with the instructions contained
in this booklet.
AA
AA
TT
TT
TT
TT
EE
EE
NN
NN
TT
TT
II
II
OO
OO
NN
NN
The filters and the dust bags are sold by Polti authorized Service Centres and by quality
electrical retailers. We recommend to use manufacturer's original spare parts only.
Page is loading ...
Page is loading ...
Page is loading ...
Page is loading ...
Page is loading ...
-
 1
1
-
 2
2
-
 3
3
-
 4
4
-
 5
5
-
 6
6
-
 7
7
-
 8
8
-
 9
9
-
 10
10
-
 11
11
-
 12
12
-
 13
13
-
 14
14
-
 15
15
-
 16
16
-
 17
17
-
 18
18
-
 19
19
-
 20
20
-
 21
21
-
 22
22
-
 23
23
-
 24
24
-
 25
25
-
 26
26
-
 27
27
-
 28
28
-
 29
29
-
 30
30
-
 31
31
-
 32
32


Polti CINDERELLA AS 310E Owner's manual
- Category
- Vacuum cleaners
- Type
- Owner's manual
Ask a question and I''ll find the answer in the document
Finding information in a document is now easier with AI
in other languages
Related papers
-
Polti ASPIRA AS404 Owner's manual
-
-
-
-
-
-
-
Polti Cinderella AS500 AS450 AS400 Owner's manual
Other documents
-
Candy LBCTAS120SY User manual
-
Otsein-Hoover STOH 220 E User manual
-
-
-
COMAC CA40ON User manual
-
-
-
-
-