OVEN INSTALLATION MANUAL
ENGLISH
5
ELECTRICAL SUPPLY
Before installing the oven have a qualied electrician
verify that your home is provided with adequate
electrical service and that the addition of the oven will
not overload the branch circuit on which it is to be
installed.
A separate three-wire or four-wire single phase,
240 Volt, 60 Hz, or a 208 Volt, 60Hz branch circuit is
required.
NOTE : FOR USE WITH 208 V, 60 HZ SUPPLY
VOLTAGE, SEE CONNECTING TO 208 VOLT
CIRCUIT.
For hook-up of the oven you will need to have an
approved junction box installed where it will be easily
reached through the front of the cabinet where the
oven will be located. The oven has 3 feet of conduit.
Allow two to three feet of slack in the line so that the
oven can be moved if servicing is ever necessary.
DO NOT shorten the exible conduit.
Location of rating plate
WIRING REQUIREMENTS
When making the wire connections, use the entire
length of the conduit provi ded (3 feet). The conduit
must not be cut.
Before making connections make sure the power is o
and read and observe the following:
1. A separate three-wire or four-wire, single phase,
240 Volt, 60 Hz or 208 Volt, 60 Hz branch circuit is
required for the oven.
.2
3. In the United States:
Wiring must conform to the National Electrical
Code, ANSI/NFPA No. 7 latest edition. You can
obtain a copy of the National Electrical Code by
writing to: National Fire Protection Association
Batterymarch Park Quincy, MA 02269
In Canada:
Wiring must conform to Cana dian Electrical Code
C22.1- latest edition. You can obtain a copy of the
Canadian Electrical Code by writing to: Canadian
Standards Association 178 Rexdale Boulevard
Rexdale (Toronto), Ontario, Canada M9W 1R3
4.
connections must be suitable for the rating of the
appliance as per the National Electrical Code
requirements. The exible armoured cable
extending from the oven should be connected
directly to the junction box.
5. The junction box should be located so as to allow
as much slack as possible between the junction
box and the oven so it can be moved if servicing is
ever required.
6. A U.L. listed conduit connector must be provided
at each end of the power supply cable.
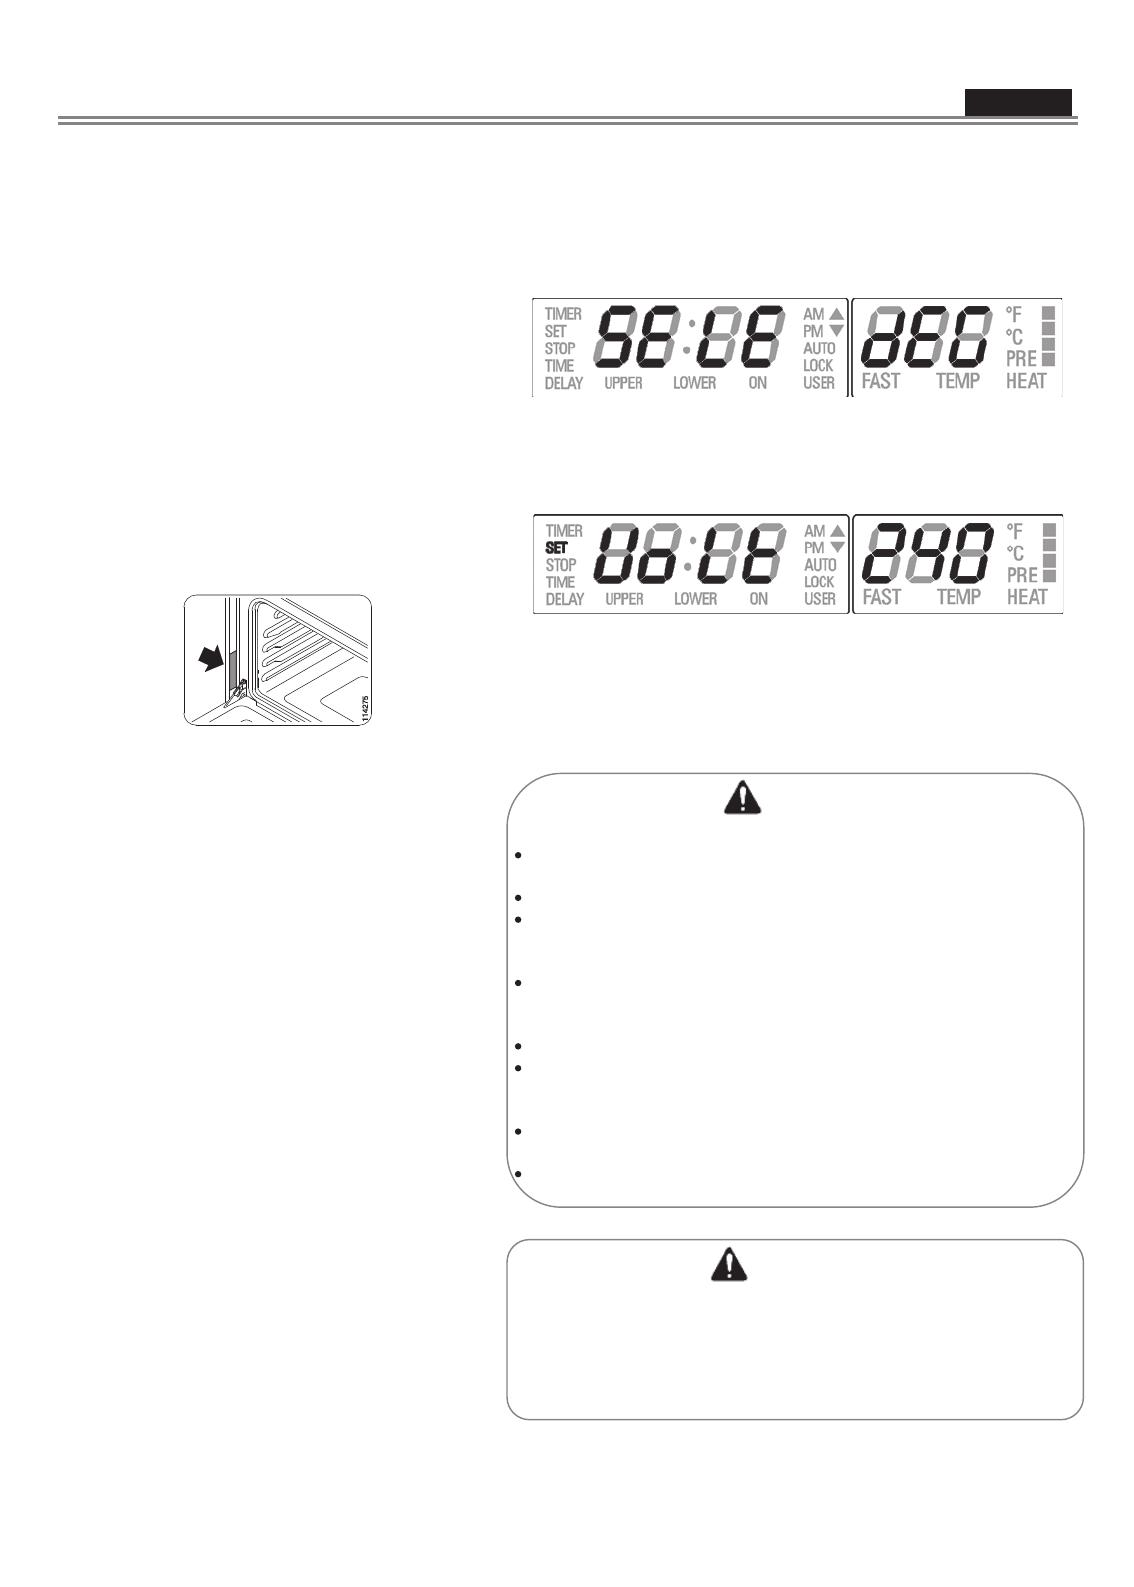
CONNECTING TO 208 VOLT CIRCUIT
This option is provided for areas where standard 240 Volt service is
not available. This option must be accessed with the oven connected
to power source, and using the following sequence:
1. Within ve minutes from power up, hold [OPTIONS] and [TIME]
keys for 3 seconds to enter the user option menu. The display
shows as follows:
2. Hold then [TIME] and [LIGHT] keys until the display becomes
dark.
3. Hold [OPTIONS] and [LIGHT] further, until the time display shows
“Volt” and temperature module shows “240” blinking, waiting for
an input.
4. Using [INC] or [DEC] keys, the control toggles between 240V and
208V options. Hold “OPTIONS” to conrm.
5. Hold [TIME] and [LIGHT] keys in order to quit the selection.
6. Hold [OPTIONS] key for 3 seconds to quit the user option menu.
The voltage setting is stored and kept even after a long power-o.
WARNING
ELECTRICAL SHOCK HAZARD
The electrical power to the oven branch circuit must be shut o
while line connections are being made.
Do not use an extension cord with this appliance.
Electrical ground is required on this appliance. The free end of the
green wire (the ground wire) must be connected to a suitable
ground. This wire must remain grounded to the oven.
If cold water pipe is interrupted by plastic, non metallic gaskets,
union connections or other insulati ng materials, DO NOT use for
grounding.
DO NOT ground to a gas pipe.
DO NOT have a fuse in the NEUTRAL or GROUNDING circuit. A
fuse in the NEUTRAL or GROUNDING circuit could result in an
electrical shock.
Check with a qualied electrician if you are in doubt as to whether
the appliance is properly grounded.
Failure to follow these instructions could result in serious injury or
death.
CAUTION
Do not repair or replace any part of the appliance unless specically
recommended in the manual. All other serv icing should be done by a
qualied technician. This may reduce the risk of personal injury and
damage to the oven.
Never modify or alter the construction of the appliance by removing
panels, wire covers, screws, or any other part of the product.
The oven must be connected with Copper or
Aluminum wire.
Wire size (Copper or Aluminum wire) and


