Garmin Montana 600 Owner's manual

Type
Owner's manual
Instructions
Instructions
Istruzioni
Anweisungen
Instrucciones
Instruções
Instructies
Instruktioner
Ohjeet
Instruksjoner
Instruktioner
Instrukcja
Pokyny
Инструкции
Marine Mount
MONTANA
600 Series
2 Montana600SeriesMarineMountInstructions

See the Important Safety and Product Information in the Montana product box
before installing the marine mount.

Always wear safety goggles, ear protection, and a dust mask when drilling,
cutting, or sanding.
notice
Incorrectly wiring the power or audio cable with bare wire leads can result
in damage to the boat or the battery. Garmin strongly recommends having an
experienced installer with the proper knowledge of electrical systems install the
mount.
The metal contacts on the Montana and the mount should be kept dry to avoid
equipment damage. Use the weather cap on the mount at all times when the unit is
not mounted to keep the metal contacts dry and protected.

Drill
Hardware for the swivel mount: 3 bolts or 3 screws (not included)
#8 (4 mm) pan-head machine bolts with matching nuts and washers and
a 5/32 in. (5 mm) drill bit
#8 (4 mm) pan-head self-tapping screws and a 1/16 in. (1.5 mm) drill bit
for drilling starter holes
Montana600SeriesMarineMountInstructions 3
3/8 in. (9.5 mm) wrench or socket
Phillips or at screwdriver

notice
Do not place the swivel mount in an area that is exposed to extreme temperature
or conditions. The temperature range for the Montana is from 5°F to 158°F (from
-15°C to 70°C). Extended exposure to temperatures exceeding this range (in
storage or operating conditions) may cause failure of the LCD screen.
Use pan-head machine bolts or self-tapping screws to secure the swivel base. If
you use screws with countersunk heads, you may damage the mounting bracket.
Select a location to install the mount.
The location provides a clear view of the screen and access to the Montana.
The location is sturdy enough to support the Montana and the mount.
The location allows room for the routing and connection of the cables.
There should be at least a 3 in. (8 cm) clearance behind the case.

notice
Do not overtighten the screws or bolts; you may damage the swivel base.
4 Montana600SeriesMarineMountInstructions
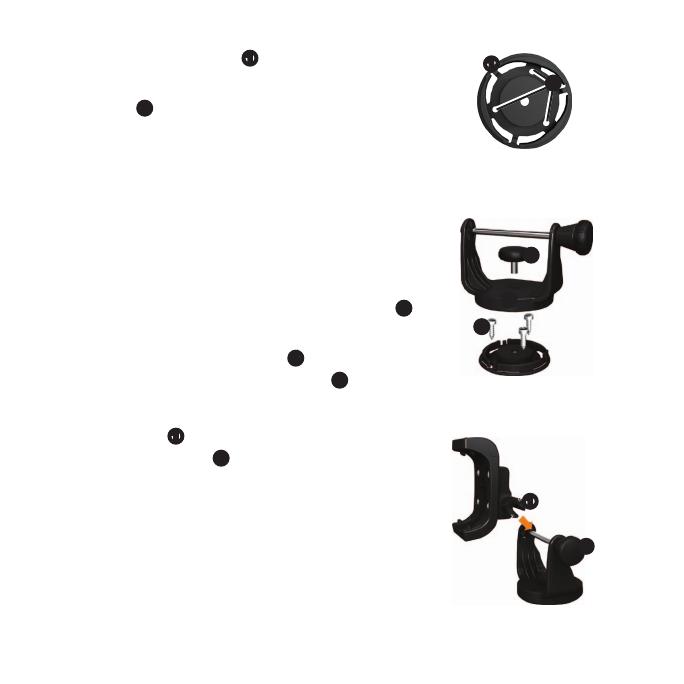
1. Separate the swivel base
from the mount.
2. Using the swivel base as a template, mark the pilot hole
locations
.
3. Drill the mounting holes.
If you secure the base with machine bolts, drill three
5/32 in. (5 mm) holes at the locations you marked.
If you secure the base with self-tapping screws,
drill three 1/16 in. (1.5 mm) starter holes at the
locations you marked. Do not make the starter
holes deeper than half of the screw length.
4. Secure the swivel base with 3 bolts or 3 screws
(not included).
5. Place the swivel mount bracket
over the swivel
base and secure it with the short knob
.

1. Align the slot
on the back of the cradle with the
long mounting knob
and slide the cradle into place
on the bar.
If necessary, you can adjust the knob to spread the
bracket arms apart. Turn the knob counter-clockwise
to widen the bracket arms, turn the knob clockwise
to tighten the bracket arms.
Montana600SeriesMarineMountInstructions 5
2. Adjust the cradle angle, and tighten the long mounting knob
until the cradle
is snug.
3. Rotate the swivel mount bracket
by twisting it left or right.
The bracket clicks as you turn it. Select a good viewing angle,
and then tighten both knobs.

notice
If any wire is left unconnected, insulate the wire and safely secure it on your boat.
1. Connect the red
and black
wires to your boat’s main power
(10 to 50 Volts).
2. If necessary, connect the serial data wires to your boat.
Yellow
is the serial data input wire.
Blue
is the serial data output wire.
Green
is the serial ground wire.
3. If necessary, connect the stereo jack
.
6 Montana600SeriesMarineMountInstructions

notice
Before placing the device in the mount, ensure that the metal contacts on the
device and the mount are dry to avoid equipment damage. Use the weather cap to
keep the mount cradle dry.
1. Place the weather cap in the storage area
on the mount.
2. Fit the bottom of your device into the cradle
.
3. Tilt the device back until it snaps into place.
4. To secure the device and deter theft, use the security screw tool
to tighten
the security screw
on the top of the mount.
NOTE: If reected light or glare makes the device display difcult to see, apply
an anti-glare screen protector to the screen.
Montana600SeriesMarineMountInstructions 7

1. Loosen the security screw.
2. Press the button
on the side of the mount to release
the device.
3. Lift out the device.
4. Place the weather cap
on the metal contacts on the
cradle.

Garmin’s standard limited warranty applies to this accessory. For more
information, see the Important Safety and Product Information in the device
product box.
© 2011 Garmin Ltd. or its subsidiaries
Garmin International, Inc.
1200 East 151
st
Street,
Olathe, Kansas 66062, USA
Garmin (Europe) Ltd.
Liberty House, Hounsdown Business Park,
Southampton, Hampshire, SO40 9LR UK
Garmin Corporation
No. 68, Zhangshu 2
nd
Road,
Xizhi Dist., New Taipei City, 221, Taiwan (R.O.C.)
www.garmin.com
July 2011 190-01330-93 Rev. A Printed in Taiwan
Garmin
®
and the Garmin Logo are trademarks of Garmin Ltd. or its subsidiaries, registered in the USA and other countries. Montana
is a
trademark of Garmin Ltd. or its subsidiaries. These trademarks may not be used without the express permission of Garmin. Other trademarks and
trade names are those of their respective owners.
  • Page 1 1
  • Page 2 2
  • Page 3 3
  • Page 4 4
  • Page 5 5
  • Page 6 6
  • Page 7 7
  • Page 8 8
  • Page 9 9
  • Page 10 10
  • Page 11 11
  • Page 12 12
  • Page 13 13
  • Page 14 14
  • Page 15 15
  • Page 16 16
  • Page 17 17
  • Page 18 18
  • Page 19 19
  • Page 20 20
  • Page 21 21
  • Page 22 22
  • Page 23 23
  • Page 24 24
  • Page 25 25
  • Page 26 26
  • Page 27 27
  • Page 28 28
  • Page 29 29
  • Page 30 30
  • Page 31 31
  • Page 32 32
  • Page 33 33
  • Page 34 34
  • Page 35 35
  • Page 36 36
  • Page 37 37
  • Page 38 38
  • Page 39 39
  • Page 40 40
  • Page 41 41
  • Page 42 42
  • Page 43 43
  • Page 44 44
  • Page 45 45
  • Page 46 46
  • Page 47 47
  • Page 48 48
  • Page 49 49
  • Page 50 50
  • Page 51 51
  • Page 52 52
  • Page 53 53
  • Page 54 54
  • Page 55 55
  • Page 56 56
  • Page 57 57
  • Page 58 58
  • Page 59 59
  • Page 60 60
  • Page 61 61
  • Page 62 62
  • Page 63 63
  • Page 64 64
  • Page 65 65
  • Page 66 66
  • Page 67 67
  • Page 68 68
  • Page 69 69
  • Page 70 70
  • Page 71 71
  • Page 72 72
  • Page 73 73
  • Page 74 74
  • Page 75 75
  • Page 76 76
  • Page 77 77
  • Page 78 78
  • Page 79 79
  • Page 80 80
  • Page 81 81
  • Page 82 82
  • Page 83 83
  • Page 84 84
  • Page 85 85
  • Page 86 86
  • Page 87 87
  • Page 88 88

Garmin Montana 600 Owner's manual

Type
Owner's manual

Ask a question and I''ll find the answer in the document

Finding information in a document is now easier with AI