<B>
AF area selection/
Multi-function button
Shooting Operation
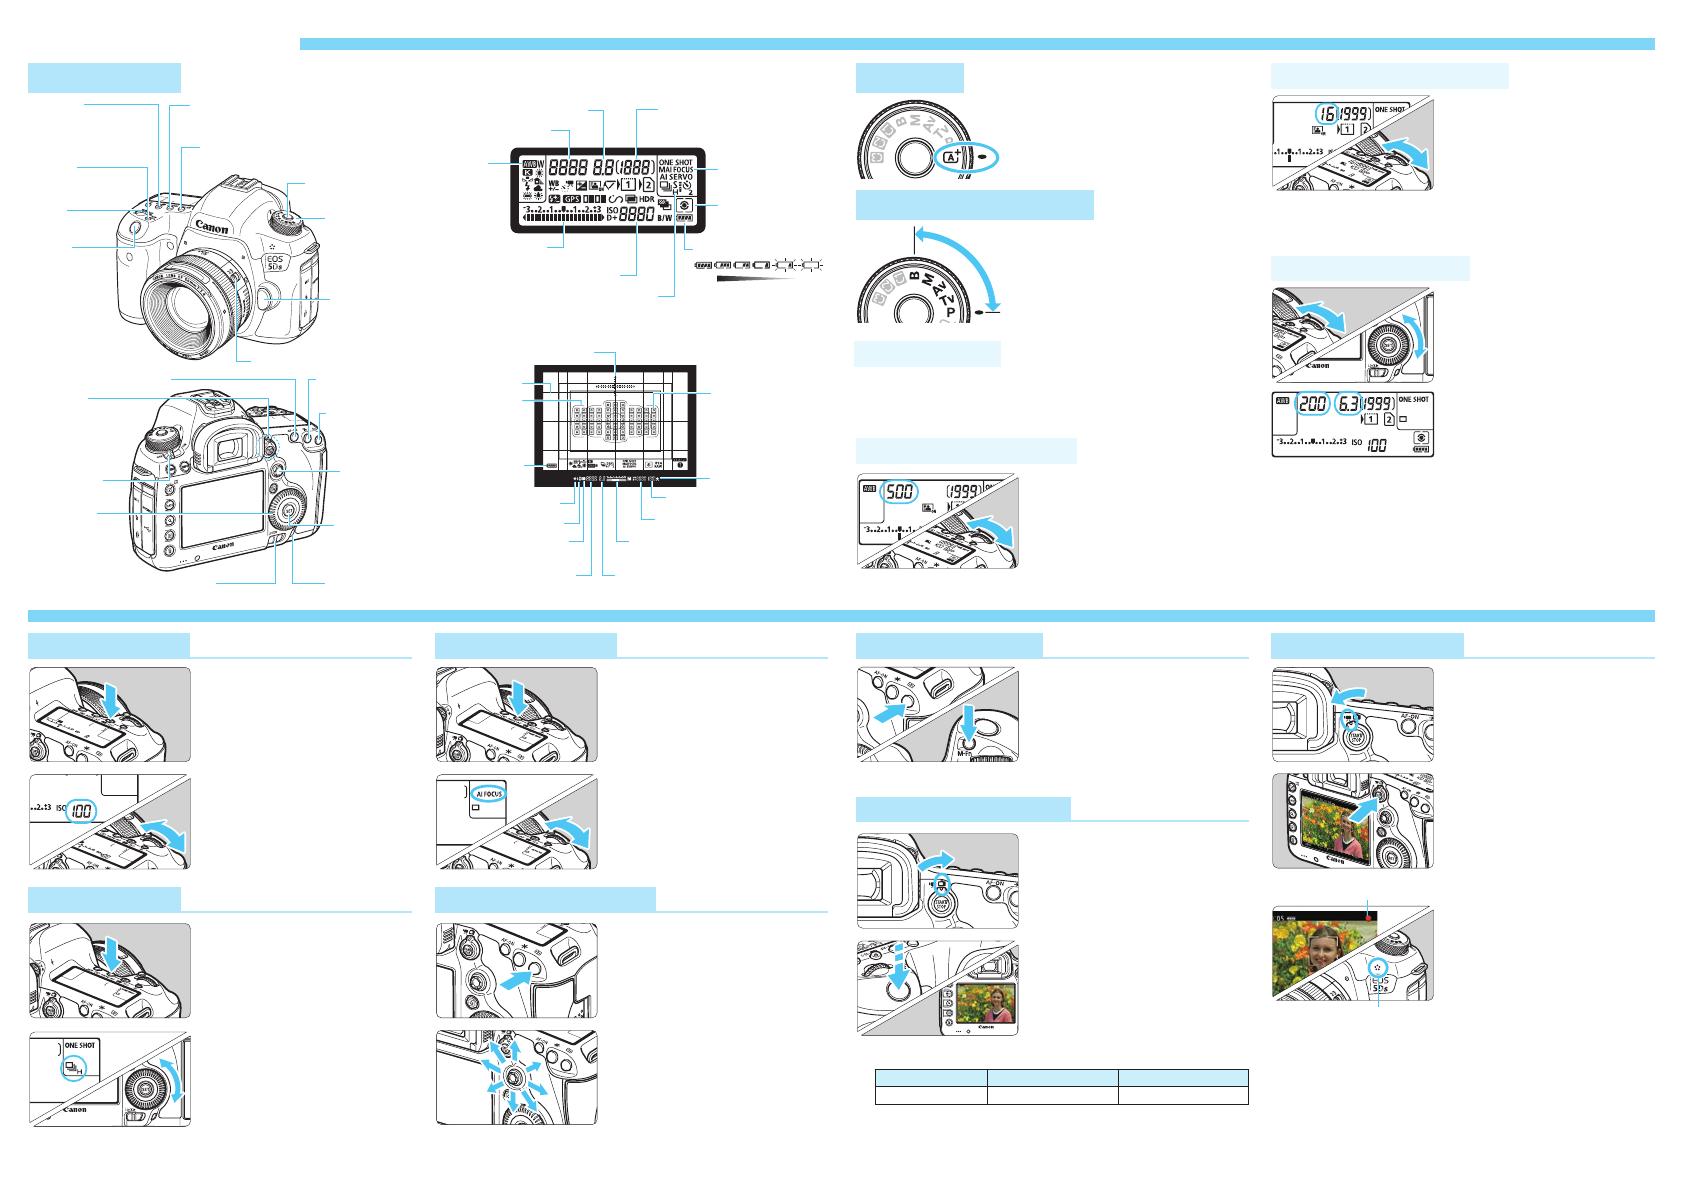
Nomenclature
A Live View Shooting
k
Shooting Movies
o Drive Mode
A Mode
d/s/f/a/F Modes
d: Program AE
f: Aperture-priority AE
a: Manual Exposure
LCD Panel
Viewnder Information
All the settings necessary for
shooting are set automatically.
You just press the shutter button,
and the camera does the rest.
You can change the camera
settings as desired to shoot in
various ways.
* Set the <R> switch to the left (Multi
function lock released).
o
Set the Mode Dial to <d>.
o
When focus is achieved, the camera automatically sets the
shutter speed and aperture as in the <A> mode.
s: Shutter-priority AE
o
Set the Mode Dial to <s>.
o
Turn the <6> dial to set the
desired shutter speed, then
focus on the subject.
X
The aperture will be set automatically.
o
I
f the aperture display blinks, turn the
<
6
> dial until it stops blinking.
o
Set the lens’s focus mode switch
to <f>.
o
Press the <o> button, then
turn the <6> dial.
X (One-Shot AF):
For still subjects
9 (AI Focus AF):
Switches the AF operation
automatically
Z (AI Servo AF):
For moving subjects
o
Press the <m> button,
then turn the <6> dial.
o
ISO 100 to ISO 6400 can be
set in 1/3-stop increments.
o
When “A” is selected, the ISO
speed is set automatically.
When you press the shutter
button halfway, the ISO speed
setting will be displayed.
o
Set the switch to <A>.
o
Press the <0> button, and the
image will appear on the LCD
monitor.
o
Press the shutter button halfway
to focus, then press it completely
to take the picture.
o
Press the <0> button to exit
the Live View shooting.
o
Set the switch to <k>.
X
The image will appear on the
LCD monitor.
o
Look through the viewnder
and press the <S> button.
o
Press the <B> button.
X
Each time you press the
<B> button, the AF area
selection mode changes.
o
Press the shutter button
halfway to focus.
o
Press the <0> button to start
shooting a movie.
o
To stop movie shooting, press
the <0> button again.
o
To shoot still photos, press the
shutter button completely.
o
Movie shooting modes
•
<A/d/F> : Autoexposure shooting
•
<s> : Shutter-priority AE shooting
•
<f> : Aperture-priority AE shooting
•
<a> : Manual exposure shooting
o
Look through the viewnder
and press the <S> button.
o
The AF point selection will
change in the direction you tilt the
<
9
>. If you press <
9
> straight
down, the center AF point (or
center zone) will be selected.
o
You can shift the AF point
horizontally by turning the <6>
dial, and vertically by turning the
<5> dial to select an AF point
(toggles among zones in Zone AF).
o
Press the <o> button,
then turn the <5> dial.
u : Single shooting
o : High-speed
continuous shooting
i : Low-speed
continuous shooting
B : Silent single shooting
M :
Silent continuous shooting
Q :
10-sec. self-timer/
remote control
k : 2-sec. self-timer/
remote control
o
Set the Mode Dial to <f>.
o
Turn the <6> dial to set the
desired aperture, then focus on
the subject.
X
The shutter speed will be set
automatically.
o
If the shutter speed display
blinks, turn the <6> dial until
it stops blinking.
o
Set the Mode Dial to <a>.
o
Turn the <6> dial to set the
desired shutter speed.
o
Turn the <5> dial to set the
desired aperture.
o
Focus on the subject and check
the exposure level indicator.
o
Number of Possible Shots (Live View Shooting)
Temperature At 23°C / 73°F At 0°C / 32°F
Possible shots Approx. 220 shots Approx. 210 shots
Microphone
Recording movie
<m>
Flash exposure
compensation/
ISO speed setting button
Mode Dial
Focus mode switch
<p> AF start button
<A> AE lock
button
<A/k>
Live View shooting/
Movie shooting switch
<0> Start/
Stop button
<9>
Multi-
controller
Access lamp
Multi function lock switch
<S> AF point
selection button
<5> Quick
Control Dial
<0>
Setting button
Power switch
Lens release
button
Mode Dial lock-
release button
<o> Drive mode selection/
AF operation/AF method selection button
<6>
Main Dial
Shutter
button
Shutter speed
White
balance
Exposure level
indicator
ISO speed
Aperture
Electronic level
Battery level
Grid
AE lock
Flash-ready
Flash exposure
compensation
Shutter speed
Possible shots
Metering mode
AF operation
Battery level
OK Not
good
Drive mode
Area AF frame
AF points
Focus indicator
Aperture
Maximum burst
ISO speed
Exposure level indicator
<n> White balance selection/
Metering mode selection button
i: ISO SpeedN f: AF OperationN
AF Area SelectionN
S AF Point SelectionN

