Page is loading ...

Installation Options:
Fossil Blu Farmhouse sinks offer installation options depending on your design.
Undermount Installation Flush-Mount Installation Built-Up Installation
Tools / Materials Needed:
• Tape Measure
• Hacksaw / Jigsaw
• Rags
• Pencil (Not Ink)
• Framing
Square
• Ear and Eye Protection
• Shims
• Denatured Alcohol
• Silicone Adhesive
Sealant
• Wood Braces
Be sure to use proper tools and
always wear personal safety devices
for your protection.
Installation and Care Manual
FSW1105 33" Copper Farmhouse
Kitchen Sink, Single Bowl, Flat Front
General Recommendations:
Please read installation and care instructions thoroughly. Inspect your sink
for any noticeable damage before installation. Check all local applicable
plumbing and building codes.
These instructions are based on application to composite material or solid
surface countertop installation only; countertop application to stone, marble,
granite or butcher-block should be referred to an experienced countertop
fabricator for custom installation.
Because Fossil Blu Farmhouse sinks are individually handmade, we suggest
using experienced and professional installers only. For custom cutting of
countertop and installation of the actual sink, on-site installation is also
recommended. Acceptable variances are approximately 1/8 of an inch.
Alignment to the cut-out and precise application and trimming of any
adhesive sealant are critical to a superior fit and finished look. Please take
extra care in this regard.
Fossil Blu Farmhouse sinks require custom order cabinets. Please consult
your cabinet dealer.
Fossil Blu sinks does not accept any liability for damage to countertop, sink
fixture, faucets or personal injury during installation. Warranty is void if
installation instructions are not followed.
CAUTION: Undermount sinks require that your countertop is fabricated to exacting standards and the sink be installed
using meticulous procedures. For these reasons, we suggest you leave the installation to a seasoned professional.
!
!

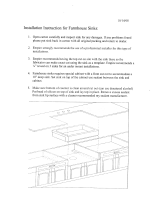
1. Prepare the Sink Base Cabinet:
Fossil Blu Farmhouse sinks offer installation options depending on your design. Farmhouse sinks require custom
order sink base cabinets with a front cutout to accommodate a 10” deep sink. Build a plywood platform on a support
frame
inside of the sink base cabinet. Platform must support the weight of the sink and any attachments such as
garbage disposals. When the sink is placed onto a platform, make sure the top of the sink is evenly flush against the
bottom of the counter-top. Allow clearance for water supply line and drains or garbage disposal, as necessary.
2. Make a Template and Cutout:
Depending on the installation option, make proper cutout
of the countertop. Fossil Blu recommends a 1/4” reveal on
3 sides when installed undermount style. For a flush
mount or built up installation, cut countertop along with
outside line of the sink profile. Front end of Fossil Blu Farmhouse
sinks are designed to be installed 3/4” extended out beyond
the front end of the countertop. Cut countertop accordingly.
No template is provided due to the custom nature of each application
and installation. The actual sink is used as the template guide for each
installation. After centering the sink and allowing for any faucets and
backsplashes, use a pencil to outline the sink as your guide for the
cutout, allowing for any reveal before the actual cutting.
3. Set The Sink:
Set the sink on top of the cabinet or into the cabinet front cutout.
Apply sealant if necessary as a gasket between the sink and cabinet.
4. Install the Countertop:
Carefully clean bottom of countertop and top flange of sink with denatured alcohol. Apply bead of silicone adhesive
(not supplied) around the top edge of the sink. Place countertop onto the sink. Remove excess sealant from the lip or
any surfaces with a cleaner recommended by manufacturer of adhesive sealant.
Typical undermount installation with 1/4” reveal recommended.
Typical flush mount and built-up
installation
Built-u
p installation may expose
sink sides to be raised up to 1”
above the countertop.
CAUTION: All installation types need to allow room for faucet installation. Ensure adequate clearance behind the
sink for any faucet and backsplash, as well as full range of motion for faucet spouts and handles.
!
!

Care and Maintenance of your Fossil Blu Copper Sink:
Much of the beauty of copper lies in its long-lasting wear and enduring good looks. Follow these simple sink
cleaning and maintenance tips, and your Fossil Blu copper sink will retain its original beauty for years to come.
Simple cleaning tips to keep your sink stain-free:
Maintaining the original beauty of your sink:
Countertop Reveal Options:
Customize the appearance of the union between your sink and countertop with these
reveals:
Positive Reveal
The countertop edge sits
typically 1/8” back from the
edge of the si
nk and the sink rim
is exposed.
+
Zero Reveal
The countertop meets the edge
of the sink and fits flush with
the sink bowls.
0
Negative Reveal
The countertop extends over the
edge on all sides of the sink.
–
FOSSIL BLU LLC
•
340 S. LEMON AVE
• WALNUT, CA 91789
•
• The charisma and charm of copper is its living fi nish,
which will change and react over the course of use.
That means if you accidently forget to wash out the
food from last night’s dinner, you will notice a
change in the copper fi nish. This will inevitably
happen and is completely normal — Relax and let the
natural patina process take over.
• Patina is a natural coating that builds on copper over
time to protect it from corrosion. Spots and blem-
ishes will come up from time to time (from citrus,
salt, ketchup and toothpaste), but just like a brand
new penny — over time it will re-patina and darken,
leaving your sink with a rich copperly blend of light
dark tones.
• Since most soaps and detergents contain chlorides,
Just recommends frequent rinsing of your copper
sink, preferably after each use. Combine this simple
daily treatment with weekly cleansing. Rinse well and
dry. Regularly drying your sink works wonders to
prevent water spots.
• Protect the fi nish of your copper sink and reduce
spotting with a monthly coating of copper wax
surface protectant.
• Do not let soap cleansers dry on the sink surface.
Rinse regularly to keep the chlorides found in most
cleansers from affecting the sink’s natural luster.
• Do not allow chlorine bleach and drain cleaners to
come into contact with the sink surface. It will
remove the patin
a and drastically alter the fi nish of
your sink.
• Steer clear of steel wool pads and strong abrasive
cleansers, as they will scratch the surface. For hard-
to-clean projects, try a ScotchBrite scouring pad
when the job at hand requires a little extra effort.
• Avoid leaving food, toothpaste or steel and cast iron
cookware in your sink for extended periods of time.
Iron plus moisture on top of copper can lead to sur-
face rust and staining.
• Rubber dish mats, wet sponges and cleaning pads
are not recommended for a lengthy stay in your sink.
Since they trap water, discoloration and staining can
result.
• Just as you do not use your cutting board to clean
the dishes, do not use your sink as a cutting board.
Knives and other sharp kitchen instruments will
natu-rally damage the surface of your sink.
/