Page is loading ...

95292-2-AB

2
95292-2-AB
Introduction
Please read these instructions carefully to familiarize
yourself with the required tools, materials, and installation
sequences. The Exploded Diagram of the Door on page 3
will also provide a helpful reference when relating the
location of the various parts.
All information in these instructions is based on the
latest product information available at the time of
publication. Kohler Co. reserves the right to make
changes in product characteristics, packaging, or
availability at any time without notice.
IMPORTANT CONSUMER INFORMATION
LIMITED ONE-YEAR WARRANTY
Kohler plumbing fixtures and fittings are warranted free of
manufacturing defects.
Kohler Co. will, at its election, repair, replace, or make appropriate
adjustment where Kohler Co. inspection discloses any such defects
occurring in normal usage within one year after installation. Kohler
Co. is not responsible for installation or removal costs.
To obtain warranty service, contact Kohler Co. either through your
Dealer or Plumbing Contractor, or by writing Kohler Co., Attn:
Customer Service Department, 444 Highland Drive, Kohler, WI 53044
USA, or by calling 1-800-4-KOHLER from within the USA.
Implied warranties, including that of merchantability or fitness
for a particular purpose, are expressly limited in duration to the
duration of this warranty. Kohler Co. disclaims any liability for
special, incidental, or consequential damages.
Some states do not allow limitations on how long an implied warranty
lasts or the exclusion or limitation of special, incidental, or
consequential damages, so these limitations and exclusions may not
apply to you. This warranty gives you specific legal rights. You may
also have other rights which vary from state to state.
This limited warranty provides specific legal rights as they apply within
the USA, and other rights may be available, but may vary from country
to country.
This is our exclusive written warranty.
KOHLER CO., KOHLER, WISCONSIN 53044
BASIC TOOLS AND MATERIALS NEEDED
TOOLS
6 foot folding rule or measuring tape
Hacksaw with 32 teeth per inch blade
Miter box or square
Hammer
Electric drill
Drill bit-5/16″
Masonry bit for ceramic tile-5/16″
Fine file
Screwdriver-Phillips
Level
Pencil
Safety glasses
Caulking gun
Knife
MATERIALS
Masking Tape
Silicone Sealant (RTV)
HOW TO CARE FOR YOUR DOOR
NEVER USE SCOURING POWDER, PADS OR SHARP
INSTRUMENTS ON METAL WORK OR GLASS PANELS.
The use of a squeegee following each shower is
recommended to eliminate water spots on the inside of the
glass panels.
An occasional wiping down with a mild detergent diluted in
water is all that is needed to keep the panels and anodized
aluminum parts looking new.
CAUTION: TEMPERED GLASS CANNOT BE CUT.

3
95292-2-AB
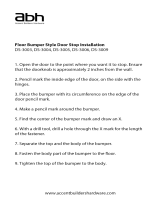
PART NAMES FOR INSTALLATION
Top
Track
No. 8-18 x 1-1/2
Panhead Screw
No. 8-18 x 3/8
Hex Washer
Head Screw
No. 8-32 x 1
Panhead
Screw
Wall
Jamb
Bumper
Bumper
Insert
Wall
Jamb
Outside
Panel
No. 6-32 x 5/16
Flathead Screw
Bottom
Track
Guide
Band
Panel
Guide
Bottom
Track
Insert
Wall Jamb
Bumper
Bumper
Insert
Anchor
No. 8-32 x 1-1/8
Flathead Screw
Screw
Cover
Handle
Locking
Bracket
Support
Housing
Towel
Bar
No. 8-18 x 1-1/2
Panhead Screw
Wall
Jamb
Roller
Identification Label located
inside of the top track.
Inside
Panel

4
95292-2-AB
1 MEASURING FOR BOTTOM
TRACK
NOTE: If your shower has a curve in
the corners at the side walls, be
sure to measure distance D above
the curves.
A. Measure distance D at the flattest part
of the shower ledge.
CAUTION: If a steel tape is used, be
sure to add the width of the case to
the measurement.
D
2 CUTTING BOTTOM TRACK AND
INSTALLING INSERT
NOTE: WEAR SAFETY GLASSES.
A. Cut bottom track 1-1/2″ (3.8cm)
shorter than distance D.
IMPORTANT: Do not measure and
cut top track until wall jambs have
been installed.
B. For best results use a 32 tooth
hacksaw blade and a miter box.
C. Place the bottom track insert into the
groove in the bottom track and push
the insert into the bottom track.
D. Align the insert with the end of bottom
track. On the opposite end, trim excess
insert with a sharp knife.
Bottom
Track
Bottom Track
Insert

5
95292-2-AB
3 INSTALLING GUIDE BAND
A. Insert a guide band over the 3 bottom
track guides as shown.
Guide
Band
Bottom
Track
Guide
4 LOCATE, DRILL AND INSTALL
BOTTOM TRACK GUIDES
NOTE: WEAR SAFETY GLASSES.
A. Divide the cut length of bottom track by
four.
B. Measure from each end of bottom
track and use this dimension to mark
guide hole location on each end of
bottom track. Mark for a third hole at
the center of the end marks.
NOTE: The leg of the bottom track
guide fits into a groove at the front
of the bottom track.
C. Using the panel guide as a template,
place a panel guide at each location
mark on the bottom track. Align the
location mark with the center of the
guide hole. Drill 1/8″ (3mm) diameter
holes at each location in bottom track
through the hole in the panel guide.
Align the holes in the guides with the
drilled holes in the bottom track.
Secure with No. 6-32 x 5/16″ flathead
screws.
Guide
Guide
Band
Bottom
Track
(Front Side)
Guide Leg
Fits Here
No. 6-32 x 5/16
Screw
Guide
1/8 Diameter
Hole
Guide Leg
Fits Here
Bottom Track
(Front Side)

6
95292-2-AB
5 LOCATING BOTTOM TRACK
A. Place the bottom track on the flattest
part of the ledge with the sloping face
of the track towards the inside of the
shower. Make sure that the space
between the wall and track is the same
on both ends.
B. Fasten the track with masking tape.
Mark the ledge with a soft pencil along
the front edge of the track.
Bottom Track This
Side Toward Inside
6 LOCATING WALL JAMB
NOTE: WEAR SAFETY GLASSES.
A. Place one wall jamb down over end of
bottom track. The wall jamb must sit
flat against the wall with the legs of wall
jamb fully engaged with bottom track.
B. NOTE: you may need to shape the
bottom ends of jambs to fit units having
a curve at the side walls.
Wall Jamb
Bottom Track
(Shower Side)
Wall Jamb
Bottom
Track
Round off bottom
ends of wall jambs
if necessary.

7
95292-2-AB
7 MARKING HOLE LOCATIONS
A. Use a level to plumb the wall jamb as
shown and mark the 3 hole locations.
B. Repeat procedure at opposite end of
the unit with the other jamb.
Wall
Jamb
Pencil
Level
8 DRILLING HOLES
NOTE: WEAR SAFETY GLASSES.
A. Remove the bottom track.
B. Lightly center punch the 3-hole
locations for each wall jamb. On
ceramic tile, use the center punch to
nick the surface glaze. Tap the punch
lightly with your hammer so you don’t
crack the tile.
C. Drill all 6 holes with a 5/16″ (8mm) drill
bit (use a masonry bit for ceramic tile).
D. After drilling, thoroughly clean the
shower ledge.
9 SEALING BOTTOM TRACK
A. Apply a bead of caulk on the underside
of the bottom track as shown. This will
give a good seal with the ledge.
B. Install the bottom track on the ledge at
location marked in step 4.
Bottom
Track
Caulk
Here

8
95292-2-AB
10 INSTALLING WALL JAMBS
Use the following steps to install the wall jambs using hollow wall
anchors.
A. Insert the hollow wall anchors into all six 5/16″ (8mm) holes
drilled in step 8.
B. Install each wall jamb by inserting over the bottom track.
Align the holes in the wall jamb with the holes in the wall.
C. Secure the wall jambs with No. 8-18 x 1-1/2″ panhead
screws. Install a wall jamb bumper insert with each
center screw.
D. Push a bumper over the installed bumper insert on each wall
jamb.
Bumper Insert
Installed with
Center Screw
No. 8-18 x 1-1/2
Panhead Screw
Wall
Jamb
Bumper
11 MEASURING, CUTTING AND
INSTALLING TOP TRACK
A. Measure the wall to wall opening at the
top of the installed wall jambs.
CAUTION: If a steel tape is used, be
sure to add the width of the case to
the measurement.
B. Cut the top track 1/32″ (1mm) shorter
than the actual measurement to allow
for clearance. For best results, use a 32
tooth hacksaw blade and miter box. File
the rough edges smooth.
C. Determine which side of the top track is
preferred to be toward the outside of the
shower.
(See Figure 1)
.
D. Install top track over the wall jamb ends.
Measure Here
FIGURE 1
(TOP TRACK)

9
95292-2-AB
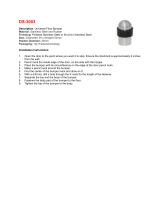
12 INSTALLING ROLLERS
A. Using No. 8-18 x 3/8″ hex washer head screws, assemble two rollers on each panel as shown. Note: The steel
side (Nut Side) of roller must be installed against the top frame flange.
B. OUTSIDE PANEL—Install the rollers toward the rough side of glass. Glass with patterns, install the rollers
opposite the pattern side.
C. INSIDE PANEL—Install the rollers toward the smooth side of glass. Glass with patterns, install the rollers toward
the pattern side of glass.
Note: The steel side (Nut Side)
of roller must be installed
against the top frame flange.
Top Frame
Inside
Panel
(Inside
Panel)
Smooth or
Pattern
Side
Outside
Panel
(Outside Panel)
Smooth or
Pattern Side
Roller
No. 8-18 x 3/8 Hex
Washer Head Screw

10
95292-2-AB
CORRECT INSTALLATION OF DOOR PANELS, TOWEL BARS AND HANDLES
All of the following illustrations for showerhead on the left side.
Showerhead
Handle
INSIDE PANEL
Towel Bar
OUTSIDE PANEL
Handle
Towel Bar
Bracket
Towel Bar
13 INSTALLING INSIDE DOOR PANEL
A. From outside the shower, install the
inside door panel first
. Lift it up inside
the top track and hang the rollers on
the inside rail of the top track. Lower
the panel bottom edge into the bottom
track guides.
B. Align the panel with the wall jamb on
the showerhead side. If adjustment is
needed, remove the panel and loosen
roller screws(s). Move the roller(s) in
the slot to align the door panel. Tighten
the screw(s) and hang the door panel.
C. Slide the inside panel close to the wall
toward the showerhead.
Inside
Rail
FRONT
SIDE
Inside
Panel
Bottom
Track
Guide

11
95292-2-AB
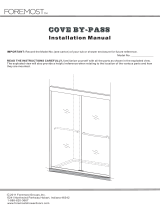
14 INSTALLING INSIDE DOOR PANEL TOWEL
BAR
A. On the side frame toward the showerhead,
position the handle (item 2) on the front side of the
side frame (item 3).
B. Insert a No. 8-32 x 1-1/8″ flathead screw (item 1)
into the door handle (item 2) then through the hole
in the side frame (item 3) and thread the screw into
the locking bracket (item 4) 2 to 3 full turns.
C. On the opposite side frame where the handle
(item 2) is not used, insert a No. 8-32 x 1″ panhead
screw through the hole in the side frame and
thread the screw into the locking bracket (item 4)
2 to 3 full turns.
D. Slide the towel bar support housing (item 5) over
the locking bracket (item 4) until the head of
locking bracket can be seen through opening in
support housing (item 5).
E.
Note that the locking bracket (item 4) can only
rotate in one direction based on its orientation
within the support housing (item 5).
Position the
opening in the support housing (item 5) opposite
that of the
wing feature
, then rotate the bracket
approximately 90 degrees so that the head of the
bracket sticks through the opening in the support
housing (item 5).
F. The towel bar (item 6) can then be mounted into
the assembly. Looking at the cross section of the
towel bar (item 6) slide the center portion of the
towel bar (item 6) into the
head feature
of the
locking bracket (item 4) and into the opening of the
support housing (item 5). Repeat for the other end
of the towel bar (item 6).
G. Now tighten the screws until the towel bar (item 6)
is secure.
H. Remove the backing from the screw cover and
push the cover into the handle over the screw
head.
INSIDE DOOR PANEL TOWEL BAR INSTALLATION
WITH SHOWERHEAD ON LEFT SIDE OF SHOWER
(item 5)
Support
Housing
(item 6)
Towel Bar
(item 2)
Handle
(item 4)
Locking
Bracket
(item 3)
Side
Frame
Screw
Cover
(item 1)
No. 8-32 x 1-1/8
Flathead Screw
No. 8-32 x 1
Panhead Screw
(item 5)
Support
Housing
(item 6)
Towel Bar
(item 2)
Handle
(item 4)
Locking
Bracket
(item 3)
Side
Frame
(item 1)
No. 8-32 x 1-1/8
Flathead Screw
Head
Feature
TOWEL BAR CROSS SECTION
(item 5)
Support
Housing
(item 6)
Towel Bar
Rotate 90
Degrees
Wing
Feature

12
95292-2-AB
15 INSTALLING OUTSIDE DOOR
PANEL
A. Be sure the inside panel is close to the
wall on the showerhead side.
B. Lift the outside door panel up inside the
top track and hang the rollers on the
outside rail of the top track. Lower the
panel bottom edge into the bottom
track guides.
C. Align the panel with the wall jamb
opposite the showerhead side. If
adjustment is needed, remove the
panel and loosen roller screw(s). Move
the roller(s) in slot to align door panel.
Tighten screw(s) and hang the door
panel.
D. After the outside door panel has been
adjusted, remove the panel for towel
bar installation.
FRONT
SIDE
Outside
Panel
Bottom
Track Guide
Outside
Rail

13
95292-2-AB
16 INSTALLING OUTSIDE DOOR PANEL
TOWEL BAR
A. Use same procedures to install the towel bar on
the outside door panel as was used on the inside
door panel.
B. Install the towel bar (item 6) to the room side of the
outside door panel.
C. Be sure to install the handle (item 2) on the shower
side of side frame that will be toward the wall jamb
opposite the showerhead.
D. After towel bar installation, install the outside door
panel. Be sure the inside door panel is close to the
wall on the showerhead side.
OUTSIDE DOOR PANEL TOWEL BAR INSTALLATION
WITH SHOWERHEAD ON LEFT SIDE OF SHOWER
(item 5)
Support
Housing
(item 6)
Towel Bar
(item 2)
Handle
(item 4)
Locking
Bracket
(item 3)
Side
Frame
Screw
Cover
(item 1)
No. 8-32 x 1-1/8
Flathead Screw
No. 8-32 x 1
Panhead Screw
(item 2)
Handle
(item 4)
Locking
Bracket
(item 3)
Side Frame
(item 1)
No. 8-32 x 1-1/8
Flathead Screw
(item 5)
Support
Housing
(item 6)
Towel Bar
Head
Feature
TOWEL BAR CROSS SECTION
(item 5)
Support
Housing
(item 6) Towel Bar
Rotate 90 Degrees
Wing
Feature
17 SEALING
Carefully seal where the wall jambs and wall
meet (1), bottom track and wall jamb join (2)
and bottom track and shower ledge join (3).
Allow the sealant to set
for 24 hours before use.
(1)
(2)
(3)

14
95292-2-AB

15
95292-2-AB

16
95292-2-AB
Questions? Problems? First review the installation instructions to ensure correct installation. For additional assistance
in the USA, call our Customer Service Department for direct help. You may also contact us at our web site listed below.
1-800-4-KOHLER
CALL US FOR HELP
95292-2-AB
/