Page is loading ...

IMPORTANTSAFETYINSTRUCTIONS
•
• Toreducetheriskofdeath,personalinjuryorpropertydamagefromfire,electricshock,fal lingparts,cuts/abrasions,andother
hazardspleasereadallwarningsandinstructionsincludedwithandonthefixtureboxandallfixturelabels.
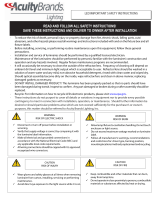
READANDFOLLOWALLSAFETYINSTRUCTIONS!
SAVETHESEINSTRUCTIONSANDDELIVERTOOWNERAFTERINSTALLATION
• Beforeinstalling,servicing,orperformingroutinemaintenanceuponthisequipment,followthese generalprecautions.
• Installationandserviceoflu minairesshouldbeperformedbyaqualifiedlicensedelectrician.
• Maintenanceoftheluminairesshouldbeperformedbyperson(s)familiarwiththeluminaires’constructionandoperationandany
hazardsinvolved.Regularfixturemaintenanceprogramsarerecommended.
• Itwilloccasionallybenecessarytocleantheoutsideoftherefractor/lens.Frequencyofcleaningwilldependonambientdirtlevel
andminimumlightoutputwhichisacceptabletouser.Refractor/lensshouldbewashedinasolutionofwarmwaterandanymild,
non‐abrasivehouseholddetergent,rinsedwithcleanwaterandwipeddry.Shouldopticalassemblybecomedirtyontheinside,
wiperefractor/lensandcleaninabovemanner,replacingdamagedgasketsasnecessary.
• DONOTINSTALLDAMAGEDPRODUCT!Thisluminairehasbeenproperlypackedsothatnopartsshouldhavebeendamaged
duringtransit.Inspecttoconfirm.Anypartdamagedorbrokenduringorafterassemblyshouldbereplaced.
• Ifthelampismarked(Hg)itcontainsMercury.Followalldisposallaws.Seewww.lamprecycle.org.
• Theseinstructionsdonotpurporttocoveralldetailsorvariationsinequipmentnortoprovideeverypossiblecontingencytomeet
inconnectionwithinstallation,operation,ormaintenance.Shouldfurtherinformationbedesiredorshouldparticularproblems
arisewhicharenotcoveredsufficientlyforthepurchaser’sorowner’spurposes,thismattershouldbereferredtoAcuityBrands
Lighting,Inc.
9 Wearglovesandsafetyglassesatalltimeswhen
removingluminairefromcarton,installing,servicingor
performingmaintenance.
9 Avoiddirecteyeexposuretothelightsourcewhileitis
on.
CAUTION
RISKOFINJURY
9 Disconnectorturnoffpowerbeforeinstallationor
servicing.
9 Verifythatsupplyvoltageiscorrectbycomparingit
withtheluminairelabelinformation.
9 Makeallelectricalandgroundedconnectionsin
accordancewiththeNationalElectricalCode(NEC)and
anyapplicablelocalcoderequirements.
9 AllwiringconnectionsshouldbecappedwithUL
approvedrecognizedwireconnectors.
WARNING
RISKOFELECTRICSHOCK
1/10
9 Allowlamp/fixturetocoolbeforehandling.Donot
touchhotlens,lamp,guard,orenclosure.
9 Donotexceedmaximumwattagemarkedonluminaire
label.
9 Followalllampmanufacturer’swarnings,
recommendationsandrestrictionsonlampoperation
includingbutnotlimitedto:ballasttype,burning
position,replacement,andrecycling.
9 UseonlylampsthatcomplywithANSIstandards.
9 Keepcombustibleandothermaterialsthatcanburn
awayfromlamp/lens.
9 Donotoperateincloseproximitytopersons,
combustiblematerialsorsubstancesaffectedbyheat
ordrying.
CAUTION
RISK OF FIRE
WARNING
RISKOFBURN
Please see product specific installation instructions for additional warnings or any applicable FCC or other regulatory
statements.
Failuretofollowanyoftheseinstructionscouldvoidproductwarranties.
ForacompletelistingofproductTermsandConditions,pleasevisitwww.acuitybrands.com.
OurBrands Indoor/Outdoor IndoorLighting OutdoorLighting Controls Daylighting
LithoniaLighting Gotham AmericanElectricLighting DARKTOLIGHT SunOptics
Carandini MarkArchitecturalLighting AntiqueStreetLamps LC&D
Holophane Peerless Hydrel ROAM
RELOC RenaissanceLighting Tersen SensorSwitch
LightConcepts WinonaLightingSynergy
AcuityBrandsLighting,Inc.assumesnoresponsibilityforclaimsarisingoutofimproperorcarelessinstallationorhandlingofitsproducts.
©2010AcuityBrandsLighting,Inc.Allrightsreserved.12/01/10ABLGeneralWarnings,FormNo.503.204

INSTALLATION
INSTRUCTIONS
LITHONIA TRACK LINE VOLTAGE FIXTURES
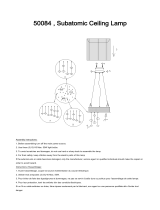
FEATURES:
1. Fixture heads are multi-directional.
DOWNLIGHTING
& TRACK
SYSTEMS
ONE LITHONIA WAY,
CONYERS,
GEORGIA 30012,
TELEPHONE 770-922-9000,
FAX
770-860-3106
www.lithonia.com
IN CANADA: 1100 50TH AVE., LACHINE, QUEBEC H8T
2V3
2. Uses 120V, GU10 shielded 50W bulbs or GU10 LED 25W Max bulbs (Included).
or GU10 LED
25W Max bulbs
3. Designed for mounting to ceilings.
QUESTIONS, PROBLEMS, MISSING PARTS:
Before returning to your local Home Depot, please visit www.lightahome.com for customer support
TOOLS REQUIRED FOR ASSEMBLY & INSTALLATION (not included):
PARTS INCLUDED FOR ASSEMBLY (parts are not to scale):
Ladder
Safety
Goggles
Gloves
Flathead
Screwdriver
Phillips
Screwdriver
Electrical
Tape
Wire
Cutters
x1 GU10 Halogen
50watt bulbs
x1 Mounting bracket
Assembly
x2 screws
x3 x1 Suction cup or Installer Wire Connectors
IMPORTANT SAFETY INSTRUCTIONS
CAUTION:
Make sure power is turned off at the electrical panel box before beginning your installation. Turning the power
off at the wall switch is not sufficient to prevent electrical shock
INSTRUCTIONS PERTAINING TO RISK OF FIRE OR INJURY TO PERSONS
1. Read all instructions prior to beginning the installation process.
2. Do not install this lighting system in a wet location.
3. Lighted lamp is HOT!
4.
CAUTION - HOT SURFACE.
Keep away from curtains and other combustible materials.
5. Do not touch bulb, lens, guard or enclosure at any time. Use a soft cloth. Oil from skin may damage
lamp.
6.
CAUTION -
To reduce the risk of fire, use only 50W Max type GU10 shielded bulbs or 25W Max GU10 LED bulbs.
7. All electrical connections must be in accordance with local codes and the National Electrical Code. If you are unfamiliar
with methods of installing electrical wiring, secure the services of a qualified licensed electrician.
8. These fixtures are intended to be mounted to a 4” square x 2-1/8
” deep metal octagon outlet box. The box must be directly
supported by the building structure.
9. Before starting the installation, disconnect the power by turning off the circuit breakeror by removing the appropriate fuse at
the fuse box. Turning the power off using the light switch is not sufficient to prevent electrical shock.
SAVE THESE INSTRUCTIONS
2/10

INSTALLATION
INSTRUCTIONS
LITHONIA TRACK LINE VOLTAGE FIXTURES
ASSEMBLY INSTRUCTIONS (AS SHOWN IN DIAGRAM):
DOWNLIGHTING
& TRACK
SYSTEMS
ONE LITHONIA WAY,
CONYERS,
GEORGIA 30012,
TELEPHONE 770-922-9000,
FAX
770-860-3106
www.lithonia.com
IN CANADA: 1100 50TH AVE., LACHINE, QUEBEC H8T
2V3
1. Make sure the main power to the circuit is OFF.
2. Install mounting bracket to existing outlet box with screws.
3. Pull wires
through mounting bracket hole.
4. ELECTRICAL CONNECTIONS:
a. Connect the white wire(s) from the fixture to the white wire of the supply circuit.
b. Connect the black wire(s) from the fixture to the black wire of the supply circuit.
c. Connect the green colored (or bare copper) wire to the grounding conductor of the supply circuit.
d. Use U.L. Listed wire connectors suitable for the size, type and number of conductors. No loos
e strands or loose
wires should be present.
e. Secure wire connectors with U.L. Listed electrical tape.
f. Carefully tuck connected wires back into the outlet box.
5. Secure the canopy to the mounting bracket with provided screws.
RELAMPING THE BULB
1. Make sure that the power is turned off.
2.
THE BULB IS HOT!
Make sure that the bulb is cool before re-lamping the fixture.
3. Attach the suction cup to the bulb, and secure the bulb to the socket on lamp housing by twisting and locking correctly.
4. Detach the suction cup from the bulb by pulling the small pin.
5. Restore electricity and check the ope
ration of your new lighting fixture.
CAUTION:
Refer to the re-lamping label located near the lamp holder for recommended maximum wattage.
DO NOT
exceed
the recommended maximum wattage.
ASSEMBLY DIAGRAM
A
B
C
D
E
3/10

INSTALLATION
INSTRUCTIONS
LITHONIA TRACK LINE VOLTAGE FIXTURES
1. Turn off power to the light fixture.
2. To clean simply wipe with a soft dry cloth.
3. Do not use any cleaners with chemicals, solvents or harsh abrasives.
4. Allow the fixture to dry completely before power is restored.
DOWNLIGHTING
& TRACK
SYSTEMS
ONE LITHONIA WAY,
CONYERS,
GEORGIA 30012,
TELEPHONE 770-922-9000,
FAX
770-860-3106
www.lithonia.com
IN CANADA: 1100 50TH AVE., LACHINE, QUEBEC H8T
2V3
PRODUCT MAINTENANCE:
TROUBLE SHOOTING:
Light Bulb will not illuminate.
Possible Cause:
Corrective Action:
1. Light bulb is burned out.
1. Replace light bulb.
2. Power is off.
2. Make sure power supply is on.
3. Check wiring.3. Faulty wire connection
4. Faulty switch
4. Test or replace switch
Fuse blows or circuit breaker
trips when light bulb is
illuminated.
Crossed wires or power wire is
grounding out.
Check wire connections
Problem:
4/10
/