
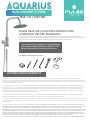
rain shower system
1052-ch | 1052-BN
Please Read The Following Instructions
Completely Before Beginning!
Our goal is to ensure your installation goes smoothly and safely. Please read these instructions carefully and follow
recommendations for plumbing and mounting. After reading instructions, if you determine you do not have the necessary
skills and/or tools, we recommend that a licensed plumbing contractor complete the installation.
1. Defects Covered; Warranty Period. Pulse Shower Spas, Inc. (“Pulse”) warrants to the original consumer purchaser who purchases this shower spa (the “Product”)
for use in his or her own home, that the Product will be free from defects in material and manufacturing workmanship for as long as the original consumer purchaser owns
that same home. For all other purchasers (including, but not limited to purchasers for industrial, commercial and business use), the above warranty will apply for a period of
5 years from the original date of purchase.
2. Remedy. If the Product does not conform to the above warranty, Pulse, at its option, will repair or replace the Product, free of charge, or refund your purchase price.
For warranty claims, please visit www.pulseshowerspas.com/index.php/warranty. Pulse may require that you return the Product to Pulse, shipping prepaid, in which case
Pulse will provide you with a return materials authorization number (RMA). Pulse may also require that you provide evidence of the date you purchased the Product.
Pulse will ship a new or repaired Product to you, at the expense of Pulse, or refund your purchase price. Service labor performed by you or others in connection with the
removal or replacement of the Product will not be reimbursed by Pulse.
3. Exclusions. Pulse shall not be responsible for failure of the Product, and the above warranties will not apply, if the Product fails as a result of improper installation,
improper use, modications or repairs by anyone other than Pulse, or accident or abuse (including damage during shipment).
4. Warranty on Repairs and Replacements. For consumer purchasers who purchased the Product for home use, repaired or replacement Products will continue to be covered
under this warranty for as long as he or she owns that same home. For other purchasers, repaired or replacement Products will be covered for the balance of the original
warranty period.
5. No Other Warranties; Limitation of Liability. OTHER THAN THE LIFETIME LIMITED WARRANTY STATED ABOVE, PULSE DISCLAIMS ALL OTHER WARRANTIES, EXPRESS OR
IMPLIED, INCLUDING BUT NOT LIMITED TO WARRANTIES OF MERCHANTABILITY AND FITNESS FOR A PARTICULAR PURPOSE, TO THE EXTENT PERMITTED BY APPLICABLE LAW.
THE REMEDIES STATED ABOVE ARE YOUR SOLE REMEDIES IN CONNECTION WITH THIS WARRANTY. IN NO EVENT WILL PULSE BE LIABLE TO YOU FOR ANY DAMAGES,
WHETHER DIRECT, INDIRECT, INCIDENTAL, SPECIAL OR CONSEQUENTIAL, INCLUDING BUT NOT LIMITED TO LOST PROFITS OR BUSINESS INTERRUPTION, ARISING OUT OF OR
RELATING TO THE PRODUCT OR ITS USE, WHETHER UNDER A CONTRACT, WARRANTY, TORT, OR ANY OTHER CAUSE OF ACTION, EVEN IF PULSE HAS BEEN ADVISED OF THE
POSSIBILITY OF SUCH DAMAGES. NOTWITHSTANDING THE TERM OF ANY LIMITED OR IMPLIED WARRANTY, OR IN THE EVENT THAT ANY LIMITED WARRANTY FAILS OF ITS
ESSENTIAL PURPOSE, IN NO EVENT WILL PULSE’S ENTIRE LIABILITY EXCEED THE PURCHASE PRICE OF THE PRODUCT. SOME STATES AND PROVINCES DO NOT ALLOW THE
EXCLUSION OR LIMITATION OF INCIDENTAL OR CONSEQUENTIAL DAMAGES SO THE ABOVE LIMITATIONS OR EXCLUSIONS MAY NOT APPLY TO YOU.
THIS LIMITED WARRANTY GIVES YOU SPECIFIC LEGAL RIGHTS, AND YOU MAY ALSO HAVE OTHER RIGHTS WHICH VARY FROM STATE TO STATE AND PROVINCE TO PROVINCE.
If you encounter any problems during installation
Call Technical Support Toll Free at 888-785-7320
Before returning your ShowerSpa to the store
You Will Need The Following Tools:
LIFETIME LIMITED WARRANTY

installation manual
rain shower system
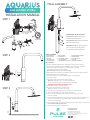
step 1
flange
front view
final assembly
operation instructions:
Showerhead: Rotate diverter(9)
for ON and OFF function.
Handshower(10): Rotate handle for
ON and OFF function.
IMPORTANT: When exiting shower
please make sure mixing valve
is in the OFF/CLOSED position.
step 3
wall
floor
CUSTOMER SERVICE
1-888-785-7320
Hours: Mon.-Fri. 8:30 to 5pm PST
For more information and shop for parts visit us at:
www.PulseShowerSpas.com
step 2
wall
5
2
3
3
4
13
5
6
7
Maximum distance
from finished wall
1 3/4 - inches
wall
8
9
10
11
14
14
14
12
1
1. showerhead
2. inlet fitting
3. flange
4. set screw (3)
5. shower body
parts legend
6. escutcheon
7. Extension (2)
8. Mounting screws
w/ anchors (2)
9. showerhead on/off
10. handshower on/off
11. handshower
12. shower hose
13. top-tee
14. rubber washer (3)
Instructions:
1. Remove inlet tting(2) from top-tee(14) by loosening set screws(4).
2. Remove top-tee(14) from shower body(5) by loosening set screws(4).
3. Determine length of nipple for your installation. If needed,
add extension(s)(7) for proper length.
Note: drawing on Step 1 for correct length.
4. Apply PTFE tape (clockwise) or plumber's thread sealant to nipple threads.
5. Thread ange(3) on to inlet tting(2).
6. Use Allen wrench to securely tighten nipple into wall tting
ensuring no leaks.
7. Tighten ange(3) against nished wall surface.
Optional: Drill two 3/16-in. holes through ange.
Insert anchors(8) and secure with screws provided(8).
CAUTION: Live plumbing behind the wall.
8. Slide escutcheon(6) onto top-tee(14).
9. Re-insert top-tee(14) over inlet tting(2).
Hint: Use soft soap to lubricate o-rings.
10. Vertically align top-tee(14)and secure with two set screws(4).
11. Slide escutcheon(6) against nished wall surface.
12. Attach shower body(5) to top-tee(14). Vertically align and secure
with set screw(4).
13. Insert a rubber washer(14), attach hose(12) to top-tee(14) and handshower.
Note: Hex nut fastens to top-tee tting(14). Tapered end of hose(12)
attaches to handshower.
15. Insert handshower into bottom of shower body(5) until magnet is activated.
Note: Held with Magnetic holder
16. Attach showerhead (1) to shower arm.
-
 1
1
-
 2
2


PULSE Showerspas 1052-BN Installation guide
- Type
- Installation guide
- This manual is also suitable for
Ask a question and I''ll find the answer in the document
Finding information in a document is now easier with AI
Related papers
-
Pulse 1052-BN Installation guide
-
-
PULSE Showerspas 1011-III-BN User manual
-
-
-
Pulse 7002-SSB Owner's manual
-
-
Pulse 1053-CH Owner's manual
-
-
Other documents
-
Delta U4999-SS Installation guide
-
-
-
ALFI BRAND AB7938-BN User manual
-
-
-
-
Barclay Products 350-PN Installation guide
-
-