Page is loading ...

THANK YOU
We appreciate the trust and confidence you have placed in Hampton Bay through the purchase of this dining set. We strive to
continually create quality products designed to enhance your home. Visit us online to see our full line of products available for your
home improvement needs. Thank you for choosing Hampton Bay!
Item #1000 000 000
Model #FG-VOL5DNTOF
USE AND CARE GUIDE
AINSWORTH 5 PIECE DINING SET
Questions, problems, missing parts? Before returning to the store,
call Hampton Bay Customer Service
8 a.m. – 7 p.m., EST, Monday – Friday, 9 a.m. – 6 p.m., EST, Saturday
1-855-HD-HAMPTON
HAMPTONBAY.COM

2
Table of Contents
Table of Contents .......................................................... 2
Safety Information ......................................................... 2
Warranty ......................................................................... 3
What is Covered ......................................................... 3
What is Not Covered .................................................. 3
Pre-Assembly ................................................................ 4
Planning assembly ..................................................... 4
Hardware Included ..................................................... 4
Table Package Contents............................................ 5
Chair Package Contents ............................................ 6
Table Assembly............................................................. 7
Chair Assembly ............................................................. 9
Care and Cleaning ...................................................... 11
Safety Information
WARNING: Do not put heavy objects on the table.
DANGER: Please keep children out of the
assembly area at all times.
IMPORTANT: Please check the tightness of the bolts
at least every 90 days.

3 HAMPTONBAY.COM
Please contact 1-855-HD-HAMPTON for further assistance.
Warranty
3 YEAR LIMITED WARRANTY
WHAT IS COVERED
Residential use of this furniture is warranted for a three (3) year limited warranty period for the frame construction. The
warranty is valid from the date of purchase and applies only to the original purchaser. If your Hampton Bay outdoor
furniture fails structurally during normal use (other than damage as a result of dropping or breaking a cast part) within
three (3) years of purchase, the manufacturer will repair or replace the frame at its discretion with the same or similar
product if the original product is discontinued, at no charge. Cushions are warranted for a one (1) year period against
seams separating or tearing. Fabric is covered under the 3 year limited warranty. The finish is warranted against peeling,
cracking or blistering for a period of one (1) year provided the product has not been scratched or abraded. Scratches and
chips resulting from normal wear and tear are not covered. Straps and/or wicker weave are warranted for a period of one
(1) year against separation or tearing. Fading of the finish, straps and/or wicker weave resulting from exposure to
elements is not covered. Stains as a result of chemical spills and certain food items are not covered.
WHAT IS NOT COVERED
The following are expressly excluded from warranty coverage: failure caused by unreasonable or abusive use; furniture
that was sold as clearance items, display models, or items purchased in "as is" condition; freight damage; furniture
damaged by acts of nature, vandalism, fire, abuse, lack of proper care and maintenance, or improper assembly; normal
fading of straps and fabric; discoloration of frame or fabric from exposure to elements, oils, spills, fluids or chemicals; table
top breakage; hardware corrosion or rusting; buckling or splitting of tubing resulting from exposure to water and freezing
temperatures; glass table tops; purchased or replacement parts; and plastics. Also excluded from warranty coverage is
lost time of use and/or money, inconvenience, travel, packaging, or any other consequential or incidental damages. In no
event shall the manufacturer’s responsibility exceed the value of the replacement product. Warranty is to the original
purchaser when items are purchased from one of our authorized retailers, and is not transferable. All warranty claims
must be submitted with a dated register receipt within the warranty period. Should replacement of the warranted item be
unavailable, the manufacturer reserves the right to substitute items of its choice similar in style, color and quality. For
quality control purposes and verification, we reserve the right to request photographs of the damaged item(s). The terms
of this warranty are subject to change without notice. Shipping and handling charges are at all times the responsibility of
the claimant. We do not ship outside of the North American continent.
Contact the Customer Service Team at 1-855-HD-HAMPTON or visit www.Hamptonbay.com.

4
Pre-Assembly
PLANNING ASSEMBLY
It will take one or two people about 20 minutes to complete the assembly process.
PLEASE READ COMPLETE INSTRUCTION MANUAL PRIOR TO ASSEMBLY! Identify all parts packed in the carton
against the parts list. Remove all protective materials and place the parts on a nonabrasive surface to avoid scratching.
HARDWARE INCLUDED
NOTE: Hardware shown to actual size.
Part
Description
Quantity
AA
Bolt (1/4 in. x 30 mm)
8
BB
Bolt (5/16 in. x 20 mm)
4
CC
Bolt (1/4 in. x 25 mm)
8
DD
Bolt (1/4 in. x 40 mm)
8
EE
Bolt (1/4 in. x 15 mm)
16
FF
Flat Washer (1/4 in.)
16
GG
Lock Washer (1/4 in.)
16
HH
Flat Washer (5/16 in.)
4
II
Lock Washer (5/16 in.)
4
JJ
Hex Wrench (5/16 in.)
1
KK
Hex Screw Driver
5
AA BB CC DD
EE FF GG HH I I
JJ KK

5 HAMPTONBAY.COM
Please contact 1-855-HD-HAMPTON for further assistance.
Pre-Assembly (continued)
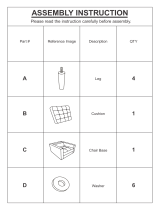
TABLE PACKAGE CONTENTS
Part
Description
Quantity
A
Table Top
1
B
Table Leg
4
C
Leg Connector Ring
1
D
Umbrella Hole Cap
1
A
B
C
D

6
Pre- Assembly (continued)
CHAIR PACKAGE CONTENTS
Part
Description
Quantity
E
Chair Back
4
F
Chair Leg (Left)
4
G
Chair Leg (Right)
4
H
Chair Seat
4
I
Seat Cushion
4
E H
F I
G

7 HAMPTONBAY.COM
Please contact 1-855-HD-HAMPTON for further assistance.
Table Assembly
1
ASSEMBLING THE BASE
2
ASSEMBLING THE TOP TO
THE BASE
□ Remove all protective material carefully. Avoid
scratching the surface of the frames while removing
the packaging material. Loosely attach the Table
Legs (B) to the Leg Connector Ring (C) with Bolts
(AA) through the Lock Washers (GG) and Flat
Washers (FF). See figure.
NOTE: Do not tighten bolts completely until assembly
is completed.
□ Place the Table Top (A) up-side down. Align the bolt
holes on the assembled table base to those on the
Table Top (A). Secure the table base with Bolts (BB)
through Lock Washers (II), Flat Washers (HH) and
the table base. See figure.
NOTE: Do not tighten bolts completely until assembly
is completed.
C
B
AA GG
FF
C
B
A
BB
HH
II

8
Table Assembly (continued)
3
ADUSTING THE TABLE & FINISHING ASSEMBLY
□ With the help of another person, carefully turn the
table to up-right position. Check the alignment of
the table and adjust if necessary. Once the
alignments are correct and all bolts are in place,
tighten all bolts with the Hex Screwdriver (HH) and
the Hex Wrench (GG).
□ Place the Umbrella Hole Cap (D) on the umbrella
hole in the center of the table.
□ The table is ready for your enjoyment now.
A
D

9 HAMPTONBAY.COM
Please contact 1-855-HD-HAMPTON for further assistance.
Chair Assembly
1
ASSEMBLING THE CHAIR
BACK AND SEAT
2
ASSEMBLING THE LEFT LEG
□ Remove all protective material carefully. Avoid
scratching the surface of the frames while removing
the packaging material. Loosely attach the Chair
Seat (H) to the Chair Back (E) with Bolts (CC)
through the Lock Washers (GG), Flat Washers
(FF), Chair Seat (H) and Chair Back (E). See figure.
NOTE: Do not tighten bolts completely until assembly
is completed.
□ Align the Chair Leg (Left) (F) with the assembly hole
on the Chair Seat (H) and attach with Bolts (EE). See
figure.
□ Align the Chair Leg (Left) (F) with the assembly hole
on the Chair Back (E) and attach with a Bolt (DD).
See figure.
NOTE: Do not tighten bolts completely until assembly
is completed.
E
H
FF
GG
CC
FF
G
G
CC
E
H
E
DD
F
EE

10
Chair Assembly (continued)
3
ASSEMBLING THE RIGHT
LEG
4
FINISHING ASSEMBLY
□ Align the Chair Leg (Right) (G) with the assembly
hole on the Chair Seat (H) and attach with Bolts
(EE). See figure.
□ Align the Chair Leg (Right) (G) with the assembly
hole on the Chair Back (E) and attach with Bolts
(DD). See figure.
NOTE: Do not tighten bolts completely until assembly
is completed.
□ Carefully turn the Dining Chair to the up-right position
on a flat surface. Check the alignment of the chair.
Once the alignments are correct and all bolts are in
place, tighten all bolts and finish assembly.
□ Put the Seat Cushion (I) on the Chair.
□ The Chair is ready for your enjoyment.
□ Repeat steps 1-3 to assemble the remaining chair.
NOTE: Periodically check to make sure all bolts
are tight after long periods of usage.
G
EE
DD
H
E
I

11 HAMPTONBAY.COM
Please contact 1-855-HD-HAMPTON for further assistance.
Care and Cleaning
Clean the furniture frame with a wet towel using mild soap and water solution. Dry completely with a soft towel. Clean the
cushions and sling seat material with a mild solution of soap and water and hang cushions to drip dry completely. It is
recommended that cushions be stored in a dry area during rain and if they are not in use and in direct sunlight. Do not
machine wash or dry. Do not use bleach or strong solvents to clean any of your patio furniture. It will harm both fabrics
and metal finishes. Caution should be used when using oils, lotions and other chemicals such as chlorine or repeated
exposure to extreme weather conditions (including heat), which may cause permanent discoloration to the fabric. To
maintain and protect the furniture, always cover it with an outdoor furniture cover or store in a safe dry area when not in
use for long periods of time.
You may contact our customer service department with any questions by phone at 1-855-HD-HAMPTON or visit
www.hamptonbay.com

Questions, problems, missing parts? Before returning to the store,
call Hampton Bay Customer Service
8 a.m. – 7 p.m., EST, Monday – Friday, 9 a.m. – 6 p.m., EST, Saturday
1-855-HD-HAMPTON
HAMPTONBAY.COM
Retain this manual for future use.
/