Chicago Pneumatic Red Hawk Road Operating instructions
- Type
- Operating instructions

Safety and operating instructions
Petrol breakers
Valid for United States of America only
Red Hawk Road
www.cp.com

9800 1529 01 | Original instructions2
Red Hawk Road

Contents
Introduction. . . . . . . . . . . . . . . . . . . . . . . . . . . . . . . . . . . . . . . . . . . . . . . . . . . . . . . . . . . . . . . . . . . . . . . 5
About the Safety and operating instructions. . . . . . . . . . . . . . . . . . . . . . . . . . . . . . . . . . . . . . . 5
Safety instructions. . . . . . . . . . . . . . . . . . . . . . . . . . . . . . . . . . . . . . . . . . . . . . . . . . . . . . . . . . . . . . . . . 6
Safety signal words. . . . . . . . . . . . . . . . . . . . . . . . . . . . . . . . . . . . . . . . . . . . . . . . . . . . . . . . . . . . . . . . 6
Personal precautions and qualifications. . . . . . . . . . . . . . . . . . . . . . . . . . . . . . . . . . . . . . . . . . . . . . 6
Installation, precautions. . . . . . . . . . . . . . . . . . . . . . . . . . . . . . . . . . . . . . . . . . . . . . . . . . . . . . . . . . . . 6
Operation, precautions. . . . . . . . . . . . . . . . . . . . . . . . . . . . . . . . . . . . . . . . . . . . . . . . . . . . . . . . . . . . 6
Maintenance, precautions. . . . . . . . . . . . . . . . . . . . . . . . . . . . . . . . . . . . . . . . . . . . . . . . . . . . . . . . . 11
Storage, precautions. . . . . . . . . . . . . . . . . . . . . . . . . . . . . . . . . . . . . . . . . . . . . . . . . . . . . . . . . . . . . . 11
Overview. . . . . . . . . . . . . . . . . . . . . . . . . . . . . . . . . . . . . . . . . . . . . . . . . . . . . . . . . . . . . . . . . . . . . . . . . 12
Design and function. . . . . . . . . . . . . . . . . . . . . . . . . . . . . . . . . . . . . . . . . . . . . . . . . . . . . . . . . . . . . . 12
Choosing the correct breaker for a task. . . . . . . . . . . . . . . . . . . . . . . . . . . . . . . . . . . . . . . . . . . . . . 12
Main parts. . . . . . . . . . . . . . . . . . . . . . . . . . . . . . . . . . . . . . . . . . . . . . . . . . . . . . . . . . . . . . . . . . . . . . 12
Labels. . . . . . . . . . . . . . . . . . . . . . . . . . . . . . . . . . . . . . . . . . . . . . . . . . . . . . . . . . . . . . . . . . . . . . . . . . 13
Transport. . . . . . . . . . . . . . . . . . . . . . . . . . . . . . . . . . . . . . . . . . . . . . . . . . . . . . . . . . . . . . . . . . . . . . . . . 13
Installation. . . . . . . . . . . . . . . . . . . . . . . . . . . . . . . . . . . . . . . . . . . . . . . . . . . . . . . . . . . . . . . . . . . . . . . 14
Fuel. . . . . . . . . . . . . . . . . . . . . . . . . . . . . . . . . . . . . . . . . . . . . . . . . . . . . . . . . . . . . . . . . . . . . . . . . . . . 14
Insertion tool. . . . . . . . . . . . . . . . . . . . . . . . . . . . . . . . . . . . . . . . . . . . . . . . . . . . . . . . . . . . . . . . . . . . 14
Operation. . . . . . . . . . . . . . . . . . . . . . . . . . . . . . . . . . . . . . . . . . . . . . . . . . . . . . . . . . . . . . . . . . . . . . . . 16
Start and stop. . . . . . . . . . . . . . . . . . . . . . . . . . . . . . . . . . . . . . . . . . . . . . . . . . . . . . . . . . . . . . . . . . . 16
Operating. . . . . . . . . . . . . . . . . . . . . . . . . . . . . . . . . . . . . . . . . . . . . . . . . . . . . . . . . . . . . . . . . . . . . . . 16
When taking a break. . . . . . . . . . . . . . . . . . . . . . . . . . . . . . . . . . . . . . . . . . . . . . . . . . . . . . . . . . . . . . 17
Maintenance. . . . . . . . . . . . . . . . . . . . . . . . . . . . . . . . . . . . . . . . . . . . . . . . . . . . . . . . . . . . . . . . . . . . . 17
Every day. . . . . . . . . . . . . . . . . . . . . . . . . . . . . . . . . . . . . . . . . . . . . . . . . . . . . . . . . . . . . . . . . . . . . . . 18
Every month. . . . . . . . . . . . . . . . . . . . . . . . . . . . . . . . . . . . . . . . . . . . . . . . . . . . . . . . . . . . . . . . . . . . . 19
Every year. . . . . . . . . . . . . . . . . . . . . . . . . . . . . . . . . . . . . . . . . . . . . . . . . . . . . . . . . . . . . . . . . . . . . . . 19
Repair. . . . . . . . . . . . . . . . . . . . . . . . . . . . . . . . . . . . . . . . . . . . . . . . . . . . . . . . . . . . . . . . . . . . . . . . . . . . 19
Replacing the starter cord. . . . . . . . . . . . . . . . . . . . . . . . . . . . . . . . . . . . . . . . . . . . . . . . . . . . . . . . . 19
Troubleshooting. . . . . . . . . . . . . . . . . . . . . . . . . . . . . . . . . . . . . . . . . . . . . . . . . . . . . . . . . . . . . . . . . . 20
Storage. . . . . . . . . . . . . . . . . . . . . . . . . . . . . . . . . . . . . . . . . . . . . . . . . . . . . . . . . . . . . . . . . . . . . . . . . . . 21
Disposal. . . . . . . . . . . . . . . . . . . . . . . . . . . . . . . . . . . . . . . . . . . . . . . . . . . . . . . . . . . . . . . . . . . . . . . . . . 21
Technical data. . . . . . . . . . . . . . . . . . . . . . . . . . . . . . . . . . . . . . . . . . . . . . . . . . . . . . . . . . . . . . . . . . . . 22
Products. . . . . . . . . . . . . . . . . . . . . . . . . . . . . . . . . . . . . . . . . . . . . . . . . . . . . . . . . . . . . . . . . . . . . . . . 22
Machine data. . . . . . . . . . . . . . . . . . . . . . . . . . . . . . . . . . . . . . . . . . . . . . . . . . . . . . . . . . . . . . . . . . . . 22
Gearbox unit. . . . . . . . . . . . . . . . . . . . . . . . . . . . . . . . . . . . . . . . . . . . . . . . . . . . . . . . . . . . . . . . . . . . 22
Impact unit. . . . . . . . . . . . . . . . . . . . . . . . . . . . . . . . . . . . . . . . . . . . . . . . . . . . . . . . . . . . . . . . . . . . . . 23
Noise and vibration declaration statement. . . . . . . . . . . . . . . . . . . . . . . . . . . . . . . . . . . . . . . . . . . 23
Additional vibration information. . . . . . . . . . . . . . . . . . . . . . . . . . . . . . . . . . . . . . . . . . . . . . . . . . . 23
Noise and vibration data. . . . . . . . . . . . . . . . . . . . . . . . . . . . . . . . . . . . . . . . . . . . . . . . . . . . . . . . . . 24
EC Declaration of Conformity. . . . . . . . . . . . . . . . . . . . . . . . . . . . . . . . . . . . . . . . . . . . . . . . . . . . . 25
EC Declaration of Conformity (EC Directive 2006/42/EC). . . . . . . . . . . . . . . . . . . . . . . . . . . . . . 25
Warranty. . . . . . . . . . . . . . . . . . . . . . . . . . . . . . . . . . . . . . . . . . . . . . . . . . . . . . . . . . . . . . . . . . . . . . . . . 26
Emission control system warranty. . . . . . . . . . . . . . . . . . . . . . . . . . . . . . . . . . . . . . . . . . . . . . . . . . 26
General warranty conditions and limitations on liability. . . . . . . . . . . . . . . . . . . . . . . . . . . . . . . 27
39800 1529 01 | Original instructions
ContentsRed Hawk Road

9800 1529 01 | Original instructions4
Red Hawk RoadSafety and operating instructions

Introduction
Thank you for choosing Chicago Pneumatic brand products. For over a century, the
Chicago Pneumatic brand has represented performance and innovation in the
pneumatic tool industry.
Today the brand is found around the world on a range of pneumatic and hydraulic
tools that includes breakers, rock drills, chipping hammers, clay-diggers, picks and
busters, scabblers, pumps and a whole lot more.
The Chicago Pneumatic brand is associated with powerful and reliable products that
are easy to maintain and that give good value for the money.
For more information please visit www.cp.com
Atlas Copco Construction Tools AB
Box 703
391 27 Kalmar
Sweden
About the Safety and operating
instructions
The aim of the instructions is to provide you with knowledge of how to use the petrol
breaker in an efficient, safe way. The instructions also give you advice and tell you
how to perform regular maintenance on the petrol breaker.
Before using the petrol breaker for the first time you must read these instructions
carefully and understand all of them.
59800 1529 01 | Original instructions
Safety and operating instructionsRed Hawk Road

Safety instructions
To reduce the risk of serious injury or death to
yourself or others, read and understand the Safety
and operating instruction before installing,
operating, repairing, maintaining, or changing
accessories on the machine.
Post this Safety and operating instruction at work
locations, provide copies to employees, and make
sure that everyone reads the Safety and operating
instruction before operating or servicing the
machine.
In addition, the operator or the operator's employer
must assess the specific risks that may be present as
a result of each use of the machine.
Safety signal words
The safety signal words Danger, Warning and
Caution have the following meanings:
Indicates a hazardous situation
which, if not avoided, will result
in death or serious injury.
DANGER
Indicates a hazardous situation
which, if not avoided, could
result in death or serious injury.
WARNING
Indicates a hazardous situation
which, if not avoided, could
result in minor or moderate
injury.
CAUTION
Personal precautions and
qualifications
Only qualified and trained persons may operate or
maintain the machine. They must be physically able
to handle the bulk, weight, and power of the tool.
Always use your common sense and good
judgement.
Personal protective equipment
Always use approved protective equipment.
Operators and all other persons in the working area
must wear protective equipment, including at a
minimum:
> Protective helmet
> Hearing protection
> Impact resistant eye protection with side
protection
> Respiratory protection when appropriate
> Protective gloves
> Proper protective boots
> Appropriate work overall or similar clothing (not
loose-fitting) that covers your arms and legs.
Drugs, alcohol or medication
WARNING Drugs, alcohol or medication
Drugs, alcohol or medication may impair your
judgment and powers of concentration. Poor
reactions and incorrect assessments can lead to
severe accidents or death.
► Never use the machine when you are tired or
under the influence of drugs, alcohol or
medication.
► No person who is under the influence of drugs,
alcohol or medication may operate the machine.
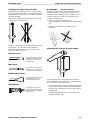
Installation, precautions
WARNING Ejected insertion tool
If the tool retainer on the machine is not in a locked
position, the inserted tool can be ejected with force,
which can cause personal injury.
► Always stop the machine before changing the
inserted tool or accessories.
► Never point the inserted tool at yourself or anyone
else.
► Make sure that the insertion tool is fully inserted
and the tool retainer is in a locked position before
the machine is started.
► Check the lock function by pulling the inserted
tool outwards powerfully.
WARNING Moving or slipping insertion
tool
An incorrect dimension of the inserted tool’s shank
can result in that the inserted tool is lost or is slipping
out during operation. Risk of severe injury or crushed
hands and fingers.
► Check that the insertion tool has the shank length
and dimensions that the machine is intended for.
► Never use an insertion tool without a collar.
Operation, precautions
DANGER Explosion hazard
If a warm insertion tool or exhaust pipe comes into
contact with explosives, an explosion could occur.
During operating with certain materials, sparks and
ignition can occur. Explosions will lead to severe
injuries or death.
► Never operate the machine in any explosive
environment.
► Never use the machine near flammable materials,
fumes or dust.
► Make sure that there are no undetected sources
of gas or explosives.
9800 1529 01 | Original instructions6
Red Hawk RoadSafety and operating instructions

► Avoid contact with the warm exhaust pipe or the
bottom of the machine.
DANGER Fuel hazard
The fuel is extremely flammable and petrol fumes
can explode when ignited, causing serious injury or
death.
► Protect your skin from contact with the fuel. If fuel
has penetrated the skin, consult a qualified health
professional.
► Never remove the filler cap, and never fill the fuel
tank when the machine is hot.
► Mix the fuel and fill the fuel tank outdoors or in a
clean and well ventilated place, free from sparks
and open flames. Fill the fuel tank at least ten
meters (30 feet) from the place where the machine
is to be used.
► Release the filler cap slowly to let pressure escape.
► Never overfill the fuel tank.
► Make sure the filler cap is screwed on when the
machine is used.
► Avoid spilling fuel on the machine, wipe off any
spilled fuel.
► Check regularly for fuel leaks. Never use the
machine if it is leaking fuel.
► Never use the machine in the proximity of material
that can generate sparks. Remove all hot or
spark-generating devices before starting the
machine.
► Never smoke when filling the fuel tank or when
working with the machine or servicing it.
► Only store fuel in a container that is specially
constructed and approved for the purpose.
► Consumed petrol and oil containers must be taken
care of and returned to the retailer.
► Never use your fingers to check for fluid leaks.
WARNING Unexpected movements
The inserted tool is exposed to heavy strains when
the machine is used. The inserted tool may break
due to fatigue after a certain amount of use. If the
inserted tool breaks or gets stuck, there may be
sudden and unexpected movement that can cause
injuries. Furthermore, losing your balance or slipping
may cause injury.
► Make sure that you always keep a stable position
with your feet as far apart as your shoulder width,
and keeping a balanced body weight.
► Always inspect the equipment prior to use. Never
use the equipment if you suspect that it is
damaged.
► Make sure that the handles are clean and free of
grease and oil.
► Keep your feet away from the inserted tool.
► Stand firmly and always hold on to the machine
with both hands.
► Never start the machine when it is lying on the
ground.
► Never ‘ride’ on the machine with one leg over the
handle.
► Never strike or abuse the equipment.
► Check regularly for wear on the insertion tool,
and check whether there are any signs of damage
or visible cracks.
► Pay attention and look at what you are doing.
79800 1529 01 | Original instructions
Safety and operating instructionsRed Hawk Road

WARNING Dust and fume hazard
Dusts and/or fumes generated or dispersed when
using the machine may cause serious and permanent
respiratory disease, illness, or other bodily injury (for
example, silicosis or other irreversible lung disease
that can be fatal, cancer, birth defects, and/or skin
inflammation).
Some dusts and fumes created by drilling, breaking,
hammering, sawing, grinding and other construction
activities contain substances known to the State of
California and other authorities to cause respiratory
disease, cancer, birth defects, or other reproductive
harm. Some examples of such substances are:
> Crystalline silica, cement, and other masonry
products.
> Arsenic and chromium from chemically-treated
rubber.
> Lead from lead-based paints.
Dust and fumes in the air can be invisible to the
naked eye, so do not rely on eye sight to determine
if there is dust or fumes in the air.
To reduce the risk of exposure to dust and fumes,
do all of the following:
► Perform site-specific risk assessment. The risk
assessment should include dust and fumes created
by the use of the machine and the potential for
disturbing existing dust.
► Use proper engineering controls to minimize the
amount of dust and fumes in the air and to
minimize build-up on equipment, surfaces,
clothing, and body parts. Examples of controls
include: exhaust ventilation and dust collection
systems, water sprays, and wet drilling. Control
dusts and fumes at the source where possible.
Make sure that controls are properly installed,
maintained and correctly used.
► Wear, maintain and correctly use respiratory
protection as instructed by your employer and as
required by occupational health and safety
regulations. The respiratory protection must be
effective for the type of substance at issue (and if
applicable, approved by relevant governmental
authority).
► Work in a well ventilated area.
► If the machine has an exhaust, direct the exhaust
so as to reduce disturbance of dust in a dust filled
environment.
► Operate and maintain the machine as
recommended in the operating and safety
instructions
► Select, maintain and replace consumables/
working tools/ other accessories as recommended
in the operating and safety instructions. Incorrect
selection or lack of maintenance of consumables/
inserted tools/ other accessories may cause an
unnecessary increase in dust or fumes.
► Wear washable or disposable protective clothes
at the worksite, and shower and change into clean
clothes before leaving the worksite to reduce
exposure of dust and fumes to yourself, other
persons, cars, homes, and other areas.
► Avoid eating, drinking, and using tobacco
products in areas where there is dust or fumes.
► Wash your hands and face thoroughly as soon as
possible upon leaving the exposure area, and
always before eating, drinking, using tobacco
products, or making contact with other persons.
► Comply with all applicable laws and regulations,
including occupational health and safety
regulations.
► Participate in air monitoring, medical examination
programs, and health and safety training
programs provided by your employer or trade
organizations and in accordance with
occupational health and safety regulations and
recommendations. Consult with physicians
experienced with relevant occupational medicine.
► Work with your employer and trade organization
to reduce dust and fume exposure at the worksite
and to reduce the risks. Effective health and safety
programs, policies and procedures for protecting
workers and others against harmful exposure to
dust and fumes should be established and
implemented based on advice from health and
safety experts. Consult with experts.
► Residues of hazardous substances on the machine
can be a risk. Before undertaking any maintenance
on the machine, clean it thoroughly.
DANGER Exhaust gas hazard
The exhaust gas from the machine’s combustion
engine contains carbon monoxide which is
poisonous, and chemicals known to the State of
California and other authorities to cause cancer, birth
defects, or other reproductive harm. Inhalation of
exhaust fumes can cause serious injury, illness, or
death.
► Never inhale exhaust fumes.
► Never operate the machine indoors or in a poorly
ventilated area.
► Never stand in a deep hole, ditch, or similar
surrounding during operating.
9800 1529 01 | Original instructions8
Red Hawk RoadSafety and operating instructions

WARNING Projectiles
Failure of the work piece, of accessories, or even of
the machine itself may generate high velocity
projectiles. During operating, splinters or other
particles from the working material may become
projectiles and cause personal injury by striking the
operator or other persons. To reduce these risk:
► Use approved personal protective equipment and
safety helmet, including impact resistant eye
protection with side protection.
► Make sure that no unauthorised persons trespass
into the working zone.
► Keep the workplace free from foreign objects.
► Ensure that the work piece is securely fixed.
WARNING Splinters hazard
Using the insertion tool as a hand struck tool can
result in splinters hitting the operator and can cause
personal injury.
► Never use an insertion tool as a hand struck tool.
They are specifically designed and heat-treated to
be used only in a machine.
WARNING Slipping, tripping and
falling hazards
There is a risk of slipping or tripping or falling, for
example tripping on the hoses or on other objects.
Slipping or tripping or falling can cause injury. To
reduce this risk:
► Always make sure that no hose or other object is
in your way or in any other person's way.
► Always make sure you are in a stable position with
your feet as far apart as your shoulders width and
keeping a balanced body weight.
WARNING Motion hazards
When using the machine to perform work-related
activities, you may experience discomfort in the
hands, arms, shoulders, neck, or other parts of the
body.
► Adopt a comfortable posture while maintaining
secure footing and avoiding awkward
off-balanced postures.
► Changing posture during extended tasks may
help avoid discomfort and fatigue.
► In case of persistent or recurring symptoms,
consult a qualified health professional.
WARNING Vibration hazards
Normal and proper use of the machine exposes the
operator to vibration. Regular and frequent exposure
to vibration may cause, contribute to, or aggravate
injury or disorders to the operator’s fingers, hands,
wrists, arms, shoulders and/or nerves and blood
supply or other body parts, including debilitating
and/or permanent injuries or disorders that may
develop gradually over periods of weeks, months,
or years. Such injuries or disorders may include
damage to the blood circulatory system, damage to
the nervous system, damage to joints, and possibly
damage to other body structures.
If numbness, persistent recurring discomfort,
burning sensation, stiffness, throbbing, tingling,
pain, clumsiness, weakened grip, whitening of the
skin, or other symptoms occur at any time, when
operating the machine or when not operating the
machine, stop operating the machine, tell your
employer and seek medical attention. Continued
use of the machine after the occurrence of any such
symptom may increase the risk of symptoms
becoming more severe and/or permanent.
Operate and maintain the machine as recommended
in these instructions, to prevent an unnecessary
increase in vibration.
The following may help to reduce exposure to
vibration for the operator:
► Let the tool do the job. Use a minimum hand grip
consistent with proper control and safe operation.
► If the machine has vibration absorbing handles,
keep them in a central position, avoid pressing
the handles into the end stops.
► When the percussion mechanism is activated, the
only body contact with the machine you should
have are your hands on the handle or handles.
Avoid any other contact, for example supporting
any part of the body against the machine or
leaning onto the machine trying to increase the
feed force. It is also important not to keep the start
and stop device engaged while extracting the tool
from the work surface.
► Make sure that the inserted tool is well-maintained
(including sharpness, if a cutting tool), not worn
out, and of the proper size. Insertion tools that
are not well-maintained, or that are worn out, or
that are not of the proper size result in longer time
to complete a task (and a longer period of
exposure to vibration) and may result in or
contribute to higher levels of vibration exposure.
► Immediately stop working if the machine
suddenly starts to vibrate strongly. Before
resuming the work, find and remove the cause of
the increased vibrations.
► Never grab, hold or touch the inserted tool when
using the machine.
99800 1529 01 | Original instructions
Safety and operating instructionsRed Hawk Road

► Participate in health surveillance or monitoring,
medical exams and training programs offered by
your employer and when required by law.
► When working in cold conditions wear warm
clothing and keep hands warm and dry.
► The exhaust air is strongly chilled and shall not
make contact with the operator. Always direct the
exhaust air away from hands and body.
See the ”Noise and vibration declaration statement”
for the machine, including the declared vibration
values. This information can be found at the end of
these Safety and operating instructions.
DANGER Electrical hazard
The machine is not electrically insulated. If the
machine comes into contact with electricity, serious
injuries or death may result.
► Never operate the machine near any electric wire
or other source of electricity.
► Make sure that there are no concealed wires or
other sources of electricity in the working area.
WARNING Concealed object hazard
During operating, concealed wires and pipes
constitute a danger that can result in serious injury.
► Check the composition of the material before
operating.
► Watch out for concealed cables and pipes for
example electricity, telephone, water, gas and
sewage lines etc.
► If the inserted tool seems to have hit a concealed
object, switch off the machine immediately.
► Make sure that there is no danger before
continuing.
WARNING Involuntary start
Involuntary start of the machine may cause injury.
► Keep your hands away from the start and stop
device until you are ready to start the machine.
► Learn how the machine is switched off in the event
of an emergency.
WARNING Noise hazard
High noise levels can cause permanent and disabling
hearing loss and other problems such as tinnitus
(ringing, buzzing, whistling, or humming in the
ears). To reduce risks and prevent an unnecessary
increase in noise levels:
► Risk assessment of these hazards and
implementation of appropriate controls is
essential.
► Operate and maintain the machine as
recommended in these instructions.
► Select, maintain and replace the working tool as
recommended in these instructions.
► If the machine has a silencer, check that it is in
place and in good working condition.
► Always use hearing protection.
► Use damping material to prevent work pieces
from 'ringing'.
WARNING Unstable position hazard
During operation of the machine, there is a risk for
falling, tripping and/or coming in contact with the
inserted tool, which can cause injury. This risk
increases if you work in an unstable position or on
any unstable ground, object or surface. To reduce
this risk:
► Never work in an unstable position.
► Always make sure you are in a stable position with
your feet as far apart as your shoulder width and
keeping a balanced body weight.
► Never stand on any unstable ground, objects or
surfaces.
WARNING Slippery machine surface
hazard
There is a risk that the machine (for example, the
handle and other surfaces) is slippery due to grease,
oil, or other substances. If the machine is slippery,
there is a risk that you might lose your grip, drop
the machine, and/or come in contact with the
inserted tool during operation of the machine. Any
such event can cause injury. To reduce this risk:
► Always make sure that the handles and other
gripping surfaces of the machine are not slippery.
► Always make sure that the handles and other
gripping surfaces are free from grease and oil.
9800 1529 01 | Original instructions10
Red Hawk RoadSafety and operating instructions

Maintenance, precautions
WARNING Machine modification
Any machine modification may result in bodily
injuries to yourself or others.
► Never modify the machine. Modified machines
are not covered by warranty or product liability.
► Always use original parts, cutting blades/insertion
tools, and accessories.
► Change damaged parts immediately.
► Replace worn components in good time.
CAUTION High temperature
The machine's front cover, exhaust pipe, and bottom
become hot during operation. Touching it can lead
to burns.
► Never touch a hot front cover.
► Never touch the hot exhaust pipe.
► Never touch the bottom of the machine when its
hot.
► Wait until the front cover, exhaust pipe, and
bottom of the machine has cooled down before
carrying out maintenance work.
CAUTION Hot insertion tool
The tip of the insertion tool can become hot and
sharp when used. Touching it can lead to burns and
cuts.
► Never touch a hot or sharp insertion tool.
► Wait until the insertion tool has cooled down
before carrying out maintenance work.
Storage, precautions
♦
Keep the machine and tools in a safe place, out
of the reach of children and locked up.
119800 1529 01 | Original instructions
Safety and operating instructionsRed Hawk Road

Overview
To reduce the risk of serious injury or death
to yourself or others, read the Safety
instructions section found on the previous
pages of this manual before operating the
machine.
Design and function
CP Red Hawk Road is designed for medium to heavy
demolition of material such as concrete and asphalt.
The petrol breaker is designed for vertical use only.
No other use is permitted.
To choose the correct insertion tool, check the tool
shank dimension on the machine, and see the spare
parts list.
Choosing the correct
breaker for a task
It is important to choose the correct size of breaker
for the work to be performed.
A breaker that is too small means that the work will
take longer.
A breaker that is too large means that there must be
frequent repositioning, which is unnecessarily tiring
for the operator.
A simple rule for choosing the correct size of breaker
is that a normal sized piece of broken material should
be removed from the workpiece within 10–20
seconds operation.
> If it takes less than 10 seconds a smaller breaker
should be selected.
> If it takes more than 20 seconds a larger breaker
should be selected.
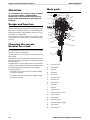
Main parts
Q
P
O
N
M
L
H
C
B
D
F
I
G
J
K
E
A
R
A. Fuel filler cap
B. Carburettor
C. Air filter
D. Flywheel
E. Fan cover
F. Throttle lever
G. Ignition coil
H. Drive piston
I. Fuel tank
J. Silencer
K. Chisel fixture
L. Decompression valve
M. Engine piston
N. Spark plug
O. Hammer piston
P. Hammer piston guide
Q. Tool sleeve
R. Tool retainer
9800 1529 01 | Original instructions12
Red Hawk RoadSafety and operating instructions

Labels
The machine is fitted with labels containing
important information about personal safety and
machine maintenance. The labels must be in such
condition that they are easy to read. New labels can
be ordered from the spare parts list.
IMP OIL
H
A
P
S
HAND AND ARM PROTECTION SYSTEM
Data plate
Made in XXXX
Ser.No. XXXX
Type XXXX
Atlas Copco Construction Tools AB
A
B
C
D
A. Machine type
B. Serial number
C. The warning symbol together with the book
symbol means that the user must read the
Safety and operating instructions before the
machine is used for the first time.
D. The CE symbol means that the machine is
EC-approved. See the EC Declaration of
Conformity which is delivered with the
machine for more information.
Noise level label
WA
xxx
dB
The label indicates the guaranteed noise level
corresponding to EC-directive 2000/14/EC. See
"Technical data" for accurate noise level.
Warning label
To reduce the risk of injury, everyone using,
installing, repairing, maintaining, changing
accessories on, or working near this tool must read
and understand the safety instructions before
performing any such task.
Operate with chisel retainer in place.
Emission compliance label
Emissions compliance period referred to on the label
indicates the number of operating hours for which
the engine has been shown to meet Federal
emissions requirements.
Category C = 50 hours, B = 125 hours, and A = 300
hours.
Transport
WARNING Fuel hazard
The fuel (petrol and oil) is extremely flammable and
petrol fumes can explode when ignited, causing
serious injury or death.
► Empty the tank before transport.
139800 1529 01 | Original instructions
Safety and operating instructionsRed Hawk Road

Installation
Fuel
Two-stroke oil
The fuel is petrol with a 2% oil mixture (1 part oil to
50 parts petrol). Always use high quality lead-free
petrol (non-alkylat).
For best lubrication results use recommendet
two-stroke oil. Allways use a high quality two-stroke
oil for air-cooled engines (not two-stroke oil for
outboard engines). Contact your local representative
for advice on the correct two-stroke oil.
Mixing the petrol and oil
Always mix the petrol and oil in a clean petrol can.
First add the oil and then the correct amount of
petrol. Then shake the can thoroughly. Shake the
can before every refilling.
NOTICE During long term storage of two-stroke
mixture, the oil and petrol can separate. Never mix
more fuel than you intend to use within two weeks.
Filling
WARNING Fuel hazard
The fuel (petrol and oil) is extremely flammable and
petrol fumes can explode when ignited, causing
serious injury or death.
► Protect your skin from contact with the fuel.
► Never remove the filler cap and do not fill the fuel
tank when the machine is hot.
► Never smoke when filling the fuel tank or when
working with the machine or servicing it.
► Avoid spilling fuel and wipe off any fuel spilled
on the machine.
Filling procedure
1. Stop the engine and let it cool down before
filling the tank.
2. The machine must be in a upright position when
filling it with fuel.
2%
3. Release the filler cap slowly to let any pressure
escape.
4. Never overfill the tank. It is possible due to the
movement of the fuel within the tank to have
fuel at a higher level than the tank cap, which
can lead to a spillage of fuel if the tank cap is
opened. This can be avoided by opening the
tank cap, only when the machine is tilted and
the tank cap is at the fuel tanks highest point.
5. Make sure that the filler cap is screwed on when
the machine is used.
Insertion tool
CAUTION Hot insertion tool
The tip of the insertion tool can become hot and
sharp when used. Touching it can lead to burns and
cuts.
► Never touch a hot or sharp insertion tool.
► Wait until the insertion tool has cooled down
before carrying out maintenance work.
NOTICE Never cool a hot insertion tool in water,
it can result in brittleness and early failure.
9800 1529 01 | Original instructions14
Red Hawk RoadSafety and operating instructions

Selecting the right insertion tool
Selecting the right insertion tool is a precondition
for proper machine function. It is important to select
a high quality insertion tool to avoid unnecessary
machine damage.
Never use an insertion tool without collar. Always
use the correct insertion tool.
NOTICE Never use the machine directly on spikes
or tent poles. This will destroy the machine.
Recommended insertion tools are listed in the
machine's spare parts list.
Narrow chisel
The narrow chisel is used for
demolition and cutting work in
concrete and other types of
hard materials.
Moil point
The moil point is only used for
making holes in concrete and
other types of hard materials.
Wide bladed chisel
The wide bladed chisel is used
in soft materials, such as
asphalt and frozen ground.
Spiking tool
The spiking tool is used for
spikes and tent poles in soft
materials, such as asphalt and
frozen ground.
WARNING Vibration hazard
Using inserted tools that do not fulfil the criterias
mentioned below, will result in a longer time to
complete a task, and may result in higher levels of
vibration exposure. A worn tool will also cause
increased working time.
► Make sure that the inserted tool is
well-maintained, not worn out and of the proper
size.
► Always use a sharp tool in order to work
efficiently.
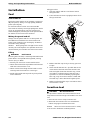
Checking for wear on the tool shank
A
B
Use the gauge that corresponds to the insertion
tool’s shank dimension. See section "Technical data"
for correct tool shank dimensions.
> Check if the gauge’s hole (A) can be pushed down
on the insertion tool’s shank, this means that the
shank is worn out and the insertion tool should
be replaced.
> Check the length (B), that it is according to the
ordered machine type.
159800 1529 01 | Original instructions
Safety and operating instructionsRed Hawk Road

Operation
WARNING Involuntary start
Involuntary start of the machine may cause injury.
► Keep your hands away from the start and stop
device until you are ready to start the machine.
► Learn how the machine is switched off in the event
of an emergency.
Start and stop
Cold start
1. Remove the fuel cap and check the fuel level.
Secure the fuel cap before start.
2. Slide the start button towards the fuel tank to
ON position.
3. Press the decomp knob located at the right side
of the front cover.
4. Pump at least ten times on the primer pump.
5. Close the choke by turning the choke control
into upward position.
6. Press and hold the throttle lever.
7. Pull the starter handle. The cord must not be
wound around the operators's hand when
starting the engine. Never release the starter
handle until it reaches the starter cover.
If the machine do not start, pull the starter
handle again.
8. If the machine starts but then stops. Press the
decomp knob and adjust the choke to halfway
position. Pull the starter handle.
9. Five seconds after the machine starts, put choke
gradually into a downward position.
10. Let the engine run for 2-3 minutes with throttle
lever slightly pressed before use.
Warm start
1. Remove the fuel cap and check the fuel level.
Secure the fuel cap before start.
2. Slide the start button towards the fuel tank to
ON position.
3. Press the decomp knob on the right side of the
front cover.
4. Pump eventually five times on the primer pump.
5. Press and hold the throttle lever.
6. Pull the starter handle.
If the engine do not start, pull the starter handle
another three times.
7. If engine runs, go to 11. If the engine do not
run, go to 8.
8. Close the choke by turning the choke control
into upward position.
9. Pull the starter handle.
10. When the machine starts move immediatly the
choke into downward position.
11. Release the throttle lever slowly and let the
engine run stationary during 30 seconds.
Stopping
1. Stop the machine by pushing the stop button
on the left handle forwards.
Operating
Starting a cut
♦
Stand in a stable position with your feet well away
from the inserted tool.
♦
Press the machine against the working surface
before you start.
♦
The impact unit is activated when the machine is
pressed down and loaded. When the machine is
lifted, the impact unit disengages automatically.
♦
The working speed of the machine is controlled
via the throttle lever.
♦
Start collaring at such a distance from the edge
that the machine is capable of breaking the
material without levering.
9800 1529 01 | Original instructions16
Red Hawk RoadSafety and operating instructions

♦
Never break off too large pieces. Adjust the
breaking distance (A) so that the inserted tool
does not fasten.
A
Breaking
♦
Never use the machine as a lever, the material
should be broken by impact energy.
♦
If the tool fastens, never try to lift it by pulling on
the top of the fuel tank.
♦
Check that the handle bar can move freely (up
and down) without binding.
♦
Let the machine do the work. Never press too
hard. The vibration absorbing handle should never
be forced all the way to the bottom.
♦
The feed force should be adjusted so that the
handle is pressed 'half way down'. This position
provides the best vibration damping and the best
breaking force.
♦
Avoid working in extremely hard material such as
granite and reinforcing iron, since such materials
can cause strong vibrations.
♦
Avoid idling; operation without a inserted tool
and operation with the machine lifted.
♦
Release the throttle lever when the machine is
lifted.
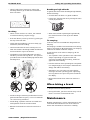
Breaking at high altitude
To get the best result when breaking at high altitude,
do the following:
♦
Check that the air filter is in good condition.
♦
If necessary, lean the fuel mix by turning the main
nozzle (A) clockwise.
A
♦
When finished with operating at high altitude,
turn back the main nozzle (A) to the default
position.
Tie tamping
Cobra TT and Cobra TT-AWD are designed for tie
tamping.
Tie tamping is used for local maintenance of railway
tracks in an area up to 30 square meters. Tie tamping
stabilizes the ballast under the sleepers.
To get the best result when tie tamping, do the
following:
♦
Two operators must operate on each side of the
sleeper. Operating on opposite sides will
compress the ballast down and up, and fill all
gaps and create stability.
♦
Lean the machine when operating. Do not operate
in a straight angle, it will compress the ballast too
deeply and reduce the stability.
♦
Operate for 2-3 seconds at one point before
moving to another operating point. Operating
too long time at one point will press the ballast
too deeply.
♦
Release the throttle lever when the machine is
lifted.
When taking a break
♦
Stop the machine during breaks.
♦
During all breaks, put the machine away so that
there is no risk for unintentional start.
Maintenance
Regular maintenance is a basic requirement for the
continued safe and efficient use of the machine.
Follow the maintenance instructions carefully.
179800 1529 01 | Original instructions
Safety and operating instructionsRed Hawk Road

♦
Before starting maintenance on the machine,
clean it in order to avoid exposure to hazardous
substances. See “Dust and fume hazards”
♦
Never use a pressure washers on the top cover
and inside the breaker housing.
♦
Use only authorised parts. Any damage or
malfunction caused by the use of unauthorised
parts is not covered by warranty or product
liability.
♦
When cleaning mechanical parts with solvent,
comply with appropriate health and safety
regulations and ensure there is satisfactory
ventilation.
♦
For major service of the machine, contact the
nearest authorised workshop.
♦
After each service, check that the machine's
vibration level is normal. If not, contact the nearest
authorised workshop.
Every day
Before undertaking any maintenance or changing
the inserted tool, turn the machine off.
♦
Perform a general inspection and check that there
are no leaks and no damage.
♦
Check that the tool retainer is not worn and that
it functions as it should. Never use the equipment
if you suspect that it is damaged.
♦
Check that the O-ring on the oil plug is
undamaged and seals properly.
♦
Check that the oil plug is tight regularly.
♦
Check for wear in the tool bush.
♦
Check the insertion tool, make sure that it is sharp
and not worn out.
♦
Change damaged parts immediately.
♦
Replace worn components in good time.
In order to ensure that the machine remains within
the stated vibration level values, the following checks
must be performed:
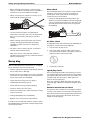
Wear check
If a inserted tool with a worn shank is used, machine
vibration will increase. Avoid such vibration by
checking for shank wear before mounting the
insertion tool on the machine.
♦
Use the shank gauge that corresponds to the
dimension of the inserted tool shank. If the gauge
can be inserted beyond point A in the tool bush
(point B) then the tool bush must be replaced
immediately.
AB
Air filter check
A clogged air filter will eventually cause damage to
the engine. Check the air filter regularly.
1. Unscrew the air filter cover.
2. Tap the air filter carefully against the palm of
your hand. If the air filter is very dirty, it must be
replaced. Never wash the air filter.
3. Clean filter container.
Spark plug check
If the spark plug electrodes are very dirty or burnt
you should replace the spark plug. You will find the
spark plug under the service cover, mounted in the
cylinder head. See the section "Main parts" for
position of the spark plug.
Only use Champion RCJ8 and make sure that the
electrode gap is 0.6-0.7 mm before fitting the spark
plug.
Hammer mechanism oil check
The machine has a natural oil consumption and the
oil level in the impact unit should be checked every
day. The machine must be upright when performing
the oil check. The oil level should be at the same
height as the filling pipe.
9800 1529 01 | Original instructions18
Red Hawk RoadSafety and operating instructions

IMPACT-OIL
To choose the correct impact-oil, see the spare parts
list.
Every month
Gearbox oil level check
Before releasing the oil plug remove the six nuts for
the back cover. The level in the gearbox is checked
by unscrewing the oil plug. The oil level is correct
when it reaches to the bottom of the filling hole with
the machine standing upright. The volume of the
gearbox is 0.1 litre.
Every year
Overhauling must be done after one year of
continuous operation. Overhauling must for safety
reasons be performed by authorised personnel at
an authorised workshop.
Repair
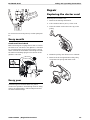
Replacing the starter cord
Removing the old starter cord
1. Remove the starting mechanism.
2. Pull out about 40 cm (16 in.) of the cord.
3. Place the starter cord in the recess (A) in the
pulley.
A
4. Rotate the pulley until all tension is released.
5. Remove the lock ring and lift out the pulley
complete with spring and starter cord.
199800 1529 01 | Original instructions
Safety and operating instructionsRed Hawk Road

Fitting a new starter cord
6.
WARNING Spring tension
The starter spring may cause personal injury by
striking the operator or other persons.
► Wear impact resistant eye protection with side
protection and gloves.
Place the knot on the starter spring in the recess
on the inside of the pulley and wind in the starter
spring (anti-clockwise).
7. If the starter spring must be rewound, place the
spring-hook in the pulley groove and wind on
the spring anti-clockwise. If the spring must be
replaced, position the spring-hook above the
groove in the starter pulley. Leave the safety ring
in place, press down the spring into the starter
pulley.
8. Wind up the starter cord onto the pulley leaving
5 cm (2 in.) of slack. Locate the end of the spring
in the bushing groove, press the starter pulley
onto the bushing. Replace the lock ring.
Pre-load the starting spring
9. Place the notch in the pulley edge in line with
the starter cord guide and place the starter cord
in the notch.
10. Fit the lock ring.
11. Rotate the pulley 2 turn anti-clockwise.
12. Release the starter cord slowly.
13. Pull on the starting handle, check the function.
14. Pull out the starter cable, at the same time grip
the starter disc and check that if it can be turned
anticlockwise another 1/2 turn. If not, the spring
has been over-tightened and is touching the
bottom, the starter cable must therefore be
loosened a turn.
15. Fit the starting mechanism.
16. Check the function.
Troubleshooting
If the petrol breaker does not start, has low power
or runs unevenly, check the following points.
9800 1529 01 | Original instructions20
Red Hawk RoadSafety and operating instructions
Page is loading ...
Page is loading ...
Page is loading ...
Page is loading ...
Page is loading ...
Page is loading ...
Page is loading ...
Page is loading ...
Page is loading ...
Page is loading ...
Page is loading ...
Page is loading ...
-
 1
1
-
 2
2
-
 3
3
-
 4
4
-
 5
5
-
 6
6
-
 7
7
-
 8
8
-
 9
9
-
 10
10
-
 11
11
-
 12
12
-
 13
13
-
 14
14
-
 15
15
-
 16
16
-
 17
17
-
 18
18
-
 19
19
-
 20
20
-
 21
21
-
 22
22
-
 23
23
-
 24
24
-
 25
25
-
 26
26
-
 27
27
-
 28
28
-
 29
29
-
 30
30
-
 31
31
-
 32
32


Chicago Pneumatic Red Hawk Road Operating instructions
- Type
- Operating instructions
Ask a question and I''ll find the answer in the document
Finding information in a document is now easier with AI
Related papers
-
Chicago Pneumatic CP Red Hawk Operating instructions
-
-
-
-
-
Chicago Pneumatic CP Rail, CP Road Operating instructions
-
-
Chicago Pneumatic CP 0222 Operating instructions
-
-
Other documents
-
Hasbro 85571 User manual
-
iGear HAWK User manual
-
Atlas Copco QAS 500 Volvo S2A APP User manual
-
 Hawk HA-EMS02 User & Installation Manual
-
-
-
Wacker Neuson BH 23 User manual
-
 EZ Air Hawk User manual
-
 EZ Air Hawk User manual
-
Hayter Mowers 308A User manual


