Page is loading ...

1 1350004-W2-A
Installation & User Guide
These instructions must be left with the user
Mira Virtue
Thermostatic Mixer

21353004-W2-A
Important Safety Information
Mira thermostatic mixers are precision engineered and should give
continued safe and controlled performance, provided:
1. They are installed, commissioned, operated and maintained in
accordance with manufacturer’s recommendations.
2. Periodic attention is given, when necessary, to maintain the product
in good functional order.
Caution!
1. Read all of these instructions.
2. Retain this guide for later use.
3. Pass on this guide in the event of change of ownership of the
installation site.
4. Follow all warnings, cautions and instructions contained in this
guide.
5. Anyonewhomayhavedicultyunderstandingoroperatingthe
controls of any shower should be attended whilst showering.
Particular consideration should be given to the young, the elderly,
theinrmoranyoneinexperiencedinthecorrectoperationofthe
controls.
6. Rapid/Excessivemovementoftheowand/ortemperaturecontrol
levers may result in momentary unstable blend temperatures.
7. Careisrequiredwhenadjustingowortemperature,makesure
that the temperature has stabilised.
8. When this product has reached the end of its serviceable life, it
should be disposed of in a safe manner, in accordance with current
local authority recycling, or waste disposal policy.
9. The function of a thermostatic mixing valve is to deliver water
consistentlyatasafetemperature.Inkeepingwitheveryother
mechanism, it cannot be considered as functionally infallible and
as such, cannot totally replace a supervisor’s vigilance where that
is necessary. Provided it is installed, commissioned, operated and
maintained within manufacturers recommendations, the risk of
failure, if not eliminated, is reduced to the minimum achievable.

3 1350004-W2-A
Product
Model
Number
Colour
Mira Virtue 1.1927.002
Chrome
Mira Virtue with Diverter 1.1927.001
Introduction
Guarantee
For domestic installations, Mira Showers guarantee the Mira Virtue against any
defectinmaterialsorworkmanshipforaperiodofveyearsfromthedateofpurchase
(showerttingsforoneyear).
For non-domestic installations, Mira Showers guarantee the Mira Virtue against
anydefectinmaterialsorworkmanshipforaperiodofoneyearfromthedateof
purchase.
Fortermsandconditionsrefertothebackcoverofthisguide.
ThankyouforpurchasingaqualityMiraproduct.Toenjoythefullpotentialofyour
newproduct,pleasetaketimetoreadthisguidethoroughly,havingdoneso,keep
it handy for future reference.
The Mira Virtue thermostatic mixer is a thermostatic shower control with a single
controlleverforon/oandtemperaturecontrol.A12L/Minowregulatorissupplied
for high pressure systems to reduce excessive shower force.
The thermostatic mixer incorporates a wax capsule temperature sensing unit, which
provides an almost immediate response to changes in pressures or temperature of
the incoming water supplies to maintain the selected temperature. An adjustable
maximum temperature stop is provided which limits the temperature to a safe level.
Inletltersarettedtoprotectthethermostaticcartridge.
Mira Virtue:ThermostaticMixerforconnectiontorising,fallingorrearentrypipework,
supplied with a deluge head.
Mira Virtue with Diverter: Thermostatic Mixer for connection to rising or rear entry
pipework,suppliedwithadivertervalvewhichgivestheoptionofusingthehandset,
deluge head or both.
Mira Mixer Showers covered by this guide:

41353004-W2-A
Recommended Usage
Recommended Usage
Domestic
LightCommercial
Heavy Commercial
Healthcare
Patents and Design Registration
GB: 2 291 693, 2 392 225, 2 422 886
Euro: 1672257DEFRGBITNLSE
USA: 7 240 850
Patent Applications:
Euro: 07015846.4
USA: 2006-0124758-A1, 2010-0219255-A1

5 1350004-W2-A
Pack Contents
Ticktheappropriateboxestofamiliariseyourselfwiththepartnamesandtoconrm
that all of the parts are included.
q 2 x Concealing Plates
q2xCompressionNuts(15mm)
q2xOlives(15mm)
q 5 x Wall Plugs
q 2 x Fixing Screws
q 1 x 2.5 mm Hexagonal Key
q 1 x ‘O’ Key
q 1 x Flow Regulator & Adapter
q 1 x Thermostatic Mixing Valve
q 1 x 3 mm Hexagonal Key
q 1 x Cartridge Removal Tool
q4xCompressionNuts(18mm)
q4xOlives(18mm)
q3xFixingScrews(Chrome-WallBracket)
q 1 x Deluge Head
q 1 x Shower Arm
q1xWallBracket
q 1 x Rigid Riser
Mira Virtue
1 x Installation & User Guide
1 x Guarantee Registration Document
1 x Installation Template

61353004-W2-A
q 2 x Concealing Plates
q2xCompressionNuts(15mm)
q2xOlives(15mm)
q 5 x Wall Plugs
q 2 x Fixing Screws
q 1 x 2.5 mm Hexagonal Key
q 1 x 3 mm Hexagonal Key
q 1 x ‘O’ Key
q 1 x Flow Regulator & Adapter
q 1 x Thermostatic Mixing
Valve
q 1 x Hose Sleeve
q 1 x Cartridge Removal Tool
q6xCompressionNuts(18mm)
q6xOlives(18mm)
q 3 x Fixing Screws
(Chrome-WallBracket)
q 1 x Deluge Head
q 1 x Shower Arm
q 1 x Diverter Valve
Mira Virtue with Diverter
q1xWallBracket
q 1 x Rigid Riser
(Long)
q 1 x Rigid Riser
(Short)
q 1 x Showerhead
q 1 x Shower Hose
q 2 x Hose Washers
1 x Installation & User Guide
1 x Guarantee Registration Document
1 x Installation Template

7 1350004-W2-A
Specications
Pressures
• Max Static Pressure: 10 Bar.
• Max Maintained Pressure: 5 Bar.
• MinMaintainedPressure(GravitySystem):0.1 Bar (0.1 bar = 1 Metre head from
coldtankbasetoshowerheadoutlet).
Note! Forgravityfedorotherlowpressuresystems(0.5barorbelow)donott
theoutletowregulator.
• For optimum performance supplies should be nominally equal.
Temperatures
• Factory Pre-set at safe temperature under ideal inlet supply conditions. See
‘Commissioning’.
• Optimum Thermostatic Control Range: 35°C to 43°C (achieved with supplies of
15°Ccold,65°Chotandnominallyequalpressures).
• Recommended Hot Supply: 60°C to 65°C Note! The mixing valve can operate
at higher temperatures for short periods without damage, however this could
detrimentallyaectthermostaticperformance.Forsafetyandperformancereasons
it is recommended that the maximum hot water temperature is limited to 65°C.
• Cold Water Range: up to 25°C.
• MinimumRecommendedDierentialbetweenHotSupplyandOutletTemperature:
12°C.
Thermostatic Shut-down
• For safety and comfort the thermostat will shut o the mixing valve within 2
Seconds if either supply fails (achieved only if the hot water supply temperature
is12°Cabovethesetblendtemperature).
Connections
• Inlets: 15 mm Compression.
• Outlet: ½” BSP Flat Face / 15 mm Compression
• Standard connections are: hot - left, cold - right, outlet - top.
Flow Rates
0
5
10
15
20
25
30
35
00.5 1.51.
02
2.5
Flow Rate (L/min)
Supply Pressure (Bar)
COMBINED FLOW RATE
OVERHEAD FLOW RATE
HANDSET FLOW RATE

81353004-W2-A
413
164
156
153
216
59
1050
35
80
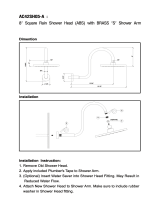
Dimensions
216
Mira Virtue
Mira Virtue with Diverter
413
164
1006
313
153
80
59
216
35
156
All dimensions in mm
153
156
216
156
153
413
413
313
164
1006
35
35
59
80
164
1050
59
80

9 1350004-W2-A
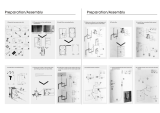
Installation
Suitable Plumbing Systems
Gravity Fed:
Thethermostaticmixermustbefedfromacoldwatercistern(usuallyttedinthe
loftspace)andahotwatercylinder(usuallyttedintheairingcupboard)providing
nominally equal pressures.
Mains Pressurised Instantaneous Hot Water System (Combination Boiler):
The thermostatic mixer can be installed with systems of this type with balanced
pressures. (Recommended Minimum Maintained Pressure: 1.0 Bar).
Thereisnoowadjustmentwiththisproduct.A12l/minowregulatorissupplied
and is recommended to be tted in High Pressure systems(see Flow Regulator
Installation)
Unvented Mains Pressure System:
The thermostatic mixer can be installed with an unvented, stored hot water system.
Thereisnoowadjustmentwiththisproduct.A12l/minowregulatorissupplied
and is recommended to be tted in High Pressure systems(see Flow Regulator
Installation)
Pumped Systems:
Thethermostaticmixercanbeinstalledwithaninletpump(twinimpeller).Thepump
must be installed in a suitable location and in accordance with its instructions.
General
Installation must be carried out in accordance with these instructions, and must be
conductedbydesignated,qualiedandcompetentpersonnel.
The installation must comply with the “Water Supply Regulations 1999 (Water
Fittings)”oranyparticularregulationsandpractices,speciedbythelocalwater
companyorwaterundertakers.
Note!Makesurethatallsiterequirementscorrespondtotheinformationgivenin
section: ‘Specications’.
1. The Mixer must not be installed in an area where it may freeze.
2. Forstudpartitionsalternativexingsmayberequired.
3. Isolating valves must be installed close to the Mixer for ease of maintenance.
4. Pipeworkmustberigidlysupportedandavoidanystrainontheconnections.
5. Pipeworkdead-legsshouldbekepttoaminimum.

101353004-W2-A
Flow Regulator Installation
FlowregulatorsaresuppliedwiththisproductandshouldbettedinHighPressure
systems to either;
1. Reduce Excessive Force and Flow Rate
2. Reduce Noise through the mixer due to high or unequal pressures
3. Stabilise incoming supply temperatures
25 mm Spill
OverLevel
Hose Retaining Ring
6. Decide on a suitable position for the Mixer. The position of the Mixer and
the Shower Fittings must provide a minimum gap of 25 mm between the
spill-overleveloftheshowertray/bathandtheshowerhead(refertoillustration).
Thisistopreventback-siphonage.Forfurtherinformationontheinstallation
of your Shower Fittings, refer to the Fittings Installation and User Guide.
Note! Only use Shower Fittings recommended by the manufacturer or supplier.

11 1350004-W2-A
Warning! Isolate the water supplies before installing the shower .
1
Usetheinstallationtemplatetomarkthe
positions of the holes for the backplate
and the pipe centres.
For rising or falling supplies the pipe
positions should be set 35 mm from
thecentreofpipetothenishedwallat
153 mm centres.
2
The thermostatic mixer can be installed
with rear or falling supply inlets. Decide
on the most appropriate method for
your installation, and if necessary, the
inlet elbows can be swivelled to suit.
Note! The Mira Virtue with Diverter
cannot be installed with a falling
supply.
35 mm
Installation of Mira Virtue Mixer
3
Fitthesupplypipework:Hot - Left, Cold - Right. For rear entry supplies the inlet
pipeworkshouldextend28mmfromthenishedwallsurface,forrisingorfalling
suppliesthecentreofthepipeshouldbeset35mmfromthenishedwallsurface.
Note! If it is not possible to install the mixer with this pipework conguration
complete the installation then refer to section: ‘Reversed Inlet Supplies’.
HOT
COLD
Ø19 mm
28 mm from finished
wall surface
Elbow
Diameter 19 mm
x 2 mm deep
28 mm
153 mm
HOT
COLD

121353004-W2-A
4
Forsolidwalls,drilltheholesforthebackplatewitha6mmdrillandinsertthe
wall plugs.
Note!Forothertypesofwallstructurealternativexingsmayberequired
(notsupplied).
DO NOTdrillthroughthebackplateintothewall.
DO NOT drill into buried cables or pipes.
Ø 6 mmdrillrequiredforwallplugssupplied
5
Removethebackplatefromthemixerbylooseningthegrubscrewwitha2.5mm
hexagonalkey.
Backplate

13 1350004-W2-A
6
Fixthebackplatetothewall,2xNo.8x1¼”screwsandwallplugsaresupplied.
For Rear Entry Supplies Only:
Note! Falling supplies are not suitable for Mira Virtue with diverter.
Fit the concealing plates over the inlet pipes.
Note! Apply silicone sealant to the back face of the concealing plate.
Flush the water supplies thoroughly before connecting the shower unit.
Caution! It is essential at this point that the supply pipework is thoroughly
ushed through before connection to the mixer. Failure to do so may result in
product malfunction and will not be covered under the guarantee.
FALLINGSUPPLIES REARSUPPLIES
7
Silicone
sealant
Concealing Plate

141353004-W2-A
Tightenthegrubscrewtosecurethemixertothebackplate.DO NOT overtighten
the screw.
Fittheshowerunitoverthebackplateandxtothepipework.Avoiddamageto
thechromenishwhentighteningthecompressionnuts.
9
8

15 1350004-W2-A
Rigid Riser
Pipe
Horizontal
Arm
WallBracket
Showerhead
Flow Regulator
Adapter
1. Temporarilyttherigidriserpipeandwallbrackettotheshowercontroloutlet
andmarkthepositionofthewallbracket.Useaspiritleveltoensurethepipe
is vertical. Drill the holes and insert the wall plugs.
Note! The vertical rigid riser pipe can be shortened if required. De-burr the pipe
endsbeforemakingthenalconnection.
2. Fix the wall bracket, rigid riser pipe, horizontal arm and tighten the three
compressionttingsontheshowercontroloutletandhorizontalarm.
Note!Caremustbetakenwhentighteningcompressionnutssothatyoudo
not damage the plated surfaces.
3. Turnonthehotandcoldwatersuppliesandcheckforleaks.
4. Thoroughlyushtheoutletpipeworkbeforeconnectingtheshowerhead.Slide
thecompressionnutandoliveoverthehorizontalarmandmaketheconnection
to the shower head.
Note!Ifttingtheowregulator,makesurethatitisttedatthisstage.
5. Before using the shower, refer to section: ‘Commissioning’.
10
Installation of Shower Fitting
A. Mira Virtue

161353004-W2-A
B. Mira Virtue with Diverter
1. Refer to ‘Mira Virtue, paragraphs 1 to 9’ to install the mixer.
2. Temporarilyttherigidriserpipe(short),diverter,rigidriserpipe(long)andwall
brackettotheshowercontroloutletandmarkthepositionofthewallbracket.
Use a spirit level to ensure the pipes are vertical. Drill the holes and insert the
wall plugs.
Note!Ifttingtheowregulator,makesurethatitisttedatthisstage.
Note! The vertical rigid riser pipes can be shortened if required. De-burr the
pipeendsbeforemakingthenalconnection.
Note! The short and long riser pipes can be swapped around if the handset is
required at a higher position.
Showerhead
Rigid Riser
Pipe(long)
Horizontal Arm
WallBracket
Rigid Riser
Pipe(short)
Parking
Socket
Adapter
Flow
Regulator
Diverter
Shower Hose
Showerhead
Parking
Socket
Sleeve

17 1350004-W2-A
3. Fixtherigidriserpipes,diverterwallbracketandtightenthefourcompression
ttings on the shower control outlet. Fit the horizontal arm and tighten the
compressiontting.
Note!Caremustbetakenwhentighteningcompressionnutssothatyoudo
not damage the plated surfaces.
4. Turnonthehotandcoldwatersuppliesandcheckforleaks.
5. Thoroughlyushtheoutletpipeworkbeforeconnectingtheshowerhead.Slide
thecompressionnutandoliveoverthehorizontalarmandmaketheconnection
to the shower head.
6. Connecttheshowerhosetotheoutletofthediverter.Makesurethatthehose
washeristted.
7. Passthehosethroughtheparkingsocket.
8. Stretchtheparkingsocketsleeveoverthehoseusingthesplit.Squeezethe
parkingsocketsleevetotitintotheparkingsocket.Ensurethesplitisatthe
backandthetagisfacingthediverter.
9. Connecttheshowerhead.Makesurethatthehosewasheristted.
10. Locatetheshowerheadintheparkingsocket.
11. Before using the shower, refer to section: ‘Commissioning’.
Reversed Inlet Supplies
The Mira Virtue thermostatic mixer is supplied with inlet connections Hot - Left,
Cold - Right as standard. If the hot and cold water supply pipes have been reversed
during installation the thermostatic cartridge must be removed and rotated 180°.
1. Isolate the hot and cold water supplies and operate the control lever to relieve
pressure and drain any residual water.
2. Makesurethatthecontrolleverisinthe‘O’position.
3. Press and rotate the ceramic bezel anticlockwise by 90° to remove.
Careful! There is a spring behind the ceramic bezel.
4. Usinga3mmallenkey,removethehandlesecuringthescrewandwasher.
5. Pullothehandletrimalongwithindicatortrim
Note!Theindicatortrimmaybetighttopullo
6. Remove the bearing and hub from mixer.
Ceramic Bezel
Screw
Handle Trim
Washer
Spring
Handle
Bearing
Indicator Trim
Hub

181353004-W2-A
Handle Trim
Bearing
Valve Body
Cut out
Indicator Trim
Hub
‘O’ Key
Cartridge
RemovalSocket
7. Fitthecartridgeremovalsocketand‘O’Key(supplied)ontothecartridgenut
andturnanticlockwise.Unscrewfullyandpullthecartridgefromthemixerbody.
8. Rotate the Cartridge 180°.
9. Makesurethatthetwocartridgeinletsealsarettedandcarefullypushintothe
body, aligning the cartridge lugs into the body slots.
Note!Checkthatthecartridgelugstamped‘H’isalignedwiththehotinletsupply.
Important!Takecarewhenttingthecartridgeasdamagetothecartridgeinlet
seals may result in dripping from the shower head.
10. Tightenthenutbyturningthe‘O’keyandthecartridgeremovalsocketclockwise.
11. Retthehubandbearing.Makesurethatthehubispositionedfullyclockwise.
12. Push on the indicator trim in the same orientation that you removed it. Note!
Ensure the lugs on the inside of the indicator trim matches up with the cut outs
on the valve body.
13. Retthehandletrim.
Internal View
Indicator Trim
Lug

19 1350004-W2-A
14. Fit the handle using the washer and screw.
Note! Makesurethewasheristtedashandlemaycomelooseduringuse.
15. Tighten the screw to secure the handle.
Screw
Washer
Handle
Handle Alignment
(Rear View
ofHandle)
Front View of Mixer
16.Pressandrotatetheceramicbezelclockwiseby90°toret.Careful! There is
a spring behind the ceramic bezel.
17. Checkthattheshoweringtemperatureiscorrect.
MiraVirtueLogo
BezelLugsAlignment
with Handle
Back View
Ceramic BezelHandle
Front View
Installed Ceramic Bezel

201353004-W2-A
Commissioning
Maximum Temperature Setting
Beforeusingtheshower,themaximumtemperaturemustbecheckedtomakesure
that it is at a safe level. It has been preset to a safe showering temperature under
ideal conditions at the factory, appropriate for most systems. However, site conditions
andpersonalpreferencemaymakeitnecessarytoresetthistemperature.
Note! Makesurethatthehotwatertemperatureisatleast55°Candthatthereis
sucientsupply.
1. Turnontheshowertothemaximumtemperature(i.e.fullyanticlockwise)and
allow the temperature to stabilise. If the temperature is too hot or too cold, turn
otheshowerandadjustasfollows:
2. Makesurethatthecontrolleverisinthe‘O’position.
3. Pressand rotate the ceramic bezel anticlockwise by 90° to remove.
Careful! There is a spring behind the ceramic bezel.
4. Usinga3mmallenkey,removethehandlesecuringthescrewandwasher.
5. Remove the handle trim along with indicator trim.
6. Turn on the shower to the maximum temperature by rotating the hub fully
anticlockwiseandallowthetemperaturetostabilise.
7. Remove the bearing and hub from mixer.
8. Insertthe2.5mmallenkeyintothecentreofthespindleandengagewiththe
recessed temperature adjusting screw.
9. Rotate the allen keyuntil therequiredmaximumtemperature is obtained at
theshower.Turnanticlockwiseto increase the temperature,or clockwiseto
decreasethetemperature(¼turn=approximately1°C).
10. Oncethedesiredmaximumblendtemperaturehasbeenachievedturnothe
shower.
Internal View
Indicator Trim
Lug
Ceramic
Bezel
3mm Allen Key
Spring
Screw
Washer
Handle
Handle
Trim
Bearing
Indicator Trim
2.5mm
Allen Key
Hub
Valve Body
Cutout
Handle Alignment
(RearViewofHandle)
Front View of Mixer
/