Whirlpool LA8800XS User manual
- Category
- Washing machines
- Type
- User manual
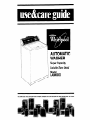
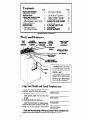
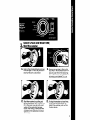
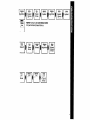
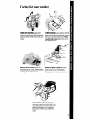
Whirlpool LA8800XS is a super capacity automatic washer with three variable speeds that can handle different laundry sizes and fabrics. It has a variety of cycles, including regular heavy, regular normal, permanent press normal, permanent press light, knits/gentle normal, knits/gentle light, soak, pre-wash, super wash, rinse and spin, and drain and spin. The washer also features an extra rinse option, a liquid bleach dispenser, a liquid fabric softener dispenser, and a self-cleaning MAGIC CLEAN™ lint filter.
Whirlpool LA8800XS is a super capacity automatic washer with three variable speeds that can handle different laundry sizes and fabrics. It has a variety of cycles, including regular heavy, regular normal, permanent press normal, permanent press light, knits/gentle normal, knits/gentle light, soak, pre-wash, super wash, rinse and spin, and drain and spin. The washer also features an extra rinse option, a liquid bleach dispenser, a liquid fabric softener dispenser, and a self-cleaning MAGIC CLEAN™ lint filter.


-
 1
1
-
 2
2
-
 3
3
-
 4
4
-
 5
5
-
 6
6
-
 7
7
-
 8
8
-
 9
9
-
 10
10
-
 11
11
-
 12
12
-
 13
13
-
 14
14
-
 15
15
-
 16
16
-
 17
17
-
 18
18
-
 19
19
-
 20
20


Whirlpool LA8800XS User manual
- Category
- Washing machines
- Type
- User manual
Whirlpool LA8800XS is a super capacity automatic washer with three variable speeds that can handle different laundry sizes and fabrics. It has a variety of cycles, including regular heavy, regular normal, permanent press normal, permanent press light, knits/gentle normal, knits/gentle light, soak, pre-wash, super wash, rinse and spin, and drain and spin. The washer also features an extra rinse option, a liquid bleach dispenser, a liquid fabric softener dispenser, and a self-cleaning MAGIC CLEAN™ lint filter.
Ask a question and I''ll find the answer in the document
Finding information in a document is now easier with AI
Related papers
-
Whirlpool LASOOXM User manual
-
Whirlpool LA5000XP User manual
-
-
-
-
-
-
-
-