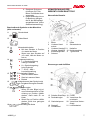
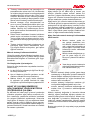
AL-KO Top handle BKS 2625 T User manual
- Category
- Power chainsaws
- Type
- User manual
This manual is also suitable for
Page is loading ...

D
2 BKS 2625 T / BKS 2625 TSB
Page is loading ...

D
4 BKS 2625 T / BKS 2625 TSB

469850_d 5
Inhaltsverzeichnis
D Betriebsanleitung...................................................................................................... 6
EN Instructions for use.................................................................................................34
FR Notice d'utilisation...................................................................................................59
ES Manual de instrucciones........................................................................................ 86
IT Istruzioni per l'uso................................................................................................ 113
TR İşletim talimatı.......................................................................................................139
© 2016
AL-KO KOBER GROUP Kötz, Germany
This documentation or excerpts therefrom may not be reproduced or disclosed to third parties without
the express permission of the AL-KO KOBER GROUP.
Page is loading ...
Page is loading ...
Page is loading ...
Page is loading ...
Page is loading ...
Page is loading ...
Page is loading ...
Page is loading ...
Page is loading ...
Page is loading ...
Page is loading ...
Page is loading ...
Page is loading ...
Page is loading ...
Page is loading ...
Page is loading ...
Page is loading ...
Page is loading ...
Page is loading ...
Page is loading ...
Page is loading ...
Page is loading ...
Page is loading ...
Page is loading ...
Page is loading ...
Page is loading ...
Page is loading ...
Page is loading ...

en
Translation of the original instructions for use
34 BKS 2625 T / BKS 2625 TSB
TRANSLATION OF THE ORIGINAL
INSTRUCTIONS FOR USE
Contents
How to use this manual................................... 34
Identification of the main components..............35
Safety regulations............................................ 36
Using the chain saws for tree maintenance with
a rope and climbing harness..................40
Assembling the chain saw............................... 42
Preparing for work............................................43
Starting the engine, using the machine and
switching it off........................................ 45
Using the machine........................................... 46
Maintenance and storage................................ 49
Troubleshooting................................................53
Accessories...................................................... 54
Technical data.................................................. 54
Maintenance schedule..................................... 55
Guarantee.........................................................57
EU declaration of conformity............................58
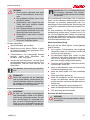
ADVICE
This special type of chain saw was de-
veloped specifically for tree maintenance
and therefore may only be operated by
skilled workers using safe and carefully
configured work equipment.
This chain saw may only be used for tree
maintenance and in adherence with the
above conditions. Normally it is used with
two hands like a conventional chain saw.
Some national regulations may restrict
its use.
HOW TO USE THIS MANUAL
Some particularly important sections are identi-
fied differently in the text of this manual, and the
meaning of such markings should be understood
as follows:
NOTE or IMPORTANT
ADVICE
Provides explanatory notes or other in-
formation about statements made pre-
viously, with the intention of avoiding da-
mage to the machine or causing other
damage.
CAUTION!
Non-compliance represents a risk of in-
jury to yourself or others.
DANGER!
Non-compliance represents a risk of se-
vere or even fatal injury to yourself or
others.
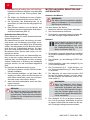
Symbols
1 Please read carefully
and follow all instruc-
tions.
2 Danger of kickback.
3 Hold the chain saw with
both hands.
4 Read the instructions
for use carefully before
using the saw.
5 Wear a helmet, protec-
tive glasses and ear de-
fenders. The operator
should be aware that
under normal working
conditions, he/she will
be exposed to a noise
level of 85 dB (A) or
more on a daily basis.
6 Use sturdy working gl-
oves.
7 Wear boots or work
shoes with a non-slip
sole and steel caps.
8 Use suitable safety de-
vices for feet/legs and
hands/arms.

How to use this manual
469850_d 35
9 This chain saw is only
suitable for users who
have been trained in
tree maintenance. (see
instructions for use).
Descriptive symbols on the machine (if ap-
plied)
11 Mixture tank
12 Chain oil tank
13 Engine off switch
The engine starts with the
switch in position «I».
The engine stops immediately
when the switch is set to «O».
14 Carburettor setting
L = mixture control,
low speed
H = mixture control,
high speed
T - ID LE - MIN =
idle setting
15 Choke lever (starter)
Starting when the engine is
cold
Starting when the engine is
warm
Operation
16 Chain brake (the symbol indicates
the release direction of the brake)
17 Oil pump controller
When you turn the knob in the
direction of the arrow to the
"MAX" position with a screwd-
river, more oil will flow to the
chain.
When you turn it to the "MIN"
position, less oil will flow.
18 Direction of motion of the chain
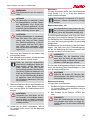
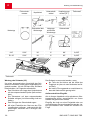
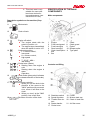
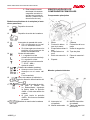
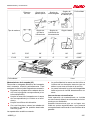
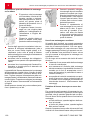
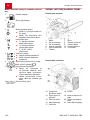
IDENTIFICATION OF THE MAIN
COMPONENTS
Main components
1 Engine 7 Chain
2 Front hand guard 8 Chain guard
3 Front hand grip 9 Eyelet
4 Rear hand grip 10 Bumper spike
5 Chain interception
bolt
11 Type plate
6 Bar
Controls and filling
13 Start/stop switch 18 Primer
14 Speed regulator 19 Mixture tank cap
15 Throttle lever de-
tent
20 Chain oil tank lock
16 Starter handle 21 Air filter cover
17 Choke lever

en
Safety regulations
36 BKS 2625 T / BKS 2625 TSB
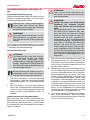
SAFETY REGULATIONS
Intended use/unintended use
The chain saw may only be used by skilled
workers and was developed to cut the treetops of
standard tall trees, bushes, trunks/logs or wooden
beams, whose diameter depends on the length
of the bar. It may only be used to cut wood.
Any other type of use is not permissible. IN AD-
DITION, THE CHAIN SAW MAY ONLY BE USED
BY QUALIFIED SKILLED WORKERS FOR TREE
MAINTENANCE.
When using the chain saw, the worker is respon-
sible for ensuring use of safety equipment in line
with the instructions in the manual and the sym-
bols on the chain saw. In addition, the safety in-
structions in the manual and the information on
use and maintenance are an important part of
the instructions for use. Any person operating the
chain saw or performing saw maintenance must
be familiar with the manual. It is only permissible
to use original spare parts or those approved by
the manufacturer (bar, chain, spark plug) and the
approved bar/chain combinations that are speci-
fied in the manual. Responsibility for any type of
accident due to the unintended use and/or an un-
approved change to the structure of the chain saw
lies with the user and not with the manufacturer.
This chain saw may only be used in the open.
Residual risks
Even if the chain saw is used as instructed, a re-
sidual risk remains that cannot be eliminated. De-
pending on the type and structure of the chain
saw, the following potential risks exist:
Contact with the exposed teeth of the chain
(risk of cutting)
Access to the moving chain (risk of cutting)
Sudden and unexpected movement of the
bar (risk of cutting)
Detachment of parts of the chain (risk of cut-
ting/injury)
Detachment of parts of the wood being
worked on
Inhalation of particles of the wood being
worked on, emissions from the petrol engine
Contact of the skin with fuel (petrol/oil)
Impairment of hearing during work if ear de-
fenders are not used
Training
Read the instructions carefully. Familiarise
yourself with the control elements and correct
use of the machine. Learn how to stop the
engine quickly.
Never allow children or people lacking the ne-
cessary knowledge as described in these in-
structions to use the machine. Local regulati-
ons may specify the minimum age of the user.
The machine is not allowed to be used by
more than one person.
The machine must never be used:
When there is anyone, especially child-
ren or animals, in the vicinity;
If the user is tired or feels unwell, is under
the influence of drugs, alcohol or other
substances that impair his/her attention
and reactions;
If the user is incapable of holding the ma-
chine firmly in two hands, or if he/she is
unable to maintain a stable equilibrium
with his/her legs during work.
Note that the user is responsible for accidents
and damage that may befall other persons or
their property.
Preparatory measures
The user must wear suitable clothing which
does not obstruct his/her movements while
working.
Wear close-fitting protective clothing with
cut-resistant protective inserts.
Wear a protective helmet, gloves, protec-
tive goggles, dust mask and cut-resistant
safety boots with a non-slip sole.
Wear ear defenders.
Do not wear scarves, shirts, necklaces
or other loosely hanging accessories that
could get snagged on the machine or on
any objects in the workplace.
Tie back long hair.
IMPORTANT: DANGER! Petrol is highly in-
flammable:

Safety regulations
469850_d 37
Store fuel in containers designed and ap-
proved specifically for this purpose;
Do not smoke when handling fuels;
Open the tank cap slowly to allow the
pressure inside to escape gradually;
Only refuel in the open air and using a
funnel;
Fill fuel before starting the engine. Do not
open the tank cap or refuel with petrol
while the engine is still running and while
the machine is still hot;
If petrol overflows, do not attempt to
start the engine. Instead, move the ma-
chine away from the area contaminated
by fuel. Avoid doing anything that could
cause a fire until the petrol has com-
pletely evaporated and the fuel vapours
have volatilized;
Immediately remove all traces of any pe-
trol that is spilled onto the machine or the
ground;
Do not start the machine in the location
where it was filled;
Avoid contact between fuel and clothing;
if you do get fuel on your clothing, you
should change before starting the en-
gine;
The tank cap and petrol container cap
must always be screwed firmly on.
Renew faulty or damaged silencers.
Before use, thoroughly check the entire ma-
chine and in particular:
Make sure the throttle lever and the ope-
rator presence control lever can be mo-
ved easily, do not jam and when they are
released, they must automatically and
quickly return to their initial position;
Make sure the throttle lever is blocked
when the operator presence control lever
is not actuated;
Make sure the engine stop switch can be
moved from one position to the other ea-
sily;
Make sure that the electrical cable and
above all the spark plug cable are in per-
fect condition to exclude the possibility of
sparking, and the connector must be at-
tached to the spark plug correctly;
Make sure that the hand grips and pro-
tective devices of the machine are clean
and dry, and are firmly attached to the
machine;
Make sure that the chain brake is fully
functional;
Make sure that the bar and chains are
fitted according to the regulations;
Make sure that the chain is correctly ten-
sioned.
Before starting work, make sure that all pro-
tective devices have been attached correctly.
The machine in use
The engine is not allowed to run in enclosed
spaces within which dangerous carbon mon-
oxide fumes could collect. Ensure an exch-
ange of air if you are working in ditches, ca-
ves or the like.
Only work during daylight or with good artifi-
cial light.
Assume a safe and stable position while
working on the ground:

en
Safety regulations
38 BKS 2625 T / BKS 2625 TSB
As far as possible, avoid using the ma-
chine on wet or slippery ground, or in
any case on uneven or steeply sloping
ground if the user cannot achieve suffici-
ent stability during work;
Avoid steps and unstable platforms;
Do not work with the machine above
shoulder height;
Do not run, always proceed carefully and
watch out for unevenness in the ground
as well as the presence of potential obst-
acles.
Do not work alone or in remote places so
that you can quickly request first aid in
the event of an accident.
Press down on the machine firmly when star-
ting the engine:
Do not start the engine unless you are
at least 3 metres away from the place
where you filled the fuel;
Make sure that no one else is within
range of the machine;
Never point the silencer and conse-
quently also the exhaust gases towards
inflammable substances:
Pay attention to the possibility of material
being thrown out due to the chain move-
ment, above all if the chain encounters
obstacles or foreign bodies.
Do not alter the basic setting of the engine or
overrev it.
Do not expose the machine to excessive
forces, and do not use small machines for
heavy work. Using a suitable machine re-
duces the risks and improves the quality of
work.
Make sure that the chain does not move
when the engine is idling, and that after the
throttle lever is operated the engine quickly
returns to idling speed.
Make sure that the bar does not collide with
foreign bodies, and also pay attention to ma-
terial flying around due to the friction of the
chain.
The engine must be switched off:
If you leave the machine unattended.
Before refuelling.
Switch off the engine and remove the ignition
key.
Before you check the machine, clean it
or carry out work on it;
After encountering a foreign body. Check
if the machine has been damaged and
carry out the necessary repairs before
you use the machine again;
If the machine starts to vibrate abnor-
mally (immediately identify the causes of
the vibration and have the necessary in-
spections carried out at a specialist com-
pany).
If the machine is not used.
Avoid exposure to the dust and chips created
by the chain during cutting.
Maintenance and storage
Make sure that all nuts and screws are firmly
tightened so as to be certain that the machine
is always operating under good conditions.
Regular maintenance is essential for safety
and maintaining performance.
Never store the machine with fuel in the tank
inside a room in which petrol vapours could
come into contact with naked flames, a heat
source or sparks.
Allow the engine to cool down before you
place the machine in a room.
To reduce the risk of fire, always keep the en-
gine, the exhaust silencer and the fuel sto-
rage location free from saw chips, prunings,
leaves or surplus grease; never leave contai-
ners with cutting residues inside a room.
If you need to empty the tank, do this out-
doors with the engine cold.
Wear gloves whenever working on the cutting
device.
Always make sure that the chain is well shar-
pened. All work to be performed on the chain
requires technical skills and the use of spe-
cial tools.
For safety reasons, never use the machine
with worn or damaged parts. The damaged
parts must be renewed and are never allowed
to be repaired. Only use genuine spare parts.
Non-equivalent spare parts can damage the
machine and endanger the operator.
Before putting the machine away, make sure
that you have removed the spanners or tools
used for maintenance.
Store the machine out of reach of children!

Safety regulations
469850_d 39
Transport and handling
The following instructions must be complied
when transporting and handling the machine:
Switch off the engine; wait for the chain
to come to a complete standstill, discon-
nect the spark plug connector;
Put on the chain guard;
Only lift the machine using the hand grips
and position the bar so it is pointing op-
posite to the direction in which you are
walking;
If the machine is transported in a motor vehi-
cle, it must be positioned so that it does not
represent a danger and can also be effec-
tively attached to prevent it from tipping over
with consequent damage and leaking of fuel.
Residual risks
Keep all parts of your body away from the
saw chain when the saw is running. Before
starting the saw, make sure that nothing is
touching the saw chain. When working with
a chain saw, one moment of inattention can
mean your clothing or parts of your body co-
ming into contact with the saw chain.
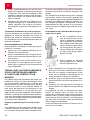
When working with both hands, the right hand
always grasps the rear grip while the left hand
grasps the front grip. Holding the chain saw
with your hands the other way around increa-
ses the risk of injury and is not allowed.
Wear protective goggles and ear defenders.
Further protective equipment is recommen-
ded for the head, hands, legs and feet. Ap-
propriate protective clothing reduces the risk
of injury due to flying chips and inadvertent
contact with the saw chain.
When cutting a branch that is under tension,
expect it to spring back. When the tension in
the wood fibres is released, the branch under
tension can hit the operator and/or cause a
loss of control over the chain saw.
Take particular care when cutting under-
growth and young trees. The thin material can
get caught in the saw chain and hit you or
cause you to lose your balance.
Carry the chain saw at the front grip when it is
switched off, and have the saw chain pointing
away from your body. Always put on the pro-
tective cover when transporting or storing the
chain saw. Careful handling of the chain saw
reduces the probability of inadvertent contact
with the running saw chain.
Follow the instructions for lubrication, chain
tensioning and changing accessories. An in-
correctly tensioned or lubricated chain can
either tear or increase the risk of kickback.
Keep the grips dry, clean and free from oil and
grease. Greasy, oily grips are slippery and re-
sult in loss of control.
The starter system of this machine generates
a relatively weak magnetic field, nevertheless
it is not possible to exclude the likelihood of
interference with active or passive implants in
the operator's body, with correspondingly se-
vere health risks. Users of such medical de-
vices are thus strongly recommended to seek
advice from a doctor or the manufacturer of
the devices before using the machine.
Causes of kickback and how to avoid them
Be especially careful in slippery conditions (wet
ground or snow), on uneven ground or on ter-
rain covered in plant growth. Watch out for hidden
obstacles like logs, roots, rocks, holes and ditches
to avoid tripping. Exercise special care on slopes
and uneven ground. Never use the saw with only
one hand. If only one hand is used, it is more dif-
ficult to control and prevent kickback since the bar
or chain can slip along or rebound off of a branch
or trunk. Kickback can occur if the tip of the chain
bar touches an object or if the wood bends and
traps the saw chain during cutting.
In many cases, contact with the tip of the bar can
lead to an unexpected, rearward reaction causing
the chain bar to be knocked upwards and towards
the operator.
If the saw chain is trapped on the top edge of the
chain bar, the bar can be forced violently back
towards the operator. Each of these reactions can
result in you losing control of the saw, with the pos-
sibility of severe injury. Do not rely entirely on the
safety devices installed on the chain saw. As user
of a chain saw, you should take various measures
to be able to work without accident and injury.
Kickback is the consequence of incorrect or faulty
use of the chain saw. It can also be prevented by
taking suitable precautions as described below:

en
Safety regulations
40 BKS 2625 T / BKS 2625 TSB
Hold the saw tight with your thumb and fin-
gers grasping the grips and assume a posi-
tion with your body and arms that enables you
to withstand kickback forces. If suitable mea-
sures are taken, the operator will be able to
control the kickback forces. Never release the
chain saw.
Avoid any abnormal posture, and do not
saw anything above shoulder height. This will
avoid inadvertent contact with the tip of the
bar, and allow better control of the chain saw
in unexpected situations.
Always use replacement bars and saw chains
prescribed by the manufacturer. Incorrect re-
placement bars and saw chains can lead to
the chain breaking and/or to kickback.
Comply with the instructions of the manufac-
turer for sharpening and maintaining the saw
chain. Depth limiters set too low increase the
tendency to kickback.
Techniques for using the chain saw
Always comply with the safety instructions and
use the best cutting technique for the work to be
carried out according to the information and the
examples given in the instructions for use.
Recommendations for beginners
Before you fell a tree or prune a tree for the first
time, you should:
Have attended a special training course for
using this type of tool;
Have carefully read the safety instructions
and the instructions in this manual;
Practice on a tree stump or a log set up on a
stand in order to get the feel of the machine
and acquire suitable cutting techniques.
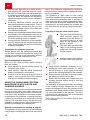
USING THE CHAIN SAWS FOR TREE
MAINTENANCE WITH A ROPE AND
CLIMBING HARNESS
This section describes the procedures that reduce
the risk of injury when using chain saws for tree
maintenance with the aid of a rope or climbing har-
ness. Even if this description could serve as a ba-
sic description for guidelines or training manuals,
it should not be viewed as a substitute for formal
training. The rules described in this appendix are
examples of good practice. National laws and re-
gulations must always be complied with.
General requirements for working at heights
The operators of chain saws for tree maintenance
using a rope or climbing harness must never work
alone. They should be supported by a worker on
the ground who is trained in the appropriate emer-
gency procedures.
The operators of chain saws for tree cutting
should be trained in the general climbing techni-
ques and working positions used in this type of
work and in the use of climbing harnesses, ropes,
belts with loops at the ends, carabiners and other
equipment for securely holding the operator and
the chain saw and assuming a safe working posi-
tion.
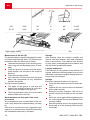
Preparing to use the chain saw on a tree
The chain saw should be che-
cked, refuelled, started and
warmed up by the worker on
the ground before it is swit-
ched off and handed to the
worker in the tree.
The chain saw should be atta-
ched to the climbing harness
of the user with a belt suitable
for this purpose.
Attach the belt to the eyelet on
the back of the chain saw (A).
Have suitable carabiners available for con-
necting the chain saw indirectly (i.e. with a
belt) or directly (i.e. to the eyelet of the chain
saw) to the climbing harness of the operator.
Ensure that the chain saw if securely connec-
ted when you reach it to the user.
Ensure that the chain saw is attached to the
climbing harness before taking it from the
hoisting device.
The possibility of attaching the chain saw directly
to the climbing harness reduces the risk of da-
mage to the equipment while the operator moves
around the tree. Always switch off the chain saw if
it is connected directly to the harness. The chain
saw should be connected to the recommended
loops on the climbing harness.
These may be found in the middle (front or rear)
or on the sides.

Using the chain saws for tree maintenance with a rope and climbing harness
469850_d 41
If possible, connect the chain
saw to the rear middle loop to
prevent it from hindering the
climbing ropes and to ensure
that its weight is centred at
base of the spine of the ope-
rator.
When transferring the chain
saw from one loop to another,
the operator must ensure that
it is attached to the new po-
sition before detaching it from
the previous loop.
Using a chain saw in a tree
An analysis of the accidents with these chain
saws during tree maintenance work shows that
the main cause of accidents is the unintended use
of the chain saw with only one hand. In most ac-
cidents, the operators do not try to assume a safe
working position that enables them to grasp the
chain saw with both hands.
This causes an increased risk of injury because:
The operator does not have a firm hold on the
chain saw in case of a kickback.
The operator does not have control over the
chain saw, which increases the possibility of
contact between the chain saw and the clim-
bing ropes and with the body of the operator
(especially with the left arm and left hand),
It is possible to lose control because the ope-
rator does not assume a safe working posi-
tion, which can lead to contact with the chain
saw (unintentional movement while the chain
saw is running).
Safe working position for two-hand operation
To enable the operator to use the chain saw with
both hands, it must be a general rule to assume
a safe working position when operating the chain
saw.
At hip height, when cutting horizontally
At solar plexus height, when cutting vertically
When the operator is working close to vertical
trunks, with low thrust forces on the working posi-
tion, a good support may be necessary to main-
tain a safe working position.
When the operator moves away
from the trunk, however, an at-
tempt must be made to cancel out
or neutralise the growing thrust
forces, such as by changing the
direction of the main rope with an
additional anchor point or by con-
necting an adjustable belt directly
to the harness at an additional
loop.
A secure hold in the working po-
sition can be achieved by using a
stirrup that is temporarily fashio-
ned from a loop into which the
foot is placed.
Starting the chain saw in a tree
When starting the chain saw in a tree, the opera-
tor:
Must apply the chain brake before starting the
chain saw
Hold the chain saw on the left or right side of
the body before starting the chain saw, i.e.:
On the left side, grasping the chain saw
with the left hand at the front grip and
away from the body, while pulling the
starter cable with the right hand, or
On the right side, grasping the chain saw
with the right hand at the front grip and
away from the body, while pulling the
starter cable with the left hand, or
The chain brake must always be applied before
letting the running chain saw hang from the belt.
Before performing critical cuts, the operator must
always check if the chain saw has enough fuel.
Using the chain saw with only one hand
The chain saws for tree maintenance should not
be operated using only one hand if the operator is
not in a safe working position or the chain saw is
being using to cut twigs at the ends of branches
instead of a hand saw.
The chain saws for tree maintenance are only per-
mitted to be used with one hand if:

en
Using the chain saws for tree maintenance with a rope and climbing harness
42 BKS 2625 T / BKS 2625 TSB
The operator is unable to as-
sume a working position in
which two-hand use is possi-
ble, and
The operator requires one
hand to maintain the working
position and the chain saw is
fully extended, perpendicular
to the body of the operator and
held away from the operator.
The operator must:
Never cut using the kickback area of the saw
at the tip of the bar
Never "cut and hold" pieces and
Never try to grasp pieces as they fall.
Freeing a jammed chain saw
If the chain saw becomes jammed while cutting,
the operator must:
Switch off the chain saw and safely secure it
to the trunk-side of the branch, or to a rope of
the equipment.
Pull the chain saw out of the cut while lifting
the branch, for example.
If necessary, use a hand saw or a second
chain saw to free the jammed chain saw by
introducing a cut of at least 30 cm away from
the jammed saw.
If a hand saw or chain saw is used to free the jam-
med saw, the cuts should be made on the tip-side
of the branch (i.e. between the jammed saw and
the tip of the branch and not between the trunk
and the jammed saw) to prevent an even more
difficult situation in which the chain saw is dragged
along with the cut branch.
ASSEMBLING THE CHAIN SAW
ADVICE
The machine is supplied with the bar and
chain dismantled, and with the mixture
and oil tanks empty.
CAUTION!
Unpacking and assembly must be car-
ried out on a firm and level surface.
There must be sufficient space for mo-
ving the machine and the packaging,
and suitable tools must be available. The
packaging must be disposed of accord-
ing to local regulations.
CAUTION!
Always wear sturdy working gloves when
assembling the bar and chain. When in-
stalling the bar and chain, take the grea-
test of care so as not to impair the safety
and efficiency of the machine; contact
your dealer if you are in doubt.
Before installing the bar, make sure that the chain
brake is not applied; the chain brake is released
when the front hand guard is pulled all the way to
the rear in the direction of the engine housing.
DANGER!
Carry out all work with the engine swit-
ched off.
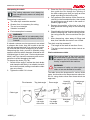
Assembling the bumper spike (if not already
fitted at the factory)
1. Release the nut (1) and take off the cover (2).
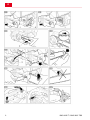
Installing the bar and chain
1. Unscrew the nut and remove the cover to ac-
cess the chain sprocket and the seat of the
bar (Fig. 2).
2. Remove the plastic spacer (1); this spacer is
only used for transporting the packaged ma-
chine and is not required any longer (Fig. 2).
3. Install the bar (2) by inserting the grub screw
into the groove and pressing the bar towards
the rear of the machine housing (Fig. 3).
4. Fit the chain around the chain sprocket and
along the bar guides, paying attention to the
running direction (see Fig. 4); if the tip of the
bar is equipped with a reversing sprocket,
make sure that the chain links are seated cor-
rectly in the recesses of the reversing spro-
cket.
5. Mount the cover again without tightening the
nut, ensuring that the two rear fasteners are
correctly seated.
6. Check that the pin of the chain tensioner (3)
of the cover is seated correctly in the corre-
sponding hole of the bar; if not, use a screwd-
river to turn the screw (5) of the chain tensio-
ner until the pin is completely seated (Fig. 5).
7. Turn the screw of the chain tensioner (4) until
the chain is correctly tensioned (Fig. 5).
8. Lift the bar and tighten the nut of the cover
with the supplied spanner (Fig. 6).

Assembling the chain saw
469850_d 43
Checking the chain tension
1. Check the chain tension. The tension is cor-
rect if the links do not come out of the guide
when you lift the chain in the middle of the bar
(Fig. 7).
PREPARING FOR WORK
Mixture preparation
This machine is equipped with a two-stroke en-
gine that runs on a petrol/oil mixture.
CAUTION!
Using petrol alone will damage the en-
gine and invalidate the warranty.
CAUTION!
Only use high-quality petrol and lubrica-
ting oil so as to ensure overall perfor-
mance and the service life of the mecha-
nical parts in the long term.
Petrol properties
Only lead-free petrol (green petrol) with an octane
number less than 90 RON.
ADVICE
Lead-free petrol tends to leave deposits
in the tank if it is stored for more than 2
months. Always use fresh petrol!
Oil properties
Only use high-quality synthetic oils specifically for
two-stroke engines.
Oils specially developed for such engines are
available from your dealer, which can guarantee
high performance.
Using such oils permits a 2.5% mixture composi-
tion, i.e. 1 part oil to 40 parts petrol.
Mixture preparation and storage
DANGER!
Petrol and mixed fuel are highly in-
flammable!
Exclusively store fuel and mixed fuel
in containers specially approved for
fuels, and keep them in a safe place
away from heat sources and naked
flames.
Never leave the containers within
reach of children.
Do not smoke when mixing fuel, and
attempt to avoid inhaling the petrol
vapours.
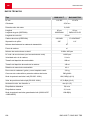
The table shows the amounts of fuel and oil requi-
red for mixture preparation depending on which
oil is used.
Mixing proce-
dure
Petrol Mixing oil
1 litres 25 ml
2 litres 50 ml
40 parts petrol: 1
part mixing oil (2-
stroke mixing oil)
4 litres 100 ml
For the mixture preparation:
1. Pour about half of the specified quantity of fuel
into an approved canister.
2. Pour in the full volume of oil specified in the
table.
3. Then pour in the remaining petrol.
4. Close the container and shake well.
ADVICE
The mixture is subject to a continuous
ageing process. Do not prepare exces-
sive amounts in order to avoid deposits
forming.
ADVICE
Always store the mixed fuel and petrol
containers separately and identifiably so
as to eliminate any risk of mixing them
up during use.
ADVICE
Regularly clean the petrol and mixture
containers to remove any deposits.
CAUTION!
An excessively lean mixture increases
the risk of a premature piston seizure.
The warranty shall be rendered void if
the instructions on mixing the fuel, etc.,
in this manual are not followed.
Refuelling
DANGER!
RISK OF BURNS AND FIRE
The petrol and petrol vapours are highly
inflammable.
CAUTION!
Always open the tank cap carefully be-
cause pressure may have built up inside.

en
Preparing for work
44 BKS 2625 T / BKS 2625 TSB
DANGER!
Do not smoke while refuelling and
do not inhale the petrol vapours.
Fill in fuel before starting the engine.
Ensure that the tank cap is closed
again correctly after refuelling.
Never remove the tank cap or add
fuel whilst the engine is running or
still warm.
Do not spill fuel whilst refuelling.
Start the engine at an appropria-
tely safe distance from the refuelling
place.
Before refuelling:
Shake the mixture container well.
Place the machine on a level surface in a
stable position with the tank cap pointing up-
wards.
Clean the tank cap and the surrounding area
so that no dirt will drop into the tank when re-
fuelling.
Carefully open the tank cap to allow the pres-
sure to escape slowly. Always refuel using a
funnel, and do not fill the tank brim-full.
ADVICE
Always close the tank very firmly.
CAUTION!
Immediately remove any mixed fuel re-
sidues which may have spilled onto the
machine or the ground, and do not start
the engine until all petrol vapours have
evaporated.
Chain lubricant
CAUTION!
Only use special chain saw oil or chain
saw adhesive oil for chain lubrication. Do
not use contaminated oil, since this can
lead to blockage of the filter in the tank
and irreparable damage to the oil pump.
ADVICE
Specific oil for chain lubrication is biode-
gradable. Using mineral oil or engine oil
is harmful to the environment.
Using high-quality oil is a decisive factor in achie-
ving effective lubrication for the cutting elements;
used or low-quality oil impairs lubrication and re-
duces the service life of the chain and bar.
It is recommended that you fill the oil tank fully
every time you refuel (by means of a funnel). The
capacity of the oil tank is designed so that the fuel
will run out before the oil does, thereby guarante-
eing that the machine will not be operated without
lubricant.
Checking the machine
Check the following before you start work:
Check that the clutch is operating properly
(the chain is not permitted to move while the
machine is idling).
Check the saw daily or every time before use,
and after a fall or any kind of impact for da-
mage or major defects.
Fill mixed fuel and oil into the corresponding
tanks;
Make sure all screws on the machine and the
bar are tightened;
Make sure that the chain is sharp and unda-
maged;
Make sure that the air filter is clean;
Make sure that the hand grips and protective
devices on the machine are clean and dry,
correctly mounted and firmly attached to the
machine;
Make sure that the hand grips are correctly
attached;
Make sure that the chain brake functions cor-
rectly;
Check the chain tension.
Checking the chain tension
DANGER!
Carry out all work with the engine swit-
ched off.
1. The tension is correct if the links do not come
out of the guide when you lift the chain in the
middle of the bar (Fig. 7).
2. Loosen the nut of the cover using the supplied
spanner (Fig. 4).
3. Turn the screw of the chain tensioner (4) until
the chain is correctly tensioned (Fig. 4).
4. Lift the bar and tighten the nut of the cover
with the supplied spanner (Fig. 5).
Checking the chain brake
This machine is equipped with a safety brake sys-
tem.
The chain brake was developed to immediately
halt the chain in case of kickback. The brake

Starting the engine, using the machine and switching it off
469850_d 45
is normally applied automatically through inertia.
It can also be applied manually by pushing the
brake lever (hand guard) forward and down.
This brake can also be operated manually by
pressing the front hand guard forwards. To re-
lease the brake, pull the front hand guard towards
the hand grip until the brake disengages.
To check the brake effect:
1. Start the engine and hold the grips with both
hands.
2. Operate the throttle lever to keep the chain
moving, then press the brake lever forwards
using the back of your left hand; the chain
must stop immediately.
3. When the chain has stopped, immediately re-
lease the throttle lever.
4. Release the brake.
DANGER!
The machine is not allowed to be used
if the chain brake is not functioning cor-
rectly. Contact your dealer to have the
required checks carried out.
STARTING THE ENGINE, USING THE
MACHINE AND SWITCHING IT OFF
Starting the engine
WARNING!
The engine is not allowed to be started
unless it is at least 3 m away from the
fuel filling location.
Before starting the engine:
1. Place the machine on the ground in a stable
position.
2. Remove the chain guard.
3. Make sure that the bar is not touching the
ground or other objects.
Cold start
ADVICE
A cold start refers to starting after
at least 5 minutes has elapsed follo-
wing switching off the engine or refu-
elling. To start the engine (Fig. 8):
1. Make sure that the chain brake is applied
(front hand guard pressed fully forwards).
2. Move the switch (1) to the "START" position.
3. Activate the starter by pulling the knob (2) all
the way out.
4. Press the primer knob (3) three to four times
to enrich the mixture for starting.
5. With one hand on the grip, press the machine
firmly against the ground to prevent losing
control of the machine when starting it (Fig. 9).
WARNING!
If the machine is not held firmly, the
thrust force developed by the engine
could cause the user to lose his/her
balance or the bar might be pressed
against an object or the operator who
is starting the machine.
6. Pull the starter handle slowly out by 10–15 cm
until you feel a certain resistance, then pull
firmly a couple of times until you notice the
engine firing for the first time.
WARNING!
Never wind the starter cord around
your hand.
DANGER!
Never start the chain saw by let-
ting it drop while holding the star-
ter cord. This method is extremely
dangerous, because it represents a
complete loss of control over the ma-
chine and the chain.
CAUTION!
To avoid damage, it is better not to
pull the cord out fully or to cause it
to rub against the edge of the cord
guide opening; also, do not let go of
the handle in such a way that the
cord is retracted in an uncontrolled
manner.
7. Let the starter knob move back in about half
way.
8. Pull the starter handle again until the engine
starts correctly.
ADVICE
If the handle of the starter cord is pul-
led several times with the starter ac-
tuated, this can flood the engine and
make starting more difficult. If the en-
gine has flooded, remove the spark
plug and pull lightly on the handle of
the starter cord to remove the sur-
plus fuel, then dry the electrodes of
the spark plug and insert it again.

en
Starting the engine, using the machine and switching it off
46 BKS 2625 T / BKS 2625 TSB
9. After the engine starts, press the speed regu-
lator briefly to release the starter so the en-
gine runs at idling speed.
CAUTION!
Avoid running the engine at high
speed when the chain brake is ap-
plied; this can cause the clutch to
overheat and become damaged.
10. Allow the engine to run for at least 1 minute
at idling speed before you start using the ma-
chine.
Warm start
For a warm start (immediately after the engine is
switched off), perform steps1 - 2 - 5 - 6 - 9 of the
procedure described above.
ADVICE
The notes in the "For your safety" section
must be followed closely.
Engine operation (Fig. 10)
ADVICE
Release the chain brake by pulling the
lever towards the operator before pres-
sing the throttle lever.
The chain speed is controlled using the speed re-
gulator (1) on the rear hand grip (2).
It is only possible to operate the speed regulator
if the interlock lever (3) is operated at the same
time.
The movement is transferred from the engine to
the chain via a centrifugal clutch which prevents
the chain from moving when the engine is idling.
CAUTION!
Do not use the machine if the chain turns
when the engine is idling; in this case,
you must contact the dealer for advice.
The correct working speed is achieved by moving
the speed regulator (1) up to the stop.
CAUTION!
Do not run the engine at maximum speed
during the first 6-8 hours of use.
Engine shutdown
To switch off the engine:
1. Release the control of the speed regulator (1)
and allow the engine to run at idling speed for
a few seconds.
2. Move the switch (4) to the "STOP" position.
CAUTION!
When the speed regulator is moved to
idling speed, it can take a few seconds
before the chain comes to a complete
standstill.
ADVICE
If the machine does not switch off, ope-
rate the starter to cause the engine to
switch off by overrunning and immedia-
tely contact the dealer to establish the
cause of the problem and have the ne-
cessary repairs carried out.
USING THE MACHINE
ADVICE
Always consider that an incorrectly used
chain saw can disturb other people and
pollute the environment significantly.
For considerate use with regard to other people
and the environment:
Avoid using the machine in surroundings and
at times that can be disruptive.
Strictly observe the local regulations on the
disposal of cutting residues.
Strictly observe the local regulations on the
disposal of oil, damaged parts and all other
environmentally polluting substances.
During work, a certain amount of oil is re-
leased into the environment for the purpose
of chain lubrication; for this reason, only bio-
degradable oil specially intended for this pur-
pose is allowed to be used.
To reduce the risk of fire, do not put the
machine down amongst leaves or dry grass
when its engine is hot.

Using the machine
469850_d 47
ADVICE
Wear appropriate clothing during
work. Your dealer can provide you
with useful information about the
best health and safety devices
to guarantee your safety when
working. Do not apply constant or
excessive pressure when gripping
the handles.
Extensive use of the chain saw ex-
poses the operator to vibrations,
which can lead to circulation issues
("white fingers"). To avoid this risk,
wear gloves and keep your hands
warm. If any symptom of "white fin-
gers" occurs, consult a physician
immediately. These symptoms in-
clude: Numbness, loss of feeling,
tingling, itching, pain, reduced mus-
cular strength, changes in the colour
or condition of the skin. Normally
these conditions affect the fingers,
hands or pulse. The risk increases
at low temperatures.
Plan your work in such a way that
the use of devices that generate
strong vibrations is spread over se-
veral days.
ADVICE
Using the machine for felling and pruning
trees requires special training.
WARNING!
Keep the chain saw away from all
parts of your body while working.
Do not work with the chain saw in
wind, bad weather, poor visibility,
and too low or high temperatures.
Ensure that there are no dead bran-
ches that may fall down.
Never work inside the crown of a
tree unless you have been specifi-
cally trained to do so.
Checks to carry out during work
Checking the chain tension
During work, the chain undergoes continuous
elongation, as a result of which the tension must
be checked regularly.
ADVICE
During the first period of use (or after
changing the chain), the check for chain
elongation must be carried out more fre-
quently.
WARNING!
Do not work with a loose chain so as to
avoid hazardous situations that can oc-
cur if the chain slips out of its guide.
To tighten the chain tension, proceed as described
under "Preparing for work" > "Checking the chain
tension".
Checking the oil flow
CAUTION!
Do not use the machine without lubrica-
tion! The oil in the oil tank can be entirely
consumed during the time it takes to use
each fill of fuel. Make sure that you rep-
lenish the oil tank each time you refuel
the chain saw.
ADVICE
When checking the oil flow, make sure
that the bar and the chain are correctly
positioned.
1. Start the engine, let it run at medium speed
and check that the oil is distributed by the
chain as shown in Fig. 11.
2. The oil flow can be adjusted with a screwdri-
ver at the corresponding adjusting screw (1 or
1a) of the pump, which is found at the bottom
of the machine (Fig. 11).
Working methods and cutting techniques
Before you fell or prune a tree for the first time,
you should practice on a tree stump or a branch
set up on a stand to gain a feel for the machine
and acquire the suitable cutting techniques.
WARNING!
If the chain does not run true during work,
switch off the engine immediately.

en
Using the machine
48 BKS 2625 T / BKS 2625 TSB
WARNING!
Always be aware of the possibility of
kickbacks that can occur if the bar en-
counters an obstacle.
Kickback occurs when the tip of the chain
touches an obstacle, or when wood
blocks the chain whilst cutting. This con-
tact with the tip of the chain can cause
the bar to be violently jerked backwards
in the opposite direction, throwing it up
toward the user. This also happens when
the chain is jammed along the top of the
bar. In both cases, kickback can lead to
a loss of control of the chain saw and the
potentially serious consequences.
Before beginning with work, please read the
"For your safety" section. We recommend
practising on thinner tree trunks first. This will
help you become accustomed to working with
the chain saw.
Always follow the safety instructions. Only
use the chain saw to cut wood. It is prohibited
to cut other materials. In this case, the vibra-
tions and kickback would be different and the
safety requirements would not be complied
with. Do not use the chain saw as a lever to
lift, move or split objects and do not block it
on firm ground. It is prohibited to attach tools
or parts to the power take-off of the chain saw
that were not specified by the manufacturer.
It is not necessary to apply force while cut-
ting. After the engine has reached its maxi-
mum speed, apply light pressure only.
If the chain becomes jammed while cutting,
do not try to free it with force but use a wedge
or lever.
If there is an obstacle between the piece
being cut and the chain saw, switch off the
chain saw and wait for it to come to a stand-
still. Put on safety gloves and remove the
obstacle. If the chain needs to be removed,
follow the instructions in the section on instal-
ling the chain saw. After the obstacles has
been removed and the chain reinstalled, per-
form a test run. If vibrations or mechanical
noises are perceived during the test, stop
working and contact your dealer.
Using the bumper spike (if intended, Fig. 12)
1. Force the bumper spike into the trunk and use
the bumper spike as a fulcrum about which to
move the chain saw in an arc, thereby cutting
into the wood.
2. Repeat the working procedure several times,
moving the point of contact of the bumper
spike if necessary.
Pruning a tree (Fig. 13)
DANGER!
Make sure that the area where the bran-
ches will fall is clear.
ADVICE
When pruning trees at heights using a
rope and climbing harness, the instruc-
tion in the "For your safety" section must
be following closely.
WARNING!
Do not stand on unstable ground or
rung ladders when working.
Do not stretch out too far.
Do not cut higher than shoulder le-
vel.
1. Position yourself on the opposite side of the
branch to be cut off.
2. Start with the lowermost branches and then
move on to cutting the higher ones.
3. Cut from the top of the branch to the bottom
so as to prevent the bar from getting jammed.
Felling a tree (Fig. 14)
WARNING!
On slopes, always work on the uphill side
of the tree, and check that the felled tree
cannot cause any damage by rolling.
1. Select the felling direction of the tree by taking
account of the wind, angle of the tree, position
of the heaviest branches, simplicity of working
after felling, etc.
2. Clear the area around the tree and make sure
that you have a good standing position.
3. Make sure that suitable escape routes are
available without obstacles; the escape rou-
tes must be approximately 45° opposite to the
felling direction of the tree, and must make it
possible for the worker to escape to a safe
area at a distance that is about 2.5 times the
height of the tree to be felled.

Using the machine
469850_d 49
4. Prepare an undercut on the felling side of the
tree with a depth of approx. 1/3 of the diame-
ter of the trunk.
5. Cut into the tree on the opposite side at a po-
sition slightly above the horizontal cut of the
felling notch, and leave a bridge (1) of approx.
5–10 cm.
6. Slowly reduce the thickness of the bridge, wi-
thout pulling out the bar, until the tree falls.
7. Under particular conditions or if there is low
stability, felling can be completed by inserting
wedges (2) into the undercut and driving them
in with a hammer.
Cutting off branches after felling (Fig. 15)
ADVICE
Pay attention to where the branch is
in contact with the ground because it
is possible for the branch to be under
tension, consider the direction that the
branch will move in when cut and the
possible instability of the tree after the
branch has been cut.
1. Take account of the direction in which the
branch is growing out of the trunk.
2. Make the first cut on the side with the bend,
and complete the cut on the opposite side.
Cutting through a trunk on the ground (Fig.
17)
1. Cut through the trunk to about the middle of
its diameter, roll the trunk and complete the
cut on the opposite side.
Cutting through a raised trunk (Fig. 18)
1. If the majority of the cut is to be made opposite
to the contact points (A), cut one third of the
diameter from underneath and then complete
the work from above.
2. If the cut is made between two contact points
(B), cut one third of the diameter from above
and complete the work from below.
Completing work
When the work is done:
1. Switch off the engine as described above
(section 6).
2. Wait for the chain to come to a complete
standstill and allow the machine to cool down.
3. Loosen the fastening nut on the bar so as to
reduce the chain tension.
4. Remove all traces of saw chips or oil residues.
5. If the chain is highly contaminated or gummed
with resin, remove it and leave it to soak for
a few hours in a container of special cleaner.
Then rinse with clean water and spray with
an appropriate anticorrosion product before
installing on the machine.
6. Fit the chain guard before putting the machine
away.
CAUTION!
Allow the engine to cool down before you
place the machine in a room. To reduce
the risk of fire, the machine must be clea-
ned to remove saw chips, twigs, leaves
or surplus grease; do not store contai-
ners with cutting residues inside rooms.
MAINTENANCE AND STORAGE
For your safety and the safety of others:
Correct maintenance is essential to retain the
original efficiency and working safety of the
machine.
Make sure that all nuts and screws are firmly
tightened so as to be certain that the machine
is always operating under good conditions.
Never use the machine with worn or dama-
ged components. The damaged parts must
be renewed and are never allowed to be re-
paired. Use original spare parts only. Non-
equivalent spare parts can damage the ma-
chine and endanger the operator.
During maintenance work:
Remove the spark plug connector.
Wait until the motor has cooled down suffici-
ently.
Wear protective gloves when working on the
bar and the chain.
Do not remove the chain guard unless you
need to work on the bar or the chain themsel-
ves.
Dispose of oils, petrol or other contaminating
substances according to the regulations.
Cylinder and silencer (19)
To reduce the risk of fire to a minimum, frequently
clean the cylinder vanes with compressed air and
keep the area around the silencer free from twigs,
cuttings, leaves or other residues.
Starter group
Always keep the cooling air intake grille clean and
free from saw chips and dirt at all times to prevent

en
Maintenance and storage
50 BKS 2625 T / BKS 2625 TSB
the engine from overheating and becoming dama-
ged.
The starter cord must be renewed if it shows any
sign of wear.
Clutch group (20)
The clutch bell housing must b kept free from saw
chips and dirt by removing the clutch cover after
completing work and blowing out the clutch with
compressed air. Your dealer must lubricate the in-
side bearing after every 30 operating hours.
Chain brake
Regularly check the function of the chain brake
and that the metal band around the clutch bell
housing is undamaged. Do this by removing the
cover after completing work and then reinstalling
it correctly.
The band must be replaced if the thickness at the
contact points with the clutch bell is reduced to
approx. half of its thickness at the two ends, which
are not exposed to wear.
Chain sprocket
The condition of the pinion must be checked re-
gularly by the dealer and it must be renewed if the
wear exceeds the permitted amount.
Do not install a new chain on a worn chain spro-
cket or vice versa.
Lubricating hole (21)
Regularly remove the cover, remove the bar and
check that the lubricating holes of the machine (1)
and the bar (2) are not blocked.
Chain interception bolt
This bolt is an important safety element because
it prevents uncontrolled movements of the chain
if it breaks or becomes loose.
Regularly check the condition of the bolt and re-
pair it if damaged.
Fastenings
Regularly check that all fastening screws and nuts
are firms seated, and that all hand grips are firmly
attached.
Cleaning the air filter (22)
CAUTION!
Cleaning the air filter is a prerequisite for
correct operation and a long service life
of the machine. To avoid irreparable da-
mage to the engine, do not work without
a filter, or if the filter is damaged.
ADVICE
Cleaning should be carried out after
every 15 hours of machine use.
To clean the filter:
1. Unscrew the rotary cap (1).
2. Remove the cover (2) and filter element (3).
3. Strike the filter element (3) lightly to remove
dirt, and clean it with low-pressure compres-
sed air if necessary.
CAUTION!
Never wash the filter element (3).
Replace it if it becomes too dirty or
is damaged.
4. Mount the filter element (3) and cover (2)
again.
5. Screw the rotary cap (1) back on.
Checking the spark plug (23)
The spark plug can be accessed by removing the
cover of the air filter.
1. Regularly remove the spark plug and clean off
any deposits using a small metal brush.
2. Check the electrode gap and re-establish the
correct dimension if necessary.
3. Reinsert the spark plug and use the supplied
spanner to tighten it as far as the stop.
ADVICE
The spark plug must be renewed using
an equivalent spark plug with correspon-
ding properties if the electrodes have
burned out or the insulation is damaged.
In any event, renew it every 100 opera-
ting hours.
Carburettor setting
The carburettor is set at the factory so that ma-
ximum performance will be achieved in any ope-
rating situation, with minimum harmful exhaust
emissions and in accordance with the applicable
standards.
If the performance is poor, make sure in advance
that the chain can run freely and that the bar does
not have worn guides; contact your dealer to have
the carburettor performance and engine checked.
Idling speed setting
The chain is not allowed to move when the engine
is idling. If the chain does move when the engine
is idling, you will have to contact your dealer in
order to achieve the correct engine setting.
Page is loading ...
Page is loading ...
Page is loading ...
Page is loading ...
Page is loading ...
Page is loading ...
Page is loading ...
Page is loading ...
Page is loading ...
Page is loading ...
Page is loading ...
Page is loading ...
Page is loading ...
Page is loading ...
Page is loading ...
Page is loading ...
Page is loading ...
Page is loading ...
Page is loading ...
Page is loading ...
Page is loading ...
Page is loading ...
Page is loading ...
Page is loading ...
Page is loading ...
Page is loading ...
Page is loading ...
Page is loading ...
Page is loading ...
Page is loading ...
Page is loading ...
Page is loading ...
Page is loading ...
Page is loading ...
Page is loading ...
Page is loading ...
Page is loading ...
Page is loading ...
Page is loading ...
Page is loading ...
Page is loading ...
Page is loading ...
Page is loading ...
Page is loading ...
Page is loading ...
Page is loading ...
Page is loading ...
Page is loading ...
Page is loading ...
Page is loading ...
Page is loading ...
Page is loading ...
Page is loading ...
Page is loading ...
Page is loading ...
Page is loading ...
Page is loading ...
Page is loading ...
Page is loading ...
Page is loading ...
Page is loading ...
Page is loading ...
Page is loading ...
Page is loading ...
Page is loading ...
Page is loading ...
Page is loading ...
Page is loading ...
Page is loading ...
Page is loading ...
Page is loading ...
Page is loading ...
Page is loading ...
Page is loading ...
Page is loading ...
Page is loading ...
Page is loading ...
Page is loading ...
Page is loading ...
Page is loading ...
Page is loading ...
Page is loading ...
Page is loading ...
Page is loading ...
Page is loading ...
Page is loading ...
Page is loading ...
Page is loading ...
Page is loading ...
Page is loading ...
Page is loading ...
Page is loading ...
Page is loading ...
Page is loading ...
Page is loading ...
Page is loading ...
Page is loading ...
Page is loading ...
Page is loading ...
Page is loading ...
Page is loading ...
Page is loading ...
Page is loading ...
Page is loading ...
Page is loading ...
Page is loading ...
Page is loading ...
Page is loading ...
Page is loading ...
Page is loading ...
Page is loading ...
Page is loading ...
Page is loading ...
Page is loading ...
Page is loading ...
Page is loading ...
Page is loading ...
Page is loading ...
-
 1
1
-
 2
2
-
 3
3
-
 4
4
-
 5
5
-
 6
6
-
 7
7
-
 8
8
-
 9
9
-
 10
10
-
 11
11
-
 12
12
-
 13
13
-
 14
14
-
 15
15
-
 16
16
-
 17
17
-
 18
18
-
 19
19
-
 20
20
-
 21
21
-
 22
22
-
 23
23
-
 24
24
-
 25
25
-
 26
26
-
 27
27
-
 28
28
-
 29
29
-
 30
30
-
 31
31
-
 32
32
-
 33
33
-
 34
34
-
 35
35
-
 36
36
-
 37
37
-
 38
38
-
 39
39
-
 40
40
-
 41
41
-
 42
42
-
 43
43
-
 44
44
-
 45
45
-
 46
46
-
 47
47
-
 48
48
-
 49
49
-
 50
50
-
 51
51
-
 52
52
-
 53
53
-
 54
54
-
 55
55
-
 56
56
-
 57
57
-
 58
58
-
 59
59
-
 60
60
-
 61
61
-
 62
62
-
 63
63
-
 64
64
-
 65
65
-
 66
66
-
 67
67
-
 68
68
-
 69
69
-
 70
70
-
 71
71
-
 72
72
-
 73
73
-
 74
74
-
 75
75
-
 76
76
-
 77
77
-
 78
78
-
 79
79
-
 80
80
-
 81
81
-
 82
82
-
 83
83
-
 84
84
-
 85
85
-
 86
86
-
 87
87
-
 88
88
-
 89
89
-
 90
90
-
 91
91
-
 92
92
-
 93
93
-
 94
94
-
 95
95
-
 96
96
-
 97
97
-
 98
98
-
 99
99
-
 100
100
-
 101
101
-
 102
102
-
 103
103
-
 104
104
-
 105
105
-
 106
106
-
 107
107
-
 108
108
-
 109
109
-
 110
110
-
 111
111
-
 112
112
-
 113
113
-
 114
114
-
 115
115
-
 116
116
-
 117
117
-
 118
118
-
 119
119
-
 120
120
-
 121
121
-
 122
122
-
 123
123
-
 124
124
-
 125
125
-
 126
126
-
 127
127
-
 128
128
-
 129
129
-
 130
130
-
 131
131
-
 132
132
-
 133
133
-
 134
134
-
 135
135
-
 136
136
-
 137
137
-
 138
138
-
 139
139
-
 140
140
-
 141
141
-
 142
142
-
 143
143
-
 144
144
-
 145
145
-
 146
146
-
 147
147
-
 148
148
-
 149
149
-
 150
150
-
 151
151
-
 152
152
-
 153
153
-
 154
154
-
 155
155
-
 156
156
-
 157
157
-
 158
158
-
 159
159
-
 160
160
-
 161
161
-
 162
162
-
 163
163
-
 164
164
-
 165
165
-
 166
166
-
 167
167
-
 168
168


AL-KO Top handle BKS 2625 T User manual
- Category
- Power chainsaws
- Type
- User manual
- This manual is also suitable for
Ask a question and I''ll find the answer in the document
Finding information in a document is now easier with AI
in other languages
Related papers
Other documents
-
Oleo-Mac MTH 560 / MTH 5600 Owner's manual
-
Oleo-Mac MTT 2500 Owner's manual
-
McCulloch Inline 1800T Owner's manual
-
Oleo-Mac OM 84/14,5 K Owner's manual
-
Oleo-Mac MT 451 / MT 4510 Owner's manual
-
Oleo-Mac GSH 400 Owner's manual
-
Skil 0780 AA Owner's manual
-
McCulloch CS35S Owner's manual
-
Jonsered CS2238 User manual
-