Bresser 4964131 Owner's manual

Type
Owner's manual

Bresser 4964131 is a versatile accessory for astronomy enthusiasts, providing accurate guidance and enhancing the user's celestial observation experience. With its illuminated reticle and adjustable brightness, it assists in precise alignment and object location in the night sky. The focusing capability allows for sharp and clear viewing, while the mounting mechanism ensures stable and secure attachment to compatible telescopes. Whether you're a beginner or an experienced astronomer, this device is designed to elevate your stargazing adventures.

Bresser 4964131 is a versatile accessory for astronomy enthusiasts, providing accurate guidance and enhancing the user's celestial observation experience. With its illuminated reticle and adjustable brightness, it assists in precise alignment and object location in the night sky. The focusing capability allows for sharp and clear viewing, while the mounting mechanism ensures stable and secure attachment to compatible telescopes. Whether you're a beginner or an experienced astronomer, this device is designed to elevate your stargazing adventures.

Telescope accessory
Illuminated Polender Scope for EXOS-1
Art. No. 4964210
Instruction Manual
GB
2
Scope of delivery:
Polar nder scope with illuminated recticle
Necessary tools (have to be purchased seperately):
Hex key 1.5mm and 2mm
Illumination
Before you can switch on the illumina-
tor (1; Figure 1), you have to remove
the battery strip. Unscrew the cap with
the knurling (2; Figure 1). Remove the
security strip and screw the cap back
on. Locate the ON/OFF switch on the
upper end of the illuminator (3; Figure
1). It also enables you to adjust the
brightness.
Focussing the polar nder scope
Focussing can be done before the installation of the nder scope. Look through
the scope at an object that is at least 100m away. If the image is not sharp, look
through the scope while turning the eyepiece (5; Figure 1) until the image is sharp.
Mounting the polar nder scope
Remove the dust cover from the southern end of the polar axis of your mount to
get access to the polar nder mounting hole (1; Figure 2).
Loosen the locking screw of the locking nut (2; Figure 2).
Unscrew the locking nut (3; Figure 2)
Make sure the locking screw (2; Figure 2)
has been loosened far enough to prevent
damage to the thread of the locking nut.
Remove the illuminator (1; Figure 1) from
the polar nder scope.
Apply the O-ring to the polar nder scope
from the front end (1; Figure 3).
Fig. 1
Fig. 2
3
Shift the locking nut (2; Figure 3) onto
the polar nder scope.
Re-install the illumination unit.
Insert the polar nder scope into the po-
lar nder mounting hole (Figure 4). Lock
the polar nder scope with the locking
nut and secure the nut with the locking
screw. Please take care not to overtighten
the screw.
Adjusting the recticle
The alignment of the polar nder recticle (Fig-
ure 5) can be done best during the day.
Then follow the procedure below:
Remove the optics from the mount if this
hasn´t been done already.
Loosen the Dec-Lock and turn the declination
axis to 90°.
Remove the dust cap from the northern face of
the declination housing of the mount (topic 18
in the Bresser mount manual).
Set up your mount so that you are able to see a land object that is at least 50m
away. Use the Alt/Az controls of the mount to center a feature of the object in the
polar nder scope. It should be a fairly distict feature, like a rooftop edge or suchlike.
Loosen the RA-lock of your mount and swing the RA axis from left to right and back.
Fig. 3
Fig. 4
Fig. 5
4
If the image of the object is not (or very little) moving in the polar nder scope
there is no need to adjust your polar nder.
If the object moves while you move the RA axis, follow the procedure below:
The polar nder scope has three radial screws for adjusting the recticle (4; Fig. 1).
Use a 1.5mm hex key to move the recticle. Always loosen two screws a little
and counter with the third screw. Then check the polar nder scope adjustment
again. Repeat this procedure until the image remains stationary in the polar
nder scope while you move the RA-axis. Make sure to have all three adjust-
ment screws locked when you have nished this procedure.
Using the polar nder scope
Orient yourself towards the sky. To align your mount to the celestial pole with
the help of your polar nder scope, you need unobstructed view towards the
northern part of the sky (or to the south, if you are using the telescope in the
southern hemisphere, such as Australia).
The following procedure applies to aligning the telescope for the use on the
northern hemisphere, such as Europe or North America. Look for the constel-
lation „Big Dipper“. The Big Dipper represents a part oft he constellation „Big
Bear (Ursa Major)“. Depending on the season you can see the constellation at
different locations at dusk: in the winter it can be seen just above the northern
horizon, in spring halfway up in the north east, in the summer almost directly
above in the north, and in the autumn in the north west. Figure 6 shows you the
northern part oft he sky at dusk in the beginning of january.
Fig. 6
5
The Big Dipper /Big Bear is located directly above the northern horizon. We can
spot the three stars that form the handle of the Big Dipper at the middle left
and two bright stars at the other end of the constellation (marked yellow in the
gure 6), one of them beeing the star „Dubhe“ in the upper right. We need those
„rear“ stars to get tot he North Star (Polaris). If yopu prolong the line that is
formed by those two yellow stars oft he Big Dipper you will get tot he brightest
star in the constellation Little Dipper/Little Bear (Ursa Minor). This is the North
Star (Polaris – also marked yellow).
The North Star may be located in the immedi-
ate vicinity oft he north celestial pole, but it is
not located directly at the pole.For this reason
it does circle the pole during the day/year like
any other star that circle the celestial pole. We
now have to nd out on which position on this
circle the star is located at this very moment.
For this, let us refer to gure 7.
Figure 7 shows the engraving on the recticle
of the polar nder scope. You may notice three
gures with little circles that are connected with
lines. These symbols represent constellations.. To align the mount onto the north
celestial pole we need the constellation in the upper left and the constellation be-
low the middle at the right. You may have recognized the left constellation already
– it ist he Big Dipper, that we already located successfully. The other constellation
is Cassiopeia which we have to locate now. To do this, let us have a look onto gure
8, which is simply showing a bigger part of the sky then gure 6 above:
Fig. 8
Fig. 7
6
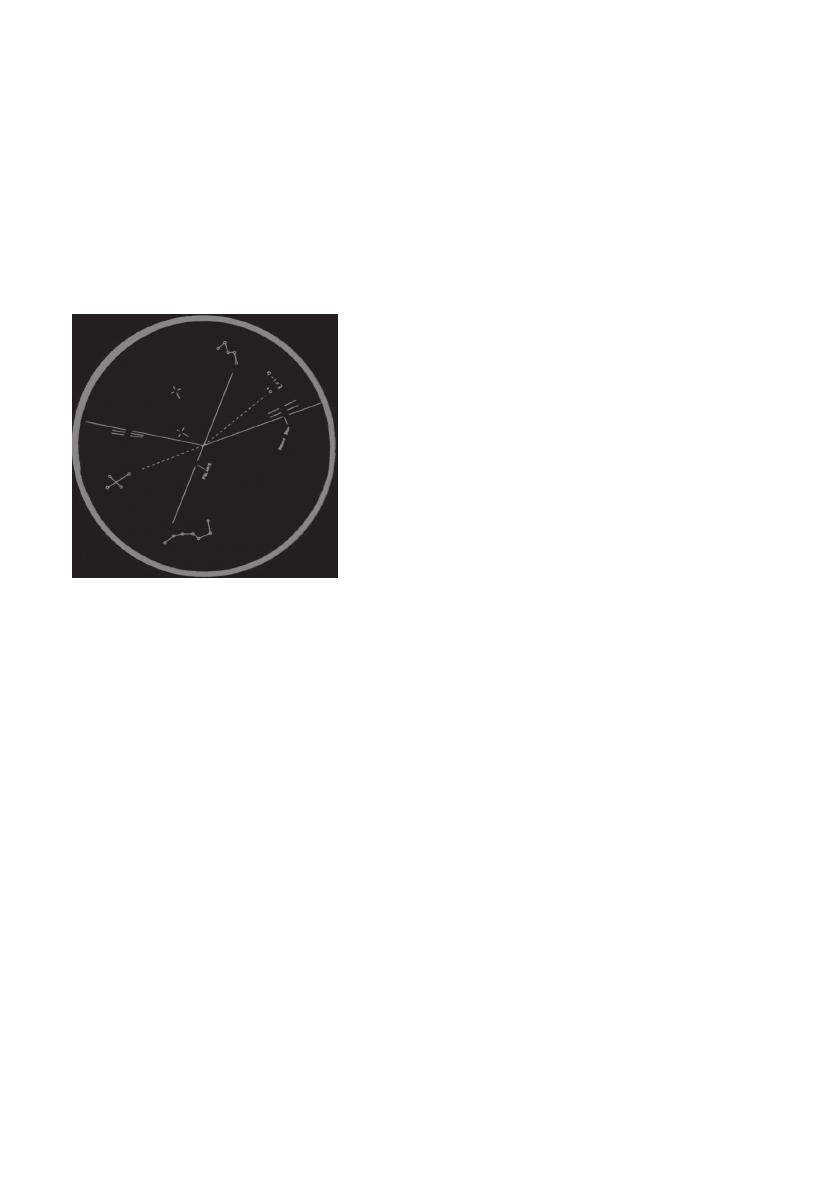
We recognize the Big Dipper at the lower part in the middle of the eld of view,
the North Star almost in the middle oft he picture and a constellation at the
upper end of the picture just slightly to the right of the middle. This constellation
looks like a W turned upside down - Cassiopeia. We have marked stars in each
of the constellations for you: the rst star in the Big Dippers handle (Alkaid),
Polaris and the star at the lower right in the constellation Cassiopeia (Epsilon
Cassiopeia). These three stars are forming a line.
Now we are moving the polar axis of our telescope mount until the line in the
recticle aligns with the orientation of the corresponding line at the sky.
Please notice the difference tot he image oft he
recticle in the beginning of this manual (gure
7): the position oft he constellation symbols in
the recticle now aligns with the orientation oft
he real constellations at the sky. Now we lock
the RA-axis oft he telescope mount. Now you
move the mount only with the ne adjustment
knobs for azimut and altitude until Polaris is
positioned at the right place in the line in the
recticle – we have marked this position already
for you with a white dot star. Your mount is
now aligned to the North Celestial Pole.
Aligning the mount to the Southern Celestial
Pole is analogous tot he alignment described above. The constellations that
help us orient the recticle are the Southern Cross (or, more precisely its bright-
est star, Acrux) and the brightest star in the constellation Eridanus (Achenar).
The star that has to be positioned into the right place in the recticle is Polaris
Australis (Sigma Octans).
Fig. 9
7
Bresser GmbH
D-46414 Rhede • Gutenbergstr. 2 • Germany
service.apd@bresser.de • www.bresser.de
Errors and technical changes excepted.
Manual_4964210-Polender-Scope-EXOS-1_en_BRESSER_v042018a
  • Page 1 1
  • Page 2 2
  • Page 3 3
  • Page 4 4
  • Page 5 5
  • Page 6 6
  • Page 7 7
  • Page 8 8

Bresser 4964131 Owner's manual

Type
Owner's manual

Bresser 4964131 is a versatile accessory for astronomy enthusiasts, providing accurate guidance and enhancing the user's celestial observation experience. With its illuminated reticle and adjustable brightness, it assists in precise alignment and object location in the night sky. The focusing capability allows for sharp and clear viewing, while the mounting mechanism ensures stable and secure attachment to compatible telescopes. Whether you're a beginner or an experienced astronomer, this device is designed to elevate your stargazing adventures.

Ask a question and I''ll find the answer in the document

Finding information in a document is now easier with AI