
XK-CMD-KIT – XKcommand 8 Channel Bluetooth Switch Panel
1
System Input
Voltage
Sensor Wire
Input Voltage
Max Power
Output Per Channel
Warranty
9-16V DC
9-16V for red, green, and blue wires
(programmable sensor wires). 3-16V
for white wire (ignition sensor wire)
15A/channel
3 year
Warranty and Disclaimer
Within THREE years after the purchase date, the original buyer may return any XKcommand product
that has failed due to a defect in materials or workmanship.
Installation of this product must be performed by a licensed professional. Should the failure of the product
be the result of damage occurring as a result of improper installation, alteration of the product or an act or
omission on the part of the consumer, this warranty is void. XKGLOW Lighting shall not be responsible for
any consequential damages which arise from the use and/or installation of the product. If the kit is installed in
any manner other than specified, XKGLOW Lighting reserves the right to deny any warranty claims at the
discretion of the technical support department. Any product return must include the original packaging,
invoice number and a statement of the alleged defect. Upon receipt of the returned product, the company will
test the product for defect. If the results of the testing do not support the warranty claim, do not reveal any
defect or indicate consumer negligence in the installation and handling of the product, then the product will be
returned to you and you will be charged a reshipping fee. If the product is returned from an address within
the continental United States, within the first 30 days after purchase, and is found to be defective, XKGLOW
Lighting will exchange or refund the original purchase expense. This offer does not extend to the cost for
shipping charges on any international packages.
Additional Disclaimer Terms
Please check your local and state laws for the proper use of this product.
• Improper installation of electrical products such as lighting may cause damage to any vehicle or device to
which the improperly handled or installed lighting is attached.
• Improperly installed product may cause electrical injury to persons.
• It is recommended that the kit should be installed by a licensed professional.
• XKGLOW assumes no liability for the installation of the product.
• Warranty or liability will not exceed the product purchase price, which shall be buyer’s sole and exclusive
remedy.
Return/Exchange Procedure
1. Email [xk@xkglow.com] to notify us of the product issue as well as the item number and name of
customer on invoice.
2. We will send you the trouble-shooting guide to fix the issue, or to narrow down which of the component(s)
need to be replaced. If the issue still exists, we will ask you to send back the defective items to be
replaced.
3. Please send the returned item as instructed, along with claims and a telephone number where you can
be reached.
4. After the returned item(s) have been accepted and inspected, we will issue a refund or replace the items
ASAP. For refunds, item(s) must be sent to XKGLOW within 30 days from date of purchase. Original
shipping charges are not refundable.
We always stand behind our products and are committed to our customers! For questions you may
have, please contact xk@xkglow.com. We normally respond within 24 hours. (Monday-Friday).

XK-CMD-KIT – XKcommand 8 Channel Bluetooth Switch Panel
2
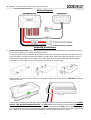
Wiring Diagram
Mounting Instructions
1. Mount XKcommand Hub: Find a mounting location for the XKcommand hub. Hub should be mounted
on or near the battery in an easily accessible location.
If using the optional XKcommand hub mounting bracket, first, mount the L-bracket to the fire wall or any
other flat surface using the provided self-tapping screws. Next, attach the larger bracket piece to the L-
bracket with the included nuts and bolts. Last, mount the hub to the bracket using the provided allen
bolts and nuts. The bracket has 3 slots built into it for wiring to route through.
After the hub is secured, remove the hub cover by pressing the tab shown below in GREEN and rotating
it towards the rear.
Connect the included power and ground wires. First, connect the wires to the XKcommand hub. PLEASE
NOTICE THE WIRING DIAGRAM ABOVE. The RED power wire connects to the terminal CLOSEST to
the output rail. If these wires are connected wrong, the XKcommand hub WILL short and this WILL NOT
be covered under warranty. Route wiring through the slotted channel as shown above. Next, ground wire
to the battery. Do not connect power wire to battery until all output channels are wired.

XK-CMD-KIT – XKcommand 8 Channel Bluetooth Switch Panel
3
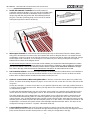
2. Install XKcommand Controller: Mount XKcommand
controller in desired location. You can use the included angle
bracket to set the controller at desirable angle. Route the
longer wire with the plug end to the XKcommand hub and
plug it in. The tabs on these plugs can be cut off for easier
routing through the fire wall if necessary.
3. Wire Output Channels: Ensure that the main positive power wire is disconnected from the battery before
wiring. Wire all desired accessories to the XKcommand hub. Refer to diagram above to see output channel
configuration. Channel 1 starts on the left side all the way to channel 8 on the far-right side of the hub. Using a
small Phillips head screwdriver, secure wiring for each channel in place. Wiring should pass through the
bottom slots as shown in the diagram above.
Do not exceed 15A per channel. If more than 15A is needed, you can link the channels together to increase
output current by running both channel wires to the 12V accessory. Example- if 30A is needed for a light bar,
you can use channel 1 and 2. Run both the positive and the negative wires from each channel to the light
bar. Then in the app, make sure that both channels are checked on for each button that is used.
4. Add Controller Stickers: Now that the output channels are wired, take the included stickers and add them to
the corresponding buttons on the XKcommand controller. If any of the sticker icons do not fit the use of the
button, there are blank stickers included on the sheet to make your own.
5. Optional- Connect Sensor Wires and Ignition Wire: If desired, connect the sensor wires to a positive 12V
source. As shown in the wiring diagram on page 2, sensor wire 1 is red, sensor wire 2 is blue, and sensor wire
3 is green.
Sensor wire example – Connect sensor wire 1 to your positive high beam wire. In the App, enable Channels 1,
2, and 3 to turn on with that sensor wire. When your high beams are activated, all forward facing lights will turn
on automatically as well.
To utilize the dim backlight feature, tap one of the three sensor wires into a positive running light wire on the
vehicle. When the vehicles running lights come on, the XKcommand controller will automatically dim down.
The white ignition wire can be tapped into any vehicle ignition source. When the vehicle is powered on, the
XKcommand will automatically power on. When the ignition wire gets signal from On to Off, it shuts off all
output channels, turns off the Bluetooth signal, and the control panel back light. If this wire isn’t used, you can
manually press any button to power the XKcommand system on. In this status, if no buttons are turned on and
no Bluetooth is connected, the system will turn off its backlight and Bluetooth after 30min. This time can be
configured in the app (Customize -> System -> Bluetooth Auto Off).
6. Connect Red Power Wire: After all of the output channels are wired, connect the red power wire to the
positive battery terminal. Ensure all connections are tight and that wiring is free from any moving parts. At this
point, the XKcommand controller should power on and is ready for configuration in the app.

XK-CMD-KIT – XKcommand 8 Channel Bluetooth Switch Panel
4
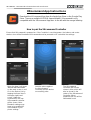
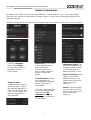
XKcommand App Instructions
Download the XKcommand App from the Apple App Store or the Google Play
Store. There are multiple XKGLOW Apps available. XKcommand is only
compatible with the XKcommand App seen to the left with the orange lettering.
How to pair the XKcommand Controller
Ensure that XKcommand is powered on. If the Controller is receiving power, the buttons and center
wireless icon will be illuminated. XKcommand must be powered on to customize the settings.
Open the App. It will show
“Device Not Connected”
on the main screen in red.
Go to the Device List by
tapping the three lines in
the upper right-hand
corner. Under the
Unpaired list, the new
XKcommand controller
will be shown. Note-
Bluetooth settings may
have to be enabled for
XKcommand in your
phone settings.
Hold the phone against
the XKcommand
controller until the device
successfully pairs.
The XKcommand
Controller will now be
shown in blue, which will
also be shown in the
center of the XKcommand
Controller. When
unpaired, this icon will be
illuminated in red.

XK-CMD-KIT – XKcommand 8 Channel Bluetooth Switch Panel
5
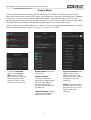
Button Customization
By default, each button controls one channel. Button 1 controls channel 1, etc. In the app, multiple
channels can be tied to a single button. Example- button 1 controls all rear facing lights which are on
separate channels.
All button settings are accessed via the XKcommand app. At the bottom of the screen, click Customize.
From the Customize
menu, select Button.
Choose which button to
customize from the
screen above.
Button Icon- This is what
will be displayed on the
app home screen.
Choose a preset icon,
take or select a photo to
display, or name the
button.
Linked Channels- Select
each channel to be
controlled by the selected
button. See Pg. 8 for
more details.
If you are linking channels
to increase current output,
make sure that all
channels wired to that
accessory are checked on
for that button.
Momentary Switch- This
will turn the button into a
momentary switch. It will
only activate while it is
being pressed; ex.- horn.
Sync All Channels- Each
channel can perform
different actions on the
same button. Select this
option to sync all
channels.
Action- Select the action
for each channel. If Sync
All Channels is off, scroll
down to find other
channels.
Strobe Actions-
Available actions have an
A and a B option. These
are matched opposites. If
CH1 is set to Flash A and
CH2 is set to Flash B, the
lights will strobe with a
wig wag effect.

XK-CMD-KIT – XKcommand 8 Channel Bluetooth Switch Panel
6
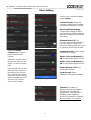
Sensor Wires
There are three loose wires coming off of the XKcommand Controller. These are the sensor wires.
When any of these wires receive a 12V signal, XKcommand can perform a customized action. Example-
Channels 1, 2, and 3 are connected to forward facing lights. Tap one of the sensor wires into the
positive high beam wire. In the App, enable Channels 1, 2, and 3 to turn on with that sensor wire. When
the high beams are activated, all forward facing lights will turn on automatically as well.
Note- A channel can link with multiple sensor wires. If sensors are triggered simultaneously, the order of
sensor priority on the same channel is: Sensor 1 > Sensor 2 > Sensor 3.
From the Customize
menu, select Sensor
Wire. Choose which
sensor wire to customize
from the screen above.
Wire color can be seen
below each sensor wire.
Sensor Name- Name the
sensor wire.
Sensor Function-
Choose to dim button
back light or trigger output
action. To dim buttons,
tap into running light
source that turns on when
it is dark out.
Linked Channels- Select
channels to be linked to
selected sensor wire.
Sync All Channels- Each
channel can perform
different actions on the
same sensor wire. Select
this option to sync all
channels.
Action- Select the action
for each channel. If Sync
All Channels is off, scroll
down to find other
channels.

XK-CMD-KIT – XKcommand 8 Channel Bluetooth Switch Panel
7
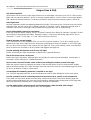
Other Settings
Under the Output
Channel menu, set the
current limit for each
channel.
Select the channel, name
the channel, and use the
+ and – to set the current
limit.
Input a value close to the
max operation current of
the load on this channel.
Once reaching this value,
the power of this channel
will be immediately cut off
and error color will be
shown on the button.
Access more controller settings
under System.
Controller Name- Name the
controller. Helpful when multiple
XKcommand systems are used.
Auto Cutoff Input Voltage-
Set minimum voltage at which
vehicle will start. When voltage is
met, XKcommand system will be
shut down.
Bluetooth Auto Off- If all
channels are off and controller is
not connected to a device via
Bluetooth, Bluetooth will be cut off
to preserve power after set time.
Temperature Unit- Select unit for
internal hub readings.
Button Color and Brightness –
ON- Set backlight options for ON
Button Color and Brightness –
ON- Set backlight options for OFF
Button Warning Color- Set
button warning color
Factory Reset- Reset
XKcommand to factory defaults
Firmware- Firmware on
XKcommand can be updated
via Bluetooth. Red dot will
appear when new firmware is
available. When updating,
ensure XKcommand is powered
ON until update is complete.

XK-CMD-KIT – XKcommand 8 Channel Bluetooth Switch Panel
8
Unique Uses & FAQ
SXS Street Legal Kit-
XKcommand can be used to control lights and horn for a street legal conversion kit on a SXS. Wire running
lights and turn signals to buttons 1 and 2. In the app, program buttons 1 and 2 to flash as turn signal pattern.
Add a button for hazards and horn. Under the horn button, make sure the momentary option is turned on.
Auto-High Beam-
Let’s say channels 1 and 2 are powering forward-facing lights. Take sensor wire 1 and tap it into the positive
high beam wire. Go into sensor wire 1 settings and turn on channels 1 and 2. Whenever the high beam is
activated, sensor wire 1 will trigger, and the forward-facing lights will come on automatically.
How to link multiple channels to one button-
In the app under the button settings, there is a Linked Channels menu listing off channels 1 through 8. Select
each channel to be tied with that button. Example- button 1 controls all rear facing lights which are on
channels 1, 2, and 7. In the app, 1, 2, and 7 will need to be checked.
How to increase current output-
If you need more than the available 15A, you can link channels together. To do this, simply run the
output wires from those channels to the accessory needing more current. Example- to run a 30A light
bar, run wires from channel 1 and channel 2 to the light bar. Then in the settings, make sure that both
those channels are checked on for any button that triggers that light bar.
Can the dimming functions be used for any 12V light?
Please check with your light manufacturer to make sure it supports dimming.
Places the sensor wires can tap into-
Brake, turn signal, high beam, welcome light, running light (for reducing panel backlight), reverse light, or
even add in rocker switches for 3 additional buttons.
How to reset a channel if it auto shuts off due to exceeding the set max current in the app-
When the set max current is triggered, the power of the channel will be cut off for safety and the related
buttons will flash warning color. After fixing the issue that causes the set max current being triggered, power
off and on all buttons via app of control panel.
Can multiple XKcommand systems be controlled in one app?
Yes. The main app page will have an arrow indicating the user to swipe left/right to access each panel.
Can the system be used to control motorized accessories such as a winch or air compressor?
The system can be used to power on/off the relay switch but should NOT be used to directly power the
product. Motorized products can have very high momentary voltage/current during power on/off stage that
goes way beyond the standard spec. Using a relay ensures safe operation.
Can the white (ignition trigger sensor) wire be tapped into a data wire with 3-5V voltage?
Yes. The white sensor wire is designed to be 3-16V compatible.
-
 1
1
-
 2
2
-
 3
3
-
 4
4
-
 5
5
-
 6
6
-
 7
7
-
 8
8


Ask a question and I''ll find the answer in the document
Finding information in a document is now easier with AI