
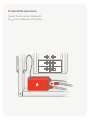
Solar Install Guide
®

Warning
Sense is connected to dangerous voltages.
Improper use or installation can be dangerous
or even fatal. Please make sure to follow
these guidelines:
1. The installation should be conducted by a
qualied professional, according to local
electrical codes.
2. Personal protective equipment should be
worn when installing a current sensor on a
conductor exposing hazardous live voltages. If
the current sensors are used in a manner other
than specied, the safety protection provided
may be impaired.
3. Do not try to open the Sense monitor,
touch any internal parts, or try to repair it.
4. If you believe the monitor, sensors, or
cables may have been damaged, do not try
to use them.
5. Use the Sense monitor only in the United
States and Canada, and only with a 60Hz
120V/240V split phase system.
6. Install the Sense monitor where it will not
be exposed to direct sunlight or extremely
low or high temperatures. No exposure to
water. RH < 90%; Elevation < 2000 meters;
Temperature 0 - 68°C.
Legal
This equipment has been tested and found
to comply with the limits for a Class B digital
device, pursuant to part 15 of the FCC Rules.
Operation is subject to these conditions:
1. It may not cause harmful interference.
2. It must accept any interference received,
including interference that may cause
undesired operation. If it is not installed and
used as per the instructions, it may cause
interference which is harmful to wireless
communications. There is no guarantee that
interference will not occur in a particular
installation. If it does cause interference we
recommend: reorienting or relocating the
receiving antenna, or increasing the separation
between the device and the receiver.
3. Patents: sense.com/patents
Questions?
Go to help.sense.com.
Designed by Sense in Cambridge, MA
©2019 Sense Labs, Inc.
USC
Certied to CSA STD C22.2 No. 61010-1
Conforms to UL STD 2808
Conforms to UL STD 61010-1
Conforms to UL STD 61010-2-032
Conforms to CAN ICES-3(B)/NMB-3(B)


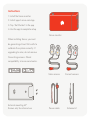
Solar sensors Current sensors
Power cable Antenna kit
Instructions
1. Install the Sense monitor
2. Install app at sense.com/app
3. Tap “Get Started” in the app
4. Use the app to complete setup
Sense monitor
External mounting kit*
Screws only for external use
When installing Sense, you must
be generating at least 150 watts to
calibrate the system correctly. If
upgrading to solar, do not remove
the existing sensors. Check
compatibility at sense.com/works.

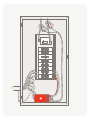
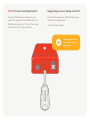
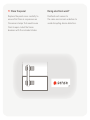
01 Turn o power
Open the door to the electric panel
and turn o the main breaker and
power to the incoming solar feed. This
helps protect you during installation.
Don’t forget your ashlight!
OFF

OFF
Warning: The
service mains are
always live!
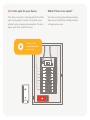
02 Remove panel cover
Remove the screws securing the
panel cover to access the circuit
breakers. If solar is in a subpanel,
remove the subpanel cover.

03 First time installing Sense?
Using a athead screwdriver, pry
open the cap on the middle port of
the Sense monitor. This will be used
to connect the solar sensors.
Warning: Do not use
screwdriver on live
equipment.
Upgrading current setup to solar?
Ensure the power is o before prying
open the middle port.
Then skip to step 8.

Warning: The
service mains are
always live!
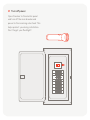
04 Find a spot for your Sense
The Sense monitor is designed to t within
your main panel in order to monitor your
whole home energy consumption. Find an
open spot that works for you.
What if there is no room?
Use the mounting bracket provided.
See more installation congurations
at help.sense.com.

05 Install the antenna
Using the back of a screwdriver, punch
out the knockout cover in the electric
panel. Then, insert the antenna.
Extension cable knobExtension cableInsertAntenna Knob

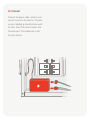
06 Connect
Connect the power cable, antenna, and
current sensors to the monitor. The solar
sensors, labelled should only be used
for solar. Insert the current sensors into
the outer port. The middle port is only
for solar sensors.

07 Clamp sensors around service mains
Clamp the current sensors around the service
mains so that both Sense labels face the same
direction. The direction of the sensors does
not matter, as long as they are the same.
As a safety
precaution, rst plug
the sensors into the
Sense monitor.

08 Connect the solar sensors
Connect the solar sensors, labeled with
the to the middle port on the monitor.

09 Clamp the solar sensors
Clamp the solar sensors around the
wires to the incoming solar feed so that
both labels face the same direction. The
direction of the sensors does not matter,
as long as they are the same.
Upgrading current setup to solar?
Please skip to step 11.

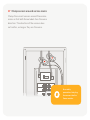
10 Connect the power
Connect the black wire and the red wire to
an empty 240V breaker and the white wire
to the neutral bus bar. Sense draws less
than 0.1A, so you should use the smallest
240V breaker available for your panel.
Don’t have an empty breaker?
Connect to an existing or add a new
240V breaker. Do not use a tandem
breaker, unless it is 240V. Learn more
at help.sense.com.
Breaker Neutral

11 Close the panel
Replace the panel cover carefully to
ensure that there is no pressure on
the sensor clamps that would cause
them to open. Label the Sense
breakers with the included sticker.
Doing electrical work?
Reattach each sensor to
the same service main as before to
avoid disrupting device detection.

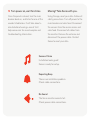
12 Turn power on, wait for chime
Once the panel is closed, turn the main
breaker back on, and listen for one of the
sounds listed below. It will take about a
minute before hearing a sound. Visit
help.sense.com for sound samples and
troubleshooting information.
Moving? Take Sense with you.
Using the app, reset your data. Follow all
safety precautions. Turn o power to the
main breaker and solar feed. Disconnect
the sensors from the service mains and
solar feed. Disconnect all cables from
the monitor. Remove the antenna and
disconnect the power cable. Contact
Sense to reset your data.
Success Chime
Installation looks good!
Sense is ready for setup.
Repeating Beep
There is an installation problem.
Check cable connections.
No Sound
The Sense monitor cannot start.
Check power cable connections.

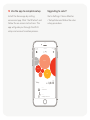
13 Use the app to complete setup
Install the Sense app by visiting
sense.com/app. Click “Get Started” and
follow the on-screen instructions. The
app will guide you through the Wi-Fi
setup and account creation process.
Upgrading to solar?
Go to Settings / Sense Monitor
/ Setup Solar and follow the solar
setup procedure.
100%9:41 AM
Fridge
Dryer
Unknown
AC
Hall light
Porch
Solar
Today 3,825
WA T T S
312:45
Tea kettle on
12:58
Hall lights turned on

MUSS-PRNT-05.03 - RGB
Caution: The Sense monitor should be installed
by a qualied professional. Before installing,
please read and review the safety warnings.
Technical Specications
Sense is a home energy monitoring device.
It is used to measure the current and
voltage on the service mains. It monitors
two phases of 110/120VAC. If installed
outside, it must be kept dry and within
specied temperature ranges.
Current Sensor Specications
CAT IV 250V 200A max
Cable length: 46” | Inside diameter: 0.95”
May be used on uninsulated conductors
Monitor Specications
Compatibility: 120VAC (90v-130v)
Power Use: < 5 Watts, 0.1 amps
Wi-Fi: 2.4 GHz 802.11b/g/n
Size: 137mm x 66mm x 32mm
Weight: 200g
Climate Specications
RH <90%; IPx0 rating
Temperature: 0-68ºC
Elevation < 2,000m

See what’s up. Know what’s on.
™
-
 1
1
-
 2
2
-
 3
3
-
 4
4
-
 5
5
-
 6
6
-
 7
7
-
 8
8
-
 9
9
-
 10
10
-
 11
11
-
 12
12
-
 13
13
-
 14
14
-
 15
15
-
 16
16
-
 17
17
-
 18
18
-
 19
19
-
 20
20


Ask a question and I''ll find the answer in the document
Finding information in a document is now easier with AI
Other documents
-
Square D WISEREMCTEXT25 Operating instructions
-
-
-
Hayward OmniLogic Installation guide
-
Victron energy Venus GX Owner's manual
-
Victron energy Cerbo GX Owner's manual
-
 Goldline LOGIC PL-P-4 User manual
-
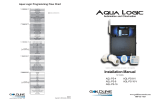 Aqua Logic AQL-PS-4 User manual
-
-

