
PRODUCT
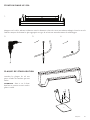
HOPPER BENCH – FLOOR FASTENING – STABILIZING SUPPORT –
MAINTENANCE
HOPPER BENCH
© design by dirk wynants
READ INSIDE
ASSEMBLY INSTRUCTIONS,
HOW TO USE, USEFUL TIPS
FOR KEEPING YOUR TOOL FOR
TOGETHERNESS IN SHAPE
LANGUAGES
FR – IT – ES
MORE
WWW.EXTREMIS.BE

LANGUAGES
ENGLISH P. 3
contents p. 3
assembly hopper bench p. 4
oor fastening p. 7
stabilizing support p. 7
maintenance p. 8
NEDERLANDS P. 11
inhoud p. 11
montage hopper bench p. 12
grondverankering p. 15
grondplaat p. 15
onderhoud p. 16
DEUTSCH P. 19
inhalt p. 19
montage hopper bench p. 20
bodenverankerung p. 23
bodenplatte p. 23
pege p. 24
FRANÇAIS P. 27
contenu p. 27
montage hopper bench p. 28
xation dans le sol p. 31
plaque de stabilisation p. 31
entretien p. 32
ITALIANO P. 35
contenuto p. 35
montaggio hopper bench p. 36
ancoraggio a terra p. 39
supporto di stabilizzazione p. 39
manutenzione p. 40
ESPAÑOL P. 43
contenido p. 43
montaje hopper bench p. 44
anclaje al suelo p. 47
soporte estabilizador p. 47
mantenimiento p. 48
2 content

extremis
extremis
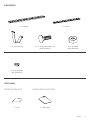
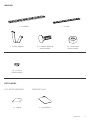
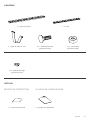
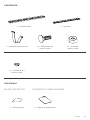
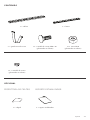
2 x felt 2 x oor plate
PROTECTION FELT STABILIZING SUPPORT
OPTIONAL
12 x lock washer
(hot galvanised)
2 x steel table leg 12 x carriage bolt M10 x 30
(hot galvanised)
12 x nut M10
(hot galvanised)
1 x tabletop 1 x bench
CONTENTS
english 3

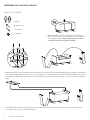
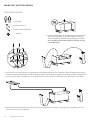
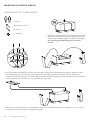
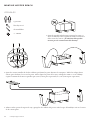
+/- 20 min.
3. Put the lid back on the box and put the 2 boards mentioned in step 2 on top of the lid. e box is now located
centrally with respect to the four table legs.
2. Remove the four screws from the two boards that prevent the table legs from moving during transport. Fold down
the cardboard aps to have better access to the table legs. Take them out of the box and position them as shown in
the drawing. Depending on the size of the table put them 2,6 m (bench for 3 people) or 3,2 m (bench for 4 people)
apart.
1. Remove the lid of the box containing the table legs.
is is the box on the wooden pallet. To this end, just
cut the pallet straps. e packaging material must
stay intact for the rest of the assembly!
WHAT YOU NEED
spanner no. 17
2 people
screwdriver
ASSEMBLING HOPPER BENCH
4 assembly hopper bench

A
B
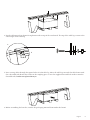
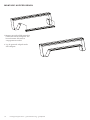
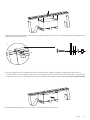
6. Before assembling the benches, remove the packaging material from under the frame!
5. Put 3 carriage bolts through the square holes of eacht table leg. Move the table legs towards the table frame until
the 3 threaded rods t into the 3 holes in the coupling piece. Screw the supplied nuts and lock washers onto the
threaded rods, but do not tighten them yet.
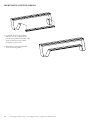
4. Put the tabletop with its frame facing downwards on top of the two boards. e top of the table legs is now at the
same height as the tabletop.
english 5

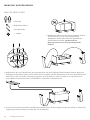
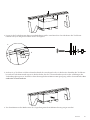
7. Fasten the bench frame to the table
legs in the way described above.
en tighten all the nuts.
8. Put the optional felt mats under
the table legs.
ASSEMBLING HOPPER BENCH
6 assembly hopper bench - floor fastening - stabilizing support

1.
2. 3. 4.
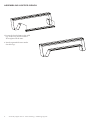
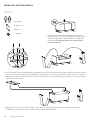
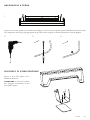
Attach the oor plates to the legs by
means of the bolts we have included.
NOTE that in this case the bench
should be standing on a at and rm
surface.
STABILIZING SUPPORT
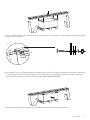
Mark the spots on the ground where you want to anchor the table and drill holes at the indicated spots. Use the xing
media most suited to the type of ground on which you intend to install the Hopper Bench.
FLOOR FASTENING
english 7

MAINTENANCE
8 maintenance
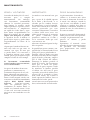
IROKO / H.O.T.WOOD
Iroko wood and H.O.T.wood requires
little or no maintenance. However,
we strongly advise you to remove
persistent dirt. To clean the wood
you can use special products (www.
rmc-extremis.be) or simply a sti
bristle brush and some water. Be
careful not to irreparably damage
the wood bres. For this reason,
never use a high pressure cleaner as
this will roughen the wood’s smooth
surface and irreparably damage the
wood’s bres.
At rst, the wood will give o this red
dye every time it comes into contact
with water. e dye that drips onto
the frame and the surface will remain
water-soluble and will dissapear
entirely aer a while.
We strongly recommend that you
treat your wood for indoor use with
wood oil to protect it from stains.
When delivered, the wooden parts of
our products are untreated. Exposure
to sun and rain will gradually
change their colour to silvery grey,
and also roughen the surface. If
you want to somewhat retain their
original colour, you should oil them
once a year. We recommend using
RMC Hybrid Wood Protector
(www.rmc-extremis.com). RMC
products for wood treatment are
available all over the world. Visit
the website www.rmc-extremis.
com to nd a reseller near you.
IMPORTANT!
Wood is a living matter and,
in spite of the superior quality
provided by Iroko and H.O.T.wood,
outdoors it constantly has to adapt
to extreme changes in temperature
and humidity. Due to internal
stress resulting from these constant
adaptations the wood “warps”. is
warping can among other things
lead to cracking. Changes in colour
or wood structure may also appear.
ese characteristics are typical of
the material and by choosing this
material you accept them.
Should any cracks appear, you can
simply sand them down either by
hand using sandpaper or by means
of a hand sander. To protect any
galvanised or painted parts, cover
the edges with highly robust masking
tape. Use 80-grit sandpaper and start
at the vertical side of the tabletop.
Keep the hand sander parallel to the
edge of the tabletop. Lightly sand
the edge until it is smooth again.
Now sand the rest of the tabletop.
Make sure that you always hold the
hand sander parallel to the tabletop.
Do not only sand the crack, but the
entire tabletop to obtain a uniform
result. To avoid burrs, sand the top
edge of the tabletop by hand. When
you have removed all the burrs, you
can treat the wood with hardwood
furniture oil or leave it untreated,
depending on the desired eect.
GALVANISED LEGS +
FRAME
Hot dip galvanisation is the most
durable way of protecting metal
against rusting. If the zinc coating
is damaged, the exposed metal can
rust. is can easily be touched up
with zinc paint that automatically
has the same colour and is readily
available in shops.
Galvanisation is a thermal process
that can slightly deform the material.
Other metal protection methods do
not have this disadvantage, but the
quality they oer is insucient.

english 9

10 inhoud
LANGUAGES
ENGLISH P. 3
contents p. 3
assembly hopper bench p. 4
oor fastening p. 7
stabilizing support p. 7
maintenance p. 8
NEDERLANDS P. 11
inhoud p. 11
montage hopper bench p. 12
grondverankering p. 15
grondplaat p. 15
onderhoud p. 16
DEUTSCH P. 19
inhalt p. 19
montage hopper bench p. 20
bodenverankerung p. 23
bodenplatte p. 23
pege p. 24
FRANÇAIS P. 27
contenu p. 27
montage hopper bench p. 28
xation dans le sol p. 31
plaque de stabilisation p. 31
entretien p. 32
ITALIANO P. 35
contenuto p. 35
montaggio hopper bench p. 36
ancoraggio a terra p. 39
supporto di stabilizzazione p. 39
manutenzione p. 40
ESPAÑOL P. 43
contenido p. 43
montaje hopper bench p. 44
anclaje al suelo p. 47
soporte estabilizador p. 47
mantenimiento p. 48

nederlands 11
INHOUD
1 x tafelblad 1 x bank
2 x stalen tafelpoot 12 x slotbout M10 x 30
(warm verzinkt)
12 x moer M10
(warm verzinkt)
12 x veering
(warm verzinkt)
2 x viltpad 2 x grondplaten
VILT BESCHERMVEL GRONDPLAAT
OPTIONEEL
extremis
extremis

MONTAGE HOPPER BENCH
BENODIGDHEDEN
steeksleutel nr. 17
2 personen
philips schroevendraaier
1. Schuif het deksel van de verpakking met de tafelpoten.
Dit is de verpakking op de houten pallet. Hiervoor
dienen enkel de spanbanden doorgeknipt te worden.
De verpakking moet intact blijven voor het vervolg
van de montage!
+/- 20 min.
2. Verwijder de vier vijzen uit de twee plankjes die de tafelpoten xeren voor transport. Plooi de appen naar buiten
zodat de tafelpoten makkelijk bereikbaar worden. Haal ze nu uit de doos en plaats ze zoals op tekening. Aankelijk
van de grootte van de tafel plaats je ze 2,6m (bank voor 3 personen) of 3,2m (bank voor 4 personen) van elkaar.
3. Plaats nu het deksel opnieuw op de doos en leg de xeerplankjes van stap 2 er bovenop. De verpakking staat nu
centraal tussen de vier tafelpoten.
12 montage hopper bench

nederlands 13
4. Leg het tafelblad met het dragende frame op de twee plankjes. De bovenzijde van de tafelpoten komt nu op gelijke
hoogte met het tafelblad.
5. Per tafelpoot steek je 3 slotbouten door de vierkante gaten. Schuif vervolgens de tafelpoten tot tegen het tafelframe,
en zorg hierbij dat de 3 draadeinden telkens in de 3 openingen van de koppelplaat passen. Draai vervolgens de
bijgeleverde moeren met veerring op het draadeinde, maar span nog niet aan.
6. Vooraleer de bank te monteren moet de verpakking van onder het frame gehaald worden!
A
B

14 montage hopper bench - grondverankering - grondplaat
MONTAGE HOPPER BENCH
7. Monteer nu op dezelfde manier het
bankframe aan de tafelpoten. Pas
hierna kunnen alle moeren
aangespannen worden.
8. Leg de optionele viltpads onder
elke tafelpoot.

nederlands 15
GRONDVERANKERING
GRONDPLAAT
Markeer de plaatsen op de vloer waar de verankeringen moeten komen en boor op de aangeduide punten. Gebruik
hiervoor de bevestigingsmiddelen die meest geschikt zijn voor de ondergrond waarop de Hopper moet staan.
Maak de grondplaten vast aan de
poten met de bijgeleverde bouten.
LET OP: in dit geval moet de bank
zeker op een vlakke en harde
ondergrond staan.
1.
2. 3. 4.

ONDERHOUD
16 onderhoud
IROKO / H.O.T.WOOD
Iroko en H.O.T. wood vragen weinig
tot geen onderhoud. Wij raden u
echter wel aan om hardnekkige
vuilresten te verwijderen. Om het
hout te reinigen, kunt u speciale
producten (www.rmc-extremis.
be) gebruiken of gewoon een
harde borstel en wat water. Zorg er
echter voor dat u de houtvezels niet
beschadigt. Gebruik daarom nooit
een hogedrukreiniger. Hierdoor
wordt het gladde oppervlak van
het hout immers ruwer en raken
de houtvezels onherstelbaar
beschadigd.
Zoals vele andere houtsoorten bevat
Iroko een wateroplosbare gomstof.
In het begin zal het hout deze fel
rode kleurstof afscheiden telkens
het met water in contact komt. De
op het onderstel en de ondergrond
afgedropen kleurstof blij
wateroplosbaar en zal na zekere tijd
volledig verdwijnen.
We raden ten sterkste aan het hout
voor binnen gebruik in te oliën
tegen vlekken.
Bij levering zijn de houten
onderdelen van onze producten
onbehandeld. Door blootstelling
aan zonlicht en regen zullen ze
geleidelijk een grijs patina krijgen
en zal hun oppervlak ook ruwer
worden. Als u de oorspronkelijke
kleur min of meer wilt behouden,
moet u ze jaarlijks oliën.
Hiervoor raden wij RMC
Hybrid Wood Protector (www.
rmc-extremis.com) aan. De
houtbeschermingsproducten
van RMC zijn overal ter wereld
verkrijgbaar. Kijk op www.rmc-
extremis.com voor een verkooppunt
in uw buurt.
BELANGRIJK!
Hout is een levende materie, en
ondanks de superieure kwaliteiten
van Iroko en H.O.T.wood, moet
het zich buiten steeds aanpassen
aan extreme schommelingen
van temperatuur en vochtigheid.
Hierdoor opgebouwde interne
spanningen doet het materiaal
“werken” of vervormen en kan
er mogelijk o.a. scheurvorming
veroorzaken. Ook kunnen er kleur-
en structuurverschillen voorkomen.
Deze kenmerken zijn typisch voor
het materiaal, die u door uw keuze
hiervoor accepteert.
U kan mogelijke scheuren
eenvoudig glad schuren met de
hand en een vel schuurpapier of
met een handschuurmachine.
Om de gegalvaniseerde of gelakte
onderdelen te beschermen, moet
u hun randen vooraf afplakken
met stevige afplakband. Gebruik
schuurpapier met korrel 80 en
begin bij de vertikale zijde van
het tafelblad. Houd de machine
evenwijdig aan de tafelrand. Schuur
lichtjes tot de rand weer egaal glad
is. Schuur nu het bovenblad. Let
er op dat u de machine evenwijdig
aan het tafelblad houdt. Behandel
niet enkel de gescheurde plaats,
maar gans uw blad om een egaal
resultaat te bekomen. Om bramen
te vermijden schuurt u de bovenste
rand van het tafelblad glad. Doe dit
deel met de hand. Als alle bramen
verwijderd zijn kan u, aankelijk
van het gewenste eect, de tafel
inoliën met hardhout olie.
GEGALVANISEERDE
POTEN + FRAME
Galvanisatie, of thermische
verzinking, is de meest duurzame
manier om metaal te beschermen
tegen roestvorming. Als de
zinklaag wordt beschadigd, kan het
blootgekomen metaal toch roesten.
Dit is eenvoudig bij te werken
met zinkverf, die automatisch
dezelfde kleur hee en in de handel
verkrijgbaar is.
Galvanisatie is een thermisch
proces en kan het materiaal
licht vervormen. Andere
metaalbeschermingsmethodes
hebben dit nadeel niet, maar leveren
onvoldoende kwaliteit.

nederlands 17

LANGUAGES
ENGLISH P. 3
contents p. 3
assembly hopper bench p. 4
oor fastening p. 7
stabilizing support p. 7
maintenance p. 8
NEDERLANDS P. 11
inhoud p. 11
montage hopper bench p. 12
grondverankering p. 15
grondplaat p. 15
onderhoud p. 16
DEUTSCH P. 19
inhalt p. 19
montage hopper bench p. 20
bodenverankerung p. 23
bodenplatte p. 23
pege p. 24
FRANÇAIS P. 27
contenu p. 27
montage hopper bench p. 28
xation dans le sol p. 31
plaque de stabilisation p. 31
entretien p. 32
ITALIANO P. 35
contenuto p. 35
montaggio hopper bench p. 36
ancoraggio a terra p. 39
supporto di stabilizzazione p. 39
manutenzione p. 40
ESPAÑOL P. 43
contenido p. 43
montaje hopper bench p. 44
anclaje al suelo p. 47
soporte estabilizador p. 47
mantenimiento p. 48
18 inhalt

extremis
extremis
2 x Filzschutz 2 x Bodenplatte
FILZSCHUTZ BODENPLATTE
OPTION
12 x Sprengring
(feuerverzinkt)
2 x Tischbein aus Stahl 12 x Muttern M10 x 30
(feuerverzinkt)
12 x Muttern M10
(feuerverzinkt)
1 x Tischplatte 1 x Bank
INHALT
deutsch 19

MONTAGE HOPPER BENCH
+/- 20 min.
20 montage hopper bench
3. Setzen Sie jetzt den Deckel wieder auf den Karton und legen Sie die Fixierungsbrettchen von Schritt 2 darauf. Die
Verpackung steht jetzt mittig zwischen den vier Tischbeinen.
2. Entfernen Sie die vier Schrauben aus den zwei Brettchen, die die Tischbeine beim Transport xieren. Biegen Sie
die Klappen nach außen, sodass die Tischbeine leicht erreichbar werden. Nehmen Sie sie jetzt aus dem Karton und
stellen Sie sie auf, wie auf der Zeichnung angegeben. Je nach Größe des Tisches stellen Sie sie im Abstand von
2,6 m (Bank für 3 Personen) oder 3,2 m (Bank für 4 Personen) voneinander auf.
1. Nehmen Sie den Deckel von der Verpackung mit den
Tischbeinen. Das ist die Verpackung auf der
Holzpalette. Dafür müssen nur die Spannbänder
durchschnitten werden. Für die nächsten
Montageschritte muss die Verpackung intakt
bleiben!
WAS SIE BRAUCHEN
Maulschlüssel Nr. 17
2 Personen
schraubenzieher
Page is loading ...
Page is loading ...
Page is loading ...
Page is loading ...
Page is loading ...
Page is loading ...
Page is loading ...
Page is loading ...
Page is loading ...
Page is loading ...
Page is loading ...
Page is loading ...
Page is loading ...
Page is loading ...
Page is loading ...
Page is loading ...
Page is loading ...
Page is loading ...
Page is loading ...
Page is loading ...
Page is loading ...
Page is loading ...
Page is loading ...
Page is loading ...
Page is loading ...
Page is loading ...
Page is loading ...
Page is loading ...
Page is loading ...
Page is loading ...
Page is loading ...
Page is loading ...
-
 1
1
-
 2
2
-
 3
3
-
 4
4
-
 5
5
-
 6
6
-
 7
7
-
 8
8
-
 9
9
-
 10
10
-
 11
11
-
 12
12
-
 13
13
-
 14
14
-
 15
15
-
 16
16
-
 17
17
-
 18
18
-
 19
19
-
 20
20
-
 21
21
-
 22
22
-
 23
23
-
 24
24
-
 25
25
-
 26
26
-
 27
27
-
 28
28
-
 29
29
-
 30
30
-
 31
31
-
 32
32
-
 33
33
-
 34
34
-
 35
35
-
 36
36
-
 37
37
-
 38
38
-
 39
39
-
 40
40
-
 41
41
-
 42
42
-
 43
43
-
 44
44
-
 45
45
-
 46
46
-
 47
47
-
 48
48
-
 49
49
-
 50
50
-
 51
51
-
 52
52


Ask a question and I''ll find the answer in the document
Finding information in a document is now easier with AI
in other languages
- italiano: Extremis Hopper bench Manuale utente
- français: Extremis Hopper bench Manuel utilisateur
- español: Extremis Hopper bench Manual de usuario
- Deutsch: Extremis Hopper bench Benutzerhandbuch
- Nederlands: Extremis Hopper bench Handleiding
Related papers
-
Extremis Extempore table User manual
-
-
-
-
-
-
-
-
-
Other documents
-
Woood Bruno User manual
-
Ferm TSM1003 User manual
-
KLIM K152 User manual
-
-
Lifetime 22127 Operating instructions
-
DeWalt Tisch-, Kapp- und Gehrungssäge DW 711 User manual
-
Rauch AP 19 / AP 240 / AP 250 / AP 280 Installation guide
-
-
ELU EMTS711 User manual
-