Valsi E17MG0600RV-40 User guide
- Category
- Air compressors
- Type
- User guide


IMPORTANT
To help us serve you better do not hesitate contacting us if you have any problems or suggestions.
This manual has important information for installation, operation and maintenance of your compressor. It is very important to read
this manual carefully before starting your compressor installation and keep it in a safe place for further reference.
Thank you for your preference, we hope to have the pleasure of serving you again in the future.
INDICATIONS
IMPORTANT SAFETY INFORMATION INDICATES HOW TO PREVENT
DAMAGE TO EQUIPMENT AND PERSONAL SECURITY INSTRUCTIONS
INTRODUCTION
Our compressors are the result of state of the art technology
applied to air compressor equipment. In order to provide you
with an excellent service we offer the following manual.
Please read it carefully before using your compressor, to
ensure a proper installation and operation.
Providing adequate service to your compressor will ensure
optimum operation for many years.
Installation:
INSTRUCTIONS.
We recommend that you keep this manual for future reference.
Please verify that all the necessary parts were included:
• Compressor body, and its components:
• Rubber feet kit.
INSTALLATION
Before starting your compressor
Examine hoses and tubes for signs of damage.
Locate your compressor in a clean area, well ventilated, and free
from flammable product vapors. If the compressor is located
near an object or a wall that obstructs the easy airflow from
filters, separate it at least 15". Your compressor should be as
near as possible to your working area to avoid the use of long air
hoses. Do not place your compressor in a place, which will
become too hot such as near a boiler or furnace.
Maintain filter free from air obstructions. If not it will reduce the air
delivery of your compressor.
Keep children away from your compressor, it starts automatically
by a pressure switch.
Never use your compressor in the rain. Be careful never to
get your compressor wet as it may damage the engine.
Your compressor is designed to re self ventilating. Never cover
the engine, it would not allow air to circulate properly.
Clean carefully any dirty compressor part. It will work better.
Do not weld anything to the air tank of this compressor. Welding
on the air compressor tank can severely impair tank strength and
cause an extremely hazardous condition. Welding anything to the
tank will void the warranty.
Spray paint or other liquids in an open, well-ventilated area away
from flames or electrical equipment.
Be sure the air tool you are going to connect consumes less or
the same air the compressor delivers at the needed pressure
Check the security valve pulling it by hand to avoid it from engaging.
The correct belt tension exists if a deflection of ½” occurs by
placing 5 pounds of force midway between the motor pulley and
the pump flywheel, if not shift the engine to the point where the
correct deflection exists.
Be ensure the oil level is always near the red line. If not Refill it
with compressor oil: SAE -30 or synthetic oil ANDEROL. Do not
use automotive oil.
Oil capacity E15V ¾ Lt.
WARNING
AIR FROM THIS COMPRESSOR, AS EQUIPPED, IS NOT
SAFE FOR BREATHING!
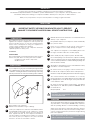
If your compressor is going to be in a definite place tighten it firmly
to floor. Otherwise be sure the compressor doesn’t move because
of vibrations. Installing the rubber feet under tank legs and securing
with the provided nuts as shown in the drawing reduces vibration.
1
2
3
4
5
6
7
8
9
10
11
12
13
14
OPERATING
The engine and the head compressor generate high temperatures.
To prevent burns or other injuries, DO NOT touch compressor
while it is operating. Allow it to cool before handling or servicing.
Always wear safety glasses and hearing protection. Remove
jewelry. Fasten hair out of way. Do not wear loose fitting clothes,
scarves or neck ties because they can become caught in moving
parts of the equipment
THE COMPRESSED AIR MAY CAUSE DAMAGE. NEVER
DIRECT THE AIRFLOW TO THE BODY.

Start your compressor after you have connected your air tools.
Do not remove the air tools while the compressor is running.
MAINTENANCE
To avoid any personal injury, always make sure engine is shut off
and all pressure is relieved from the tank before performing any
type of maintenance.
Never operate your compressor without the pulley guard.
Always check the oil level before operation. Refill if it necessary.
Change the oil every 50-operation hours, or every month when
the use is not continuos, or when it is dirty.
Drain tank after each use. Moisture caused from condensation of
compressed air and humidity will cause rust and weaken tank. To
drain moisture from tank, open the drain petcock underneath the
tank. Tank air pressure should be 10PSI, or less before opening
petcock.
Check and clean the filters weekly or after each use, directing air
to them through the common flow in opposite direction.
Replace filters when they are broken, or obstructed.
Avoid running your compressor without filters.
Verify every three or four months, there are no leaks on the
hoses, the belt tension, and there are untaught bolts. Correct as
necessary.
If your compressor runs continuously, it is possible that the
pressure switch is not tuned up correctly, never adjust the
pressure switch to stop at pressures above 125 PSI.
STORAGE
Store compressor in a cool dry place. Pull the pressure relief
valve to release all the pressure from the tank. Disconnect hose
and hang open ends down to allow any moisture to drain. Clean
the filters, Drain the oil from the pump crankcase and replace it
with new oil. Cover the entire unit to protect it from moisture and
dust.
IF YOU HAVE A PROBLEM WITH YOUR COMPRESSOR, AT
THE END OF THIS MANUAL YOU WILL FIND A TROUBLE
SHOOTING CHART. IF YOU DO NOT HAVE THE TOOLS TO
REPAIR THE PRODUCT YOURSELF, PLEASE CONTACT
YOUR NEAREST DEALER OR AUTHORIZED SERVICES
CENTER.
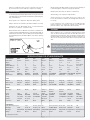
SPECIFICATIONS FOR OTHER PRODUCTS
COMPRESSOR E040 E070 E121 E15V E22V E230 E460 E920
Body Frame Cast iron Cast iron Cast iron Cast iron Cast iron Cast iron Cast iron Cast iron
Stages 1 1 1 1 1 1 o 2 1 o 2 1 o 2
Cylinders 1 2 1 2 2 2 4 4 por cabeza
Cylinder Diameter 2” 2” 3 5/32” 2 9/16” 3 5/32” 41/8”-21/8” 41/8”-21/8” 41/8”-21/8”
Cylinder Stroke 1½” 113/16” 1 31/32” 1 31/32” 1 31/32” 3½” 3½” 3½”
Oil Capacity 0.2 lts. 0.25 lts. 0.4 lts. 0.75 lt. 0.75 lt. 1.9 lts. 2.4 lts 2.4 lts.
Flywheel diameter 5.9” 10.5” 11” 11” 14” 17” 19” 19”
Speed 860 RPM 760 RPM 1041 RPM 1020 RPM 812/1406RPM 1100/1140RPM 1070/1150 RPM 805 RPM
Displacement 0.07 m3/min 0.15 m3/min 0.25 m3/min 0.34 m3/min 0.70 m3/min 0.88 m3/min 1.77 m3/min ***
TANK
Material Gauge 14 Gauge 14 Gauge 14 Gauge 14 Gauge 14 Gauge 13 Gauge 13 Gauge 13
Max. Pressure 8.8 kg/cm38.8 kg/cm38.8 kg/cm3 8.8 kg/cm38.8 kg/cm312.3 kg/cm312.3 kg/cm312.3 kg/cm3
Capacity 40 lts. 70,108 lts. 108 lts. 40, 108 lts 170, 235,300lts. 300,500 lts. 500,1000 lts. 1000 lts.
MOTOR
Motor Type Electric Electric Electric Electric or Electric or Electric or Electric Electric
Gasoline Gasoline Gasoline
Power ½ HP 1 HP 2 y 3 HP 4,5 HP 3,5 Y 10 HP 5, 7½ y 10 HP 10 y 15 HP 20 HP
Speed 1750 RPM 3450 RPM 1750 o 3450 1750 / 3600 1750 RPM 1750 o 3600 1750 RPM 1750 RPM
Voltage 127 / 220 V 127 / 220 V 127/220/440V 127/220V 127/220V 127/220/440 V 220 / 440 V 220 / 440 V
Current 7.6 / 3.8 A 13 / 6.5 A *** NA / 8,2 A *** *** 13,2 A 52.0 / 26.0 A
Frecuency 60 Hz 60 Hz 60 Hz 60 Hz 60 Hz 60 Hz 60 Hz 60 Hz
COMPONENTS
Pulley diameter (motor)3 7/8” 5 y 6” 2½”,3½” y35/32” 2½” 3”,3¼”,3½,37/8”,5” 3½”,8”,8¾” 8¾” y 10” 10”
Band type 1A-26 1A-42, 44 1A-39,41 y 42 1B-44 1B-60,61,62,66 2B-70,75 y78 2B-81y83 2B-87
Discharge Cuprum Ø 3/8” Cuprum Ø 3/8” Cuprum Ø 3/8” Cuprum Ø 3/8” Cuprum Ø 3/8” Cuprum ؼ”,¾” Cuprum ؼ”,¾” Cuprum ؼ”,¾”
Fittings Bronze Bronze Bronze Bronze Bronze Bronze Bronze Bronze
(***) Depends on model

TRAHCGNITOOHSELBUORT
ERUSSERPEGRAHCSIDWOL
SESUAC SNOITCERROC
skaelriA tonoD.snoitcennocrosgnittifgnikaelecalperronethgiT
.thgitrevo
sevlavgnikaeL .retnececivresdezirohtuanatcatnoC
ekatniriadetcirtseR .stnemeleretlifriaecalperronaelC
steksagnwolB .retnececivresdezirohtuanatcatnoC
rednilycrosgnirnotsipnroW .retnececivresdezirohtuanatcatnoC
GNIKCONKPMUPROSSERPMOC
SESUAC SNOITCERROC
leehwylfrosserpmocroyellupenigneesooL .tnemngilakcehC.leehwylfdnayellupnethgiteR
esackcnarcpmupnilevelliowoL .semitllatalevelreporptaliopeeK
notsipfopotrosevlavnonobracssecxE .retnececivresdezirohtuanatcatnoC
RIAEGRAHCSIDNILIO
SESUAC SNOITCERROC
.rednilycrosgnirnotsipnroW .retnececivresdezirohtuanatcatnoC
.ekatniriadetcirtseR .stnemeleretlifriaehtecalperronaelC
.hgihootlevelliO .liotnegreted-nonesU.levelreporpotniarD
GNITAEHREVO
SESUAC SNOITCERROC
.noitalitnevrooP detalucricllew,yrd,loochtiwaeranaotrosserpmocetacoleR
.llawtseraenmorf"51tsaelta,ria
.secafrusgniloocytriD .ylhguorhtsecafrusgniloocllanaelC
.segassapriadetcirtseR .redaolnuro/dnasebutrefsnartecalpeR
RAEWTLEBEVISECXE
SESUAC SNOITCERROC
.tnemngilafotuoyelluP .leehwylfrosserpmochtiwyellupngilaeR
noisnettlebreporpmI . tsujdaeR
selbbowyelluP rotfahsknarcdegamadarofkcehcdnayellupehtecalpeR
.leehwylf
DLOCNITRATST'NOWROSSERPMOC
SESUAC SNOITCERROC
knatnierusserpkcabhcumooT .rotomgnitratsnehwkcoctepnepO
dlocootrosserpmoC .noitacolremrawaotrosserpmocevoM
RIAEGRAHCSIDNIERUTSIOM
SESUAC SNOITCERROC
morfdesuacknatniretawronoitasnednoC
.riafonoisserpmocroytidimuh
dimuhniyltneuqerferomknatniarD.esuhcaeretfaknatniarD
.retlifenilrianaesudnarehtaew
.retlifdeggolcroytriD .ecnanetniameeS.retlifecalperronaelC
.dnuoranoitalitnevriareporpmI .aeradetalitnevllewnirosserpmocpeeK
YLSUOUNITNOCSNURROSSERPMOC
SESUAC SNOITCERROC
rosserpmocnahtrehgihstnemeriuqerlootriA
tuptuo
esurehtiE.yticapacs'rosserpmocehtoterusserpriaehttimiL
.rosserpmocyticapacregralarolootrellamsa
Ver. 0601
-
 1
1
-
 2
2
-
 3
3
-
 4
4


Valsi E17MG0600RV-40 User guide
- Category
- Air compressors
- Type
- User guide
Ask a question and I''ll find the answer in the document
Finding information in a document is now easier with AI