Page is loading ...

FOCUS ON YOUR
BUSINESS, NOT
YOUR BUSINESS
COMMUNICATIONS.
Welcome to Comcast
Business VoiceEdge
™

Table of Contents 2
Table of Contents
Welcome to Comcast Business VoiceEdge
™
...........................................5
Quick Start: VoiceEdge Common Basic Features .....................................6–8
Introduction to Your Phone .......................................................6–7
Placing a Call ..................................................................7
Voicemail Set Up ................................................................7
Listening to Voicemail ............................................................8
Call Transfer ...................................................................8
3-Way Calling ..................................................................8
Quick Start: VoiceEdge Common Advanced Features ................................9–12
Downloading the Telephony Toolbar ..................................................9
Activating Your Telephony Toolbar ...................................................9
Dialing from the Telephony Toolbar ..................................................10
Speed Dial ................................................................10 –11
Be Anywhere ..............................................................11–12
VoiceEdge Mobile App ...........................................................12
Messages — On the Phone ....................................................13–15
Setting Up Voicemail ............................................................13
First Time Voicemail Activation .....................................................13
Setting Your Personalized Name ....................................................13
Accessing Voicemail ............................................................13
Managing Voicemail ............................................................14
Using Your Voicemail Box to Forward Calls ............................................15
To Make a Call from the Voice Portal ................................................15
Leaving Messages for Other Users in Your Group .......................................15
Messages — Online ..........................................................16–18
Greetings ....................................................................17
Distribution Lists ...............................................................18
Features — On the Phone .....................................................19–22
Call Transfer ..................................................................19
Call Transfer with Consultation .....................................................19
Call Transfer Direct to Voicemail ....................................................19
Call Hold .....................................................................19
Call Return ...................................................................20
Call Waiting ..................................................................20
Caller ID and Caller ID with Call Waiting ..............................................20
Do Not Disturb ................................................................21
Extension Dialing ...............................................................21
Extensions — Standard Seat ......................................................21
Selective Call Acceptance .....................................................21–22
Selective Call Rejection ..........................................................22
Directed Call Pickup with Barge-In ..................................................22
Features — Online and/or Using the Telephony Toolbar .............................23–36
Downloading the Telephony Toolbar .................................................23
Using the Telephony Toolbar ......................................................24
Services Menu ................................................................25
Be Anywhere ..............................................................25–27
Remote Office .................................................................28
Click to Dial from Microsoft Outlook .................................................28
Alternate Numbers .............................................................29

Table of Contents 3Table of Contents 3
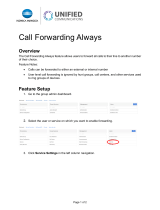
Call Forwarding Always ..........................................................29
Call Forwarding Busy ............................................................30
Call Forwarding No Answer ....................................................30–31
Call Forwarding Selective. . . . . . . . . . . . . . . . . . . . . . . . . . . . . . . . . . . . . . . . . . . . . . . . . . . . . . . . . 31
Sequential Ring ................................................................31
Call Notify ....................................................................32
Hoteling ..................................................................33–34
Priority Alert ..................................................................35
Privacy ......................................................................36
Bria Softphone ..............................................................37–43
System Requirements and Devices ..................................................37
Login .......................................................................38
Bria Softphone Basics ...........................................................38
Placing a Call .................................................................39
Answering a Call ...............................................................39
Controlling Calls ............................................................40–41
Three-Way Calling ...........................................................42–43
Voicemail ....................................................................43
Reception Console ...........................................................44–45
Launching Reception Console for the First Time ........................................44
Accessing Reception Console via Desktop Icon .........................................44
Reception Console Overview ......................................................45
Managing Calls with Reception Console ..............................................45
System Requirements ...........................................................45
Tech Admin .................................................................46–51
Music On Hold ................................................................46
Call Park .....................................................................46
Call Park and Retrieve ...........................................................46
Call Pickup ...................................................................47
Busy Lamp Field ...............................................................47
Shared Call Appearance .........................................................47
Multiple Call Arrangement ........................................................47
Automatic Callback .............................................................48
Basic Call Logs ................................................................48
Push to Talk ..................................................................48
Business VoiceEdge Auto Attendant ..............................................48–49
Hunt Group — Automatically Handled ............................................49–51
Business Voice Continuity .....................................................52–53
Call Forwarding Not Reachable ....................................................52
Additional Business Voice Continuity Features ..........................................53
Privacy .......................................................................54
Caller ID Blocking per Call ........................................................54
Caller ID Blocking per Line ........................................................54
Anonymous Call Rejection ........................................................54
Billing Features .............................................................55–57
Online Bill Access ..............................................................55
Call Detail Records ..........................................................56–57
Block Calls to 900/976 Numbers ...................................................57
Block Collect Calls and Bill to Third Party Calls .........................................57
International Calling Plans ........................................................57

Table of Contents 4
More Services ...............................................................58–59
Business Level Support ..........................................................58
Directory Listings ..............................................................58
Directory Assistance ............................................................58
Directory Assistance Call Completion ................................................58
Diversion Inhibitor ..............................................................58
Enhanced Directory Assistance ....................................................58
IP Phone Information ............................................................59
911 Emergency Calls ............................................................59
Toll Free Service ...............................................................59
Useful Tips .................................................................60–61
Last Number Redial .............................................................60
Lists ........................................................................60
Domestic Dialing ...............................................................60
International Dialing .............................................................60
Operator Services ..............................................................60
Feature Access Codes ........................................................60–61
Index ......................................................................62–63

Welcome 5
Welcome to Comcast Business VoiceEdge
™
Now that you have Comcast Business VoiceEdge
™
, you can focus on your business and not your business
communications. You’ll enjoy all the usual features you would expect of a phone service, plus advanced
features that help ensure your business voice continuity and can enhance your business productivity. You
could enjoy features like:
• Call Forward Not Reachable to assure your business keeps receiving calls, even when weather or power
outages keep the lights off
• Voicemail
• Voicemail to Email Integration so messages follow you wherever you’re located
• High-Definition Voice Calling with Advanced IP phones
And all of this is provided and managed by Comcast, bringing you the latest technology to help your business.
Plus, you get unlimited nationwide direct-dial calling for your office.
Enhancing features have never been so accessible. With Business VoiceEdge, you can access features
in three convenient ways — the Telephony Toolbar* available on your desktop integrated with Microsoft
Outlook
®
and/or Internet Explorer
®
and Mozilla Firefox
®
, the Comcast Business VoiceEdge Online Web portal
for additional point-click activation and for some features via feature access codes on your IP phone or via
your mobile smartphone.
To download the Telephony Toolbar or the Bria Softphone*, visit business.comcast.com/getstarted and
follow the links. Alternately for feature activation and customization, visit Business VoiceEdge Online at
http://hdvdmsweb.on voip.net.
To learn more about your convenient calling features and options, flip through the following pages or visit our
online interactive training at business.comcast.com/getstarted.
Still have questions? Want to add features and services? Your Business Customer Support
representatives will be happy to help. Just call 800-472-4176.
* Telephony Toolbar and Bria Softphone only available with the Unified Communications user package.

Quick Start 6
Quick Start: VoiceEdge Common Basic Features
Get familiar with your new Business VoiceEdge service and phones by reading this quick start section.
Introduction to Your Phone
The Business VoiceEdge service comes with Polycom
®
IP Phones. Please refer to the diagrams below to get
quickly introduced to the buttons and functions of your new phone.
Polycom 335 Series Phone
Display
Softkeys
Line Keys
Volume Keys
Headset
Navigation Arrows
Hold
Mute
Speaker Phone
Feature Buttons
Handset
Polycom 560 Series Phone
Display
Navigation Arrows
Headset
Volume Keys
Mute
Softkeys
Hold
Feature Buttons
Speaker Phone
Feature Buttons
Line Keys
Handset
Note: The Polycom 670 series phone has the same layout as the 560 series, and includes 6 lines.
Your new Polycom IP phone will operate similar to other phones for the basic functions. In addition, the
Polycom IP phones use a screen to display interactive features that become available as needed. Users can
use the navigation arrows as well as the soft keys to help navigate through each feature. The navigation
arrows will be your main tool for navigating the different setup menus while the soft keys will be used for more
call related options.

Quick Start 7
Navigation Arrows
If you are not in any Menu lists your Navigation Arrows act as a quick access tool for your recent call logs. By
pressing each of the Navigation Arrows you can access Placed calls, Missed calls, Received calls and Speed
Dial. All calls are ordered in order by time stamp with the most recent appearing at the top of the list.
Arrow Key Call Log
▷ Right arrow Placed calls
▽ Down arrow Missed calls
◁ Left arrow Received calls
△ Up arrow Speed dial
Soft Keys
Your Polycom phone is equipped with a number of soft keys. The soft keys are the buttons directly below the
screen, and the display changes depending on the current call state. For example, if you are on a call, the soft
keys may display transfer or conference as options. As the phone goes through different states, the Soft keys
provide different options. To use a soft key, press the button below the screen that corresponds to the option
you would like to select.
Placing a Call
There are many ways to place a call — you can pick up the handset and dial, you can select the soft key for
“new call”, you can hit the speaker button and dial, and more. To see a short video on time-saving tricks to
place calls, please visit business.comcast.com/getstarted.
Placing calls using the number pad
To place a call using your phone number pad simply pick up the handset and dial your desired telephone
number or extension using the number pad. If you would like to use a headset or speaker phone, activate the
headset or speaker phone by pressing the appropriate button and then dial the number or extension.
Dialing from Call Logs
To place a call from a number that is stored in your call logs, enter a call log of your choice by pressing the
corresponding Navigation Arrow key. Using the Navigation Arrow keys scroll up or down to highlight the
number you wish to dial. And then, press the Dial soft key.
Voicemail Set Up
Comcast Business VoiceEdge voicemail enables you to manage your time without missing your calls. Callers
can leave a message while you’re on the phone, off-site, or just need phone-free time to focus on a project.
If you are away from the office, you can opt to be notified via email that you have messages waiting. Voicemail
is included with a Unified Communication seat, and can be added as an a la carte item to a Standard seat,
Hunt Group or Auto Attendant.
Activate your voicemail account
To setup your voicemail for the first time you have to be physically present at your desk phone. For voicemail
activation:
1. Press the “Messages” button on your phone or dial your extension or 10-digit telephone number.
2. A tutorial will guide you through the setup of your new voicemail service.
Note: You will be prompted to enter the default password, which is the numbers 17932486. Once you’re in the system, listen carefully
to the recorded instructions. You will be prompted to create a password, record your name and record a customized business
greeting.

Quick Start 8
Listening to Voicemail
When a voicemail has been recorded, your phone will alert you by flashing the red messages light.
To listen to your voicemail:
1. Push the “Messages” button on your phone.
2. When prompted enter your passcode and press the key.
3. Follow the prompts to listen to your messages.
To access your voicemail while you are away from your desk phone:
1. Dial your office telephone number.
2. When your personal greeting starts, press the
key.
3. Enter your passcode when prompted.
If you are a Unified Communications user, voicemail to email will be activated so that you will receive a copy
of your voicemail delivered to your email in a .wav format file. You can then listen to this voicemail on your
smartphone or wherever you check email.
Call Transfer
Business VoiceEdge allows users to quickly and easily transfer callers to the appropriate party. Users have the
option to blind transfer or transfer with a consultation. Blind transfers send the caller to a coworker without
knowledge of the call, while a consultative transfer allows the coworker to talk with the destination party prior
to transferring the call.
To blind transfer a call to another team member or to an off-site facility:
1. Press the “Transfer” button on your phone.
2. Dial the phone number or extension of the destination party.
3. Press the “Transfer” button again.
To transfer with consultation:
1. Press the “Transfer” button on your phone.
2. Dial the phone number of the destination party.
3. When the second party answers, you will be speaking privately.
4. When you are ready to connect all parties press the “Transfer” button once again.
5. Hang up. The transfer will be complete.
3-Way Calling
Often it’s more efficient to get your colleagues or clients on the phone at the same time. 3-Way Calling makes
it easy for multiple parties to collaborate on a call.
To connect a three-party conference:
1. Connect to the first party.
2. Press the “Conference” button on your phone.
3. Dial the second party.
4. When the second party answers press the “Conference” button again.

Quick Start 9
Quick Start: VoiceEdge Common Advanced Features
Business VoiceEdge has many advanced features that can help enhance your productivity and this section will
guide you through using the most common features.
Most of these features are set up and accessed through the Telephony Toolbar or the portal. You will find
reference to activating features in either place.
Downloading the Telephony Toolbar
The Telephony Toolbar is a tool that gives you quick access to many of your Business VoiceEdge functions
and features. The Toolbar is available through an online download and installs to your browser and Microsoft
Outlook
®
, Internet Explorer
®
or Mozilla Firefox
®
. Downloading the Telephony Toolbar is quick and easy with
our Telephony Toolbar Installation Wizard. Follow the instructions below to access and download your toolbar.
Note: The Telephony Toolbar is a PC-only application. Please refer to page 23 for minimum PC requirements.
1. Go to business.comcast.com/getstarted.
2. Find the Telephony Toolbar Download area and click on the words “Click here”.
3. The Telephony Toolbar Installation Wizard will pop up in a new screen.
4. Follow the instructions in the Wizard.
5. Once the installation process starts, you may need to exit out of any open browsers and Microsoft Outlook.
After you have installed the Telephony Toolbar you will notice a new toolbar in your browser, as pictured below.
Activating Your Telephony Toolbar
Once the Telephony Toolbar has been installed, you will need to activate it for the first time:
1. Click the
button. This is the Options menu.
2. On the left hand side of the screen click on “General”.
3. Make sure that the Check Box is checked for the Auto Login.
4. On the left hand side of the screen click on “Account”.
5. Enter your username which is your 10 digit number (no dashes, no spaces).
6. Enter the Password that is given to you in the Welcome Letter.
Note: The Welcome email is sent to the point of contact on the account. Please check with your internal point of contact or call our 24x7
care team at 800-472-4176.
7. Select boxes for “Save User Name” and “Save Password”.
8. On the left hand side of the screen select “Connection”.
9. Enter the Host Address: hdvdmstoolbar.onvoip.net.
10. Enter Host Port number: 2208.
11. Clic k “O K ”.
The buttons on the Telephony Toolbar will no longer be gray and will light up. To view a short video outlining
these steps, please visit business.comcast.com/getstarted.

Quick Start 10
Dialing from the Telephony Toolbar
Unified Communication seats have the ability to make calls from the Telephony Toolbar and other methods
including Click to Dial from Microsoft Outlook and calling telephone numbers that appear on your screen.
To dial from your tool bar:
1. Enter the destination number into the Dial Number area of the Telephony Toolbar.
2. Press Enter on your Keyboard.
To dial a Microsoft Outlook contact:
1. In your Microsoft Outlook click on “Contacts”.
2. Find the contact you wish to call.
3. Alternate click on the contact information.
4. Select “Call”.
To call phone numbers on a web page:
1. Highlight the number you wish to call.
2. Right click.
3. Select “Call”.
For even more ways to call please see the self-help video about time saving tricks for placing calls at
business.comcast.com/getstarted.
Speed Dial
Business VoiceEdge includes functionality for Speed Dial 8 or Speed Dial 100. Speed Dial 8 is used for
programming up to 8 telephone numbers into your phone for quick dialing using single digits. Speed Dial 100
does the same as Speed Dial 8, only it stores up to 100 numbers and you dial them using two digits. You can
do either or both as long as you follow the appropriate set up for each.
Speed Dial 8
To set up Speed Dial 8 from your phone:
1. Lift the receiver and listen for the dial tone.
2. Press
and listen for the stutter dial tone.
3. Enter a speed dial digit between 2 and 9.
4. Dial the phone number you would like the digit to represent. (Remember to include the area code and any
other numbers necessary to place the call).
5. Listen for the voice prompt confirmation.
6. To add the next number, repeat steps 2 through 5.
To set up Speed Dial 8 from your computer:
1. Log on to the Main Navigation Page.
2. From the Main Navigation Page, click “Outgoing Calls”.
3. Click “Speed Dial 8”.
4. Enter the appropriate phone numbers in the boxes
corresponding with digits 2 through 9 and the person’s
name in the Name box.
5. Click “Apply”.

Quick Start 11
To use Speed Dial 8:
1. Lift the receiver and listen for the dial tone.
2. Press the digit (2 through 9) that represents the number you wish to call, then press
.
Note: Speed Dial can also be used on the Telephony Toolbar.
Speed Dial 100
To set up Speed Dial 100 from your phone:
1. Lift the receiver and listen for the dial tone.
2. Press
and listen for the stutter dial tone.
3. Enter any two digits through 99.
4. Dial the phone number you would like the digits to represent. (Remember to include the area code and any
other numbers necessary to place the call).
5. Listen for the voice prompt confirmation.
6. To add the next number, repeat steps 2 through 5.
To set up Speed Dial 100 from your computer:
1. From the Outgoing Calls Page, click “Speed Dial 100”.
2. Click “Add”. Your Speed Dial 100 Management Page appears.
3. Select a two-digit Speed Dial code.
4. Type a name or description for the Speed Dial number in the Description text box.
5. Type the phone number and the person’s name you are assigning to your Speed Dial code.
6. Click “OK”.
To use Speed Dial 100:
1. Lift the receiver and listen for the dial tone.
2. Press
and then dial the two digits that represent the number you wish to call.
Note: Speed Dial can also be used on the Telephony Toolbar.
Be Anywhere
The Be Anywhere service allows you (as a Unified Communications seat user) to make and receive calls from
any device at any location with only one phone number. Be Anywhere lets you make and receive calls from
colleagues, prospects and customers on any phone using your office number.
Receiving Business Calls on Your Mobile
You can receive business calls on your mobile phone by adding your mobile number to the Be Anywhere
Locations List. In addition, you can also receive calls on another phone number (it does not have to be your
mobile number).
To add your mobile number to the Be Anywhere Locations List:
1. Click the “Services” button on the Telephony Toolbar.
2. Select “Be Anywhere”.
3. Click “Add”. Enter your mobile phone number and a description.
4. Ensure Enable is checked.
5. Select “Apply”.

Quick Start 12
Make Business Calls from Your Mobile
You can make calls from your mobile phone using your Business VoiceEdge business number as the calling
line ID.
From your mobile, dial your Be Anywhere portal number and wait for the dial tone. Once you hear the tone,
dial the destination number or business extension. The called party sees your Business VoiceEdge business
number (not your mobile number) as the calling line ID.
Note: Your Be Anywhere portal number is displayed in the VoiceEdge online portal or in the Telephony Toolbar under the Be Anywhere
section.
Move Call from One Phone to Another Phone
This functionality enhances your personal productivity. For example, you may move a business call you placed
through the Be Anywhere portal on your mobile while you are on lunch, and upon returning to the office, you
may choose to move the call to your desk phone.
Move Active Call from Your Mobile to Your Desk Phone or Soft Phone:
While engaged in a call you placed through the Be Anywhere portal via your mobile, dial
from your desk phone or soft client. The call is seamlessly moved to the new phone and the mobile call leg is
dropped.
You may also move a call that was placed to your business line that you answered on your mobile phone from
Be Anywhere, using the same process as above.
Note: You cannot move calls placed directly to your mobile number, since Be Anywhere and the VoiceEdge platform have no knowledge of
the call.
Move Active Call from Your Desk Phone or Soft Client to Your Mobile:
From your mobile, dial your Be Anywhere portal number and wait for the dial tone. Once you hear the tone,
dial
manually.
VoiceEdge Mobile App
The VoiceEdge Mobile App lets you make calls from your smartphone using your VoiceEdge business number,
just as if you were in your office. You can check your business voicemail, set your smartphone and other
phones as your ring to devices, change and record your voicemail greetings, see your call logs, and have easy
access to your VoiceEdge phone directory, all from your smartphone.
Following are some of the other features that the VoiceEdge Mobile App provides:
• Use the keypad for extension dialing
• Record and select your VoiceEdge No Answer greetings
• Get notifications when you have an incoming call and new voicemail
• Turn Do Not Disturb on and off for privacy
• Get notified if service is set in a way that may result in missed calls
For information on how to download and use the VoiceEdge Mobile App, see our VoiceEdge Mobile App
Quick Reference Guide that is posted with other VoiceEdge training resources at business.comcast.com/
getstarted.

End User 13
Messages — On the Phone
Comcast Business VoiceEdge voicemail enables you to manage your time without missing your calls. Callers
can leave a message while you’re on the phone, off-site, or just need phone-free time to focus on a project. If
you are away from the office, you can opt to be notified via email that you have messages waiting.
Setting Up Voicemail
To set up your new Comcast Business VoiceEdge voicemail service, follow these easy-to-use instructions.
The first time you call into your Comcast Business VoiceEdge voicemail, you will be asked to create a new
password and record your name to personalize the greeting that callers will hear when they reach your
voicemail.
Note: Each line may have its own voicemail and would need to be set up individually.
First Time Voicemail Activation
From your office:
1. Press the “Messages” button on your phone or dial your extension or 10-digit telephone number.
2. A tutorial will guide you through the setup of your new voicemail service.
Note: You will be prompted to enter the default password, which is the numbers 17932486. Once you’re in the system, listen carefully
to the recorded instructions. You will be prompted to create a password, record your name and record a customized business
greeting.
Setting Your Personalized Name
Press to record new Personalized Name.
Press
to listen to current Personalized Name.
Press
to delete Personalized Name.
Press
to return to the Main Menu.
Press
to repeat the Main Menu.
Accessing Voicemail
There are three ways to access your voicemail:
From your office:
1. Press the “Messages” button on your phone or dial your 4-6 digit extension or 10-digit telephone number.
From your desktop:
1. Click the “Dial Voicemail” icon on the Telephony Toolbar.
Away from your office:
1. Dial your office telephone number.
2. When your personal greeting starts, press
.
3. Enter your password when prompted.

End User 14
Managing Voicemail
When you access Comcast Business VoiceEdge voicemail by phone, you will be in the Main Menu. This menu
will prompt you with a set of options to use in managing your messages. Once you’ve made a selection from
the Main Menu, you will hear prompts to guide you through further options. The following is a list of options
available to you from the Main Menu.
Main Menu options:
Press
to access voice messaging.
Press
to change password.
Press
to exit.
Press
to repeat the Main Menu.
Once you’ve made a selection from the Main Menu, you will hear prompts to guide you through further options.
Message options:
Press to review your new messages. While playing the message you can:
• Press
to skip backwards 3 seconds.
• Press
to pause playback of a message.
• Press
to skip forward 3 seconds.
• Press
to skip to the beginning of a message.
• Press
to skip to the end of a message.
• Press
to delete the message.
• Press
to save the message.
After you’ve listened to your new messages, you have the following options:
• Press
to replay the message. While playing the message you can:
• Press
to return to the previous message.
• Press
to skip to the next message.
• Press
to call the sender of your message.
• Press
to hear more options.
• Press
to return to the Main Menu.
• Press
to repeat the Main Menu.
Greeting options:
Press
for message management options, like updating your various greeting messages. You then have
the following options:
• Press
for the line busy Greeting Menu.
• Press
for the no answer Greeting Menu.
• Press
for the Compose Message Menu.

End User 15
Using Your Voicemail Box to Forward Calls
If you are a Unified Communications seat user, you may use your voicemail box to activate and deactivate Call
Forwarding options when you are out of the office or when your office phone is already in Call Forwarding mode.
To activate Call Forwarding:
1. Access your voicemail box.
2. You will be prompted to enter your mailbox number, which is your 10-digit office telephone number.
3. Enter your password when prompted.
4. From the Main Menu, dial
for Call Forwarding.
5. Follow the prompts to activate or deactivate Call Forwarding Always to the current destination number.
Note: The destination numbers can only be domestic telephone numbers; international numbers are not allowed.
To Make a Call from the Voice Portal
1. Enter the destination digits. While engaged in a call, press to terminate and make another call.
2. Press
to return to the Main Menu.
Leaving Messages for Other Users in Your Group
During greeting:
1. Press
to interrupt the greeting and start recording a new voice message.
2. Press
to transfer out of the greeting to your voicemail box password prompt.
3. Press
to transfer out of the greeting to a pre-configured number.
While recording message:
1. Press
to cancel the recording and transfer to voicemail box password prompt.
2. Press
to cancel the recording and transfer to a pre-configured number.
3. Press
to stop recording and review your message.

End User 16
Messages — Online
With VoiceEdge, some feature management is only available through the portal, and this section will go
through those features.
1. From your browser, log on to
http://hdvdmsweb.on voip.net.
2. You are on the Main Navigation Page.
3. Find the service you wish to access on the left-hand
side of the Navigation Page.
Note: Your username and password were emailed to you upon
installation. Should you need this information reset, please
contact Comcast Customer Care.
To set the number of rings before a call goes to
voicemail:
1. On the left-hand side of your Main Navigation Page,
click “Messaging”.
2. From the Messaging Page, select “Greetings”.
3. Under “Number of rings before greeting”, select the
option for how many times you would like the phone to
ring before the greeting starts.
4. Click “Apply”.
To activate/deactivate voice messaging (voicemail):
1. From your Main Navigation Page, click “Messaging”.
2. From the Messaging Page, select “Voice Management”.
3. Select your preference as “On” or “Off”.
4. Click “Apply”.
To set up a message waiting indicator:
1. From your Main Navigation Page, click “Messaging”.
2. From the Messaging Page, select “Voice Management”.
3. Check the box for “Use phone message waiting indicator”.
4. Click “Apply”.
Voicemail to email — forward voicemails as WAV files to your email:
1. From the Messaging Page, select “Voice Management”.
2. Check the box for “Email a carbon copy of the message to”.
3. In the text box, enter the email address.
4. Click “Apply”.

End User 17
To be notified via email that new voicemail is waiting:
1. From the Messaging Page, select “Voice Management”.
2. Check the box for “Notify me by email of the new message at this address”.
3. In the text box, enter the email address.
4. Click “Apply”.
To allow the caller to transfer from voicemail to an operator:
1. From the Messaging Page, select “Voice Management”.
2. Check the box for “Transfer on 0 to phone number”.
3. In the text box, enter the phone number.
4. Click “Apply”.
5. Remember to change your voicemail greeting to tell callers that they can press
to reach whomever
you have designated as the operator (this could also be used to reach you on your cell phone).
Greetings
The platform also allows you to upload personal WAV files as greetings to use when people reach your voice
messaging box. You may provide up to three alternate no answer recordings, although you can access only
one of these greetings at a time.
To upload a no answer greeting:
1. From the Messaging Page, select “Greetings”.
2. If you want callers to hear a standard greeting, select “System Greeting”.
3. To have callers hear your personalized greeting, select “Unavailable Greeting”.
4. Type the name of the WAV file with your message or use the “Browse” button to locate the file.
5. Click “Apply”, then click “OK” to save and return to the previous page.
To upload a busy greeting:
1. From the Messaging Page, select “Greetings”.
2. If you want callers to hear a standard greeting, select “System Greeting”.
3. To have callers hear your personalized greeting, select “Personal Greeting”.
4. Type the name of the WAV file with your message or use the “Browse” button to locate the file.
5. Click “Apply”.
Note: To create a WAV file using your PC requires specific settings in Windows Sound Editor. The file must be saved using uLaw 8-bit
mono settings. To record your greetings please refer to the instructions on page 7 and 13. The maximum greeting length is five
minutes.

End User 18
Distribution Lists
Immediately broadcast a message to any combination of customers and colleagues with a Distribution List.
You can create up to 14 different lists that will enable you to send bulk voicemail.
To create a Distribution List:
1. From the Messaging Page, select “Distribution Lists”.
2. Select one of the 14 tabs to set up your Distribution List.
3. In the Description text box, input a name or description of the list you will create.
4. Click “Apply”. You have now set up a tab for your Distribution List and the numbers for that list.
To add phone numbers to a Distribution List:
1. From the Messaging Page, select “Distribution Lists”.
2. Select the appropriate tab for the list to receive additional phone numbers.
3. Type the number in the Phone Number box.
4. Click “Add”. The new number is added to your list.
5. Click “Apply”.
To delete a phone number from a Distribution List:
1. From the Messaging Page, select “Distribution Lists”.
2. Select the tab of the list you wish to change.
3. Check the Delete box next to the phone number(s) you wish to remove.
4. Click “Delete”. All checked numbers are deleted.

End User 19
Features — On the Phone
The features listed below are configurable through your advanced IP phone.
Call Transfer
Quickly respond to customers by transferring incoming calls to the appropriate party or to an off-site facility.
To use Call Transfer:
1. Press the “Transfer” button on your phone.
2. Dial the phone number or extension of your destination party. Use the “Transfer” button to designate the
end of your number.
Call Transfer with Consultation
Announce your caller to a colleague or briefly explain a caller issue to be resolved.
To use Call Transfer with Consultation:
1. Press the “Transfer” button. Your caller is now on hold.
2. Dial the phone number or extension of your destination party.
3. When the second party answers, you can speak privately before you connect to your original caller. When
you are ready to connect all parties, press the “Transfer” button.
4. Hang up and your transfer is complete.
Call Transfer Direct to Voicemail
Quickly transfer the caller to a specific voicemail box.
To use Call Transfer Direct to Voicemail:
1. Use the switch hook or flash button on your phone to get a second dial tone.
2. Dial and the phone number or extension of your destination party.
3. Hang up and the incoming caller will be transferred directly to the destination voicemail box.
Call Hold
Call Hold enables you to quickly telephone a second number or check information while a customer is on
the line.
To use Call Hold:
1. Press the “Hold” button on your phone.
2. Your customer is now on hold. You can dial a second number.
3. To deactivate Call Hold and return to your original call, press the “Resume” button on your phone.

End User 20
Call Return
Call Return enables you to call the last party that called. To call back the last party that called, the user dials a
recall feature access code. The system stores the number of the last party that called and attempts to connect
the user to that party. This service also allows the user to delete the last incoming number using a feature
access code.
To use Call Return:
1. Dial
from your phone. The last call received will attempt to be placed, if the number was
available. For example, Anonymous or Restricted callers would not have an available number to call back.
2. Dial
from your phone if you would like to delete the last called number.
Call Waiting
Take a second call without disconnecting the first. When you’re on the phone, a Call Waiting tone
alerts you that you have an incoming call. Call Waiting enables you to put the first caller on hold and answer
the second call. If you’re on an important call and do not wish to answer the incoming call, you can simply
continue talking.
You can also temporarily cancel Call Waiting so that you will not be disturbed during a critical call. If you
temporarily cancel Call Waiting, incoming calls will be forwarded directly to your voicemail. Call Waiting is
automatically restored for the next call.
To activate/deactivate Call Waiting online:
1. From the Main Navigation Page, click “Call Control”.
2. Click “Call Waiting”.
3. Select “On” or “Off” to enable or disable Call Waiting
for all calls, then click “Apply”.
To use Call Waiting:
1. When you hear the Call Waiting tone, press the “Hold” button or the flash hook.
2. Your first call will be placed on hold. Press the “Answer” button to answer the second call.
3. You can alternate the two calls as often as you’d like by using the “Resume” and “End Call” buttons.
To temporarily cancel Call Waiting from your phone:
1. Lift the receiver and listen for the dial tone.
2. Press
, then dial the party you wish to call.
3. Call Waiting is canceled for the current call only.
Note: Call Waiting is also available with Standard seats. Call Waiting is not available with Hunt Group.
Caller ID and Caller ID with Call Waiting
When you hear the Call Waiting tone, Caller ID with Call Waiting enables you to see the number, and where
available, the name of your incoming caller. If you decide you want to answer the second call, place the first
caller on hold by using the “Hold” button, then press the “Answer” button. If you choose not to answer the call,
the caller will be forwarded directly to your voicemail.
/