Page is loading ...

DeVilbiss
®
Nasal CPAP System Instruction
Guide 9000 & 9001 Series
CAUTION–Federal (U.S.A.) law restricts this device to sale by or on
the order of a physician. Made in U.S.A.
Guía de Instrucciones del Equipo Nasal
CPAP de DeVilbiss
®
Serie 9000 & 9001
PRECAUCIÓN–La ley federal (de los EE.UU.) restringe la venta de
este aparato, el cual sólo puede ser vendido por un médico o con la
prescripción de éste. Hecho en EE.UU.
Système CPAP Nasal de DeVilbiss
®
Guide d’Instructions Modèles 9000 et 9001
ATTENTION – La loi fédérale américaine limite la vente de cet
appareil par ou sur ordonnance d’un médecin. Fabriqué aux États-Unis.

IEC Symbols/Símbolos IEC/Symboles CEI
3
A-900
Table of Contents/Í ndice/Table des Matiè res
2
A-900
TABLE OF CONTENTS
IEC Symbols . . . . . . . . . . . . . . . . . . . . . . . . . . . . . . . . . . . . . . . . . . . . . . . . 3
Important Safeguards . . . . . . . . . . . . . . . . . . . . . . . . . . . . . . . . . . . . . . . . . 4
Travel . . . . . . . . . . . . . . . . . . . . . . . . . . . . . . . . . . . . . . . . . . . . . . . . . . . . 4
Introduction . . . . . . . . . . . . . . . . . . . . . . . . . . . . . . . . . . . . . . . . . . . . . . . 5
Important Parts . . . . . . . . . . . . . . . . . . . . . . . . . . . . . . . . . . . . . . . . . . . . . 6
Accessories/Replacement Items . . . . . . . . . . . . . . . . . . . . . . . . . . . . . . . . . . . 6
Set-Up for 9000/9001 . . . . . . . . . . . . . . . . . . . . . . . . . . . . . . . . . . . . . . . . . 7
Operation for 9000 . . . . . . . . . . . . . . . . . . . . . . . . . . . . . . . . . . . . . . . . . . . 7
Operation for 9001 . . . . . . . . . . . . . . . . . . . . . . . . . . . . . . . . . . . . . . . . . . . 9
DC Operation for 9001 . . . . . . . . . . . . . . . . . . . . . . . . . . . . . . . . . . . . . . . . 11
Supplemental Oxygen . . . . . . . . . . . . . . . . . . . . . . . . . . . . . . . . . . . . . . . . . . 12
Cleaning . . . . . . . . . . . . . . . . . . . . . . . . . . . . . . . . . . . . . . . . . . . . . . . . . . 13
Cabinet . . . . . . . . . . . . . . . . . . . . . . . . . . . . . . . . . . . . . . . . . . . . . . . . . 13
Air-Inlet Filter . . . . . . . . . . . . . . . . . . . . . . . . . . . . . . . . . . . . . . . . . . . . . 13
Mask, Headgear and Tubing . . . . . . . . . . . . . . . . . . . . . . . . . . . . . . . . . . . . 14
Maintenance . . . . . . . . . . . . . . . . . . . . . . . . . . . . . . . . . . . . . . . . . . . . . . . 14
Troubleshooting . . . . . . . . . . . . . . . . . . . . . . . . . . . . . . . . . . . . . . . . . . . . . 15
Specifications . . . . . . . . . . . . . . . . . . . . . . . . . . . . . . . . . . . . . . . . . . . . . . . 16
Warranty . . . . . . . . . . . . . . . . . . . . . . . . . . . . . . . . . . . . . . . . . . . . . . . . . . 20
ÍNDICE
Símbolos IEC . . . . . . . . . . . . . . . . . . . . . . . . . . . . . . . . . . . . . . . . . . . . . . . 3
Normas de seguridad importantes . . . . . . . . . . . . . . . . . . . . . . . . . . . . . . . . . 22
Viajes . . . . . . . . . . . . . . . . . . . . . . . . . . . . . . . . . . . . . . . . . . . . . . . . . . . 22
Introducción . . . . . . . . . . . . . . . . . . . . . . . . . . . . . . . . . . . . . . . . . . . . . . . 23
Partes importantes del equipo . . . . . . . . . . . . . . . . . . . . . . . . . . . . . . . . . . . 24
Accesorios/piezas de repuesto . . . . . . . . . . . . . . . . . . . . . . . . . . . . . . . . . . . 24
Preparación del 9000/9001 . . . . . . . . . . . . . . . . . . . . . . . . . . . . . . . . . . . . . . 25
Funcionamiento del 9000 . . . . . . . . . . . . . . . . . . . . . . . . . . . . . . . . . . . . . . . 26
Funcionamiento del 9001 . . . . . . . . . . . . . . . . . . . . . . . . . . . . . . . . . . . . . . . 27
Funcionamiento CC del 9001 . . . . . . . . . . . . . . . . . . . . . . . . . . . . . . . . . . . 29
Oxígeno suplementario . . . . . . . . . . . . . . . . . . . . . . . . . . . . . . . . . . . . . . . . . 30
Limpieza . . . . . . . . . . . . . . . . . . . . . . . . . . . . . . . . . . . . . . . . . . . . . . . . . . 31
Gabinete . . . . . . . . . . . . . . . . . . . . . . . . . . . . . . . . . . . . . . . . . . . . . . . . 31
Filtro de entrada de aire . . . . . . . . . . . . . . . . . . . . . . . . . . . . . . . . . . . . . . 31
Mascarilla, pieza para la cabeza y tubos . . . . . . . . . . . . . . . . . . . . . . . . . . . . 31
Mantenimiento . . . . . . . . . . . . . . . . . . . . . . . . . . . . . . . . . . . . . . . . . . . . . . 32
Guía de detección y solución de problemas . . . . . . . . . . . . . . . . . . . . . . . . . . . . 32
Especificaciones . . . . . . . . . . . . . . . . . . . . . . . . . . . . . . . . . . . . . . . . . . . . . 34
Garantía . . . . . . . . . . . . . . . . . . . . . . . . . . . . . . . . . . . . . . . . . . . . . . . . . . 38
TABLE DES MATIÈRES
Symboles CEI . . . . . . . . . . . . . . . . . . . . . . . . . . . . . . . . . . . . . . . . . . . . . . . 3
Mises en Garde Importantes . . . . . . . . . . . . . . . . . . . . . . . . . . . . . . . . . . . . . 40
Voyages . . . . . . . . . . . . . . . . . . . . . . . . . . . . . . . . . . . . . . . . . . . . . . . . . . 40
Introduction . . . . . . . . . . . . . . . . . . . . . . . . . . . . . . . . . . . . . . . . . . . . . . . 41
Pièces Principales . . . . . . . . . . . . . . . . . . . . . . . . . . . . . . . . . . . . . . . . . . . . 42
Accessoires et pièces de rechange . . . . . . . . . . . . . . . . . . . . . . . . . . . . . . . . . 42
Réglage . . . . . . . . . . . . . . . . . . . . . . . . . . . . . . . . . . . . . . . . . . . . . . . . . . 43
Fonctionnement du Modèle 9000 . . . . . . . . . . . . . . . . . . . . . . . . . . . . . . . . . . 44
Fonctionnement du Modèle 9001 . . . . . . . . . . . . . . . . . . . . . . . . . . . . . . . . . . 45
Fonctionnement sur Courant Continu du Modèle 9001 . . . . . . . . . . . . . . . . . . . 46
Oxygène d'appoint . . . . . . . . . . . . . . . . . . . . . . . . . . . . . . . . . . . . . . . . . . . . 47
Nettoyage . . . . . . . . . . . . . . . . . . . . . . . . . . . . . . . . . . . . . . . . . . . . . . . . . 48
Boîtier . . . . . . . . . . . . . . . . . . . . . . . . . . . . . . . . . . . . . . . . . . . . . . . . . 48
Filtre d’entrée d’air . . . . . . . . . . . . . . . . . . . . . . . . . . . . . . . . . . . . . . . . . 49
Masque, harnais, et tuyaux . . . . . . . . . . . . . . . . . . . . . . . . . . . . . . . . . . . . 49
Entretien . . . . . . . . . . . . . . . . . . . . . . . . . . . . . . . . . . . . . . . . . . . . . . . . . . 49
Guide des pannes . . . . . . . . . . . . . . . . . . . . . . . . . . . . . . . . . . . . . . . . . . . . 50
Spécifications . . . . . . . . . . . . . . . . . . . . . . . . . . . . . . . . . . . . . . . . . . . . . . 51
Garantie . . . . . . . . . . . . . . . . . . . . . . . . . . . . . . . . . . . . . . . . . . . . . . . . . . 55
IEC Symbols
ON / OFF– turns blower on and off
Select Next Item on LCD display
Increase value shown on LCD display
Decrease value shown on LCD display
Start Delay– starts the delay cycle, if prescribed
Attention, consult instruction guide
Type BF equipment– applied part
Class II electrical protection– double insulated
Data port
DC Input– 12 VDC, center pin is positive
100 – 240 Volts AC input 50/60 Hz
Symboles CEI
Arrêt/Marche - Met en marche et arrête le ventilateur
Choisir l’élément suivant de l’affichage à cristaux liquides
Augmenter la valeur montrée par l’affichage à cristaux liquides
Réduire la valeur montrée par l’affichage à cristaux liquides
Démarrage du délai – démarre le cycle de délai, si prescrit
Attention, consulter le guide d’instructions
Équipement de type BF – pièce appliquée
Protection électrique de classe II – isolation double
Port de données
Entrée c.c. – 12 V c.c., la broche centrale est positive
Entrée de 100 – 240 V c.a., 50/60 Hz.
Símbolos IEC
ON/OFF - enciende y apaga el ventilador
Selecciona el próximo parámetro del visualizador LCD
Incrementa el valor mostrado en el visualizador LCD
Disminuye el valor mostrado en el visualizador LCD
Comienzo Ret. – comienza el ciclo de retención, si se ha prescrito
Atención, consulte la guía de instrucciones
Equipo Tipo BF - Parte aplicada
Protección electricidad clase II – doblemente aislado
Puerto de datos
Entrada CC – 12 VCC, pin central positivo
100-240 Voltios de entrada CA 50/60 Hz

A-900
Important Safeguards
4
IMPORTANT SAFEGUARDS
When using electrical products, basic safety precautions should always be followed. Read
all instructions before using. Important information is highlighted by these terms:
DANGER Urgent safety information for hazards that will cause serious
injury or death.
WARNING Important safety information for hazards that might cause
serious injury.
CAUTION Information for preventing damage to the product.
NOTE Information to which you should pay special attention.
READ ALL INSTRUCTIONS BEFORE USING.
SAVE THESE INSTRUCTIONS.
WARNING
This CPAP unit should be used only with masks recommended by the unit’s
manufacturer, your physician, or respiratory therapist. To avoid rebreathing of
exhaled air 1) a mask should not be used unless the CPAP unit is turned on and
operating properly, and 2) the vent hole(s) associated with the mask should
never be blocked. When the CPAP unit is turned on and functioning properly,
new air from the unit flushes the exhaled air out through the mask vent hole(s).
However, when the CPAP unit is not operating, exhaled air may be rebreathed.
Rebreathing of exhaled air for longer than several minutes can, in some
circumstances, lead to suffocation. This warning applies to most CPAP units.
CAUTION–
At low CPAP pressures, the flow through the exhalation port may be inadequate
to clear all exhaled gas from the tubing. Some rebreathing may occur.
TRAVEL
This unit is equipped with a universal power supply capable of accepting line voltages of
100-240V~, 50/60Hz (9000/9001) and 12V (9001 only). No adjustments are required to
the AC power connector or the line fuses to accept this entire range of voltages. If
traveling to another country where the line voltage is
different than the domestic supply voltage, simply
obtain a line cord configured for that particular country
with the appropriate international plug and substitute
it for the standard plug. Operate unit as normal.
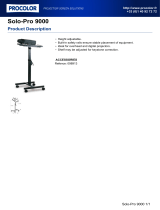
To find out which model you have either look at the
label on the bottom of the unit or look at the outlet
port color
Figure 1. Model 9000 has a grey outlet port.
Model 9001 has a black outlet port.
A-900
Introduction
5
DANGER
Electric shock hazard - Do not use while bathing.
Electric shock hazard - Do not place or drop into water or any other liquid.
NOTE
—Your home medical equipment provider has set your prescription pressure based
on the altitude in your area. Model 9000 needs to be manually changed for
altitude compensation, 9001 has onboard automatic altitude compensation. If an
adjustment is necessary, be sure to readjust the pressure upon return.
Set the altitude range on the LCD menu based on the chart below. Model 9000 can be
adjusted by pressing the select key to advance to the altitude setting. The proper
altitude can then be set by pressing the up or down key.
INTRODUCTION
What is Obstructive Sleep Apnea (OSA)?
Obstructive Sleep Apnea (OSA) is a condition where the upper airway relaxes during sleep
causing the airway to obstruct. Apnea is the Latin word meaning “without breath.”
People diagnosed with sleep apnea stop breathing repeatedly during sleep, resulting in
extreme exhaustion. High blood pressure, cardiac enlargement, and cardiac arrhythmias
are common, as are shortness of breath and loud snoring. In a 1993 report, the National
Commission on Sleep Disorders Research stated that as many as 18 million Americans
may have signs and symptoms of sleep apnea.
How does the nasal CPAP system work?
The CPAP instrument provides non-invasive continuous air pressure to your upper airway,
acting as an air “splint” to keep the airway passages open during sleep. This reduces and
eliminates the obstructive events, allowing uninterrupted sleep. The DeVilbiss 9000/9001
Series is designed to provide this therapy to you quietly and comfortably so that your
sleep is restorative and refreshing.
NOTE—This product has been designed for the treatment of obstructive sleep apnea,
specifically for use in the adult patient population.
Altitude LCD Symbol
0-2500 1
❙
2500-5000 2
❙❙
5000-7500 3
❙❙❙
7500-9000 4
❙❙❙❙
Figure 1
Outlet Port

A-900A-900
Set-up/Operation
7
Important Parts
6
SET-UP FOR 9000/9001
WARNING
This is not a life support device and is
intended to be used on spontaneously
breathing adults.
NOTE
—Refer to Important Parts for part identification.
• Place unit on level, sturdy surface away from
heating vents, radiators, drapes and bedspreads
so that air intake is not restricted.
• Insert the appropriate power cord into the AC
power connector (
Figure 3).
• Plug the power cord into an appropriate wall
outlet. The display will show
Set Pres and CPAP
will increase to the prescribed pressure.
• Refer to
Figure 5 for LCD symbol definitions.
• Connect the 6-foot length of 22 mm diameter
tubing to the outlet port on the front of the unit
(
Figure 6). This is the port from which CPAP air
supply is provided.
• Connect the opposite end of the 22 mm tubing
to the mask and headgear assembly.
NOTE—Excess facial oils will deteriorate mask material.
To prolong mask life, wash face nightly before
wearing mask.
NOTE—Some tubing is prone to kinking. Flow can be
blocked causing apnea episodes to resume. Use
only 22 mm diameter smooth bore-type, kink-
resistant tubing.
• Position mask loosely on face. Adjust headgear
straps so mask is snug and comfortable (
Figure 7).
OPERATION OF THE 9000
CO
2
Rebreathing
CO
2
rebreathing is minimized during use by providing
3cmH
2
O minimum pressure, which creates airflow
through mask vent holes. It is important that mask
vent holes are not blocked.
IMPORTANT PARTS - FIGURES 2 & 3
1. Keypad/LCD Display (refer to Figure 5 for LCD
symbol definition)
2. Outlet Port
3. Carrying Case
4. Air-Inlet Filter
5. DC input connector (model 9001 only)
6. AC Power Connector
7. DIN connector
8. Power Cord (assure proper configuration for outlet)
ACCESSORIES/REPLACEMENT ITEMS—FIGURE 4
1. CPAP Humidifier 9100D
F & P Humidifier
(not shown)
HC105
2. DeVilbiss Serenity™ Mask 9352D
(One size fits all. Includes headgear.)
Nasal CPAP Masks
(not shown)
Small 9351D-668
Medium 9351D-669
Medium/Small 9351D-667
Large 9351D-670
3. Air-Inlet Filter(4/pk) 8000D-602
4. Optional Fine Particle Filter 8000D-603
5. Oxygen Adapter 7353D-601
6. DeVilbiss Seal-Ring™ (4/pk)
(not shown)
Small 9351D-658
Medium or Medium/Small 9351D-659
Large 9351D-660
7. 6' 22 mm Tubing 7351D-616
8. Strap-Style Headgear
(not shown)
7351D-617
9. Cap-Style Headgear
(not shown)
7351D-627
10. Optional 12V DC power
cord (9001 only) 7304D-619
Ask your Sunrise Medical provider for information about
other DeVilbiss mask styles and sizes.
Figure 6
Figure 7
Figure 5
LCD Display
Window
ON/OFF
UP
Down
Delay
Button
Select
Forward
Figure 4
1
2
10
7
3
4
Figure 3
Figure 2
3
1
2
7
5
4
6
8
5

A-900
Operation
9
4. Use the UP or DOWN keys on the keypad to change the altitude setting.
5. Operate the CPAP normally.
6. Remember to return
Altitude to its original setting upon returning home.
Model 9000 LCD Display Window Definitions
Pressing the SELECT button changes the display to show information about the CPAP.
Press the UP or DOWN button to change the displayed setting. (The patient can only
change the Altitude and Language.)
• Set Pressure– CPAP pressure (cmH
2
0) prescribed by your doctor
• Altitude Range– Patient selectable, corrects CPAP pressure for changes in altitude
while traveling. See Operating Instructions for ranges and use.
• Delay Time– Time for the CPAP to reach the prescription pressure after pressing
the Delay button.
• Delay Pressure– Pressure delivered during the delay cycle.
• Compliance Hours– Number of hours recorded while breathing was present.
• Unit Hours– Number of hours recorded while CPAP blower was ON.
• Firmware Version– Identification for firmware installed in the CPAP.
• Serial Number– Serial number of the CPAP unit, same as on the label.
• Language– Language selected for LCD display messages.
• Off- Blower is OFF AC or DC power is connected.
• Error- An error has been detected by the firmware, the CPAP is in a fail safe mode.
OPERATION OF THE 9001
CO
2
Rebreathing
CO2 rebreathing is minimized during use by providing 3cmH2O minimum pressure,
which creates airflow through mask vent holes. It is important that mask vent holes
are not blocked.
During a single fault, the blower is maintained within spec or at less than the
maximum limited pressure. For a firmware detected fault, the blower is set to a fail
safe mode in which the blower is turned off and the detected error code is shown on
the LCD display. CO
2 rebreathing is minimized by keeping the mask vent holes open at
all times.
1. Plug CPAP into AC power using appropriate power cord. Will work on 100 to 240
volts AC (50 to 60 Hz) with no changes except for the end of the power cord
where it plugs in the wall. Model 9001 will also operate on 12 VDC.
2. The display will show
Set Pres and the CPAP will increase to the prescribed CPAP
pressure.
3. The display shows the CPAP pressure prescribed by the doctor.
4. Press the Delay button to start the pressure delay cycle, if prescribed. Pressure will
decrease to the Delay Pressure setting and return to the prescribed Set pressure
after the Delay Time has expired (
Figure 8).
5. When you awake in the morning, press the ON/OFF button to turn the blower OFF
(
Figure 9).
A-900
Operation
8
During a single fault, the blower is maintained within
spec or at less than the maximum limited pressure. For
a firmware detected fault, the blower is set to a fail
safe mode in which the blower is turned off and the
detected error code is shown on the LCD display. CO
2
rebreathing is minimized by keeping the mask vent
holes open at all times.
1. Plug CPAP into AC power using appropriate power
cord. Will work on 100-240 volts AC (50 or 60
Hz) with no changes except for the end of the
power cord where it plugs into the wall.
2. The display will show
Set Pres and the CPAP will
increase to the prescribed CPAP pressure.
3. The display shows the CPAP pressure prescribed
by the doctor.
NOTE—Your physician has chosen the appropriate
delay time (0, 10, 20, 30 or 45 minutes) that
has been preset by your Sunrise Medical
provider or clinician.
4. Press the Delay button
(Figure 8) to start the
pressure delay cycle if prescribed. Pressure will
decrease to the Delay Pressure setting and return
to the prescribed Set Pressure after the Delay
Time has expired.
5. When you awake in the morning, press the ON/OFF
button to turn the blower OFF
(Figure 9).
Model 9000 Altitude Selection
Model 9000 has manual altitude selection. This allows
the patient to correct the CPAP pressure when traveling.
To correct the CPAP pressure for altitude changes:
1. Plug CPAP into AC power using appropriate power
cord. Will work on 100 to 240 volts AC (50 or 60
Hz) with no changes except for the end of the
power cord where it plugs into the wall.
2. The display will show
Set Pres and the CPAP will
increase to the prescribed CPAP pressure.
3. Press the Select button on the keypad until the
LCD display shows
Altitude.
ON/OFF
Figure 8
LCD Display
Delay button
Figure 9
Select button
Set Pres
8.0 cmH
Altitude LCD Symbol
0-2500 1
❙
2500-5000 2
❙❙
5000-7500 3
❙❙❙
7500-9000 4
❙❙❙❙

Operation
11
DC Operation of the 9001
The DeVilbiss CPAP Model 9001 can be operated from a 12V DC power source in a
motor home, recreational vehicle or boat. Connect the DeVilbiss CPAP to a 12V
cigarette lighter in a vehicle with a negative ground using DeVilbiss adapter plug part
#7304D-619. There are no switches or fuses to change for DC operation. Do not use
the CPAP in a moving vehicle.
CAUTION– If this device is used with a 12VDC power source, loss of power will result in
loss of CPAP therapy; there is no internal battery. If the 12VDC power supply is
an automobile or truck battery, the battery should be professionally tested to
make sure the battery is properly charged. A weak battery can result in
insufficient voltage to operate the CPAP and loss of CPAP therapy. Do not
operate the unit while the vehicle is running.
CAUTION– Use only DeVilbiss DC power cord part #7304D-619. Use of any other cord
may cause damage to the CPAP or the vehicle electrical system.
CAUTION– The CPAP will operate for 8 hours on a car battery. The battery should be
professionally tested before using the CPAP overnight to make sure that the
battery is in good condition and is fully charged.
A-900
Operation
10
Model 9001 also has automatic start up and automatic shut off features. To start the
blower, connect the 6 foot hose and mask, then breathe into the mask. The blower will
start after the 2nd or 3rd breath. To turn the blower OFF, remove the mask. After about
one minute of mask off, the blower will turn OFF.
Model 9001 LCD Display Window Definitions
Pressing the SELECT button changes the display to show information about the CPAP.
Press the UP or DOWN button to change the displayed setting. (The patient can only
change the Language.)
• Set Pressure– CPAP pressure (cmH
2
0) prescribed by your doctor
• Delay Time– Time for the CPAP to reach the prescription pressure after pressing the
Delay button.
• Delay Pressure– Pressure delivered during the delay cycle.
• Compliance Hours– Number of hours recorded while breathing was present.
• Unit Hours– Number of hours recorded while CPAP blower was ON.
• Firmware Version– Identification for firmware installed in the CPAP.
• Serial Number– Serial number of the CPAP unit, same as on the label.
• Language– Language selected for LCD display messages.
• Off- Blower is OFF AC or DC power is connected.
• Error- An error has been detected by the firmware, the CPAP is in a fail safe mode.
A-900
DC Power Cord 7304D-619
Plug in to car cigarette lighter
12 Volt DC jack

Cleaning
13
NOTE–At a fixed flow rate of supplemental oxygen, the
inhaled oxygen concentration will vary,
depending on the pressure setting, patient
breathing pattern, mask selection and leak rate.
This applies to most types of CPAP machines.
CLEANING
WARNING
To avoid electric shock, always unplug power
cord from wall outlet power source.
CAUTION
–Never rinse or place the unit in water. Never
allow liquids to get into or around any of the ports, switches, or air filter;
doing so will result in product damage.
Cabinet
1. Unplug the power cord from the wall outlet.
2. Wipe the cabinet with a clean, damp cloth and mild dishwashing detergent every
few days to keep dust free. Do not use alcohol or any alcohol-based solutions to
clean the unit. These cleaning solutions may damage the plastic enclosure.
Allow the unit to dry completely before plugging the unit into a power source.
Air-Inlet Filter
1. The air-inlet filter should be checked daily. The filter is located in the rear of the unit
(Figure 11).
2. For weekly cleaning, remove the dirty foam filter from the frame.
3. Wash the filter in a solution of warm water and dishwashing detergent and rinse
with tap water. Allow the filter to dry completely. If the filter (part #8000D-602)
is damaged, contact your home medical equipment provider for a replacement.
4. Insert clean filter into housing.
A-900
Supplemental Oxygen
12
SUPPLEMENTAL OXYGEN
Supplemental oxygen may be prescribed with nasal
CPAP for treatment of obstructive sleep apnea.
CAUTION–Oxygen is a prescription gas and should only
be administered under the supervision of a
physician.
WARNING
Oxygen supports combustion. To avoid possible
physical injury, do not smoke while using your
CPAP unit with supplemental oxygen. Do not
use near hot, sparking objects or open sources
of flame.
WARNING
Always turn the CPAP unit on prior to turning on the oxygen flow and turn
off the oxygen before turning the unit off.
1. Activate power switch and connect the optional oxygen adapter (part #7353D-
601) to the outlet port of the unit. Always turn CPAP unit on before the oxygen
source and turn the oxygen source off before turning off the CPAP unit.
2. Connect one end of the 22 mm diameter tubing to the open end of the adapter
and the other end to the CPAP mask.
3. Oxygen may be injected into the air supply by connecting one end of standard
oxygen tubing to the oxygen adapter and the other end to the
oxygen source (
Figure 10).
WARNING
The flow setting of the oxygen source shall be specified by a physician.
WARNING
Equipment is not suitable in the presence of a flammable anesthetic mixture
with air or with oxygen or nitrous oxide.
NOTE
–Equipment is suitable for use with oxygen if prescribed by your physician.
A-900
Figure 10 Figure 11

Troubleshooting
15
TROUBLESHOOTING
NOTE
–DeVilbiss 9000/9001 Series contains no user-serviceable parts. If you believe
your unit is not working properly, BEFORE YOU RETURN IT TO THE HOME MEDICAL
EQUIPMENT PROVIDER WHERE YOU PURCHASED IT OR TO SUNRISE MEDICAL,
please take a few moments to check for these possible causes:
A-900
Maintenance
14
Mask, Headgear, and Tubing
CAUTION–Do not place mask, headgear or tubing in an automatic dishwasher. Some
automatic dishwashing detergents contain chemicals that may damage these
items. Also, do not clean with alcohol or any alcohol-based solutions as
damage will result.
1. Remove the tubing and headgear from the mask.
2. Each of these items may be washed as often as needed by using a solution of
warm water and dishwashing detergent. Wash item individually; rinse with clean,
warm tap water and allow to air dry before using. Hang the tubing vertically to
allow the water to drain and dry completely.
MAINTENANCE
DANGER
Electric shock hazard. Do not attempt to open or remove cabinet; there are no
user-serviceable internal components. If service is required, return it to a
qualified Sunrise Medical provider or authorized service center. Opening or
tampering with the unit will void warranty.
Maintenance Interval
Pressure– Check pressure once per year with a calibrated gauge, calibrate unit if:
Model 9000 error > ± 2 cmH
2
O
Model 9001 error > ± 1 cmH
2
O
Standard Filter– Check filter daily, clean if necessary. Replace every 6 months or if
damaged.
Optional Fine Particle Filter– Check filter daily, replace if dirty. Replace every 30 days
or if damaged.
A-900
BASE UNIT
Symptoms
Unit does not turn on.
No air flow emitted from flow
generator when power is
turned on, motor runs.
Symptoms of OSA have
recurred.
Skin becomes irritated where
mask touches skin.
Dryness of throat or nose.
Air from flow generator seems
warm.
Nasal, sinus, ear pain, or
runny nose.
Possible Causes
1. Unit not connected to a
live power source.
2. Power cord not attached
properly.
1. Air filter may be occluded
by dirt or bed clothing.
1. Air filter may be
occluded.
2. Incorrect air pressure
setting.
3. Sleep apnea condition has
changed.
1. Headgear is too tight.
2. Incorrect mask size.
3. Allergic reaction to the
mask material.
4. Worn mask.
1. Inadequate room
humidity.
2. Room temperature
too high.
1. Air filter may be
occluded.
2. Air filter and/or outlet
port may be obstructed.
3. Unit located too close to
a heat register or radiator.
1. Reaction to air flow
pressure, sinus infection,
or nasal congestion.
Remedies
1. Plug unit into a live
receptacle.
2. Firmly attach power cord.
1a. Clean or replace the air
filter.
1b. Move unit away from
loose material.
1. Clean or replace the air
filter and relocate unit
away from drapes, etc.
2. Contact your Sunrise
Medical provider or
authorized service center.
3. Call your physician; you
may need to be retested.
1. Loosen the headgear.
2. Contact your Sunrise
Medical provider.
3. Call your physician.
4. Replace mask.
1. Increase room humidity or
add a CPAP humidifier;
see page 6.
2. Decrease room
temperature.
1. Clean or replace the air
filter.
2. Move the unit away from
obstruction.
3. Move the unit away from
heat source.
1. Discontinue use. Contact
your physician.

Specifications
17
Model 9001 Pressure swings (cmH
2
O peak to peak at 500mL tidal volume)
Breaths per minute 10 15 20
@ 7 cmH
2
O 1.0 1.0 1.1
@ 13 cmH
2
O 1.0 1.0 1.1
@ 20 cmH
2
O 1.1 1.1 1.2
Warranty.................................................................................Two-year limited
Equipment classification with respect to protection from electric shock........Class II
Degree of protection from electric shock................................Type BF Applied Part
Degree of protection against ingress of liquids.............................................None
Equipment not suitable for use in the presence of a flammable anaesthetic mixture
with air or with oxygen or nitrous oxide.
Mode of operation ...........................................................................Continuous
Definitions
Display – purpose, type, information displayed. The LCD display shows the following
information in each model:
Model 9000 Model 9001 Description
Set Pres Set Pres CPAP pressure prescribed for the patient in cmH
2
O
Altitude Altitude setting one of four ranges
Fine Adj Fine adjustment for fine tuning pressure using an
external manometer
Dly Time Dly Time Delay time prescribed for the patient in minutes
Dly Pres Dly Pres Delay pressure prescribed for the patient in cmH
2
O
Compl Hrs Compl Hrs Compliance meter, shows accumulated time “while
breathing”
Unit Hrs Unit Hrs Unit hour meter, shows accumulated time of blower
operation
Firmware Firmware Firmware version installed in the CPAP
Serial # Serial # Serial number of the CPAP
Language Language Language selection for LCD display messages
Off Off Blower is OFF AC or DC power is connected
Error Error An error has been detected by the firmware, the
CPAP is in a fail safe mode
A-900
Specifications
16
SPECIFICATIONS
Technical Specifications
Size .............................................................................4.0"H x 7.5"W x 10.8"D
(10.2 cm x 19.6 cm x 26.2 cm)
Weight....................................................................................3.6 lbs. (1.7 kg)
Electrical Requirements (9000/9001) ...................................100-240V~, 50/60 Hz
9001 Only........................................................................12 VDC @ 3 A max
Maximum Power Consumption...............................................................65 watts
CPAP Pressure Range......................................................................3-20 cm H
2
O
Pressure Delay Time..................................................0, 10, 20, 30 or 45 minutes
Delay Pressure Range........................................3 cm H
2
O to prescription pressure
Operating Temperature Range ...................................41°F to 104°F (5°C to 40°C)
Operating Humidity Range ....................................5% to 95% RH non-condensing
Operating Atmospheric Conditions .....................................Sea level to 9,000 feet
Storage & Transportation Temperature Range. .........-4°F to 140°F (-20°C to +60°C)
Storage & Transportation Humidity Range................5% to 95% RH non-condensing
Maximum Limited Pressure .................................................................28 cmH
2
O
Sound Level........................................30 dBA (@ 10 cmH
2
O, 1 meter from CPAP)
Filter specs ..................................................Standard Filter > 3 micron particles
Optional Fine Particle Filter > 0.3 micron particles
Max flow rates Model 9000 Model 9001
83 L/m 73 L/m @ 7 cmH
2
O (1/3 max pressure)
134 L/m 118 L/m @ 13 cmH
2
O (2/3 max pressure)
163 L/m 164 L/m @ 20 cmH
2
O (max pressure)
Pressure Stability
Between maintenance intervals Model 9000 = ± 2 cmH
2
O
(maintenance interval = 1 year) Model 9001 = ± 1 cmH
2
O
Model 9000 Pressure swings (cmH
2
O peak to peak at 500mL tidal volume)
Breaths per minute 10 15 20
@ 7 cmH
2
O 1.0 1.0 1.0
@ 13 cmH
2
O 1.0 1.0 1.0
@ 20 cmH
2
O 1.3 1.3 1.4
A-900

Specifications
19
9000 Series CPAP Operation After Interruption and Restart of Power Supply
The 9000 Series CPAP will turn off if power is turned off or disconnected. When
power is restored, the CPAP will return to the prescribed pressure setting within
2 seconds.
9000/9001 Series CPAP responds to the following conditions:
Meets Spec: 9000 9001
Amb Temperature +5°C to +40°C ✓✓
Amb Humidity 10% to 95% RH ✓✓
Atmos. Pressure 700 mbar to 1060 mbar ✓✓
AC supply voltage range -15% to +10% of declared nominal (100-240V) ✓✓
DC supply voltage range -15% to +25% of declared nominal (12 VDC) ✓
A-900
Specifications
18
Pressure sensor – purpose, type, sensing position, range, conditions of measurement
The pressure sensor in Model 9001 measures the CPAP pressure inside the CPAP
during operation. This measurement is used by the blower control circuit to
correct the output pressure for mask leaks and altitude changes. The measured
pressure is viewable by the PDA Remote. The pressure sensor is a silicon
diaphragm type sensor with an input range of 0 to 25.4 cmH
2
O. The measurement
type of the sensor is “gauge” (relative to atmospheric pressure, ATPD).
General Info
Filters
Standard filter is designed to filter particles larger than 3 microns in size. The CPAP
unit must have the standard filter in place during operation. This filter should
be replaced if every 6 months or if it is damaged.
Optional Fine Particle Filter is designed to filter particles larger than 0.3 microns in
size. The fine particle filter is placed in the filter area of the CPAP air intake
with the standard filter placed over the fine particle filter. The optional fine
particle filter should be replaced every 30 days or if it appears damaged.
Interdependence of controls – (settings that affect one another) The following
settings on Model 9000 affect each other and must be set in the order listed to
obtain the correct CPAP pressure:
• Set Pressure
• Altitude
• Fine Adjust
The CPAP Pressure Setting (Set Pres) determines the pressure for normal
operation. The Set Pres value does not change when adjustments are made to
Altitude or Fine Adjust settings.
The Manual Altitude Adjustment in Model 9000 allows a patient to adjust the
pressure output of the CPAP to compensate for altitude changes when travelling.
Changing the Altitude setting changes the CPAP pressure by up to 15% of the
CPAP setting to correct for changes in barometric pressure at different altitudes.
The Fine Adjustment Control, available only during setup of the 9000 CPAP, adds
or subtracts from the CPAP setting to obtain the desired pressure as measured by
an external manometer.
The Delay Time and Delay Pressure operate the CPAP at a lower pressure for a
preset period of time before reaching the prescribed CPAP pressure. The Altitude
and Fine Adjust settings affect the Delay Pressure in the same way they affect
the CPAP pressure.
Accuracy and Range of Displayed Values and Calibrated Controls Model 9001
Pressure sensor – max zero error = ± 1 cmH
2
O
Sensitivity = ± 2% FSO+4% reading
A-900

21
A-900
Two-Year Limited Warranty
20
WARRANTY
DeVilbiss 9000/9001 Series nasal CPAP system is warranted to be free from defective
workmanship and material for a period of two years from date of purchase. Any
defective part(s) will be repaired or replaced at Sunrise Medical’s option if the unit has
not been tampered with or used improperly during that period. Make certain that any
malfunction is not due to inadequate cleaning or failure to follow the instructions. If
repair is necessary, contact your Sunrise Medical provider or Sunrise Medical Service
Department for instructions:
U.S.A. 800-333-4000, 814-443-4881
Canada 905-660-2459
Europe 44-138-444-6688.
NOTE–This warranty does not cover providing a loaner unit, compensating for costs
incurred in rental while said unit is under repair, or costs for labor incurred in
repairing or replacing defective part(s).
THERE IS NO OTHER EXPRESS WARRANTY. IMPLIED WARRANTIES, INCLUDING THOSE OF
MERCHANTABILITY AND FITNESS FOR A PARTICULAR PURPOSE, ARE LIMITED TO THE
DURATION OF THE EXPRESS LIMITED WARRANTY AND TO THE EXTENT PERMITTED BY LAW
ANY AND ALL IMPLIED WARRANTIES ARE EXCLUDED. THIS IS THE EXCLUSIVE REMEDY
AND LIABILITY FOR CONSEQUENTIAL AND INCIDENTAL DAMAGES UNDER ANY AND ALL
WARRANTIES ARE EXCLUDED TO THE EXTENT EXCLUSION IS PERMITTED BY LAW. SOME
STATES DO NOT ALLOW LIMITATIONS ON HOW LONG AN IMPLIED WARRANTY LASTS, OR
THE LIMITATION OR EXCLUSION OF CONSEQUENTIAL OR INCIDENTAL DAMAGES, SO THE
ABOVE LIMITATION OR EXCLUSION MAY NOT APPLY TO YOU.
This warranty gives you specific legal rights, and you may also have other rights which
vary from state to state.
A-900

©
Sunrise Medical 08.01
A-900 Rev. A
Sunrise Medical
Respiratory Products Division
100 DeVilbiss Drive
Somerset, Pennsylvania 15501-2125
USA
814-443-4881
Sunrise Medical Canada, Inc.
237 Romina Drive, Unit 3
Concord, Ontario L4K 4V3
CANADA
905-660-2459
Sunrise Medical Ltd.
Sunrise Business Park
High Street
Wollaston, West Midlands DY8 4PS
ENGLAND
44-138-444-6688
Sunrise Medical Pty. Limited
15 Carrington Road, Unit 7
Castle Hill NSW 2154
AUSTRALIA
61-2-9899-3144
Sunrise Medical
Division Respiratoire
Zone Industrielle
Route de Meslay
37210 Parcay-Meslay
FRANCE
33-2-47-88-58-36
Sunrise Medical
DeVilbiss Produkte
Industriegebiet
69254 Malsch/Heidelberg
GERMANY
49-7253-980-460
/