
TØRRETUMBLER
DROOGAUTOMAAT
WÄSCHETROCKNER
SÈCHE-LINGE
DRYER
Brugsanvisning
Gebruiksaanwijzing
Bedienungsanleitung
Guide d’utilisation
Instruction booklet


3
DANSK - - - - - - - - - - - - - - - - - - - - - - - - - - - - - - - - - - - - - s. 4
NEDERLANDS - - - - - - - - - - - - - - - - - - - - - - - - - - - - - - Blz. 17
DEUTSCH - - - - - - - - - - - - - - - - - - - - - - - - - - - - - - - - Seite 30
FRANÇAIS - - - - - - - - - - - - - - - - - - - - - - - - - - - - - - - Page 43
ENGLISH - - - - - - - - - - - - - - - - - - - - - - - - - - - - - - - - - Pag. 56
Page is loading ...
Page is loading ...

66
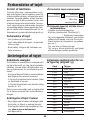
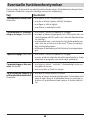
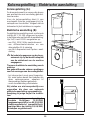
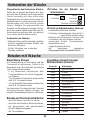
Beskrivelse af apparat
Betjeningspanel
Filter
Tre mulige bortledningskanaler til luft
Page is loading ...
Page is loading ...
Page is loading ...
Page is loading ...
Page is loading ...
Page is loading ...

1313
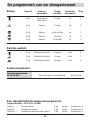
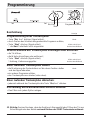
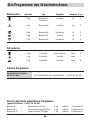
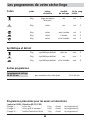
Anbefalede programmer (jf. laboratorietest)
(jf. EU-direktivet 61124 95/13/EØF)
Mængde I --- “Tør bomuld” 6 kg Vælg Prog. 2
Mængde II --- “Strygetør bomuld” 6 kg Vælg Prog. 4
Mængde III --- “Tekstiler uden særlige behov” 3 kg Vælg Prog. 7
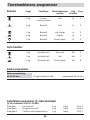
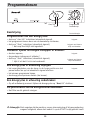
Tørretumblerens programmer
Bomuld Vægt Tekstiltype Tørretumblingens Valg Prog.
resultat af tekstil
6 kg Linned Tørt Ja 1
Cowboy-bukser
6 kg Bomuld Tørt Ja 2
6 kg Bomuld Lidt fugtigt Ja 3
6 kg Bomuld Fugtigt Ja 4
6 kg Bomuld Mere fugtigt Ja 5
Sarte tekstiler
3 kg Syntetisk/sart Mere tørt Nej 6
3 kg Syntetisk/sart Tørt Nej 7
3 kg Syntetisk/sart Mere fugtigt Nej 8
Andre programmer
Ekstra tørretumbling
60-40-20 min Meget kraftig bomuld (eksempelvis 60-20 min.)

1414
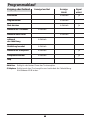
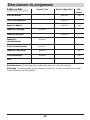
Programforløbet
Handling eller
tilstand
Kontrollampe tændt
(blinker ikke)
Kontrollampe
blinker
Lydsignal
Tænding
Valg af program
Tryk på start
I løbet af tørretumblingen
I løbet af en pause
I løbet
af afkøling
Efter afkøling
I løbet af “anti-krøl” fase
Efter “anti-krøl” fase
Stop
Tændt
Tændt
Tændt
Tændt
Tændt
Tændt
Tændt
Tændt
Tændt
Ja
Ja
Ja
Ja
Afkøling: Aktiveres i slutningen af tørretumblingen.
“Anti-krøl” fase: Aktiveres efter afslutning af tørretumblingen for at hindre tøjet i at krøl-
le. Maks. varighed: 60 min.

1515
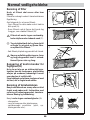
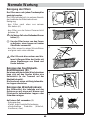
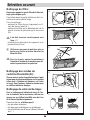
Normal vedligeholdelse
C
D
E
Rensning af filter
Husk, at filteret skal renses efter hver
tørring.
Filteret er anbragt nederst i tørretumblerens
lågeåbning.
Gør følgende for at rense filteret:
- Fjern filteret fra dets sæde ved at trække
det opad (A).
- Rens filteret ved at fjerne det tynde lag
fnugger, som dækker filteret (B).
Filteret må under ingen omstændig-
heder skylles under rindende vand (C).
Tag et stykke blødt stof og form det til
en kugle for at gnide og fjerne fibre-
ne optimalt fra filteret.
- Sæt filteret på plads og pres det helt i bund.
Støvsug udluftningsåbningerne foran
og bag på apparatet hver 6. måned.
Herved fjernes støv og fnug.
Rengøring af kontrolsonder for
fugtighed (D)
Hvis der er tale om en elektronisk tørre-
tumbler, kan det forekomme, at et kalklag
aflejres på sonderne (indvendigt i kurven
over skovlen af rustfrit stål).
Fjern kalklaget ved at tørre sonderne af med
en klud, der er fugtet med eddike.
Rensning af tørretumbleren
Benyt udelukkende en svamp eller en klud
fugtet med sæbevand i forbindelse med
rensning af betjeningspanelet, tørretum-
blerens åbning og beklædning.
Benyt under ingen omstændigheder (E):
- skurepulver
- rens-let svampe eller plastsvampe
- spritbaserede produkter (sprit, op-
løsningsmidler osv.).
B
A
Page is loading ...
Page is loading ...
Page is loading ...

19
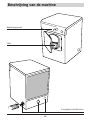
Beschrijving van de machine
Bedieningspaneel
Filter
3 mogelijke luchtafvoeren
Page is loading ...
Page is loading ...
Page is loading ...
Page is loading ...
Page is loading ...
Page is loading ...

26
Katoen Gewicht Aard van Droog Keuze van Prog.
het weefsel resultaat het weefsel
6 kg Linnengoed Droog Ja 1
Blue jeans
6 kg Katoen Droog Ja 2
6 kg Katoen Licht vochtig Ja 3
6 kg Katoen Vochtig Ja 4
6 kg Katoen Vochtiger Ja 5
Delicate weefsels
3 kg Delicate/kunststof Drooger Nee 6
3 kg Delicate/kunststof Droog Nee 7
3 kg Delicate/kunststof Damper Nee 8
Andere programma’s
Extra droogprogramma
60-40-20 min. Zeer dik katoen, bij voorbeeld 60 à 20 min
Door laboratoriumtests aanbevolen programma’s
(volgens Richtlijn - 61121 95/13/EEG)
Lading I --- “droog katoen” 6 kg kiezen Programma 2
Lading II --- “strijkdroog katoen” 6 kg kiezen Programma 4
Lading III --- “weefsel zonder bijzondere eisen” 3 kg kiezen Programma 7
De programma’s van uw droogautomaat

27
Programmauitvoering
Handeling of staat
Controlelampje
vast brandend
Controlelampje
knipperend
Akoestisc
h signaal
Aanzetten
Programmakeuze
Drukken op start
Tijdens het drogen
Tijdens een pauze
Tijdens
het afkoelen
Na het afkoelen
Tijdens de antikreukfase
Einde antikreukfase
Stop
In werking
In werking
In werking
In werking
In werking
In werking
In werking
In werking
In werking
Ja
Ja
Ja
Ja
Afkoelen: wordt in het laatste deel van de droogcyclus uitgevoerd.
Antikreukfase: wordt na de droogcyclus uitgevoerd, om het kreukelen van de weefsels
te voorkomen. Maximale duur 60 minuten.
Page is loading ...
Page is loading ...
Page is loading ...
Page is loading ...
Page is loading ...
Page is loading ...
Page is loading ...
Page is loading ...
Page is loading ...
Page is loading ...
Page is loading ...

3939
Durch Labortests empfohlene Programme
(gemäß Richtlinie - 61121 95/13/EG)
Beladung I --- „Baumwolle trocken” 6 kg wählen Programme 2
Beladung II --- „Baumwolle bügeltrocken” 6 kg wählen Programme 4
Beladung III --- „anspruchslose Textilien” 3 kg wählen Programme 7
Die Programme des Wäschetrockners
Baumwolle Gewicht Typ Ergebnis Auswahl Prog.
6 kg Bettwäsche trocken Ja 1
Bluejeans
6 kg Baumwolle trocken Ja 2
6 kg Baumwolle trockener Ja 3
6 kg Baumwolle feucht Ja 4
6 kg Baumwolle trockener Ja 5
Feinwäsche
3 kg Synthetik mehr trocken Nein 6
3 kg Synthetik trocken Nein 7
3 kg Synthetik feuchter Nein 8
Andere Programme
Zusätzliches Trocknen
60-40-20 min
sehr feste Baumwolle, beispielsweise
von 60 bis 20 min
Page is loading ...
Page is loading ...
Page is loading ...
Page is loading ...
Page is loading ...
Page is loading ...
Page is loading ...
Page is loading ...
Page is loading ...
Page is loading ...
Page is loading ...
Page is loading ...

52
Coton poids nature résultat tri du prog.
du textile de séchage textile
6kg linge de maison sec oui 1
blue jean
6kg coton sec oui 2
6kg coton peu humide oui 3
6kg coton humide oui 4
6kg coton plus humide oui 5
Synthétique et délicat
3kg synthétique délicat plus sec non 6
3kg synthétique délicat sec non 7
3kg synthétique délicat plus humide non 8
Autres programmes
Complément de séchage
60-40-20 min par exemple coton très épais 60 à 20 min
52
Programmes préconisés pour les essais en laboratoire
( selon le 61121- Directive 95/13/CEE)
Charge I --- ” coton sec ” 6 kg choisir le programme 2
Charge II --- ” coton prêt à repasser ” 6 kg choisir le programme 4
Charge III--- ” textile d’entretien facile ” 3 kg choisir le programme 7
Les programmes de votre sèche-linge

5353
Déroulement du programme
Action ou Etat
Voyant fixe Voyant clignotant Bip
sonore
Mise en marche
Choix du programme
Appui sur départ
Pendant le séchage
Pendant une pause
Pendant le
refroidissement
Fin du refroidissement
Pendant le défoulage
Fin du défoulage
Arrêt
marche
marche
marche
marche
marche
marche
marche
marche
marche
oui
oui
oui
oui
Refroidissement : il intervient dans la dernière partie du cycle de séchage.
Défoulage : il intervient dès que le séchage est terminé, il évite au textile de se tasser.
Durée maximum de 60 minutes.
Page is loading ...
Page is loading ...

5656
The following symbols are used throughout this manual:
safety rules that must be strictly complied with
(for you, your dryer and your washing);
electrical danger;
important advice and information.
Page
1. How to carry out your first installation
• Safety instructions - - - - - - - - - - - - - - - - - - - - - - - - - - - - - - - - - - - - - - - - 57
• Energy savings - - - - - - - - - - - - - - - - - - - - - - - - - - - - - - - - - - - - - - - - - - - 57
• Description of the machine - - - - - - - - - - - - - - - - - - - - - - - - - - - - - - - - - - - 58
• Air extraction - - - - - - - - - - - - - - - - - - - - - - - - - - - - - - - - - - - - - - - - - - - 59
Connection to one of the three outlets
Air extraction
• Installation - - - - - - - - - - - - - - - - - - - - - - - - - - - - - - - - - - - - - - - - - - - - - 60
Installation area
Levelling
• Building in - - - - - - - - - - - - - - - - - - - - - - - - - - - - - - - - - - - - - - - - - - - - - 61
• Reversing the door - - - - - - - - - - - - - - - - - - - - - - - - - - - - - - - - - - - - - - - 61
• Column installation - - - - - - - - - - - - - - - - - - - - - - - - - - - - - - - - - - - - - - - - 62
• Electrical connection - - - - - - - - - - - - - - - - - - - - - - - - - - - - - - - - - - - - - - - 62
2. How to use your dryer?
• Laundry preparation - - - - - - - - - - - - - - - - - - - - - - - - - - - - - - - - - - - - - - - 63
• Loading the laundry - - - - - - - - - - - - - - - - - - - - - - - - - - - - - - - - - - - - - - - 63
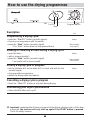
• How to use the drying programmes - - - - - - - - - - - - - - - - - - - - - - - - - - - - - 64
• Your drying programmes - - - - - - - - - - - - - - - - - - - - - - - - - - - - - - - - - - - - 65
• Programme sequence and display - - - - - - - - - - - - - - - - - - - - - - - - - - - - - - - 66
3. How to maintain your dryer
• Routine maintenance - - - - - - - - - - - - - - - - - - - - - - - - - - - - - - - - - - - - - - 67
Cleaning the filter
Cleaning the humidity probes
Cleaning the dryer
4. Troubleshooting
• What to do if… - - - - - - - - - - - - - - - - - - - - - - - - - - - - - - - - - - - - - - - - - - 68
5. Consumer relations
• After sales service - - - - - - - - - - - - - - - - - - - - - - - - - - - - - - - - - - - - - - - - - 72
Contents
Before using your dryer, please read this manual carefully; it will rapidly enable you to familiarize
yourself with the working of the machine.
In the interests of constant product development and improvement, we reserve the right to make any
modification to the technical, functional and aesthetic characteristics of products.

5757
Safety instructions
Energy savings
Your dryer was designed exclusively for domestic use, to dry machine-dryable
fabrics.
• Spin your washing at high speed, which
will reduce residual humidity and energy
consumption too. Synthetic fabrics should
also be spun before drying.
• Load your machine to maximum for
optimal use of energy. To do this, use the
recommended volumes indicated in this
booklet.
• High ambient temperatures and small
rooms increase drying times and electricity
consumption.
• If you have a condenser dryer, make sure
the ventilation grid on the front is free from
all obstacles and kept clean.
The following instructions must be
strictly complied with. We decline all
responsibility and will terminate any
guarantee if these recommendations
are ignored, which may cause
damage to persons or property.
•
Never connect the air discharge hose
to a chimney (danger of backflow of
combustion gas) or to a controlled
mechanical ventilation system (if your
machine is of the air-expulsion type).
•
Use your machine as indicated in this
manual; this will avoid damage to persons
and washing. Don’t use solvents inside the
dryer (danger of fire and explosion)
•
Stain removal products. All preliminary
treatment with solvents, stain removers
and aerosols is strictly forbidden as they
are highly inflammable products. If items
require such treatment, it should be carried
out before washing. We also advise you
not to use such products near your dryer
or other electrical appliances in general
in poorly ventilated areas, in order to avoid
the risk of explosion.
•
Scrupulously follow the drying instructions
on the labels on your washing.
•
If you have to open the door of the drum
during a drying cycle, be careful not to
touch the drum immediately, as it will be
very hot.
•
Check the discharge hose at regular
intervals (depending on the model). This
will avoid functional anomalies.
•
In the case of anomalies that you can’t
eliminate by following the instructions in
section “What to do if...”, contact a
qualified professional.
•
Don’t allow children to play with the
machine and keep pets away from it.
•
Before disposing of your dryer render it
unusable. Disconnect and cut the power
cable at its entry to the machine. Put the
door handle out of use.
•
Think of the environment. Ask your
dealer or local authorities about procedures
for scrapping used dryers.
•
If you want to change the power cable,
contact a qualified professional.
•
If the power cable is damaged, it must be
replaced by a cable or a special kit available
from the manufacturer or technical service
centre.
•
Don’t touch the back panel of the dryer
while it’s working, as it may be very hot.

5858
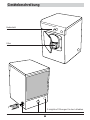
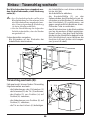
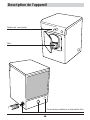
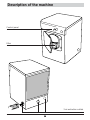
Description of the machine
Control panel
Filter
3 air extraction outlets

5959
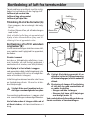
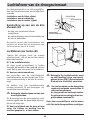
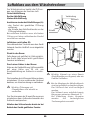
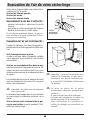
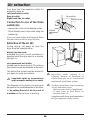
A
Air extraction
Connection
Flexible Hose
Jubilee
clip
Important: never connect to a
chimney (danger of backflow of
combustion gas) or to a controlled
mechanical ventilation system.
Further precautions when mounting
the air extraction hose:
- the hose must not be lengthened;
- it must have as few bends as
possible (max. 2).
Compliance with these recommendations
will give optimum drying results.
B
30 cm
maxi
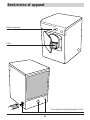
Your dryer has three separate outlets for
extracting damp air.
Left-hand side air outlet
Rear air outlet
Right-hand side air outlet
Connection to one of the three
outlets (A):
- remove the cover of the desired outlet;
- fit the flexible hose to the outlet using the
jubilee clip.
If you use a side outlet, don’t forget to block
the rear outlet with the plug left free.
Extraction of the air (B):
During drying, hot damp air from the
dryer must be expelled either:
directly into the room:
provided the room is well ventilated (if
possible install the dyer next to a window
left ajar); or
via a permanent wall outlet:
located near the dryer (vent at 30 cm above
floor level to avoid condensation in the hose).
The slats of the air vent must be at least 15
mm apart to avoid encrustation.
Important: under no circumstances
apply mosquito netting to air vents.
The diameter of the hole in the wall must
be equal to the outside diameter of the hose.
Or by putting the end of the hose out of
a window while the dryer is working.

6060
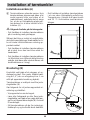
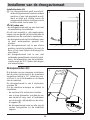
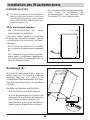
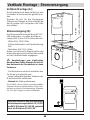
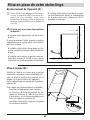
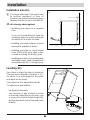
Installation area (A):
Your dryer emits heat. If you put it next
to another appliance or item of
furniture, we recommend leaving space
between the two for air to circulate (A).
We strongly advise against:
- installing your dryer on a carpeted
floor.
If you can’t avoid doing so, take the
necessary steps to ensure adequate
circulation of air under the base.
- installing your dryer where it may be
exposed to splashes of water;
- installing your dryer in a small closed
room (if this is the case, open a door
or window during the drying cycle);
- installing your dryer in an inadequately
ventilated room; room temperature
should be under 35° C during drying.
Levelling (B):
Use a level to check the floor is horizontal.
The maximum allowed inclination is 1.5°
(ie. about 1 cm with respect to the width
and depth of the dryer).
Your dryer has four adjustable feet (B).
To adjust level and stability:
- tip slightly backwards;
- use a wrench or pair of pliers to screw
or unscrew, depending on the floor, one
or more of the feet to adjust height (B);
-put the dryer back on four feet and check
stability.
Installation
A
B

6161
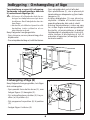
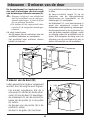
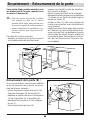
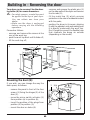
Building in - Reversing the door
Your dryer can be recessed. See the draw-
ing below (A) for recess dimensions.
• For safety reasons, a metal top must
be applied to the top of your dryer.
You can obtain one from your
dealer.
• Make sure the dryer is unplugged
before carrying out the following
operations.
Proceed as follows:
- unscrew and remove the screws at the
rear of the work top;
- push the work top back until it slides off;
- lift the work top off;
- unscrew and remove the plastic pins (1)
on the side walls of the dryer and remove
the tie-rods (2);
- fit the metal top (3) which ensures
protection in the case of accidental contact
with live parts;
- position the dryer in its recess, aligning
it with the adjacent units and making sure
it is directly underneath the work top.
Don’t forget to connect the flexible hose
that channels the damp air outside
(depending on the model).
3
1
565
600
595
600
829
830
2
Reversing the door (B):
If you wish, you can change the way the
door opens, as follows:
- remove the panel in front of the four
screws (1) fixing the hinges (2) of the
door (3);
- move the micro-switch activator (5)
from position (a) to position (b);
- invert the position of the plugs from
position (6) to position (1);
- mount the door on holes (6).
1
6
1
3
5(a)
2
5(b)
B
A

6262
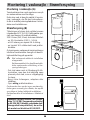
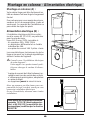
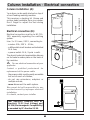
Column installation - Electrical connection
Frame
(see stacking kit)
A
B
Your appliance complies with EC
directives 73/23 (Low Voltage) and
89/336 (Electromagnetic Compatibility)
as amended by EC directive 93/68.
Column installation (A):
Your dryer can be easily stacked on top of
a front-loading washing machine.
This requires a stacking kit (frame and
suction pads) available from your dealer.
Don’t forget to adjust the feet during
installation.
Electrical connection (B):
Electrical connection must be to NF C15-
100, especially regarding the earthing
system.
Line: 3 x 2.5 mm
2
, 230 V, connecting to:
-a meter: 20A, 230 V - 50 Hz;
-a differential circuit breaker and individual
16 A fuse;
-a power outlet: 16 A, 2-pole + earth.
The dryer’s technical characteristics data are
on the serial number plate on the back of
the machine.
Tips on electrical connection of your
appliance:
Contact a qualified professional for
replacement of the power cable.
-the power outlet must be easily accessible
but out of reach of children;
- do not use extensions, adaptors or
multiple sockets;
- never disconnect the earth system.
We cannot be held responsible for any
accident caused by improper electrical
installation.
If in doubt, contact your installer.
Suction pads
(see stacking kit)
Page is loading ...
Page is loading ...
Page is loading ...
Page is loading ...
Page is loading ...
Page is loading ...
Page is loading ...
Page is loading ...
Page is loading ...
Page is loading ...
-
 1
1
-
 2
2
-
 3
3
-
 4
4
-
 5
5
-
 6
6
-
 7
7
-
 8
8
-
 9
9
-
 10
10
-
 11
11
-
 12
12
-
 13
13
-
 14
14
-
 15
15
-
 16
16
-
 17
17
-
 18
18
-
 19
19
-
 20
20
-
 21
21
-
 22
22
-
 23
23
-
 24
24
-
 25
25
-
 26
26
-
 27
27
-
 28
28
-
 29
29
-
 30
30
-
 31
31
-
 32
32
-
 33
33
-
 34
34
-
 35
35
-
 36
36
-
 37
37
-
 38
38
-
 39
39
-
 40
40
-
 41
41
-
 42
42
-
 43
43
-
 44
44
-
 45
45
-
 46
46
-
 47
47
-
 48
48
-
 49
49
-
 50
50
-
 51
51
-
 52
52
-
 53
53
-
 54
54
-
 55
55
-
 56
56
-
 57
57
-
 58
58
-
 59
59
-
 60
60
-
 61
61
-
 62
62
-
 63
63
-
 64
64
-
 65
65
-
 66
66
-
 67
67
-
 68
68
-
 69
69
-
 70
70
-
 71
71
-
 72
72


Ask a question and I''ll find the answer in the document
Finding information in a document is now easier with AI
in other languages
- français: Brandt EFM301E Le manuel du propriétaire
- Deutsch: Brandt EFM301E Bedienungsanleitung
- Nederlands: Brandt EFM301E de handleiding
- dansk: Brandt EFM301E Brugervejledning
Related papers
Other documents
-
Groupe Brandt PERFEC200 Owner's manual
-
Candy GO DV 38 User manual
-
Whirlpool AQC9 6F7 TM1 (EU) User guide
-
Hoover HNV375-S User manual
-
-
-
-
Candy EVOV 580NC-S User manual
-
Candy CDV 660 User manual
-