Page is loading ...

Fire HSEF FM Europe
Diesel-powered firefighting system
Installation and operating instructions
GRUNDFOS INSTRUCTIONS

English (GB)
2
English (GB) Installation and operating instructions
Original installation and operating instructions.
CONTENTS
Page
1. General warning
1. General warning
2
2. Symbols used in this document
3
3. General information
3
3.1 Further documentation
3
3.2 Warranty
3
3.3 Receipt of product
3
4. Product description
4
4.1 Pumped liquids
4
4.2 Applications
4
4.3 Pump set
4
4.4 Pump
6
4.5 Engine
6
5. Identification
6
5.1 Pump
6
5.2 Pump set
6
5.3 Type key
7
6. Mechanical installation
8
6.1 Pump set location
8
6.2 Foundation
9
6.3 Mounting the pump set
10
6.4 Alignment
10
6.5 Pipe connection
11
6.6 Priming tank and test pipe
11
6.7 Connecting the cooling system
12
6.8 Exhaust system
12
6.9 Separate fuel tank
13
6.10 Separate control cabinet
14
6.11 Mechanical fuel level indicator
14
6.12 Fuel hand pump
14
6.13 Leaklines
14
7. Electrical installation
15
7.1 Mains
15
7.2 Connection to earth
15
7.3 Connection to battery
15
8. Commissioning
16
8.1 Overview of a firefighting application
16
8.2 Preparations before commissioning
17
8.3 Starting the pump set
18
8.4 Checking the function
18
9. Operating the controller
18
9.1 Shaft seal run-in (stuffing box)
18
10. Operation
19
10.1 Alarm indicators
19
10.2 Automatic operation
19
10.3 Manual operation
19
10.4 Emergency operation
19
10.5 Weekly test run
19
11. Shutdown
19
12. Maintenance
19
12.1 Preparation before maintenance
20
12.2 Maintenance interval
20
12.3 Pump set
20
12.4 Shaft seal
20
12.5 Bearings
20
12.6 Fuel filters
20
12.7 Battery
20
12.8 Diesel engine
21
12.9 Coupling
21
12.10 Controller
21
13. Fault finding
22
13.1 Pump set with diesel engine
22
14. Service, accessories, spare parts
23
15. Technical data
24
15.1 Pump set
24
15.2 Sound pressure level
24
15.3 Pump
24
15.4 Battery
24
15.5 Maximum operating pressure
25
15.6 Minimum inlet pressure
25
15.7 Maximum inlet pressure
25
15.8 Minimum flow rate
25
15.9 Pump speed
25
15.10 Direction of rotation
25
15.11 Liquid and ambient temperature
25
15.12 Relative air humidity
25
15.13 Effect of ambient temperature and altitude on engine
output
26
16. Disposal
26
Warning
Prior to installation, read these installation and
operating instructions. Installation and operation
must comply with local regulations and accepted
codes of good practice.
Warning
The use of this product requires experience with and
knowledge of the product.
Persons with reduced physical, sensory or mental
capabilities must not use this product, unless they
are under supervision or have been instructed in the
use of the product by a person responsible for their
safety.
Children must not use or play with this product.

English (GB)
3
2. Symbols used in this document
The instructions below placed on the fire pump set must be
observed and must be legible at all times:
• direction of rotation arrow
• labelling of pipe connections
• stickers with safety instructions.
3. General information
These installation and operating instructions apply to HSEF
pumps approved by FM in accordance with:
• FM class 1311.
Furthermore these installation and operating instructions apply to
fire pump sets in accordance with the following standard:
•NFPA 20.
• FM data sheet 3-7.
The document includes the basic information needed for
operating the complete pump set and the diesel engine.
See also installation and operating instructions for the controller,
engine and coupling.
3.1 Further documentation
This document is to be used together with the following
documentation:
• installation and operating instructions for the controller
• installation and operating instructions for the engine
• installation and operating instructions for the coupling
• wiring diagram for the controller
• installation and operating instructions for the pressure
transmitter
• service instructions for individual components
• data booklet for pump sets
• data booklet for engine.
3.2 Warranty
The warranty is according to our general terms of delivery.
Liability for any damage which is a result of errors during
installation, electrical connection or incorrect use is excluded.
Liability for consequential damage is excluded. The start of the
warranty period is to be verified.
3.2.1 Engine warranty
In order to ensure that warranty issues can be handled correctly,
every engine needs to be registered at the manufacturer’s
website.
1. Go to http://www.clarkefire.com/.
2. Choose category "SERVICE, PARTS & WARRANTY".
3. Choose "Warranty".
4. Choose between two categories: either "Clarke/John Deere
Online Warranty Registration" or "Other Engine Manufacturers
Online Warranty Registration" depending on the manufacturer
of the engine. You find the name of the manufacturer on the
nameplate of the engine.
5. Fill out the form.
6. Submit the registration. When the registration is completed
successfully, you will receive an acknowledgement.
3.3 Receipt of product
The pump set is delivered from factory in a wooden crate or in a
closed box made of wood/plywood designed for transportation
with forklift or a similar vehicle.
Warning
If these safety instructions are not observed, it may
result in personal injury.
Warning
If these instructions are not observed, it may lead to
electric shock with consequent risk of serious
personal injury or death.
Warning
The surface of the product may be so hot that it may
cause burns or personal injury.
Warning
The sound pressure level is so high that hearing
protection must be used.
Caution
If these safety instructions are not observed, it may
result in malfunction or damage to the equipment.
Note
Notes or instructions that make the job easier and
ensure safe operation.
Note
Check the pump set carefully for transport damage
and missing parts on delivery. Transport and store it
correctly before installation.

English (GB)
4
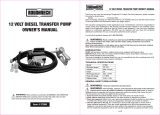
3.3.1 Lifting the pump set
Fig. 1 Lifting the complete pump set
3.3.2 Storage
3.3.3 Pump
Apply a suitable antirust agent on all machined, non-coated
surfaces. If the pump is to be stored for more than six months
before startup, treat the inner pump components with a suitable
antirust agent.
The antirust agent must meet these requirements:
• It must not attack rubber parts.
• It must be easy to remove.
• It must be applied in accordance with the manufacturer's
instructions.
In order to prevent water, dust, etc. from penetrating the pump,
cover all openings appropriately until the pipes are installed.
If this is not followed, it will be very expensive to dismantle the
pump to remove foreign bodies after commissioning.
Turn the pump shaft by hand once a month to prevent the shaft
seal from seizing up. To do this, disconnect the diesel engine
from the pump.
3.3.4 Engine
See the installation and operating instructions for the engine.
3.3.5 Coupling
See the installation and operating instructions for the coupling.
3.3.6 Controller
See the installation and operating instructions for the controller.
4. Product description
4.1 Pumped liquids
The pump is suitable for pumping clean and non-aggressive fire-
extinguishing water not containing additives or particles.
4.2 Applications
Grundfos HSEF pumps and Fire HSEF pump sets are designed
for firefighting applications for supplying water to hose reels, fire
hydrants or sprinkler systems. Do not use the pump sets for
ordinary pumping of liquids or pressure boosting.
The control cabinet must not be used to supply voltage to other
devices.
4.3 Pump set
The complete pump set consists of a pump, a diesel engine and a
controller. A flexible coupling connects engine and pump.
All components are adapted to each other and mounted on a
common base frame ready for installation. The base frame has
holes for fastening lifting equipment and holes for attaching it to
the floor. The pump set is delivered ready to use.
The fuel tank can be delivered separately in some options.
For installation and connection of fuel pipes, see section
6.9 Separate fuel tank.
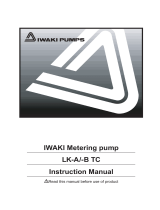
The most important components of the pump set are shown in
figures 2 and 3.
Warning
When lifting the entire pump set, use the lifting eyes
specifically marked on the base frame. Never use the
lifting eyes of the individual components.
The lifting point should always be above the centre of
gravity of the pump set. See fig. 1. Alternatively, a
forklift suitable for the weight can be used.
Use certified and approved lifting equipment in
proper condition. See the weight specification on the
system nameplate located on the base frame near
the pump.
Only transport the pump set when the cabinet door is
closed and locked. Otherwise, there is a risk of
jamming.
Do not stand under or near the fire pump set during
lifting. When guidance needed for placing the pump
set; use wires - do not touch the pump set.
TM06 2425 4214
Note
Store the pump set in a frost-free place in order to
avoid corrosion and damage.
Warning
Only use the pumps and pump sets for the
applications mentioned. Any other use is considered
improper. Grundfos cannot be held responsible for
damage caused by improper use. The risk is carried
solely by the operator.

English (GB)
5
Fig. 2 Example of a diesel-powered Fire HSEF pump set, right view
Fig. 3 Example of a diesel-powered Fire HSEF pump set, left view
TM06 2493 4314
15 23 22 19 24 16 17
71226
27
6
8
9
20
10
18
TM06 2536 4414
232011413 5
1142521
Pos. Component Pos. Component
1 Base frame 15 Generator with V-belt and cover
2 Pump 16 Starter
3 Coupling with coupling guard 17 Starter relay
4 Engine, complete 18 Starter batteries
5 Controller 19 Diesel injection pump
6 Fuel tank 20 Fuel filter
7 Tank cap 21 Fuel delivery pump
8 Manual filling pump 22 Speed setting
9 Fuel valve (hidden) 23 Stop lever
10 Drain screw on fuel tank (hidden) 24 Oil dipstick
11 Exhaust pipe 25 Oil filter
12 Heat exchanger 26 Air filter
13 Equalisation tank 27 Automatic air relief valve
14 Cooling circuit

English (GB)
6
4.4 Pump
The pump is a non-self-priming, single-stage Grundfos HSEF
standard pump with volute casing. It has an radial suction port
and a radial discharge port with ANSI B 16.5 compliant flanges.
For technical data see page 24 chapter 15.3.1 Permissible flange
forces and flange torques.
The impeller diameter can be reduced to customise the pump
performance to a certain duty point. This means that the actual
impeller diameter differs from the standard diameter stated in
sales catalogues, data sheets, etc. The actual impeller diameter
is stated on the pump nameplate.
The HSEF pump is equipped with a stuffing box seal.
4.5 Engine
The pumps are driven by a stationary 4-stroke diesel engine from
John Deere or Doosan which has been specially adjusted to the
pump drive requirements of Clarke UK Ltd.
The rated engine power is adapted to the power requirement of
the pumps. The adjustment is made via the engine speed and
consequently this must not be changed. See appendix page 27
and section 1. Dimensions and weights for relationship between
the diesel engines and the individual pumps. Depending on
performance, the engines have a turbocharger and, if necessary,
also a charge air cooler.
The engine is cooled via a heat exchanger in the water-cooled
John Deere and Doosan engines. The coolant is led to the heat
exchanger via a pipe connected to the discharge port of the
pump.
5. Identification
5.1 Pump
5.1.1 Nameplate
The nameplate shows all important data of the pump. It is
attached to top of the pump.
Fig. 4 Nameplate of a HSEF pump with FM approval
5.2 Pump set
5.2.1 Nameplate
The nameplate shows all important data of the pump set. It is
attached to the base frame.
Fig. 5 Nameplate of an FM pump set
Caution
The fuel injection pump has been set from factory,
and the setting must not be changed.
TM06 2428 4214
Pos. Description
1 Pump type and model
2 Number of stages
3 Actual impeller diameter [mm]
4 Serial number
5 Rated flow Q [l/min]
6 Rated head H [m]
7 Rated speed n [rpm]
8 Head at 150 % flow [m]
9 Maximum operating pressure [bar]
10 Maximum pump power [kW]
11 Maximum suction pressure [bar]
12 Manufacturer
13 Approval
CENTRIFUGAL FIRE PUMP
HORIZONTAL SPLIT - CASE
IMP.DIA SERIALMODEL STAGE
RATED CAPACITY RATED PRESSURE RATED APM
MAX. POWER MAX. SUCTION
PRESSURE
150% PRESSURE MAX. PRESSURE
4
3213
5
8
9
1
7
10
6
11
12
TM06 1943 5014
Pos. Description
1 Type designation
2 Product number
3 Serial number
4 Engine type
5 Impeller diameter [mm]
6 Rated flow rate Q [m
3
/h]
7 Head H [m]
8 Rated engine power P2 [kW]
9 Rated speed n [min
-1
]
10 Weight [kg]
11 Country of origin
12 Production date (year and week)
13 CE mark
14 Manufacturer
FIRE FIGHTING SYSTEM
Description:
Product number:
Main supply:
Impeller diameter:
Made in Germany - P1
Q:
P
2
:kW
Week(yy.ww):
H:
n:
W:
m
kg
Serial number:
m /h
mm
Barcode:
min
-1
3
PN
Grundfos Pumpenfabrik GmbH Willy - Pelz - StraBe 1.5 23812 Wahlstedt GERMANY
1
2
4
5
6
8
11
13
3
7
9
10
12
14

English (GB)
7
5.3 Type key
The example shows an FM compliant Fire HSEF 4-12 pump set
with the following components:
• Nominal diameter of discharge port of 4 inch.
• Pump housing size of 12 inch.
• Actual impeller diameter of 265 mm.
• Driver type is a diesel engine.
• Diver brand is a Clarke JU4H.
• FM approved and according to NFPA 20.
• Class: low spec.
• Shaft seal: Stuffing box.
• Pipe connection: ANSI flange according to ANSI B 16.5
pipework connection.
• Design: compact.
• Coupling: compact coupling.
Example Fire HSE F 4 -12 /265 D C A L S A C C
Grundfos firefighting systems
Pump type
Pump for firefighting
Nominal diameter of discharge port [inch]
Pump housing size [inch]
Actual impeller diameter [mm]
Driver type
D: Diesel engine
E: Electric motor, 50 Hz
F: Electric motor, 60 Hz
Driver brand, diesel-powered
C: Clarke JU4H
D: Clarke JU6H
E: Clarke DP6H
F: Clarke DQ6H
G: Clarke DR8H
L: Clarke LC2A
M: Clarke LC3A
N: Clarke JW6H
O: Other
Driver brand, electric-powered
H: Hoyer
S: Siemens
O: Other
Approval/standard
A: FM approved and according to NFPA-20
B: FM/UL listed and according to NFPA-20
C: LPCB listed and according to BS EN 12845
D: CNBOP approved and according to VdS CEA 4001
E: Non-listed and according to VdS CEA 4001
F: Non-listed and according to NFPA-20
G: Non-listed and according to CEA 4001
H: Non-listed and according to EN 12845
I: APSAD referenced and according to NEF 12845
J: Non listed and according to DBI 251 4001
K: Non-listed and according nothing
S: Customized systems
Class
H: High spec
L: Low spec
N: None
Shaft seal
A: BAQE
S: Stuffing box
Pipe connection
A: ANSI flange according to ANSI B 16.5
D: DIN Flange according to EN 1092-2
Design
Pump set with diesel engine
C: Compact (all components on a common base frame)
F: Flex (controller and tank delivered separately)
B: Flex B (fuel tank delivered separately)
V: VdS DACH (according to German environmental standard)
Pump set with electric motor
B: Basic (without controller)
C: Compact (all components on a common base frame)
F: Flex (controller delivered separately)
Coupling
C: Compact coupling
S: Spacer coupling

English (GB)
8
6. Mechanical installation
This section describes the installation of a complete pump set.
6.1 Pump set location
Place the pump set in a dry, frost-free, well-illuminated and well-
ventilated location. The pump set, primarily the control cabinet,
must not be exposed to direct sunlight.
Allow sufficient clearance around pump and engine to enable
maintenance and operation.
6.1.1 Ventilation
For optimum room ventilation, the air supply ventilator and air
discharge must be located on opposite walls. The pump room
temperature must be minimum 10 °C.
Ventilation must be provided for the following functions:
1. To control the maximum temperature to 25 °C at the engine air
filter inlet with the engine running at rated load.
2. To supply air for engine combustion.
3. To ensure adequate cooling for air-cooled engines.
4. To remove any hazardous vapour.
5. To ensure sufficient oxygen in the breathing air.
Water-cooled engine
You can use the following as a rule of thumb when removing
radiated heat from the engine.
Minimum air flow through the pump room:
– 0.1 m
3
/min per kW of engine gross power
For further information, see the installation and operating
instructions for the engine.
Fig. 6 Ventilation of the pump room
Install louvres on-site that open as soon as the engine starts.
The louvres must be dimensioned according to NFPA 20. This will
ensure an adequate amount of fresh air to remove engine heat
and combustion from the room.
Warning
You must not disconnect any parts of the entire pump
set without guidance by Grundfos Service.
Warning
Use personal protective equipment when carrying
out commissioning, maintenance and test in order to
prevent or minimise the risk of personal injury if other
measures cannot be taken.
Such equipment must comply with the requirements
specified by the main contractor or operator of the
operations room or the site in question.
Minimum requirements are well-fitting clothing,
protective gloves, hearing protection, safety goggles
and safety shoes.
Caution
The installation should be carried out by qualified
staff in accordance with the following instructions.
Note
Observe also the instructions in the standards
applying to this product.
Warning
Pump set with diesel engine:
Ensure an adequate supply of air for the combustion
engine and an adequate removal of heat and
exhaust.
Non-compliance or impairment of the ventilation or
exhaust system may result in suffocation of people.
Lubricants, fuels or other highly volatile or
combustible materials must not be stored near the
diesel engine. Such materials must be stored in a
suitable, separate room.
Warning
The area around the pump set must be cleaned and
cleared to avoid personal injury due to slipping and
falling.
TM06 2469 4214

English (GB)
9
6.2 Foundation
We recommend that you install the pump set on a concrete
foundation which is heavy enough to provide permanent and rigid
support for the entire pump.
Fig. 7 Installation example
The foundation must be capable of absorbing any vibration,
normal strain or shock.
As a rule of thumb, the weight of the concrete foundation should
be 1.5 times the weight of the pump set. The concrete foundation
must have an absolutely level and even surface. In the
foundation, install appropriate anchorage dowels to fasten the
pump set.
Figure 8 shows how to construct the foundation of the pump set.
When setting up the foundation, make sure that the foundation is
100 mm (dimension x) larger in length and width than the
dimensions of the base frame.
Fig. 8 Foundation dimensions
The minimum height of the foundation (h
f
) can be calculated as
follows, if the mass of the foundation is assumed to be 1.5 times
the total mass of the pump set:
The density (ρ) of the foundation is usually taken as 2200 kg/m
3
.
In installations where noiseless operation is particularly
important, we recommend that you use a foundation with a mass
of up to five times that of the pump set. The minimum height of
the foundation (h
f
) can then be calculated:
As ordinary concrete does not set shrink-freely, the resulting gap
must be grouted with a suitable, shrink-free hardening and high-
strength or reinforced undercast (i.e. Pagel V1 or Eurogrout
Premium) to have a force-fit connection between the base frame
and the foundation. Before grouting the undercast, align the
pump set by means of the adjusting screws used for the base
frame. See fig. 9.
Fig. 9 Aligning the pump set
For grouting the undercast, make a shuttering on the raw
foundation. Mix the grouting compound according to the
manufacturer instructions and pour it into the shuttering.
Wait until the specified hardening time has past before fixing the
pump set on the foundation by means of anchor bolts. Anchor
bolts are available as an accessory (P/N 97947677).
Note
The instructions in this section are
recommendations. The plant and machinery installer
is responsible for making a correct foundation.
TM06 1864 3314
TM06 2421 4214
h
f
B
f
L
f
x
x
h
f
=
m
system
x 1.5
L
f
x B
f
x ρ
concrete
h
f
=
m
system
x 5
L
f
x B
f
x ρ
concrete
TM05 2547 0212
Caution
Do not use an installation on stud bolts in connection
with additional grouting of concrete. The reason is
that the volume of the concrete shrinks resulting in a
gap between base frame and concrete. The gap will
persist even if the pump set is fixed by means of stud
bolts later on. This will lead to increased vibrations
during operation.
Undercast.
Height as required
or as specified by
the manufacturer
Anchor bolt
Rough foundation.
Determine the height at site.
Foot
Adjusting screw
Min. 130
Min. 100
Base frame

English (GB)
10
6.3 Mounting the pump set
Place the pump set on the foundation and secure it with anchor
bolts. The entire base frame must be supported. See fig. 10 and
fig. 11.
Fig. 10 Correct installation
Fig. 11 Incorrect installation
6.4 Alignment
When a complete pump set comes pre-assembled from the
factory, the coupling has been accurately aligned by means of
shims inserted under the pump and engine.
During transport and installation, the pump/driver alignment may
have been affected. Therefore always check the alignment when
the pump set has been installed.
Check the final alignment when the pump has obtained its
operating temperature under normal operating conditions.
6.4.1 Pump with diesel engine
A flexible coupling connects engine and pump. See fig. 12.
Fig. 12 Flexible coupling between pump and engine
The coupling is fixed axially on the engine fly-wheel. The pump
shaft is pushed on axially and fixed radially with four screws.
See fig. 13. For further information, see the installation and
operating instructions for the coupling.
Fig. 13 Connection of pump/engine
Warning
Lift the pump set by means of the lifting eyes of the
base frame. Never use the lifting eyes of the
individual components.
Use only suitable lifting equipment in proper
condition. See also the weight specifications on the
nameplate.
Only transport the pump set when the cabinet door is
closed and locked.
Warning
The permissible floor loading must not be exceeded.
The weight of the pump set is stated on the
nameplate
TM06 2419 4214TM06 2420 4214
Caution
Careful alignment is important for a long service life
of the coupling. This is particularly important at
increased engine speed. Follow the instructions of
the coupling manufacturer.
Note
The alignment should be made before connecting the
pipes; if not, it may not be possible to move the
pump, and it will be difficult to move the driver.
TM03 7776 4906TM03 7777 4906
A
A
A-A
Z
Z

English (GB)
11
Checking the alignment
1. Disconnect the negative pole of the starter battery.
2. Remove the coupling guard.
3. Check the alignment according to the installation and
operating instructions for the coupling.
4. Refit the coupling guard.
5. Reconnect the negative pole of the starter battery.
Aligning pump and engine
Fig. 14 Axial and radial fixation of the clamping hub of the
coupling
6. Align the coupling according to the installation and operating
instructions for the coupling.
6.5 Pipe connection
The pipes must be installed as straight as possible and be of an
adequate size. Take the pump inlet pressure into consideration.
Install the pipes so that air locks are avoided. This applies
especially to the suction side of the pump. See fig. 15.
Fig. 15 Installation of pipes
Secure the pipes close to the pump on the suction and discharge
side with pipe brackets attached to the building (wall, ceiling,
floor). See fig. 16.
The pipes should lie true against the pump flanges without being
stressed. Otherwise, the pump may be damaged.
Fig. 16 Fixing points of the pipes
Install isolating valves on both sides of the pump.
Connect the suction pipe to suction pump port and the discharge
pipe to the discharge pump port.
6.6 Priming tank and test pipe
If the pump set is supplied from a storage tank and the suction
height is negative, install a pump priming tank on the suction side
in accordance with local regulations. See also the standard
applying to the pump set.
Install a test pipe running from the discharge pipe to the storage
tank. The discharge pipe and the test pipe must be fitted with
isolating valves.
If the pump set is fed directly from the public water supply, the
test pipe must have a free outlet according to the standard
applying to the pump set.
Warning
Disconnect the battery cable before you remove the
coupling guard.
Beware of the sharp edges of the coupling guard.
Wear protective gloves.
Caution
Axial and radial screws can be reused maximum
three times.
Do not use threadlocker as it may damage the rubber
material.
TM04 0058 4907
Warning
After checking or adjusting the alignment, fit the
coupling guard.
1425 3
Caution
The pipework must not stress the pump housing or
transfer any forces to the pump housing.
See permissible flange forces and torques in section
15.3 Pump.
Note
The discharge pipe must have a port for venting and
priming the pump. See section 8.2 Preparations
before commissioning.
TM00 2263 3393TM06 1864 3314
Discharge pipe
Suction pipe

English (GB)
12
6.7 Connecting the cooling system
Water-cooled diesel engines are cooled by a flow of water
through a pipe connected to the heat exchanger via a cooling
circuit.
The cooling circuit consists of the pipework with both a main pipe
and a bypass pipe, isolating valves, pressure reduction valves,
filters, a pressure gauge as well as a solenoid valve.
See figs. 17 and 18.
Fig. 17 Cooling circuit with bypass
Install a pipe on the discharge side of the heat exchanger.
See fig. 18. The nominal diameter of the pipe must not be smaller
than the outlet of the heat exchanger (1 1/4" or 1 1/2").
Fig. 18 Heat exchanger with flow switch
6.7.1 Minimum pressure
To ensure correct cooling of the motor, there must be the below-
mentioned pressure after the dirt trap.
6.7.2 Filter in cooling circuit
The isolating valves in the bypass pipework are closed during
normal operation. Only open the valves if the filter in the main
pipe is fouled and thus keeps the cooling water from cooling the
motor. A fouled filter will result in lack of pressure on the pressure
gauge.
6.8 Exhaust system
Install the exhaust pipes as straight and with as few bends as
possible. Install the supplied silencer horizontally after the first
90 °-bend seen from the engine outlet.
Arrange the exhaust system so that no condensation water can
enter the engine. Attach the exhaust system to the building.
Connect the exhaust pipe to the flexible exhaust port of the
engine. The exhaust port is covered for transportation by a plastic
plug which must be removed before connecting the exhaust pipe.
See arrow in fig. 19. The flexible connection on the engine must
not be used to compensate for misaligned pipework.
The minimum diameter of the exhaust pipes must not be smaller
than the exhaust port of the engine.
Fig. 19 Exhaust port of the engine
TM06 2496 4313TM06 2490 4313
Type
Pressure
[bar]
Cooling water returned to storage tank 2.0
Note
This section applies to pump sets with diesel engine.
Warning
Exhaust must be directed safely to the open air
through the exhaust system.
Exhaust must not escape indoors. Operation without
an exhaust system is not safe.
Warning
Make sure that persons cannot accidentally come
into contact with hot exhaust pipes.
Warning
When welding the engine exhaust pipe to the main
exhaust pipe wear, use the following: protective
gloves, protective clothes suitable for the work, an
approved safety helmet for welding and safety
shoes.
Warning
The exhaust flange seal must be mounted and the
flange must be tightened to 220 Nm.
Retighten all flange bolts after commissioning and
cooling down
Note
The diameter of the exhaust pipes depends on the
pipe length, the type and number of silencers and the
bends, as all will affect the flow resistance. In order
not to exceed the exhaust counterpressure specified
by the manufacturer of the diesel engine, it may be
necessary to use pipes with a nominal diameter one
or two sizes larger than the engine outlet.
TM06 2494 4314
Note
The exhaust port is installed with ANSI B 16.5
exhaust flanges

English (GB)
13
6.9 Separate fuel tank
You can also install the fuel tank separately in some designs.
In these cases, install the fuel tank in a dry and well-ventilated
room and as close as possible to the pump set.
6.9.1 Fuel tank installation
The fuel tank outlet must be placed higher than the centerline of
the high pressure fuel pump at the engine. The two separate
concrete foundations must be in same level h1 = h2.
Placing the pump set (1) and fuel tank (2) at the same level
ensures gravity supported feeding of fuel to the high pressure fuel
pump at the engine. See fig. 20.
The fuel tank must be fastened to the foundation with the
mounting brackets.
Fig. 20 Example, correct installation of fuel tank.
Note
Observe the standards when sizing and installing a
separate fuel tank.
Caution
Warning
Make sure that the base of the fuel tank is installed at
the same level as the pump and engine base frame.
TM06 2777 4614
h1
h2
1
2

English (GB)
14
6.9.2 Fuel tank connection
If there is no connecting block, connect the fuel pipes as shown in
fig. 21 to the flow pipe (pos. A, from the manual fuel supply pump)
and the return pipe (pos. B, from the injection pump).
Fig. 21 Connecting the fuel pipes without connecting block.
If there is a connecting block (see fig. 21, pos. A), connect both
fuel pipes to the connecting block. The connecting block is
marked "SUPPLY" for the incoming pipe and "RETURN" for the
return pipe.
Fig. 22 Connecting the fuel pipes to the connecting block
6.10 Separate control cabinet
6.10.1 Flex version
For the "Flex" version, the control cabinet is mounted onto the
separate fuel tank. In this case, place the controller as close to
the pump as possible and within view of the pump set.
The control cabinet must also be easily accessible.
6.10.2 Flex B version
For the "Flex B" version, the control cabinet is delivered on a
separate stand. In this case, place the controller as close to the
pump as possible and within view of the pump set. The control
cabinet must also be easily accessible.
6.11 Mechanical fuel level indicator
Upon arrival of the fire set, the mechanical fuel level indicator is
not pre-installed. The fuel level indicator is stored in the base
frame.
Fig. 23 Fuel level indicator
Installing the fuel level indicator
1. Remove the plastic cap from the connection on the top of the
fuel tank.
2. Adjust the indicator disc on the display to equal 100 when the
weight is in top.
3. Install the mechanical fuel level indicator. Ensure that the
display is facing the same direction as the controller.
6.12 Fuel hand pump
The pump set is equipped with a fuel hand pump. See fig. 2.
Use the fuel hand pump to manually pump diesel fuel from
transportable containers into the fuel tank. The fuel hand pump is
designed for this purpose only. Fuel most not remain in the plastic
hoses. The plastic hoses are supplied together with the fuel hand
pump.
6.13 Leaklines
The Fire HSEF pump is equipped with leaklines. The leaklines
drains excessive water from the stuffing box. The leaklines must
be connected to drain. See fig. 24.
Fig. 24 Leakline
TM04 9851 0211TM04 5069 2609
Note
See also installation and operating instructions for
the controller.
Caution
Warning
Make sure that water escaping from the pump or
pipework cannot damage the control cabinet.
The control cabinet is only intended to be installed
indoors and must not be exposed to direct sunlight.
Ensure sufficient ventilation for the components in
the control cabinet.
Caution
Install the fuel level indicator before filling the tank.
TM06 1196 1914TM06 2492 4314
Fuel level indicator
Leakline

English (GB)
15
7. Electrical installation
7.1 Mains
Check that the supply voltage and frequency correspond to the
values stated on the nameplate of the control cabinet.
• Connect the control cabinet to a power supply which is
dimensioned to the fire pump set.
• Connect PE (protective earth) according to the installation and
operating instructions for the controller.
7.2 Connection to earth
The pump set must be connected to the main earth connection in
the electrical installation. The connection point is located in the
right lower corner of the base frame. See fig. 25, pos. 1.
• Loosen and remove the nut and spring washer.
• Mount an earth cable between the earth rod in the pump room
and the pump set.
• Mount the spring washer and nut.
• Tighten to 25 Nm.
Fig. 25 Earth connection
7.3 Connection to battery
12 V version
1. Connect the positive pole of battery 1.
2. Connect the negative pole of battery 1.
The positive pole is marked with red and the negative pole with
black. Proceed in the same way with battery 2. See fig. 26.
Fig. 26 Connecting the batteries (12 V version)
24 V version
One battery set consists of two batteries connected in series at
the factory.
1. Connect the positive pole of battery set 1.
2. Connect the negative pole of battery set 1.
The positive pole is marked with red and the negative pole with
black. Proceed in the same way with battery set 2. See fig. 27.
Fig. 27 Connecting the battery sets (24 V version)
Warning
The electrical installation must be carried out by
authorised staff in accordance with local regulations
and the wiring diagram in the control cabinet.
Warning
Switch off the power supply before making
connections.
Note
See installation and operating instructions for the
controller.
TM06 2053.3314
1
Caution
Before connecting the battery set(s), switch off the
power supply by setting the main switch to "O".
TM06 1940 3414TM06 2321 3914

English (GB)
16
8. Commissioning
The diagram in fig. 28 is used as reference.
8.1 Overview of a firefighting application
Fig. 28 Overview of a firefighting application
TM06 1523 2414
10
13
3
6
22
26
23
24
25
17
15
12
16
14
9
2
19
18
21
1
4
5
7
8
9
11
Discharge to fire protection system
Suction from
tank or city
supply
Test and
relief
piping
return to
tank
Pos. Description Pos. Description Pos. Description
1
OS&Y (outside screw and yoke)
gate valve (suction control valve)
10 Test header 19
Isolation valve (jockey pump
suction)
2 Eccentric reducer 11
Indicating gate valve or butterfly
valve (discharge control valve)
20
Check valve (jockey pump
discharge), not displayed
3 Suction pressure gauge 12 Flowmeter 21
Isolation valve (jockey pump
discharge)
4 Discharge pressure gauge 13
Indicating gate valve or butterfly
valve (flowmeter)
22 Check valve (FDC)
5 Automatic air release 14 Pump controller 23 Fire department connection
6 Pressure relief valve 15
Pressure maintenance pump
controller (jockey pump)
24 Diesel fuel tank
7 Relief cone 16 Pressure sensing line (fire pump) 25 Diesel drive exhaust silencer
8 Check valve (pump discharge) 17
Pressure sensing line (jockey
pump)
26 Batteries
9
Indicating gate valve or butterfly
valve (test header)
18
Pressure maintenance pump
(jockey pump)

English (GB)
17
8.2 Preparations before commissioning
The below listed preparation actions are valid for applications
with flooded suction conditions.
1. Check that all screws are tight.
2. Check that all pipes and hoses are installed correctly.
3. Check all electrical connections.
4. Check that all fuses in the control cabinet are switched on.
5. Check the alignment of the coupling. See section
6.4 Alignment.
6. Check that the coupling guard is installed correctly and that all
screws are tightened to 10 Nm for M6 and 25 Nm for M8.
7. Check that all safety devices are installed.
8. Make sure that any storage tank and pump priming tank are
filled with water.
9. Set the pressure switches according to the instructions.
System pressure minus 0.5 bar can be used as a reference
value.
10. Open the isolating valves on the suction and discharge sides.
The static geometric suction pressure from the main water
tank will fill the suction pipe, discharge pipe and pump with
water.
11. Bleed all air from the pump casing and suction pipe by the
opening of the automatic relief valve at the top of the pump.
Rotate the shaft a few times if possible to evacuate any air
trapped inside the impeller passages.
12. Close the isolating valves on the suction and discharge sides.
Fig. 29 Air relief valve
8.2.1 Pump set with diesel engine
1. Check the V-belt tension.
2. Check the oil level and refill, if necessary.
3. Check the level of coolant and refill, if necessary.
4. Check that all hose connections in the cooling circuit are tight
and leakage-free.
5. Fill the fuel tank with diesel fuel and vent the fuel pipes.
Warning
Commissioning must be carried out by authorised
staff.
Warning
The control cabinet of the controller must remain
closed during commissioning.
Caution
Do not start the pump until it has been filled with
water and vented.
Caution
The pump must not run against closed valve as this
may cause an unacceptable temperature increase or
the formation of vapour.
Note
See also installation and operating instructions for
the controller.
Caution
You must not change the engine speed setpoint
(rpm).
Note
Pump set with Clarke diesel engine:
We recommend that you register the diesel engine
before startup. Otherwise, Clarke cannot provide any
warranty if the engine is faulty. Go to
www.clarkefire.com: SERVICE, PARTS &
WARRANTY.
TM06 2491 4314
Caution
Check the level of oil and coolant in the engine prior
to startup.
Note
See installation and operating instructions for the
diesel engine.

English (GB)
18
8.3 Starting the pump set
Additional safety instructions for pump set with diesel
engine
General procedure
1. Open the isolating valve on the suction side (1).
2. Check that the isolating valve on the discharge side is closed
(11).
3. Open the isolating valve of the test pipe (9).
4. Switch on the controller (14) and start the pump.
See installation and operating instructions for the controller.
5. Slowly open the isolating valve (11) on the discharge side of
the pump.
6. When the pump reaches operating pressure, open the
isolating valve sufficiently to reach the duty point.
7. Measure and read the relevant operating parameters and
compare them with the rated values.
8. Stop the pump via the controller and set the pump set to
automatic mode. See installation and operating instructions
for the controller.
9. Close the isolating valve of the test pipe (9).
10. Check that the isolating valve at the discharge side (11) is
fully open.
The pump set is now operational and in automatic mode.
8.4 Checking the function
In connection with commissioning, perform a final test run
according to the standard applying to the pump set:
1. Activate the automatic startup command by lowering the
pressure in the discharge pipe with a closed fuel valve.
2. Lower the pressure by opening the isolating valve of the test
pipe.
Every starting cycle consists of a starting phase followed by a
pause. A failure warning activates after six failed start attempts.
When the fuel valve has been opened and the fault indication has
been removed, the pump should start properly.
9. Operating the controller
See installation and operating instructions for the controller.
9.1 Shaft seal run-in (stuffing box)
The pumped liquid lubricates the seal faces, meaning that there
will be a certain amount of leakage from the stuffing box.
When the pump is started for the first time, or when a new shaft
seal is installed, a certain run-in period is required before the
leakage is reduced to an acceptable level. The time required for
this depends on the operating conditions, i.e. every time the
operating conditions change, a new run-in period will be started.
Warning
Some pump sets have a sound pressure level higher
than 70 dB(A). See page 28.
In these cases, wear hearing protection when the
pump set is running.
Note
Observe the safety instructions in the installation and
operating instructions of the individual components.
Note
See also installation and operating instructions for
the controller and diesel engine.
Warning
Remove the fuel canisters from the room before
starting the pump set.
Warning
Fuel vapours are flammable. Do not start the engine
if there are fuel vapours in the room.
Warning
Exhaust must be directed safely to the open air
through the exhaust system.
Exhaust must not escape indoors.
Operation without an exhaust system is not safe.
Warning
The pump set must not be started without a coupling
guard.
Warning
Make sure that persons cannot accidentally come
into contact with hot exhaust pipes.
Note
Open the fuel valve on the fuel tank and vent the fuel
system. See installation and operating instructions
for the diesel engine.
Warning
Fuel escaping under pressure can penetrate the skin
and cause serious injuries. Always release the
pressure before disconnecting the fuel pipes.
Repressurise when the pipes have been tightened.
Warning
When the pump set is primed, pressurized and the
engine is started, check the pump set for any kind of
leakage of oil, water or fuel.
Warning
When the engine is started, check for exhaust
leakage and abnormal noise level.
Stop the engine immediately if the exhaust system is
leaking.
Note
Collect excess fuel in a container and dispose of it in
accordance with local regulations.
Note
If the pump does not start, see the fault indications
on the controller and section 13. Fault finding.
Note
This section applies to pump sets with diesel engine.

English (GB)
19
10. Operation
Detailed operation instructions are described in the installation
and operating instructions for the controller.
10.1 Alarm indicators
The most important operating and alarm indications are shown
via indicator lights and/or the display of the controller.
See installation and operating instructions for the controller.
If the controller has outputs for connection to a building
management system, you can monitor the pump set remotely.
To remove any faults, see section 13. Fault finding.
The following four operating modes are possible:
10.2 Automatic operation
Once you have installed and commissioned the pump set
according to the instructions, no further operation is necessary.
The pump set works automatically and switches itself on as soon
as water is taken from the sprinkler system and the pressure
switch thus detects a pressure drop.
You can stop the pump set manually via the controller.
10.3 Manual operation
You can also start and stop the pump set manually for a
functional test, for restarting or after service work.
10.4 Emergency operation
If the diesel engine does not start up in automatic operation after
six start attempts, the automatic operation is blocked. You can
start the pump set manually via the controller.
10.5 Weekly test run
Test the function of the pump set during a test run. See the
standard applying to the pump set.
11. Shutdown
1. Close the isolating valve on the discharge side.
2. Close the isolating valve on the suction side.
3. Switch off the power supply via the controller.
Additional procedure for pump set with diesel engine
1. Close the fuel valve on the fuel tank.
2. Disconnect the positive pole first and then the negative pole of
the batteries.
We recommend that you drain the fuel into a suitable container.
12. Maintenance
Note
Observe the safety instructions in section
8. Commissioning and its subsections, as well as in
the installation and operating instructions for the
individual components.
Note
See also installation and operating instructions for
the controller and diesel engine.
Note
The pump set will not be shut down in case of
disruptions.
Caution
Do not leave the pump room during manual
operation. Observe all operating and fault indications
as the pump set will not stop automatically in case of
fault (e.g. too high cooling water temperature or too
low oil pressure).
Note
This function is only available for pump sets with
diesel engine.
Caution
Do not leave the pump room during manual
operation. Observe all operating and fault indications
as the pump set will not stop automatically in case of
fault (e.g. too high cooling water temperature or too
low oil pressure).
Note
This section applies to the complete pump set. See
also installation and operating instructions for the
controller and diesel engine.
Note
Shut down is only possible when the pump is not
running. If the pump is running, stop it via the
controller.
Warning
Maintenance must be carried out by authorised staff.
Warning
Personal protective equipment must be used when
carrying out commissioning, maintenance and test in
order to prevent risk of personal injury if other
measures cannot be taken.
Such equipment must comply with the requirements
specified by the main contractor or operator of the
operations room or the site in question.
Minimum requirements are well-fitting clothing,
protective gloves, hearing protection, safety goggles
and safety shoes.
Warning
Make sure that persons cannot accidentally come
into contact with hot surfaces, liquids or exhaust
pipes.
Note
The operator is responsible for ensuring that all
maintenance, inspection and installation work is
performed by qualified staff according to local
regulations and the standard applying to the pump
set. A regular maintenance plan will help avoid
expensive repairs and contribute to trouble-free,
reliable operation.
Warning
Before starting work on the pump set, make sure that
the pump set has been switched off and cannot be
accidentally switched on.
Note
Observe local regulations, the standard applying to
the pump set and the installation and operating
instructions of the individual components.
Note
See also installation and operating instructions for
the controller and diesel engine.

English (GB)
20
12.1 Preparation before maintenance
1. Close the isolating valve on the discharge side.
2. Close the isolating valve on the suction side.
3. Switch off the power supply via the controller.
Additional procedure for pump set with diesel engine
1. Close the fuel valve on the fuel tank.
2. Disconnect the positive pole first and then the negative pole of
the batteries.
12.2 Maintenance interval
If not otherwise stated in the standard applying to the pump set or
in the installation and operating instructions of the individual
components, we recommend that you observe the following
maintenance intervals:
Complete pump set
Diesel engine
Controller
12.3 Pump set
• Check that all screws are tight and not corroded.
• Check all safety devices such as coupling guard.
• Check that all electrical connections are tight and intact.
• Replace defective cables and tighten loose connections.
• Check the alignment of the pump and driver. See section
6.4 Alignment.
• Carry out a test run according to the standard applying to the
pump set. See section 10. Operation.
12.4 Shaft seal
Mechanical shaft seals are maintenance-free and almost leak-
free. In case of considerable and increasing leakage, check the
shaft seal immediately. If the seal faces are damaged, replace the
entire shaft seal. See service instructions for the pump and
section 9.1 Shaft seal run-in (stuffing box).
12.5 Bearings
The maintenance-free bearings in the pump are permanently
lubricated.
12.6 Fuel filters
The engine fuel filter must be replaced according to the
installation and operating instructions for the engine. We
recommend that you replace the tank fuel filter at the same time.
12.7 Battery
The batteries must be dry under all operating conditions.
The liquid level in the batteries must be maintained.
The water used for filling must be distilled water.
Check the health of the battery by using a refractometer or similar
tool.
12.7.1 Battery replacement
If the battery is low on power, leaking or damaged otherwise the
battery must be replaced.
Before you replace the batteries, read the general precautions in
section 12. Maintenance must be observed.
1. Observe the position of the cables.
2. Remove the black minus cables.
3. Remove the red plus cables.
4. Carefully remove the defect battery.
5. Install the new battery.
6. Mount the two red plus cables.
7. Mount the black minus cables.
For further instructions, see section 7.3 Connection to battery.
Note
The list below is not complete. See also the standard
applying to the pump set.
Action
Weekly
Monthly
Yearly
Every two years
Check that all screws are tight x
Check safety devices x
Check electrical connections x
Check pump/driver alignment x
Carry out test run x
Check for leakages x
Action
Weekly
Monthly
Yearly
Every two years
Check fuel level in fuel tank x
Check fuel system x
Check exhaust system x
Check cooling system x
Change coolant x
Check battery condition and liquid level x
Check oil level x
Change oil and oil filter x
Replace fuel filters x
Check V-belt x
Replace V-belt x
Check air filter x
Replace air filter x
Replace batteries x
Action type
Weekly
Monthly
Yearly
Every two years
Test indicator light x
Check cables and connections x
Warning
Too low liquid level can cause overheat and
explosion.
/