Mares Icon HD Owner's manual

Category
Sport watches
Type
Owner's manual

This manual is also suitable for

Instruction Manual
Smart Air Dive Computer
2
TABLE OF CONTENTS
IMPORTANT WARNINGS 3
DISCLAIMER 3
1. INTRODUCTION 3
1.1. GLOSSARY 3
1.2. OPERATING MODES 4
1.3. USERREPLACEABLE BATTERY 4
1.4. CONNECTING SMART AIR TO A PC OR MAC 4
1.5. BUTTON OPERATION 4
1.6. WATCH DISPLAY 6
1.7. MOUNTING AND PAIRING OF THE TANK MODULE
OPTIONAL 6
2. MENUS, SETTINGS AND FUNCTIONS 7
2.1. CHRONO 7
2.2. PRE DIVE 7
2.3. MODE 7
2.4. SET 8
2.4.1. SET DIVE 9
2.4.1.1. LIGHT BACKLIGHT 9
2.4.1.2. P FACT P FACTOR 9
2.4.1.3. ALT ALTITUDE 9
2.4.1.4. WAtR WATER 9
2.4.1.5. GAS INTEGR GAS INTEGRATION 9
2.4.1.6. UNItS 10
2.4.1.7. FASt FAST ASCENT 10
2.4.1.8. ALAR ALARMS 10
2.4.1.9. ERASE ERASE DESATURATION 10
2.4.2. SET TIME 10
2.5. LOG LOGBOOK 10
2.6. PLAN DIVE PLANNER 11
2.7. PC 11
2.8. INFO 11
3. DIVING WITH SMART AIR 11
3.1. A FEW WORDS ABOUT NITROX 11
3.2. ALARMS 12
3.2.1. ASCENT RATE 12
3.2.2. MOD/PPO
2
12
3.2.3. CNS = 100% 12
3.2.4. MISSED DECOMPRESSION STOP 12
3.2.4.1. MISSED DECO STOP MODE 13
3.2.5. LOW TANK PRESSURE
IF OPTIONAL TANK MODULE IS USED 13
3.2.6. LOW BATTERY 13
3.3. DISPLAY INFORMATION 13
3.4. AFTER THE DIVE 14
3.5. DIVING WITH MORE THAN ONE GAS MIXTURE 15
3.5.1. SETTING MORE THAN ONE GAS 15
3.5.2. SWITCHING GAS 15
3.5.3. SPECIAL SITUATIONS 16
3.5.3.1. SWITCHING BACK TO A GAS MIXTURE WITH
LOWER OXYGEN CONCENTRATION 16
3.5.3.2. SUBMERGING BELOW THE MOD AFTER A GAS
SWITCH 16
3.6. BOTTOM TIMER MODE BT 16
3.6.1. DIVE VIOLATION INDUCED BOTTOM TIMER MODE 16
3.7. APNEA MODE 16
3.7.1. SETTINGS 16
3.7.2. USING SMART AIR ON AN APNEA DIVE 17
3.7.2.1. SURFACING BETWEEN IMMERSIONS 17
3.7.3. LOGBOOK IN APNEA MODE 17
3.7.4. SWITCHING FROM APNEA TO SCUBA 18
4. TAKING CARE OF SMART AIR 18
4.1. TECHNICAL INFORMATION 18
4.2. MAINTENANCE 18
4.2.1. REPLACING THE BATTERY IN SMART AIR 18
4.3. WARRANTY 19
4.4. WARRANTY EXCLUSIONS 19
4.5. HOW TO FIND THE PRODUCT SERIAL NUMBER 19
5. DISPOSAL OF THE DEVICE 19
3
IMPORTANT WARNINGS
No part of this document may be reproduced,
stored in a retrieval system, or transmitted
in any form without the written permission of
Mares S.p.A.
Mares adopts a policy of continuing
improvement, and therefore reserves the right
to make changes and enhancements to any of
the products described in this manual without
notice.
Under no circumstances shall Mares be held
responsible for any loss or damage sustained
by third parties deriving from the use of this
instrument.
WARNING
A dive computer is an electronic
instrument and as such it is not immune
to failure. To protect yourself against the
unlikely event of a failure, in addition to the
dive computer, also use a depth gauge, a
submersible pressure gauge, a timer or
watch, and dive tables.
WARNING
Do not dive if the display appears unusual
or unclear.
WARNING
The dive computer must not be used in
conditions that preclude its use (e.g.: low
or no visibility, making it impossible to
read the gauge).
WARNING
The dive computer cannot ensure against
possible decompression sickness.
DISCLAIMER
This manual describes how to operate an
instrument and it describes the information
provided by the instrument during a dive.
Neither this manual nor the instrument are a
substitute for dive training, common sense and
good diving practices.
How the information provided by the
instrument is interpreted and put to use by
the diver is not the responsibility of Mares.
Read the manual carefully and make sure you
understand completely how the instrument
works and the information it provides during
a dive, including information on depth, time,
decompression obligations and all warnings
and alarms. Unless you fully understand how
the instrument works and the information
it displays and unless you accept full
responsibility for using this instrument, do not
dive with it.
1. INTRODUCTION
1.1. GLOSSARY
AIR: Air dive
:
Symbolizes decompression stop violation.
:
Symbolizes uncontrolled ascent and uncontrolled ascent violation.
ASC:
Total ascent time, the time it takes to perform the ascent from your current depth to the surface in a decompression dive,
including all decompression stops and assuming an ascent rate of 10m/min or 33ft/min.
AVG: Average depth, calculated from the beginning of the dive.
CNS: Central Nervous System. CNS% is used to quantify toxic effects of oxygen.
DESAT: Desaturation time. The time needed for the body to eliminate the nitrogen taken up during diving.
Gas switching: The act of changing from one breathing gas to another.
Max depth: Maximum depth attained during the dive.
MOD:
Maximum Operating Depth. This is the depth at which the partial pressure of oxygen (ppO
2
) reaches the maximum allowed
level (ppO
2
max). Diving deeper than the MOD will expose the diver to unsafe ppO
2
levels.
Multigas: Refers to a dive in which more than one breathing gas is used (air and/or Nitrox).
Nitrox: A breathing mix made of oxygen and nitrogen, with the oxygen concentration being 22% or higher.
NO FLY: Minimum amount of time the diver should wait before taking a plane.
No deco time:
This is the time that you can stay at the current depth and still make a direct ascent to the surface without having to perform
mandatory decompression stops.
O
2
: Oxygen.
O
2
%: Oxygen concentration used by the computer in all calculations.
P Factor:
Personalization factors, which allow the user to select between the standard decompression algorithm (P0) and an
increasingly more conservative one (P1, P2).
ppO
2
:
Partial pressure of oxygen. This is the pressure of the oxygen in the breathing mix. It is a function of depth and oxygen
concentration. A ppO
2
higher than 1.6bar is considered dangerous.
ppO
2
max: The maximum allowed value for ppO
2
. Together with the oxygen concentration it defines the MOD.
Switch depth: The depth at which the diver plans to switch to a higher oxygen concentration mix while using the multigas option.
S.I.: Surface interval.
Smart Air Dive Computer
4
1.2. OPERATING MODES
The functions of the Smart Air computer
can be grouped into two categories, each
corresponding to a specific mode of operation:
watch mode: Smart Air is dry on the surface.
In this mode you can use it as a normal
watch. You can also change settings,
review your logbook, use the dive planner,
see remaining desaturation after a dive,
download to PC and much more;
dive mode: Smart Air monitors depth,
time, temperature and performs all
decompression calculations; dive mode
itself can be broken down into 4 sub
categories:
- pre-dive (Smart Air is on the surface but
actively monitoring ambient pressure, so
that it can begin to calculate a dive the
instant it is submerged below 1.2m/4ft);
- dive;
- surfacing (Smart Air is on the surface at
the end of a dive; dive time calculation
is halted but if the diver submerges
within three minutes the dive is resumed
including the time spent on the surface);
- post-dive (after the three minutes of
surfacing mode, Smart Air closes the
logbook and reverts to a display showing
desaturation time, no-fly time and surface
interval; this lasts until the desaturation
and the no-fly time both have been
reduced to zero).
1.3. USER-REPLACEABLE BATTERY
Smart Air uses a CR2450 user-replaceable
battery. See section 4.2.1 for instructions on
how to replace it. Good quality batteries should
suffice for approx 100-150 dives, depending on
the usage of the backlight and the temperature
of the water. Diving in cold water, usage of the
backlight and of the beeper increases battery
consumption.
The display alerts you of the status of the
battery. The three possible situations are
described as follows:
- battery symbol not visible: the remaining
battery charge is adequate for diving;
- steady battery symbol on the display: there
is enough charge for a few more dives, but
you should consider replacing the battery at
the next opportunity;
- blinking battery symbol on the display
(surface only): the battery is too weak for
diving. Smart Air will not function as a dive
computer and will not turn on if submerged.
The level of the battery charge can also be
found on the “INFO” page (see section 2.8).
1.4. CONNECTING SMART AIR TO A
PC OR MAC
To connect Smart Air to a PC or Macintosh
computer, use the optional clip and the USB
cable and Dive Organizer to download your
dives to a PC or Divers’ Diary to download your
dives to a Mac. Both software programs can be
downloaded from www.mares.com.
1.5. BUTTON OPERATION
Smart Air has 2 buttons, labelled UP/ENTER
and DOWN/ESC. Each button can be pressed
and released to perform one function (up and
down) and pressed and held for one second to
perform a different function (enter and esc).
We’ll refer to them as UP and DOWN button in
the remainder of this manual.
On the surface pressing and releasing either
button allows to scroll through menus, settings
and values. Pressing and holding the UP button
enters into a menu or confirms a setting, while
pressing and holding the DOWN button exits
from a menu and goes up one level.
During the dive, the UP button modifies the top
row (depth information) whereas the DOWN
button modifies the lower right corner of the
display. From the main watch display and in
dive mode, press and hold the UP button
(
) to activate the backlight.
The function of the DOWN button during the
dive deserves a particular mention already
at this stage of the manual (it is described in
more detail in section 3.3).
Smart Air shows the tank pressure as an
arc spanning the upper half of the display
perimeter, in a fashion similar to an analog
gauge with a needle pointing to a position
along the arc. The arc is composed of 36
of the 60 dots representing the seconds in
normal watch operation. A 200bar/3200psi
tank is represented with all 36 dots lit, which
gradually turn off as the tank is breathed down
during the dive, mimicking the movement of a
needle in the analog gauge.
In addition to this graphic representation,
Smart Air can show the tank pressure also as
a numeric value. In NO DECO mode, this forces
the dive time and no deco time to share the
center row, with a slight reduction in size for
the no deco time. In DECO mode the dive time
cannot be moved to the center row, so that
the numeric value of the tank pressure on the
display replaces the dive time.
To switch between the two options, whether
in NO DECO or in DECO, press and hold the
DOWN button.
B
NO DECO
DECO
1s 1s
1s 1s
An overview of the button function both in
surface mode and during a dive is presented
here below.
PRESS PRESS AND HOLD
WATCH
Scroll down or
decrease by 1
Go back one level
DIVE
Modify bottom row
Switch between dive time and tank
pressure in lower left corner.
(Multigas only:
- Activate gas switch process
- Confirm gas switch)
PRESS PRESS AND HOLD
WATCH
Scroll up or
increase by 1
From time of day display: backlight
From all others:
enter a submenu or confirm a setting
DIVE
Modify top row Backlight
A
PRESS PRESS AND HOLD
WATCH
Scroll up or
increase by 1
From time of day display: backlight
From all others:
enter a submenu or confirm a setting
DIVE
Modify top row Backlight
PRESS PRESS AND HOLD
WATCH
Scroll down or
decrease by 1
Go back one level
DIVE
Modify bottom row
Switch between dive time and tank
pressure in lower left corner.
(Multigas only:
- Activate gas switch process
- Confirm gas switch)
5
SURFACE MODE
press
press and hold
C
DIVE MODE
press
press and hold
SMART AIR - DIVE SCHEME
D
Smart Air Dive Computer
6
1.6. WATCH DISPLAY
The watch display is the “home” display
of Smart Air. In this mode, the time of day
is shown in the middle row of the display
while date, temperature, seconds, wake-up
time and second time can be displayed by
pressing the DOWN button. Note that the
temperature reading will be affected by your
body heat while you are wearing the watch. A
growing or diminishing ring of 60 dots around
the perimeter of the display represents the
seconds.
When the wake-up time is displayed, pressing
and holding the DOWN button turns the wake-
up alarm on or off.
When the second time is displayed, pressing
and holding the DOWN button switches main
time and second time.
1.7. MOUNTING AND PAIRING OF
THE TANK MODULE (OPTIONAL)
Smart Air can communicate with up to 3 tank
modules regarding tank pressure and gas
consumption information. Each tank module
needs to be mounted on a high pressure port
of a first stage regulator.
HP
HP
HP
HP
HP
HP
HP
HP
HP
In order for Smart Air to display tank pressure
and gas consumption information, you must first
establish a channel of communication between
the tank module and Smart Air. This is called
pairing. This operation needs to be performed
only once and ensures a permanent and
interference-free link between the two devices.
NOTE
To perform the pairing operation, the tank
module must be pressurized to at least
15bar/220psi. Hence it must be mounted
on a first stage regulator, which is itself
mounted on a full scuba tank and the valve
opened.
To mount the tank module on the first stage
regulator, first remove the high pressure port
plug, then screw in the tank module gently by
hand until you feel a minimum of resistance,
then use a 19mm wrench to tighten it.
NOTE
- Do not force the tank module while
holding it by the plastic cap.
- Do not overtorque while using the
wrench: the o-ring seal is assured as
soon as you feel the first resistance. The
only reason for using a wrench to tighten
a bit more is to prevent the tank module
from unscrewing itself over time.
The Mares tank module communicates via
radio frequency with Smart Air. For best
transmission, we recommend positioning the
tank module as described in the next figures.
To pair the tank module with the Smart Air,
proceed as follows:
- Open the tank valve to pressurize the tank
module. You now have two minutes to
perform all steps listed below;
- Go into SET/SET DIVE/GAS INTEGR/PAIR.
- The display will show G1 in the lower right
corner and the word PAIR in the middle. The
lower left corner shows the letters nP (Not
Paired) or P (Paired) to indicate the current
status of that channel. Use the UP and
DOWN buttons in case you are trying to pair
channel G2 or G3.
- Place Smart Air onto the tank module so
that there is contact between tank module
and Smart Air as shown below.
- Press ENTER and wait until OK appears
on the display, in which case you have
successfully established a connection. If OK
does not appear on the display you need to
repeat the operation, but you must turn off
the valve and depressurize the first stage
completely, then wait 20 seconds before
attempting again.
7
NOTE
- When diving with more than one gas
mixture, tanks G1, G2 and G3 must be
set to increasing oxygen levels. Refer
to section 3.5 for more information on
multigas diving.
- A tank module can only be paired to one
channel on one Smart Air. If you pair the
same tank module to a second channel
on the same Smart Air or to a second
Smart Air, the first one will be erased.
After a successful pairing of G1 to Smart
Air, the pre-dive display will show the tank
pressure in either bar or psi. If tank G1 has not
been paired, Smart Air will show nP instead
of a pressure value. If G1 has been paired but
Smart Air is not receiving any signal, it will
show - - - instead of a pressure value.
NOTE
- The Mares tank module has a range of
approximately 1.5m/5ft.
- The tank module turns on automatically
upon pressurization to at least 10 bar /
145 psi. It turns off automatically when
the pressure drops below 10 bar / 145 psi.
- In order to save battery power, the tank
module turns itself off also when the
pressure does not change over more than
4 minutes. The tank module turns itself
on again when a difference of pressure of
more than 1 bar / 14.5 psi is sensed.
- If a tank module battery is weak, Smart
Air alerts you by blinking the battery
symbol together with G1 (or G2 or G3) in
the upper right corner.
Refer to the dedicated tank module manual for
information on how to replace the battery in
the tank module.
NOTE
- You do NOT need to repeat the pairing
procedure after a battery replacement in
the tank module.
- You do NOT need to repeat the pairing
procedure after a battery replacement in
Smart Air.
- You do NOT need to repeat the pairing
procedure after upgrading the firmware
in your Smart Air.
2. MENUS, SETTINGS AND
FUNCTIONS
This chapter describes in detail all menus,
setting and functions of the Smart Air dive
computer.
From the time of day display, pressing the
UP button allows you to scroll through the
following sequence of menus (note that once
inside the menu loop, pressing the DOWN
button scrolls through the menus in reverse
sequence):
- CHrOnO: allows you to operate Smart Air
like a normal stopwatch;
- PRE dIVE: places Smart Air in the ready-to-
dive mode;
- MOdE: allows you to set the computer to air,
nitrox or bottom timer mode;
- SEt: allows you to view and change all
settings relative to the dive computer;
- LOG: allows you to access the detailed
history of the dives performed;
- PLAN: allows you to plan dives as a function
of depth based on your current nitrogen load;
- PC: allows you to download dives to a PC or
Mac
- InFO: allows you to view information about
software and hardware of your Smart Air.
The pre-dive mode puts the computer in a
ready-to-dive mode and ensures that Smart
Air starts to monitor the dive as soon as a
depth of 1.2m/4ft is reached. If you start the
dive without putting Smart Air into pre-
dive mode, it will start to monitor the dive
automatically but with a delay of up to 20
seconds from immersion.
The pre-dive display shows p factor and
altitude settings, time of day and tank pressure
(if a tank module is paired, active and Smart
Air is within 1.5m/5ft of the tank module). If
Nitrox is set, it will show the O
2
percentage and
the corresponding MOD.
NOTE
- If you remain in pre-dive for longer than
3 minutes without pressing any button,
Smart Air will revert to normal watch
operation.
- It is recommended to put Smart Air into
pre-dive before submerging. Not doing
so can lead to a delay of up to 20s in
Smart Air monitoring the dive.
2.1. CHrOnO
Press and hold the UP button to enter
this menu. The middle row now features a
stopwatch while the time of day has moved
to the bottom row. Press the UP button to
start and stop the time, then press the DOWN
button to reset the time to zero. Press and hold
the DOWN button to exit from the stopwatch
function (this stops and resets the stopwatch if
it was running or stopped at a non-zero value
upon exiting).
The stopwatch features also a split-time
function: by pressing the DOWN button while
the stopwatch is running, the time itself will
freeze while SPL blinks in the top row and the
stopwatch continues in the background. Every
time you press the DOWN button the split time
will refresh with the new value. Press and hold
the DOWN button to exit the split-time mode.
Note that while in split-time mode, the UP
button has no function.
2.2. PRE dIVE
Press and hold the UP button to enter this
menu and put Smart Air into the ready-to-dive
mode.
2.3. MOdE
Here you can define the type of gas you will
be breathing during the dive (air or enriched
Smart Air Dive Computer
8
air nitrox, including multigas). You can also
set Smart Air to bottom timer (BT), in which
case Smart Air will show only time, depth, tank
pressure and temperature: it will not carry out
any decompression calculation and it will not
show any warnings and alarms. You can set
Smart Air also to APNEA, which in essence is
a bottom timer with special features dedicated
to apneists.
Press the UP or DOWN button to scroll through
the four possible options (AIR, EAN, BT or
APNEA), then press and hold the UP button to
select it.
AIR is the equivalent of setting EAN to 21%
and a ppO
2
max of 1.4bar, but simplifies the
display a bit by not showing the CNS (its value
however is calculated in the background and if
needed the 75% warning and the 100% alarm
are triggered).
When selecting EAN, you are taken to
a submenu in which you can define the
percentage of oxygen in the mixture (%O
2
) and
the maximum value of oxygen partial pressure
(ppO
2
max) for up to three breathing mixes. The
maximum possible value for the ppO
2
max is
1.6bar. Most training agencies recommend not
to exceed a value of 1.4bar.
Once inside this menu, press the UP or DOWN
button to change the O
2
% and observe how this
affects the maximum operating depth (MOD).
Then press and hold the UP button to move
on to the ppO
2
max and use the UP or DOWN
button to change the value, again noticing how
this affects the MOD. Press and hold the UP
button again to save the setting.
This leads you to the G2 OFF screen. Press and
hold the DOWN button to exit the menu or go
to section 3.5 to read about diving with more
than one gas.
WARNING
- Diving with Nitrox may only be
attempted by experienced divers after
proper training from an internationally
recognized agency.
- Before every dive and after changing
the tank, you must make sure that the
set oxygen concentration in Smart Air
corresponds to the oxygen concentration
in the tank. Setting the wrong oxygen
concentration can lead to serious injury
or death.
2.4. SEt
Smart Air’s SEt menu allows you to change
settings. Once inside this menu, press the
UP or DOWN button to scroll between two
submenus: SEt dIVE, where you can set
parameters pertaining to the dive, and SEt
tIME, where you can set parameters pertaining
to time and date.
Press and hold the UP button to enter a menu,
press the UP or DOWN button to scroll up and
down between available options or to increase
or decrease the value of a setting. Then press
and hold the UP button to confirm the change
in setting. Press and hold the DOWN button to
go up one level in the menu tree.
MENU Description
SEt dIVE
- LGHt
Allows you to set the duration
after which the backlight
turns off automatically. You
can set this between 1 and 10
seconds.
- P FACt
Allows you to choose between
the standard algorithm (P0)
and an increasingly more
conservative one (P1, P2).
- ALt
Allows you to set the algorithm
into altitude mode when diving
in mountain lakes.
- WAtR
Allows you to choose between
salt (1.025kg/l) and fresh
(1.000kg/l) water or EN-319
(1.0197kg/l), corresponding
to the water density used in
European Norm 13319.
- GAS IntEGr
Allows you to pair your Smart
Air with optional tank modules
and to define all parameters
concerning gas integration
(tank volume, half tank
pressure and tank reserve).
- UnItS
Allows you to choose between
metric (m, °C, bar) and
imperial (ft, °F, psi) units.
- FASt
Allows you to turn off the dive
violation due to uncontrolled
ascent. This is for dive
instructors only, who may
find themselves in such a
situation because of their
teaching requirements.
- dEEP
Allows you to activate or
deactivate the visualization of
deep stops.
- ALAR
Allows you to turn on or off all
audible alarms of Smart Air.
- ERASE
Allows you to reset the
nitrogen saturation to zero,
thereby erasing the effects of
a previous dive. This is only for
people who plan to lend their
computer to another diver
who has not performed a dive
within the last 24hours.
SEt tIME
Allows you to set the time
format, time and date, wake-
up alarm and second time.
9
2.4.1. SEt dIVE
2.4.1.1. LIGHt (BACKLIGHT)
Smart Air has a backlight which can be
activated in case of low ambient light. The
backlight is activated by pressing and holding
the UP button. During a dive, the backlight will
stay on for the duration defined in this menu.
You can choose between 1 and 10 seconds.
NOTE
- The backlight consumes battery energy:
the longer the backlight stays on, the
less your battery will last.
- If the low battery warning is activated,
the backlight will be disabled.
In surface mode, the backlight can be activated
by pressing and holding the UP button. The
backlight will stay on for 6 seconds, unless you
go into any menu, in which case it will stay on
until you return to the pre-dive display or after
one minute of no button operation.
2.4.1.2. P FACt (P FACTOR)
Smart Air allows you to set an additional
personal safety factor for those circumstances
in which you want to be especially cautious,
such as after a long period of inactivity or
when planning a strenuous dive. In this
menu you can choose between the standard
algorithm (P0), a more conservative version
(P2) or an intermediate one (P1). On the pre-
dive, post-dive, logbook and planner displays,
P1 is displayed with p+, P2 with p++ and P0 is
indicated by the absence of symbols.
NOTE
The choice of p factor will be reflected in
the dive planner.
2.4.1.3. ALt (ALTITUDE)
Atmospheric pressure is a function of altitude
and of weather conditions. This is an important
aspect to consider for diving, because the
atmospheric pressure surrounding you has an
influence on uptake and subsequent release
of nitrogen. Above a certain altitude, the
decompression algorithm has to change in
order to account for the effect of the change
in atmospheric pressure. When diving in a
mountain lake, find out what the altitude is and
choose the altitude range in Smart Air within
the four available options:
- A0: from sea level to approximately
700m/2300ft;
- A1: from approximately 700m/2300ft to
approximately 1500m/4900ft ;
- A2: from approximately 1500m/4900ft to
approximately 2400m/7900ft;
- A3: from approximately 2400m/7900ft to
approximately 3700m/12100ft;
- We do not recommend diving at altitudes
above 3700m / 12100ft. If you do, set Smart
Air to bottom timer and find appropriate
altitude dive tables.
On the pre-dive, post-dive, logbook and
planner displays, A1 through A3 are indicated
with the mountain symbol filled with 1, 2 or 3
segments while A0 is indicated by the absence
of symbols.
WARNING
Diving in mountain lakes without first
setting Smart Air to the proper altitude
setting can cause severe injury or death.
2.4.1.4. WAtR (WATER)
You can set the computer for FRESH water,
SALt water or EN-319 calibration, depending
on where you intend to dive. Setting the
wrong water type entails an error in depth
measurement of 1-3% (e.g. at a depth of
30m/100ft, a computer set to salt water
will show 29m/97ft in fresh water whereas
a computer set to fresh water will show
31m/103ft in salt water). Note that this
does not affect the proper functioning of the
computer, since the computer performs all
of the calculations based purely on pressure
measurements.
2.4.1.5. GAS IntEGr (GAS INTEGRATION)
This menu contains five submenus. The first
one allows you to pair the tank modules to
Smart Air. Please refer to section 1.7 for the
description of the pairing process.
The second menu, tANK VOLM, allows you
to set the size of the volume of the tank,
individually for G1, G2 and G3. This parameter
is important for a correct evaluation of your
gas consumption in l/min or cu ft /min. Default
setting is 12l for metric system and 80 cubic
feet in imperial. For the imperial setting it
is paramount that you also set the correct
operating tank pressure, since the size of the
tank is referenced to this pressure.
The third menu, tANK OPERAt PrESS, is where
you define the nominal fill pressure of your
tanks. This can be set individually for each
tank (G1, G2 or G3). When the units are set
to ft/°F/psi, this value is important because
together with the tank volume it allows Smart
Air to correctly evaluate your gas consumption
in cu ft/min. Default values are 200bar and
3000psi.
The fourth menu, tANK WARN, is the value at
which Smart Air triggers a half tank warning.
This can be set individually for each tank (G1, G2
or G3). Default values are 100bar and 1500psi.
The fifth menu, tANK RSRV, is the value at which
an alarm is triggered because you should always
be at the surface before reaching this level.
Furthermore, this value is used to calculate the
TTR value (see section 3.2.5 and 3.3). This can
be set individually for each tank (G1, G2 or G3).
Default values are 50bar and 500psi.
Smart Air Dive Computer
10
2.4.1.6. UnItS
You can choose between metric (depth in
meters, temperature in °C) and imperial units.
(depth in feet, temperature in °F).
2.4.1.7. FASt (FAST ASCENT)
A fast (uncontrolled) ascent is defined as one in
which a speed of 12 m/min / 40ft/min or higher
was maintained over more than two thirds
of the way up. This applies to dives deeper
than 12m/40ft only. In such an event, due to
the potential of harmful bubble formation,
Smart Air locks the computer for 24hours in
order to discourage you from diving again. In
this menu, you have the option to disable the
locking up of the computer in the event of an
uncontrolled ascent.
WARNING
- An uncontrolled ascent increases your
risk of decompression sickness (DCS)
- This feature is intended for very
experienced divers only, such as dive
instructors, who take full responsibility
for the consequences of turning off this
function.
2.4.1.8. ALAR (ALARMS)
In this menu you can disable audible alarms.
WARNING
Disabling audible alarms can lead you into
potentially dangerous situation and could
result in serious injury or death.
2.4.1.9. ERASE (ERASE DESATURATION)
Smart Air allows you to reset the desaturation
in the computer. Any tissue saturation
information from a recent dive will be reset to
zero and the computer treats the next dive as
a non-repetitive dive. This is useful when the
computer is loaned to another diver who has
not dived in the last 24hours.
WARNING
Diving after having reset the desaturation
is extremely dangerous and is very likely to
cause serious injury or death. Do not reset
the desaturation unless you have a valid
reason to do so.
In order to prevent accidental desaturation
reset, you must enter the security code once
you decide to proceed with the reset. The
security code is 1234.
After entering the security code you will get a
confirmation of the successful completion of
the operation.
2.4.2. SEt tIME
This menu allows you to set the time format,
time, date, wake-up alarm and second time
(
). Scroll through the options by pressing
either button. Press and hold the UP button to
edit an option, then press either button to
modify the blinking value, then press and hold
the UP button to confirm the new setting.
Smart Air features a “sleep” mode: in case you
don’t wear it other than on a dive trip, you can
put Smart Air in sleep mode to reduce battery
consumption. This turns off the display while
the watch is still active in the background.
When in sleep mode, Smart Air consumes
about half as much energy as when awake. To
put Smart Air in sleep mode, press and hold
the UP button when you see "Go to sleep" on
the display. To wake up from sleep mode, press
either button.
2.5. LOG (LOGBOOK)
Smart Air can record the profiles of
approximately 95hours of diving, at a sampling
rate of 5 seconds. The information can be
transferred using the optional USB clip to PC
via the Dive Organizer software or to a Mac via
the Divers’ Diary software. In addition, Smart
Air can show most of the information directly
on the display.
When you first enter the logbook menu, you
will see a summary of all dives performed to
date. In particular, the maximum depth ever
reached, the total number of dives, the total
number of hours spent underwater and the
coldest water temperature recorded.
From here, press the UP button to scroll
through all dives in the memory of the
computer. Each dive has three or more pages
of data. Page 1 has maximum depth of the
dive in the upper left corner while minimum
temperature and average depth alternate
every 2s in the upper right corner. In the center
row time in and time out alternate on the right
side of the screen while a sequential dive
counter (1 being the most recent dive) is shown
to the left. The bottom row shows the date of
the dive.
11
Press and hold the UP button to view the next
page of the dive log, which shows the surface
interval prior to the dive alternating with the
dive time and CNS (alternating between start
and end value) in the bottom row.
Press UP again to view beginning and ending
tank pressure alternating in the bottom left
corner while the O
2
% of the gas is shown to
the right.
In case more than one gas was used in the
dive, pressing UP shows pressure and O
2
information for G2 and, if applicable, pressing
UP again shows the information for G3.
Press and hold the DOWN button to return to
the list of the main logbook menu.
2.6. PLAN (DIVE PLANNER)
This function allows you to plan your next dive.
Upon entering this menu, the display lists the
settings used for the calculation: P Factor and
Altitude selections. The bottom row shows
a surface interval of 0:00: in case you dived
recently, you can enter an additional surface
interval between now and when you intend to
dive by pressing the UP button: the residual
nitrogen load will be adapted accordingly. Next
press and hold the DOWN button to enter the
actual dive plan: Smart Air displays a depth
and the corresponding no deco time. In the
bottom row it lists the oxygen concentration
of G1.
Use the UP and DOWN buttons to increase/
decrease the depth in 3m / 10ft increments
(limited to the MOD of G1) and view the related
no deco time. Press and hold the UP button
to enter deco planning: Smart Air will add
one minute to the no deco time and show the
corresponding deco obligation. Now use the
UP and DOWN buttons to modify the dive time
and view how this affects the deco calculation.
Press and hold the DOWN button to return to
the no deco dive planner. From here either
choose a different depth and repeat a deco
plan or press and hold the DOWN button to exit
the dive planner.
NOTE
The dive planner is enabled only if either
air or nitrox mode is set
2.7. PC
This submenu allows you to download your
dive data to a PC or Mac. Press the ENTER
button and the display will show PC ready,
symbolizing that Smart Air is ready to
communicate.
2.8. INFO
This submenu provides information about the
hardware and software of your Smart Air and
about the status of the battery: OK means the
battery is good, LO means the battery is weak
but you can still do a few more dives, and KO
means the battery is very low and Smart Air
won’t function as a dive computer.
3. DIVING WITH SMART AIR
3.1. A FEW WORDS ABOUT NITROX
Nitrox is the term used to describe breathing
gases made of oxygen-nitrogen mixes with
an oxygen percentage higher than 21% (air).
Because Nitrox contains less nitrogen than
air, there is less nitrogen loading on the
diver’s body at the same depth as compared to
breathing air.
However, the increase in oxygen concentration
in Nitrox implies an increase in oxygen partial
pressure in the breathing mix at the same
depth. At higher than atmospheric partial
pressures, oxygen can have toxic effects on the
human body. These can be lumped into two
categories:
- Sudden effects due to oxygen partial
pressure over 1.4bar. These are not related
to the length of the exposure to high partial
pressure oxygen, and can vary in terms of the
exact level of partial pressure they happen
at. It is commonly accepted that partial
pressures up to 1.4bar are tolerable, and
several training agencies advocate maximum
oxygen partial pressures up to 1.6bar.
- Long exposure effects to oxygen partial
pressures over 0.5bar due to repeated and/
or long dives. These can affect the central
nervous system, cause damage to lungs or
to other vital organs.
Smart Air keeps you safe with respect to these
two effects in the following ways (as long as it
is set to either air or nitrox):
Against sudden effects: Smart Air has an
MOD alarm set for a user-defined ppO
2
max.
As you enter the oxygen concentration
for the dive, Smart Air shows you the
corresponding MOD for the defined
ppO
2
max. The default value of ppO
2
max
from the factory is 1.4bar. This can be
Smart Air Dive Computer
12
adjusted to your preference between 1.2 and
1.6bar. Please refer to section 2.1 for more
information on how to change this setting. If
Smart Air is set to air, the ppO
2
max is set to
1.4bar by default.
Against long exposure effects: Smart Air
“tracks” the exposure by means of the
CNS% (Central Nervous System). At levels
of 100% and higher there is risk of long
exposure effects, and consequently Smart
Air will activate an alarm when this level of
CNS% is reached. Smart Air also warns you
when the CNS level reaches 75%. Note that
the CNS% is independent of the value of
ppO
2
max set by the user.
3.2. ALARMS
Smart Air can alert you of potentially
dangerous situations. There are six different
alarms:
- Ascent rate alarm;
- Exceeding a safe ppO
2
/MOD;
- CNS =100%;
- Missed decompression stop;
- Low tank pressure;
- Low battery during the dive
WARNING
When in bottom timer mode, all warnings
and all alarms are OFF aside for the low
battery alarm and tank reserve alarm.
NOTE
- Alarms are both visual and audible, as
described in detail below.
- Ascent rate alarm has priority over
other alarms if they are triggered
simultaneously.
3.2.1. ASCENT RATE
As soon as depth decreases by more than
80cm / 3ft Smart Air activates the ascent rate
control algorithm and displays the calculated
value. This is shown in the lower left corner.
WARNING
A rapid ascent increases the risk of
decompression sickness.
If Smart Air determines an ascent rate of 10m/
min / 30ft/min or higher, the fast ascent alarm
is triggered: an audible alarm goes off and
SLOW appears blinking on the display. This
persists until the ascent rate is reduced to
10m/min / 30ft/min or less.
If the ascent rate exceeds 12m/min / 40ft/min
at a depth below 12m / 40ft,
blinks as well.
If a speed in excess of 12m/min / 40ft/min is
maintained for two thirds or more of the depth
at which the alarm was first triggered, Smart
Air considers it a dive violation and the display
will show the steady
.
In this case, if the diver attempts a repetitive
dive after surfacing, Smart Air will only
function as a depth gauge and timer (bottom
timer mode), and will display
on the screen
throughout the dive.
3.2.2. MOD/ppO
2
WARNING
- The MOD should not be exceeded.
Disregarding the alarm can lead to
serious injury or death.
- Exceeding a ppO
2
of 1.6bar can lead to
sudden convulsions resulting in serious
injury or death.
When the diver reaches a depth at which the
ppO
2
of the inspired gas exceeds the maximum
limit entered in the corresponding setting
(from 1.2 to 1.6bar), an audible alarm goes off,
the current depth starts to blink and the value
of the MOD is shown to the right of the current
depth, also blinking.
The alarm persists until the diver has
ascended enough for the ppO
2
to return within
the set limit.
WARNING
When the MOD alarm is triggered, ascend
immediately until the alarm stops. Failure to
do so could result in serious injury or death.
3.2.3. CNS = 100%
WARNING
When the CNS reaches 100% there is
danger of oxygen toxicity. Start procedure
to terminate the dive.
Oxygen toxicity exposure is tracked on
Smart Air by means of the CNS% based on
currently accepted recommendations for
exposure limits. This toxicity is expressed as
a percentage value which ranges from 0%
to 100%. When the value reaches 75%, an
alarm goes off and the CNS value blinks on
the screen. Additionally the CNS becomes
the default item in the lower right corner: if
you call up other information after 8 seconds
the CNS appears again. Ascend to shallower
depth to decrease oxygen loading and consider
terminating the dive.
When the oxygen toxicity level reaches 100%
the alarm is repeated for 5 seconds in one-
minute intervals after the first occurrence
and for as long as the value of CNS stays at
or above 100%. Consider terminating the dive
immediately!
WARNING
Diving with oxygen toxicity at levels of 75%
or greater may put you into a potentially
hazardous situation, which could result in
serious injury or death.
3.2.4. MISSED DECOMPRESSION STOP
WARNING
Violating a mandatory decompression
obligation may result in serious injury or
death.
If you ascend above the decompression stop
depth by more than 0.3m (1ft), a downward
pointing triangle appears, an audible alarm
goes off and both the current depth and the
depth of the deco stop start blinking. This
alarm remains active until you return to the
correct depth.
WARNING
- When the missed deco stop alarm is
triggered, desaturation of the simulated
tissue compartments is halted and
resumes only when the diver returns to
the correct stop depth.
- Never ascend above the displayed
decompression stop depth.
13
3.2.4.1. MISSED DECO STOP MODE
If the stop depth is exceeded by more than 1m
(3ft) for more than three minutes, Smart Air
considers it a dive violation and the display will
show
.
In this case, if the diver attempts a repetitive
dive after surfacing, Smart Air will function
only as a depth gauge and timer (bottom timer
mode), and it will display
on the screen.
3.2.5. LOW TANK PRESSURE (IF OPTIONAL
TANK MODULE IS USED)
When Smart Air is used in conjunction with
a tank module, you will not only have tank
pressure information clearly visible on the
display, but also an estimate of the time you
can still spend at the depth you are at, based
on the current gas consumption, before
reaching the tank reserve. This is called TTR
Time To Reserve.
When during a decompression dive Smart Air
calculates a TTR which is inferior to the total
ascent time, the TTR value starts to blink and
an audible alarm goes off. Press any button to
acknowledge the alarm and it will turn off. We
strongly suggest initiating an ascent when this
situation arises, in order to avoid running out of
breathing gas during the decompression stop.
NOTE
When set to imperial units and with a tank
pressure higher than 999psi, when the
alarm is triggered only the flashing TTR
will be displayed on the bottom row until
you acknowledge the alarm by pressing
any button.
Additionally, when the tank pressure reaches
the value specified under tANK RSRV, the
dots in the arc representing the tank pressure
and the value of the tank pressure start to
blink and an audible alarm goes off. Press any
button to acknowledge the alarm and silence
it, though the dots representing the tank
pressure will continue to blink. If the value
of the tank pressure was not shown on the
display before the alarm, the display reverts
back to the dive time after the alarm has been
acknowledged.
NOTE
For metric setting only: if the tank reserve
is set to a value below 50bar, the alarm
will go off at 50bar and the value defined
as tank reserve will be used for TTR
calculation only.
Smart Air features also a half tank alarm,
which goes off when the pressure defined in
the tANK WARN menu is reached. The dots in
the arc representing the tank pressure and the
value of the tank pressure start to blink, and
an audible alarm goes off. Press either button
to acknowledge the alarm and silence it. If
the value of the tank pressure was not shown
on the display before the alarm, the display
reverts back to the dive time after the alarm
has been acknowledged.
NOTE
If you set the tANK WARN value to the
same value as tANK RSRV, you will
eliminate the half tank alarm.
3.2.6. LOW BATTERY
If Smart Air detects that the battery power
level is safe for diving but without much
reserve left, it will show the steady battery
symbol on the display.
3.3. DISPLAY INFORMATION
Upon immersion, if Smart Air was set to pre-
dive, it will immediately start monitoring the
dive. Otherwise, it will turn on automatically
within 20 seconds of having reached a depth of
1.2m/4ft.
The following information is shown:
- current depth
- temperature
- no deco time (or depth and duration of
deepest stop and total ascent time in case of
decompression dives)
- dive time
- tank pressure
- TTR
- nitrogen saturation bar graph
Smart Air shows tank pressure as an arc of
dots spanning across the upper half of the
display, corresponding to the red, yellow, green
and blue areas on the outer mask. This mimics
the look of an analog pressure gauge for an at-
a-glance interpretation of the tank pressure.
The full arc spans from 15bar to 200bar in
metric and from 150psi to 3200psi in imperial,
with each dot corresponding to 5bar in metric
while in imperial units each dot corresponds
to 90psi from 3200psi to 500psi and changes to
50psi from 500psi to 150psi. For lower starting
tank pressures the arc will start at a lower
position, just like the needle on an analog
gauge, while for higher starting tank pressures
the arc will remain in the full position until
the tank is breathed down to a pressure below
200bar or 3200psi is reached.
E
15 bar
150 psi
50 bar
500 psi
160 bar
2500 psi
200 bar
3200 psi
105 bar
1500 psi
1 DOT = 5 bar / 90 psi
1 DOT = 5 bar / 50 psi
The tank pressure can be displayed also
numerically by pressing and holding the
DOWN button. In NO DECO this moves the dive
time to the left of the center row while the no
deco time is shifted to the right. In DECO this
replaces the dive time with the tank pressure.
By pressing and holding the DOWN button
again, the displays revert back to the previous
lay-out.
By pressing the UP button, you can modify
the information displayed in the upper row. At
each button press, the screen cycles through
temperature, max depth, average depth, MOD
(nitrox only), deep stop (if activated and if
calculated to be present), and an empty field.
By pressing the DOWN button, you can modify
the information displayed in the bottom
row. At each button press, the screen cycles
through time to reserve, gas consumption,
oxygen percentage, CNS, ppO
2
, time of day
(in lieu of the dive time; the time of the day
has a 4-second time out after which the dive
Smart Air Dive Computer
14
time is displayed again), and an empty field, in
which case the dive time is shown inclusive of
seconds.
NOTE
In imperial units, when in decompression
and with the bottom row set to show tank
pressure, when the tank pressure is higher
than 999psi no other information is shown
to the right of it due to the need to show
tank pressure with 4 digits. Pressing the
DOWN button scrolls through the same
fields but hiding the tank pressure, which
is anyway always shown as the arc of dots.
Each field other than the tank pressure has
a 4-second time out.
NOTE
The ppO
2
is indicated in bar without the
decimal point and, in order to differentiate
it better from the information field to the
immediate left, when it is displayed, it uses
a small 0 or small 1 respectively,
In case of an ascent, the speed in m/min or ft/
min is displayed in the bottom left corner.
The depth is given in 10cm resolution until
99.9 meters, after which it is given in 1m
resolution. When the depth is displayed in
feet, the resolution is always 1 foot. At a depth
shallower than 1.2m/4ft, the display shows ---.
Maximum possible depth is 150m/492ft.
The dive time is displayed in minutes. If during
the dive you ascend to the surface, the time
spent on the surface will only be counted
if you descend again below 1.2m/4ft within
3 minutes. This allows for brief periods of
orientation. While on the surface, the time will
not show as progressing but it is running in
the background. As soon as you submerge, the
time will resume, including the time spent on
the surface.
The no deco time is calculated in real time and
updated continuously. Maximum displayed no
deco time is 99 minutes. If you remain at depth
beyond a no deco time of zero minutes, you will
enter into decompression: you can no longer
make a direct ascent to the surface and Smart
Air displays a MANDATORY decompression
stop. Instead of a no deco time, it shows you
the depth and duration of the deepest stop and
the total ascent time (ASC), which includes
each decompression stop and the time
required to travel the vertical distance to the
surface at a rate of 10m/min / 33ft/min. ASC
does not include the duration of deep stops.
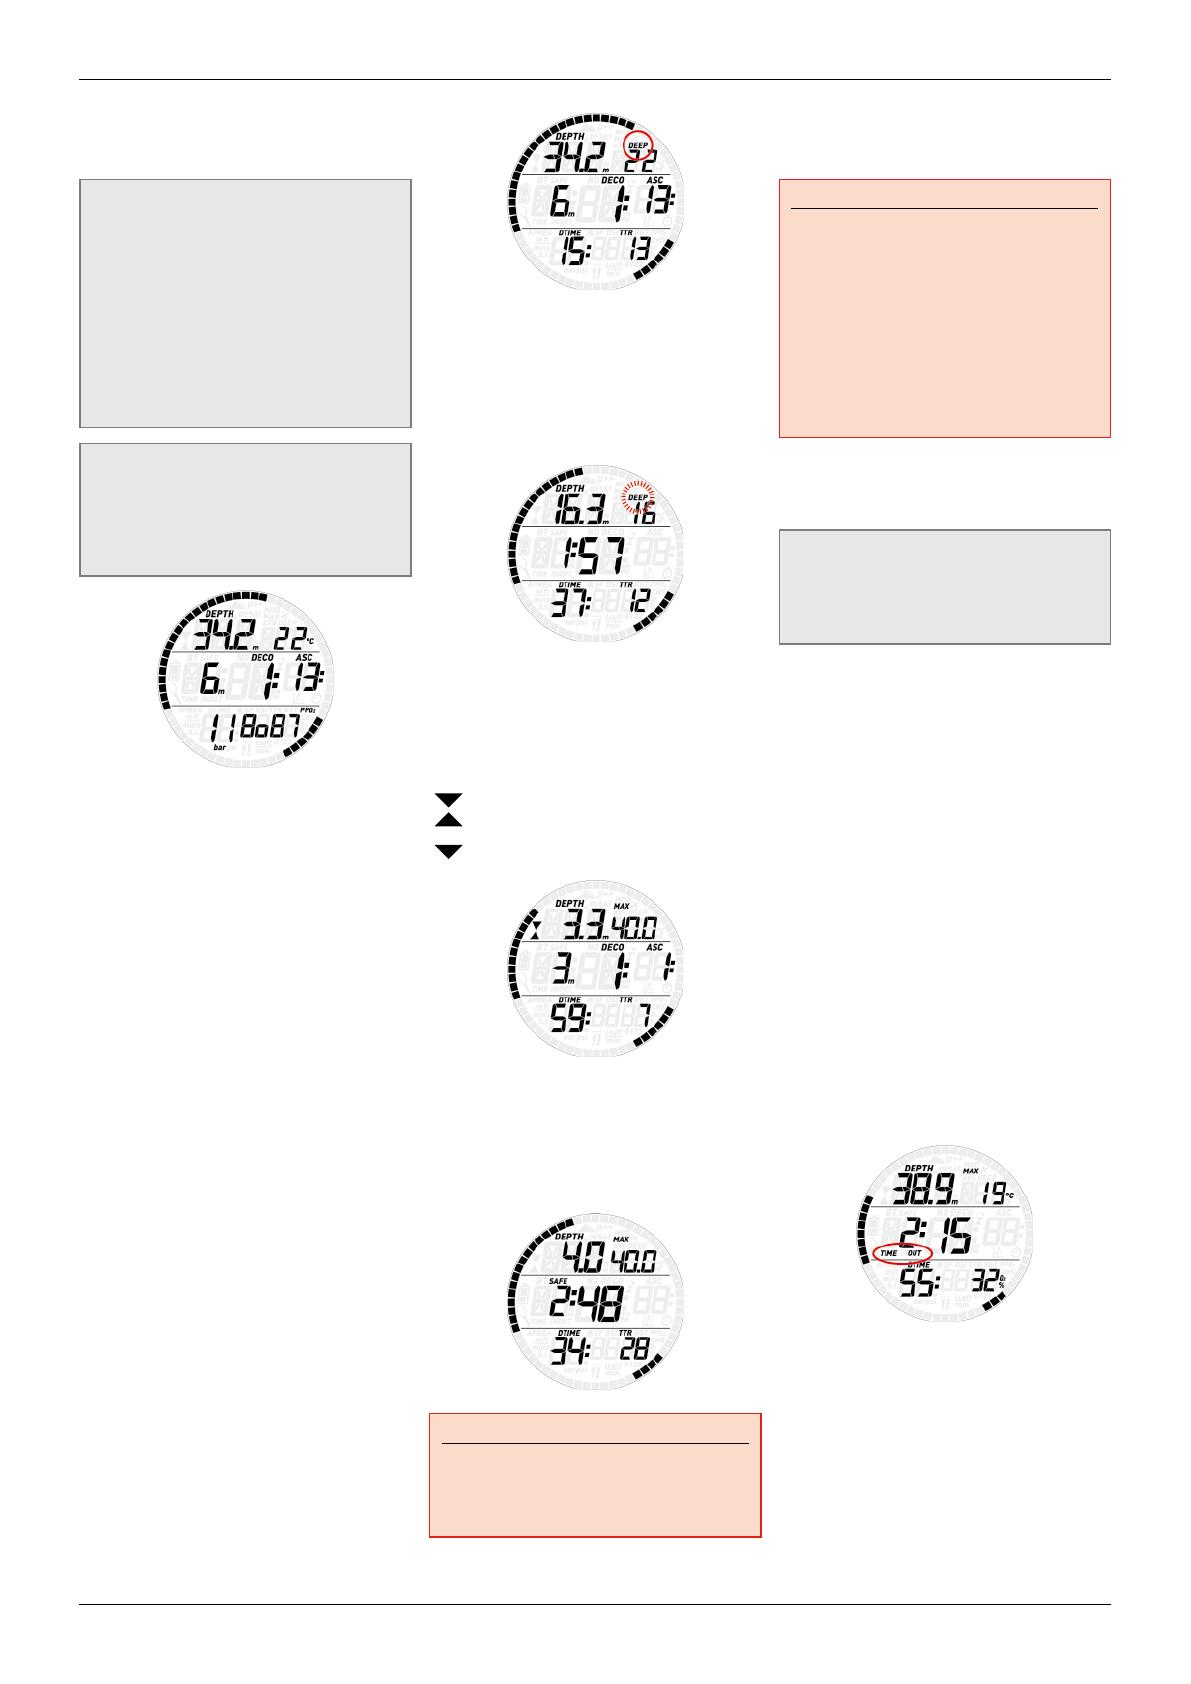
DEEP, DECO and SAFETY stops:
- DEEP stops are generated as you approach
the no deco limit. You can either have one
2-minute stop or two 1-minute stops. DEEP
stops are NOT mandatory. Deep stops are
displayed to the right of the current depth.
Upon reaching the optimum range for
carrying out a deep stop (+/- 1m /3ft of the
displayed depth), the deep stop itself will
be shown in the top right corner with the
label DEEP blinking, and a countdown timer
appears to indicate the progress of the stop.
Deep stops can be deactivated in a dedicated
settings menu.
- DECO stops are generated progressively
as you stay down beyond the no deco time.
DECO stops are MANDATORY. For DECO
stops, since the duration is a function of the
exact depth, only the minutes are shown.
During a decompression stop, the following
symbols may appear:
: optimal range for the decompression
stop;
: above decompression stop depth,
descend immediately!
- A SAFETY stop is generated as soon as the
depth of the dive exceeds 10m / 33ft. It has
a duration of 3 minutes and it is carried
out between depths of 6m / 20ft and 3m /
10ft at the end of a dive prior to surfacing.
Such stop is NOT mandatory but HIGHLY
RECOMMENDED.
WARNING
During all dives, perform a safety stop
between 3 and 6 meters/10 and 20 feet for
3 minutes, even if no decompression stop
is required.
The tank pressure is based on the signal from
the tank module. The tank module has a range
of 1.5m/5ft.
WARNING
- If Smart Air receives no signal from
the tank module for 45 seconds, the
pressure value is replaced by ---. Check
the position of Smart Air with respect to
the tank module. Start ascending if you
don’t get a tank pressure reading unless
you have a spare pressure gauge.
- If the tank pressure reaches
10bar/145psi, the tank module will turn
off and Smart Air will not show tank
pressure any longer.
The TTR (time to reserve) is the time you can
spend at the current depth breathing at the
current rate before reaching the user defined
tank reserve.
NOTE
Smart Air needs approximately 2 minutes
to analyze your breathing pattern, thus the
TTR is not displayed at the very beginning
of the dive.
The nitrogen bar graph is on the right side of
the display. It represents nitrogen saturation in
the leading tissue compartment. The bar graph
is made of five segments, which gradually fill
during the dive. The more black segments
you see, the closer to the no deco limits you
are. As you enter a situation of mandatory
decompression stop, all segments will be black.
During a surface interval, the segments will
gradually turn off as Smart Air tracks the
offgassing of your tissues.
Ascent rate: in presence of a depth change in
excess of 80cm / 3ft, Smart Air calculates the
corresponding ascent speed and displays in
place of the dive time, for the duration of the
ascent.
3.4. AFTER THE DIVE
Upon returning to the surface, Smart Air first
goes into the so-called surfacing mode. This
mode allows you to resume your dive after a
brief period of orientation. The screen shows a
3-minute countdown.
If you submerge again before the 3-minute
countdown is over, the dive time will resume
from where it left off, including the time spent
on the surface. If you do not submerge before
the end of the countdown, Smart Air considers
the dive finished, records the data to the
logbook and reverts to the so-called post-dive
mode.
The post-dive screen contains:
- The remaining desaturation time (DESAT):
this is calculated by the decompression
15
model in the computer. Any dive started
while there is remaining desaturation on
your computer is considered a repetitive
dive, meaning that Smart Air accounts
for the pre-existing nitrogen load in your
body. The bar graph shows the calculated
nitrogen load in the leading tissue. You can
use this to gauge your progress in getting
rid of nitrogen as the surface interval
grows. Smart Air continues to perform
decompression-related calculations
(nitrogen release), for as long as there is
desaturation time left.
- The no-fly time (NO FLY): this is the time
during which an exposure to the reduced
pressure inside the cabin of an airplane
could cause decompression sickness. Smart
Air employs, as recommended by NOAA,
DAN and other agencies, a standard 12-hour
(no-deco non-repetitive dives) or 24-hour
(deco and/or repetitive dives) countdown.
Hence you may find a situation in which
the desaturation time is shorter than the
no-fly time. This is simply the consequence
of the desaturation time being calculated
by the algorithm based on the actual dive
profile, while the no-fly time is an accepted
standard in the diving industry. Since the
real effect of flying after diving has never
been fully investigated, this approach fits
with our philosophy.
WARNING
Flying while Smart Air displays NO FLY can
result in serious injury or death.
- The surface interval (S.I.): this is displayed
from the moment the dive is closed (3
minutes after surfacing) for as long as there
is remaining desaturation or no-fly time on
the computer.
- In case of a dive violation, the corresponding
symbol (
, ) is shown.
The post-dive display is the default display for
as long as either the no-fly or the desaturation
is greater than 0 minutes. By pressing the
DOWN button you can go to all other screens
but Smart Air will revert automatically to the
post-dive display after an 8-second time out.
For as long as there is desaturation, Smart Air
also features a condensed log of the last dive:
maximum and average depth in the top row,
dive time and set O
2
% in the bottom row.
3.5. DIVING WITH MORE THAN ONE
GAS MIXTURE
WARNING
- Diving with more than one gas mixture
represents a much higher risk than
diving with a single gas mixture, and
mistakes by the diver may lead to
serious injury or death.
- During dives with more than one gas
mixture, always make sure you are
breathing from the tank that you intend
to breathe from. Breathing from a high
oxygen concentration mix at the wrong
depth can kill you instantly.
- Mark all your regulators and tanks so
that you cannot confuse them under any
circumstance.
- Before each dive and after changing
a tank, ensure that each gas mixture
is set to the correct value for the
corresponding tank.
Smart Air enables you to use up to three
gas mixtures during the dive (air and Nitrox
only). The three mixtures are labeled G1, G2
and G3 and must be in ascending order of
oxygen content, i.e. G1 has the lowest oxygen
concentration, G2 an intermediate value, and
G3 has the highest oxygen concentration of the
three. If you are diving with only two mixtures,
you will be utilizing tanks G1 and G2.
WARNING
It is not possible to switch to a gas at a
depth at which the oxygen partial pressure
for that gas is greater than the set
maximum value.
NOTE
- If you dive using just one gas, select G1
and deselect the other two.
- For dives with two gases, select G1 and
G2 and deselect the third.
- When enabling G2 and G3, you must first
define G2 and then G3.
- You cannot activate G3 without first
having activated G2.
- G2 cannot have an oxygen percentage
higher than G3.
- If you set G2 to OFF, G3 will
automatically be set to OFF also.
- The MOD for G2 and G3 is the switch
depth for the corresponding gas. This is
what Smart Air uses for its calculation,
alarms and suggested switch points.
3.5.1. SETTING MORE THAN ONE GAS
The characteristics of the gases must be
entered in the computer before the dive. It will
then be your responsibility to tell Smart Air
which gas is currently being used during the
various phases of the dive.
To use multiple gases, you will need to enable
the gases and set the oxygen percentage and
the ppO
2
max for each one. This is done in the
same way as for G1, with the difference that
for G2 and G3 you can turn a gas ON or OFF.
Keep in mind that the MOD for G2 and G3 is
the depth at which Smart Air will prompt you
to perform the gas switch (see section 3.5.2
below). To enable G2 press the UP button from
the G2 OFF display. You will now see G2 ON, a
value of oxygen concentration, ppO
2
and MOD.
Proceed as you would for G1 until you get
to the G3 OFF screen. Either press and hold
the DOWN button if you have finished setting
gases, or press the UP button to advance to the
G3 ON display and setting of G3.
3.5.2. SWITCHING GAS
Smart Air always begins the dive with G1,
which has the lowest percentage of oxygen.
When during the ascent you reach the depth
corresponding to the MOD of G2, Smart Air
sounds an audible signal and the oxygen
concentration of G1 starts to blink in the lower
right corner.
Press the DOWN button while this indication is
blinking to initiate the gas switch: the oxygen
percentage of G2 starts to blink in lieu of that
of G1, and in the top right corner the MOD of
G2 is displayed, also blinking.
Press and hold the DOWN button to confirm
the switch to G2: the set oxygen concentration
will be displayed steadily in the lower right
corner of the screen, and within 20 seconds
the ascent time is updated to reflect the higher
oxygen concentration in the breathing gas.
Smart Air Dive Computer
16
If you press the DOWN button while G2 is
blinking, the next available gas in the list will
be displayed instead. This will be G1 if only
two gases are set or if you are deeper than the
MOD of G3, or G3 if you have set three gases
and are shallower than the MOD of G3.
NOTE
- Smart Air will allow the change only if
the depth is shallower than the MOD
corresponding to the set ppO
2
max.
- Smart Air will not allow the gas switch if
you are deeper.
- The automatic blinking of the oxygen
concentration of G1 lasts only for 20
seconds. You can however initiate the
gas switch at any time by pressing and
holding the DOWN button when the
oxygen concentration is displayed in the
lower right corner, then switch to G2 as
long as your depth allows the gas to be
activated.
- The same process is repeated when
you approach the MOD for G3 with G2
blinking instead of G1
- If you have set G1, G2 and G3 and have not
switched from G1 to G2, once you reach
the MOD for G3 the oxygen concentration
of G1 will again blink to alert you of the
possibility of switching gas.
3.5.3. SPECIAL SITUATIONS
3.5.3.1. SWITCHING BACK TO A GAS MIXTURE
WITH LOWER OXYGEN CONCENTRATION
There may be situations in which you have
to switch back to a gas with lower oxygen
concentration than what you are currently
breathing. This can happen for instance if you
want to descend deeper than the MOD for the
current gas, or if for instance you have run out
of gas in G2 during the decompression. To do
so, simply press the DOWN button until the
oxygen concentration is displayed in the lower
right corner, then press and hold the DOWN
button to initiate the gas switch. From here
on the procedure is the same as described in
3.5.2.
3.5.3.2. SUBMERGING BELOW THE MOD AFTER
A GAS SWITCH
If after having switched to a gas mixture with a
higher oxygen concentration you inadvertently
drop again below the MOD for that mixture,
the MOD alarm will immediately go off. Either
switch back to a gas mixture suited for that
depth, or ascend above the MOD for the gas
mixture you are breathing from.
3.6. BOTTOM TIMER MODE (BT)
When Smart Air is set to BT mode, it will
only monitor depth, time and temperature,
tank pressure and will not carry out any
decompression calculation. Maximum displayed
dive time in gauge mode is 999 minutes. You
can only switch to bottom timer mode if the
computer is completely desaturated. All audible
and visual alarms, other than the low battery
alarm and low tank pressure, are turned off.
WARNING
Dives in bottom timer mode are performed
at your own risk. After a dive in bottom
timer mode you must wait at least 24hours
before diving using a decompression
computer.
During a dive in bottom timer mode, the
following information is displayed:
- current depth
- temperature
- stopwatch
- dive time
- tank pressure
- TTR
- in case of an ascent: ascent speed
(in m/min or ft/min).
Press the UP button to toggle between
temperature, max depth, average depth,
and an empty field. Press the DOWN button
to scroll through time to reserve, gas
consumption, gas identifier (G1, G2 or G3),
time of day in lieu of the dive time (the display
reverts back to dive time after 4 seconds) or an
empty field.
NOTE
In bottom timer mode the tank pressure
is visible ONLY as dots in the arc along the
outer perimeter.
Pressing and holding the DOWN button
restarts the stopwatch unless:
- the average depth is displayed in the upper
right corner, in which case in addition to
resetting the stopwatch it also resets the
average depth;
- the gas identifier is displayed in the lower
right corner, in which case the gas switch is
initiated. This happens even if the average
depth is visible in the upper right corner.
3.6.1. DIVE VIOLATION INDUCED BOTTOM
TIMER MODE
The following violations can occur during an
Air or Nitrox dive:
- Uncontrolled ascent.
- Missed deco stop.
In case of a violation, Smart Air will restrict the
use of Air and Nitrox mode for 24hours, and
will only allow operation in bottom timer mode.
3.7. APNEA MODE
Smart Air features an apnea mode with
dedicated features specifically for breath hold
divers. In apnea, we differentiate between
immersion and dive session. An immersion
is the individual trip below the water surface.
The dive session is a group of immersions
performed in sequence without exiting the
apnea mode.
WARNING
The practice of apnea exposes divers to
different hazards from those associated
with scuba diving. The diver should be
aware of these hazards and understand
how to avoid them.
WARNING
Do not practice apnea within 24 hours of
having performed a scuba dive.
3.7.1. SETTINGS
Go into the MODE menu and from here select
APNEA then press and hold the UP button to
confirm your choice. This will automatically
lead you into the settings menu for apnea
diving. Press and hold the DOWN button to exit
if you don’t need to change any of the settings.
Else scroll through the available settings
pressing either button. To edit a setting,
press and hold the UP button, then press
either button to modify the setting, then press
and hold the UP button again to confirm the
change. The available settings are:
AL.beep
This allows you activate or deactivate all
warnings at once.
Dive time
If active, when the dive time reaches the set
limit an audible alarm will go off and the dive
time will blink on the display.
17
Surf int
If active, when the surface interval reaches the
set limit an audible alarm will go off and the
surface interval will blink on the display.
Max
If active, upon reaching the depth defined in
the setting an audible alarm will go off and the
depth will blink on the display.
Int
This allows you to set a depth interval at which
a short audible sequence is activated. For
instance, if you set a depth interval of 5m/15ft,
the audible sequence will go off at 5m/15ft,
10m/30ft, 15m/45ft etc.
3.7.2. USING SMART AIR ON AN APNEA DIVE
Put Smart Air into PRE DIVE so that as soon
as you submerge past 1.2m/4ft it will start
monitoring your dive. Smart Air will show the
current depth and temperature in the top row,
the dive time in minutes and seconds in the
middle row. Press the DOWN button and the
time of day will appear for a few seconds in the
bottom row. Press and hold the UP button to
activate the backlight.
3.7.2.1. SURFACING BETWEEN IMMERSIONS
When returning to a depth of less than
0.8m/3ft, Smart Air switches to surface mode.
The display will show the maximum depth
of the dive that just ended and minimum
temperature in the top row, its duration in the
middle row, and the surface time in minutes
and seconds in the bottom row. The number
to the left of the duration is the sequential
counter of the immersions in the dive
sequence.
By pressing the UP button the display switches
to maximum depth and minimum temperature
of the dive session in the top row, maximum
dive time of the session in the middle row
and time of day in the bottom row. In order to
differentiate this "session" summary from the
individual immersion summary, the dots in the
upper half of the display are lit.
Press and hold the UP button to exit apnea
mode. Do this only at the end of your dive
session so that your immersions are all logged
together (see section 3.7.3 for information
about the logbook in apnea mode). Note
that Smart Air will exit the apnea mode
automatically after 30 minutes without
immersion.
After exiting an apnea session, the default
display will show the time of day in the center
row and the count down defined in section
3.7.4 in the bottom row, until the count down
clears.
3.7.3. LOGBOOK IN APNEA MODE
Smart Air separates scuba dive logs from
apnea logs, hence there is a dedicated
summary page for each. As you enter the
logbook function, the two alternate every 4
seconds. The apnea summary shows max
depth and minimum temperature in the top
row, number of sessions in the middle row,
longest dive time in the bottom row.
Upon pressing the UP button, individual logs
will be shown in chronological sequence. Scuba
dives are described in section 2.5. Apnea dives
are grouped in sessions, and for each session
there are two summary pages: the first shows
the maximum depth and minimum temperature
of the session, the time the session started and
the date, in addition to a sequential counter;
Press and hold the UP button to reach the
second summary page, which shows the
maximum depth and minimum temperature of
the session in the top row, the time the session
started and the number of immersions in the
session in the middle row, the longest dive
time of the session in the bottom row.
Press and hold the UP button to enter the
session and see max depth and minimum
temperature of the immersion at the top, dive
time and sequential counter of the immersion
in the middle surface interval prior to
immersion at the bottom.
Press either button to view the details of other
immersions within the same session or press
and hold the DOWN button to exit the session
log.
Smart Air Dive Computer
18
3.7.4. SWITCHING FROM APNEA TO SCUBA
It is commonly accepted that scuba diving
after apnea diving is safe, but we take a
slightly more conservative approach. Smart
Air evaluates your apnea activity and imposes
a restriction before you can switch the dive
computer from apnea to scuba based on your
max depth in apnea in the preceding 24 hours:
- up to 5m/15ft: no restriction
- up to 10m/33ft: 2-hour restriction since the
last apnea dive
- up to 20m/66ft: 4-hour restriction since the
last apnea dive
- up to 30m/100ft: 6-hour restriction since the
last apnea dive
- over 30m/100ft: 8-hour restriction
4. TAKING CARE OF SMART AIR
4.1. TECHNICAL INFORMATION
Pressure gauge function
The pressure gauge integrated in the Smart
Air dive computer has been tested and CE
certified by RINA, notified body 0474, located in
Genova, Italy.
The pressure gauge is a Category III device as
defined under European Regulation 2016/425,
and complies with the specifications set out in
the harmonized European Standard EN250 for
use with air compliant with Standard EN 12021
(oxygen content of 21%).
The EC certification process and verification
of the operating performance of the pressure
gauge in the Smart Air dive computer under
standards EN250 are understood to be
applicable to a maximum depth of 50 m below
the surface.
The Smart Air dive computer can be used in
cold water (water at temperatures below 10°C).
Marking
The instrument markings are located on the
tank module, and consist of the following:
working pressure rating: 300 bar / 4,350 psi;
reference standard: EN250;
reference marking: CE 0474.
The conformity marking indicates compliance
with the essential health and safety
requirements as per European Regulation
2016/425. The number alongside CE identifies
RINA, notified body 0474, located in Genova,
Italy, authorized to inspect the finished product
under Module D of European Regulation
2016/425.
Operating altitude:
- with decompression – sea level to
approximately 3700m/12100ft
- without decompression (gauge mode) – at
any altitude
Decompression model: RGBM Mares-Wienke
(10 tissues)
Depth measurement:
- Max displayed depth: 150m/492ft
- Resolution: 0.1m until 99.9m and 1m at
depth deeper than 100m. Resolution in ft is
always 1ft
- Temperature compensation of the
measurement between -10 °C to +50 °C /
14°F to 122 °F
- Accuracy from 0 to 80m/262ft: 1% ±0.2m/1ft
Temperature measurement:
- Measurement range: -10 °C to +50 °C /
14°F to 122 °F
- Resolution: 1 °C / 1 °F
- Accuracy: ± 2 °C / ± 4 °F
Clock: quartz clock, time, date, dive time
display up to 999 minutes
Oxygen concentration: adjustable between 21%
and 99%, ppO
2
max range between 1.2 and 1.6bar
Logbook memory: 95hours of dive profile at
5-second sampling rate
Operating temperature: -10 °C to +50 °C /
14°F to 122 °F
Storage temperature: -20 to 70 °C / -4 to 158°F
Display:
- Diagonal: 31 mm / 1 1/4"
- Mineral glass
Power supply:
- CR2450 user-replaceable battery
- battery life: 100-150 dives. Actual battery
duration depends on the usage of the
backlight and the water temperature.
4.2. MAINTENANCE
The tank pressure gauge and the parts of this
product used to measure tank pressure should
be serviced by an authorized Mares dealer
every other year or after 200 dives (whichever
comes first). In addition, the depth accuracy
should be verified by an authorized Mares
dealer every two years Aside from that, Smart
Air is virtually maintenance free. All you need
to do is rinse it carefully with fresh water after
each dive (avoid any chemical products) and
replace the battery when needed. To avoid
possible problems with your Smart Air, the
following recommendations will help assure
years of trouble free service:
- avoid dropping or jarring your Smart Air;
- do not expose Smart Air to intense, direct
sunlight;
- do not store Smart Air in a sealed container,
always ensure free ventilation.
NOTE
If you notice signs of moisture on the inner
wall of the mineral glass, take your Smart
Air immediately to an authorized Mares
service center.
WARNING
The mineral glass is not exempt from
scratches resulting from improper use.
WARNING
Do not blow compressed air onto Smart
Air, because it could damage the pressure
sensor area.
4.2.1. REPLACING THE BATTERY IN SMART AIR
WARNING
REPLACING THE BATTERY IS A VERY
DELICATE OPERATION, AND WHEN
PERFORMED BY AN INEXPERIENCED
PERSON MOST LIKELY WILL LEAD TO A
FLOODED COMPUTER. WE STRONGLY
RECOMMEND THAT YOU VISIT AN
AUTHORIZED MARES CENTER. MARES
DECLINES ALL RESPONSIBILITY FOR ANY
DAMAGE CAUSED BY REPLACING THE
BATTERY.
NOTE
Do not discard the old battery in the
environment. Mares adopts a policy of
respect for the environment, and urges
use of the appropriate separated waste
collection service.
WARNING
When changing the battery, the o-ring
must be replaced. The Smart Air battery
kit contains a high quality CR2450 battery
and a new o-ring. All computer o-rings are
inspected individually for integrity.
Follow these steps and refer to the pictures:
a) Remove the two screws as indicated in the
picture below. These hold the battery cover
in place.
NOTE
Do not remove the screws denoted with !
b) Use a small flat-head screwdriver to pry
open and lift the cover as indicated in the
picture below.
19
c) Remove the cover then remove the o-ring.
Discard the o-ring.
d) Remove the battery by prying it loose with a
small flat-head screwdriver.
e) Replace the battery with the new one from
the kit. The battery should click in place.
Make sure to respect the correct polarity
of the battery: the “+” has to be facing
outwards.
f) Position the new o-ring from the kit in the
groove around the battery, ensuring that it
sits towards the outer edge of the groove.
g) Position the cover onto the watch case and
press it down evenly. Ensure that in the area
of the screws the cover touches the watch
case.
NOTE
Do not lubricate the o-ring! Lubrication
causes the o-ring to twist when the cover is
put over it, causing the watch to flood.
h) Keep the cover pressed onto the watch case
while hand tightening the two screws. Don’t
use excessive force while tightening. Ideal
torque is 12 N cm / 17 oz-in.
WARNING
Mares reserves the right to refuse to
provide service under the warranty if the
maintenance instructions are not followed.
4.3. WARRANTY
Mares products are guaranteed for a period of
two years subject to the following limitations
and conditions:
The warranty is non-transferable and applies
strictly to the original purchaser.
Mares products are warranted free from
defects in materials and workmanship:
components that, upon technical inspection,
are found to be defective, will be replaced free
of charge.
Mares S.p.A. declines all responsibility
for accidents of any kind that result from
tampering or incorrect use of its products.
Any products returned for overhaul or repairs
under warranty, or for any other reason, must
be forwarded exclusively via the vendor and
accompanied with a proof of purchase slip.
Products travel at the risk of the sender.
4.4. WARRANTY EXCLUSIONS
Damage caused by water seepage resulting
from improper use (e.g. dirty seal, battery
compartment closed incorrectly, etc.).
Rupture or scratching of the case, glass or
strap as a result of violent impact or blows.
Damage resulting from excessive exposure to
elevated or low temperatures.
Damage caused by the use of compressed air
to clean the dive computer.
4.5. HOW TO FIND THE PRODUCT
SERIAL NUMBER
To see the product serial number, enter the
INFO submenu.
5. DISPOSAL OF THE DEVICE
Dispose of this device as electronic waste. Do
not throw it away with regular rubbish.
If you prefer, you can return the device to your
local Mares dealer.
Mares S.p.A. - Salita Bonsen, 4 - 16035 Rapallo (Ge) - ITALY - Tel. +39 01852011 - Fax +39 0185 669984
www.mares.com
code 44201440 - 03/18 - Artbook 14369/18
Algorithm
  • Page 1 1
  • Page 2 2
  • Page 3 3
  • Page 4 4
  • Page 5 5
  • Page 6 6
  • Page 7 7
  • Page 8 8
  • Page 9 9
  • Page 10 10
  • Page 11 11
  • Page 12 12
  • Page 13 13
  • Page 14 14
  • Page 15 15
  • Page 16 16
  • Page 17 17
  • Page 18 18
  • Page 19 19
  • Page 20 20

Mares Icon HD Owner's manual

Category
Sport watches
Type
Owner's manual
This manual is also suitable for

Ask a question and I''ll find the answer in the document

Finding information in a document is now easier with AI