Kaz V790 Owner's manual

Category
Humidifiers
Type
Owner's manual

This manual is also suitable for

Germ-Free
Warm Mist Humidifier
Model V790
In English 1-10
En français 11-20
En Español 21-30
Instructions for Operation, Care and Cleaning
Limited Warranty
READ AND SAVE THESE INSTRUCTIONS
Printed in CHINA
Imprimé en CHINA
Impreso en CHINA
P/N 31IMV790190
Patented
READ ALL OF THE FOLLOWING INSTRUCTIONS BEFORE
ATTEMPTING TO OPERATE YOUR HUMIDIFIER. FOLLOWING
THESE SIMPLE GUIDELINES FOR USE AND CARE WILL HELP
ENSURE YEARS OF DEPENDABLE AND EFFICIENT SERVICE.
IMPORTANT SAFEGUARDS
CAUTION: BECAUSE HIGH TEMPERATURE IS GENERATED
IN THIS HUMIDIFIER, BASIC SAFETY PRECAUTIONS SHOULD
ALWAYS BE FOLLOWED ESPECIALLY WHEN CHILDREN ARE
PRESENT.
WHEN USING ELECTRICAL APPLIANCES, THESE BASIC SAFETY
PRECAUTIONS MUST BE FOLLOWED:
1. DO NOT operate the humidifier without the water tanks.
2. ALWAYS use clean, cool tap water to fill the water tanks.
3. To avoid risk of fire or shock, DO NOT use an extension cord.
4. DO NOT handle the unit with wet hands.
5. NEVER tilt, move, or attempt to empty the unit while it is operating
or plugged in. Shut off, unplug and remove water tanks before
moving unit.
6. WARNING – Eye damage may result from directly viewing the
light produced by UV bulb. DO NOT energize unit while lamp door
is removed.
7. Place unit in an area where it is not accessible to children.
8. DO NOT place the unit close to heated areas, such as near stoves,
heaters or in direct sunlight.
9. DO NOT operate OUTDOORS. This humidifier is intended for
indoor use only.
10. DO NOT let water get into the air inlets on the bottom of the
enclosure or on the cord or plug.
11. DO NOT store or use gasoline or other flammable vapors and
liquids near the humidifier.
12. ALWAYS make sure the water tank caps and gaskets are firmly in place.
13. DO NOT touch hot surfaces.
14. ALWAYS turn the humidifier off when the water tanks are empty
or when the unit is not in use. If you turn your unit off for extended
periods, ALWAYS disconnect the power cord and empty the water
tanks and base.
15. ALWAYS place the unit on a firm flat, level, water resistant
surface and arrange the power cord so that the product is unlikely to
be upset.
16. DO NOT clean the product or service the UV bulb without
disconnecting the power cord.
17. Before connecting to electric power outlet, check your electrical
power supply. It must be 120 volts A.C. (alternating current). The
outlet may be 15 amp or 20 amp. The circuit must be of adequate
size and must be protected by fuse or circuit breaker.
18. This item has a polarized plug. As a safety feature, this plug will
fitin a polarized electrical receptacle (outlet) only one way. If the
plug does not fit fully in the outlet, reverse the plug. If it still does
not fit, contact a qualified electrician.
19. DO NOT attempt to remove TOP HOUSING, NOZZLE OR MIN-
ERAL ABSORPTION PAD, during operation, or within 15 minutes
after the humidifier is turned to the “OFF” position and unplugged.
Serious injury may result. MINERAL ABSORPTION PAD, TOP
HOUSING AND NOZZLE should only be removed for cleaning and
maintenance purposes. DO NOT place hands or face directly over
TOP HOUSING while unit is in operation.
20. Before using the unit, check the power cord for any signs of damage.
21. This humidifier requires daily and weekly maintenance.
22. Refer to CLEANING AND MAINTENANCE instructions provided.
NEVER clean humidifier in any other manner than as instructed by
this manual.
GRILL COVER
TOP HANDLE
TANK CAP
ASSEMBLY
POWER
BUTTON
TRANSLUCENT
RING
ROTARY
KNOB
MAIN HOUSING
TANK CAP
ASSEMBLY
MEDICINE CUP
T
OP HANDLE
FABRIC
PAD
NOZZLE
SAVE THESE INSTRUCTIONS
WEEKLY CLEANING AND MAINTENANCE ADVISORY
At least weekly cleaning is recommended, when the unit has been in use. Regular
cleaning prevents mineral scale buildup in the hot water reservoir. It also helps prevent
buildup of bacteria, molds or other microorganisms in the tank or system. This ensures
that your humidifier will operate at maximum efficiency. (See page 6 for full cleaning
instructions.)
HOW YOUR VICKS
WARM MIST
HUMIDIFIER WORKS
The model V790 humidifier uses
a two-step approach to eliminate
potentially harmful microorganisms
from the water before they are
spread with the mist into the air.
The first step uses a UV bulb, located
inside the base of the humidifier,
that shines on the water through a
special glass tube as it passes from
the cold water reservoirs to the hot
water reservoir. The second step is
the boiling action that takes place in
the hot water reservoir just before the mist is distributed to the air in the room.
V790 PHOTO
CONTROL PANEL
POWER SWITCH
ON POSITION - When the push button switch
is pushed to the ON setting and the unit is
plugged in, the power is on. The blue “POWER”
indicator light will be illuminated.
OFF POSITION - When the push button switch
is pushed to the “OFF” position, the “POWER”
indicator light will not be illuminated, indicating
that the power is “OFF”. This should be used (in
addition to unplugging unit) before moving,
performing maintenance, etc.
REPLACE UV BULB - If the “REPLACE UV
BULB WHEN LIT” signal light is continuous
illuminated during normal use (an occasional
faint glow may occur when switching power on or
other times, but this is normal), the bulb must be
replaced with the same special 3.5W bulb. See
the enclosed order form. The UV bulb will operate
at maximum output for approximately 2,000 hours.
The UV bulb may operate
U
V
B
u
l
b
R
e
p
l
a
c
e
R
e
l
l
H
u
m
i
d
i
t
y
L
e
v
e
l
P
o
w
e
r
O
n
T
a
n
k
99.9% Germ Free Mist
longer than 2,000 hours but at a reduced output. To keep your humidifier operating
at maximum efficiency it is recommended that the UV bulb be replaced after
2,000 hours of use.
REFILL INDICATOR - When illuminated, the water tanks need refilling. See the
section “Filling the Water Tanks”. If still illuminated a few minutes after full tank
is placed on base, reposition water tanks. (Unit will operate with only one water
tank.) Each time you fill tanks, rinse tanks, hot water reservoir and cold water
reservoirs. Clean them according to CLEANING INSTRUCTIONS if minerals or
film are present.
RELATIVE HUMIDITY CONTROL - This controls the humidity level. If moderate
humidity is desired, the control should be turned counterclockwise toward “ ”;
and if higher humidity is desired, clockwise toward “ ”. NOTE: When you
unpack your humidifier, you may find it has droplets of water on some surfaces.
This is normal as every unit is tested prior to shipping. Carefully unpack humidifier
and remove all packing material.
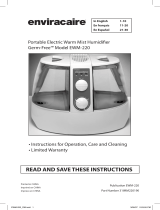
OPERATING INSTRUCTIONS
1. Place the base of the unit on a firm, flat, level and water resistant surface.
2. Fill the water tanks according to the instructions below and place on
humidifier base.
3. Plug the power cord firmly and completely into the wall outlet.
4. Push the power switch to the ON position (Lights may flicker momentarily).
Then turn the relative humidity knob clockwise until you hear a faint click. It will
be normal for the humidifier to take a few minutes to warm up and begin to mist.
5. When the water tanks are empty, (after approximately 24 hours running time),
the “REFILL WHEN LIT” lamp will go on, and the unit will stop heating. Refer
to the “FILLING THE WATER TANKS” section.
6. Whenever the water falls below the level of the float switch during operation,
the heating element will shut off and stop heating, and the REFILL indicator
will light.
7. The unit will operate as long as there is water in either tank and unit will
operate with either one or both tanks.
FILLING THE WATER TANKS
1. Before filling the water tanks, push the POWER switch to the “OFF” position
and unplug unit. Refer to CLEANING INSTRUCTIONS.
2. Remove water tanks from base, turn each tank upside down and remove tank
cap by turning counterclockwise. Fill tank with clean cold tap water. Replace
the tank cap by turning clockwise. Tighten firmly.
3. Carefully pick up tank, since it will be heavy when full, and slippery if wet.
4. Place water tanks on base. Make sure tanks are properly placed, otherwise,
the humidifier will not work correctly.
USING THE MEDICINE CUP
In order to add Vicks VapoSteam or Kaz Inhalant to the “mist” output:
1. Push the POWER switch to the “OFF” position and allow the Top Housing to cool.
2. Carefully add liquid medicine to medicine cup. DO NOT fill the cup more than
half full.
3. Push the POWER switch to the ON position.
4. After use, remove the cup from the unit and clean any residue from the cup
with warm water.
WARNING:
DO NOT use any liquid medicine other than those specifically recommended
for use with a steam vaporizer or warm mist humidifier.
DO NOT pour medicine directly into the top housing openings nor add it to
the water in the tank or tray.
MINERAL ABSORPTION PAD INSTRUCTIONS
Warm mist humidifiers do not spread fine mineral dust into the air. The mineral
dust remains trapped in the humidifier hot water reservoir. Use of mineral
absorption pads will play a major role in capturing and removing minerals from
hot water reservoir, and preventing a stubborn mineral buildup. The unit can run
without pads, but more frequent cleaning will be required.
1. Before starting humidifier, place mineral absorption pad in the hot water
reservoir. After the humidifier has been operating, the water will become
HOT, and CAUTION should be exercised when handling mineral absorption
pad. It is best to allow humidifier water to cool down, and to use tongs or
long tweezers when handling pad.
2. The useful life of the mineral absorption pad will vary, depending on the mineral
content of the water used. In areas of moderate mineral content water
supply, the mineral absorption pad should be changed after approximately
(3) weeks of continuous use. If the water is “Hard Water”, the pad should be
changed more frequently. The best way to tell when the pad should be
changed is to examine it AFTER the water has cooled down, to see if it is
still soft and pliable. When the pad is near the end of its life, it becomes stiff
and hard and should be replaced with a new pad. Another sign to change
pad is when scale begins to buildup on interior of hot water reservoir. If pad
appears to disintegrate (normally due to use of softened water) discontinue
use of pads.
CLEANING AND MAINTENANCE
Water contains minerals and other particles. During operation most of these min-
erals will remain in the water reservoir. Gradual buildup of deposits will coat the
hot water reservoir and reduce its efficiency. The importance of routine cleaning
and care cannot be over-emphasized. Hard water contains more minerals and
other particles.
CLEANING INSTRUCTIONS
Failure to perform the necessary cleaning steps will damage unit.
1. Before cleaning, set CONTROLS to “OFF” position and unplug unit.
2. Remove water tanks from humidifier base, and drain water from tanks.
3. Allow at least 15 minutes for the hot water to cool after shutting unit “OFF”
before moving base.
Remove top housing by rotating (2) lock wheels and lifting up top housing.
Remove nozzle by rotating it counterclockwise and lifting up. Remove mineral
absorption pad from hot water reservoir using tweezers or tongs to prevent
burns from hot water. When the cleaning procedure is completed, replace mineral
absorption pad. To drain water from humidifier base, grasp with both hands
and tilt to the side, draining water into the sink. BE CAREFUL NOT TO HAVE
DRAINING WATER FALL INTO CONTROLS OR VENT OPENINGS. DO NOT
drain in any manner other than indicated. WARNING: DO NOT place directly
under running faucet.
4. Pour about 1 cup of white vinegar into either reservoir and allow it to soak
for only 20 to 30 minutes.
5. Hold the base of the humidifier over the sink and tilt it on its side to empty
the vinegar. Fill the cold and hot water reservoirs with clean, warm water to
remove all traces of the vinegar. Remove any buildup of minerals in the hot
water reservoir using a small brush, such as a toothbrush. NOTE: The
buildup is due to water hardness. The harder your water, the more often
this maintenance will be needed. Empty all of this water by turning the unit
on its side. If minerals remain in the metal (stainless steel) boiler cup, a
metal scraper can be used to scrape off the mineral deposits. Be careful not
to use any metal blade on any plastic parts.
DO NOT ALLOW WATER TO ENTER THE BOTTOM OF THE HUMIDIFIER
BASE OR ANY OTHER OPENINGS, OR IMMERSE THE CORD AND PLUG.
6. Disinfect the water tanks using a solution of one teaspoon of household
chlorine bleach in 1 gallon of water. Let the solution sit for 20 minutes,
swishing every few minutes to wet all surfaces. Empty the tanks completely;
rinse thoroughly until all of the bleach smell is gone. Fill the tanks with
fresh, cool water and replace them onto the humidifier base.
7. NEVER use any metal or hard objects to clean plastic parts which may
cause scratching of the plastic parts. The only exception to this is the metal
part of the hot water reservoir. A metal scraper can be used to clean this
part only. NEVER use gasoline, kerosene, glass cleaner, furniture polish,
paint thinner or other household solvents to clean any part of the humidifier.
8. Each day the reservoirs and tanks should be drained, rinsed and refilled
with fresh tap water.
9. To clean exterior surfaces, use a solution of water and mild detergent with a
wrung-out damp cloth. Rinse and wring out the cloth and wipe the exterior
surfaces again. Finally, wipe with a dry cloth. Allow sufficient time to dry
before plugging the electrical cord into the outlet.
10. If it is noticed that the accumulated residue on the float switch affects the
floating action, clean carefully with a soft brush.
11. After base is totally cleaned and dried, replace mineral absorption pad. Place
nozzle on base and rotate clockwise until it locks. Place Top Housing on
Main Housing and rotate lock wheels until it locks in place.
12. Replace tanks. Plug in the unit and resume normal use.
CHANGING THE UV BULB
1. If the “REPLACE UV BULB” indicator illuminates during normal use, it is time
to change the UV bulb, which is a special 3.5W bulb.
2. Turn the POWER switch to the “OFF” position, unplug it and allow it to cool.
3. Remove the water tanks from the base of the humidifier. Remove Top
Housing by rotating (2) lock wheels. Remove nozzle by rotating it counter
clockwise and lifting up.
4. Place the base of the humidifier over
the sink and tilt the unit to remove
any remaining water.
5. Carefully turn the base of the humidifier
over and place it upside down on a flat
level surface. You will see a door at
back of unit that is closed with two
Phillips head screws.
6. Using a Phillips head screwdriver,
carefully turn the screws counter-
clockwise until the screws separate
from the door.
7. Open the door, by pulling forward. The UV light bulb will be visible. Pull the
door out the minimum amount to have access to unscrew bulb from socket.
8. Take a replacement 3.5W UV bulb that you purchased from Kaz, Inc. or
another supplier and change the bulb. To prolong the life of the bulb, limit
your direct contact with the glass of the bulb by using a cloth or tissue to
screw it into place.
9. When the new bulb is in place, close the door and replace the screws by
using your Phillips head screwdriver and rotating them clockwise until they
are just tight. DO NOT OVER TIGHTEN.
10.
WARNING - DO NOT turn power on, while UV lamp door is open, and
DO NOT view illuminated bulb directly because eye damage may occur.
11. Turn the unit upright, place the top housing, nozzle and water tanks on top of
the base of the humidifier, plug the unit in, and push the POWER switch to
the ON position. The “REPLACE UV BULB” indicator should no longer be lit.
IMPORTANT NOTE: Even though you will not receive maximum germicidal
effects, you can still use your humidifier until the replacement bulb arrives.
NOTE: You will hear a rattling sound and notice a small round object inside your
bulb. This is normal. Your bulb is fully operational.
Lamp contains mercury. Manage in accordance with disposal laws.
See www.lamprecycle.org or call 1-800-895-8842
Hg
UV LAMP
DOOR
UV
BULB
SCREW
UV LAMP
DOOR
UV
BULB
SCREW
STORAGE TIPS
If you do not plan to use your humidifier for an extended period of time, such as
during the summer months, it is important that you follow these instructions to
help prevent problems from developing in the unit.
1. Clean your humidifier as instructed in the section titled, “Cleaning and
Maintenance”.
2. Make sure all water is emptied from the tanks and the hot and cold water
reservoirs.
3. Dry your unit thoroughly.
4. Leave the tank caps off to expose the tanks to air.
5. Pack your humidifier in its original carton and store it in a cool, dry place.
SERVICE
DO NOT attempt to repair this humidifier yourself. For repairs covered under
the warranty, contact Kaz, Inc. by telephone or mail for a Return Authorization
Number.
TROUBLESHOOTING
TROUBLE POSSIBLE CAUSES SOLUTION
Unit does not mist Unit is not plugged in Plug in unit
Power failure Check circuit breaker
Water tanks empty Remove and refill
Power switch not turned on Push switch to ON
Unit not reset after refilling tanks Reposition water tanks
Water tank not properly Reposition water tanks
located on base unit
Humidity level set is achieved Turn Relative Humidity
Control to higher setting
Only one tank empties Move unit to level
surface. Raise end
with full tank.
Water leaks from unit Tank cap or tank cap Tighten cap.
gasket is missing or improperly Replace tank cap
positioned or reposition cap
gasket.
Moist air output low Mineral buildup in hot water Clean unit as per
reservoir instructions.
Refill indicator light on Water level is below water Refill water tanks
level float and mount tanks on base
Water level float Clean float per
is covered with film cleaning instructions
Mineral buildup in hot water Clean unit per
reservoir cleaning instructions
LIMITED WARRANTY
IMPORTANT NOTICE
PLEASE CLEAN THIS VICKS
®
PURE MIST HUMIDIFIER AT LEAST ONCE A
WEEK BY FOLLOWING THE CLEANING INSTRUCTIONS IN THE OWNER’S
MANUAL. FAILURE TO REGULARLY CLEAN THIS HUMIDIFIER WILL RESULT
IN A BUILDUP OF MINERAL DEPOSITS WHICH WILL CAUSE THE UNIT TO
CEASE TO OPERATE. IF THE UNIT FAILS TO FUNCTION BECAUSE IT HAS
NOT BEEN CLEANED, THIS WILL VOID THE WARRANTY.
To the original purchaser or gift recipient of this humidifier. You should first read
all instructions before attempting to use this product.
A. This 3 year limited warranty applies to repair or replacement of product
found to be defective in material or workmanship. This warranty does
not apply to damage resulting from commercial, abusive, unreasonable
use or supplemental damage. Defects that are the result of normal
wear and tear will not be considered manufacturing defects under this
warranty.
KAZ IS NOT LIABLE FOR INCIDENTAL OR CONSEQUENTIAL DAMAGES OF ANY
NATURE. ANY IMPLIED WARRANTY OF MERCHANTABILITY OR FITNESS FOR
A PARTICULAR PURPOSE ON THIS PRODUCT IS LIMITED IN DURATION TO
THE DURATION OF THIS WARRANTY.
Some jurisdictions do not allow the exclusion or limitation of incidental or
consequential damages or limitations on how long an implied warranty lasts, so
the above limitations or exclusions may not apply to you. This warranty gives you
specific legal rights, and you also may have other rights which vary from jurisdiction
to jurisdiction. This warranty applies only to the original purchaser of this product
from the original date of purchase.
B. At its option, Kaz will repair or replace this product if it is found to be
defective in material or workmanship. Defective product should be
returned to the place of purchase in accordance with store policy.
Thereafter, while within the warranty period defective product may be
returned to Kaz.
C. This warranty does not cover damage resulting from any unauthorized
attempts to repair or from any use not in accordance with the
instruction manual.
D. Return defective product to Kaz, Incorporated with a brief description
of the problem. Include proof of purchase and a $10 US/$15.50 CAN
check or money order for handling, return packing and shipping
charges. Please include your name, address and a daytime phone
number. You must prepay shipping charges.
Send to:
In U.S.A.: In Canada:
Kaz, Incorporated Kaz, Incorporated
Attn: Returns Department Attn: Returns Department
4755 Southpoint Drive 510 Bronte Street
Memphis, TN 38118 South Milton, ON L9T 2X6
USA Canada
CUSTOMER SERVICE #: 1-800-477-0457
Replacement Mineral Absorption Pads
(Warm Mist Humidifiers Only)
Replacement UV (Ultraviolet) Germicidal Bulb
MAIL ORDER FORM
Replacement mineral absorption pads help extend the life of your Germ-
Free Humidifier. Mineral absorption pads and replacement UV bulbs are
available from your retailer or direct from Vicks with the order form below.
We welcome MasterCard, VISA and Discover, or enclose your check or money
order payable to Vicks. Mail your order to the following address:
Phone: 1-800-477-0457
Fax: 508-481-0509
Kaz Inc.
Consumer Relations
250 Turnpike Road
Southborough, MA 01772
Please allow 10 days for shipping
ORDER INFORMATION:
Quantity Item Unit Price Total Price
(P/N: SMFP-3)
Mineral Absorption Pad $6.00
(P/N: SF-UV)
Replacement UV Bulb $12.00
Shipping and handling $6.95
Sales tax: CA 8.3%, FL 7%, MA 5%, NY 8.6%,
TN Residents add 9.8%
Total order price
SHIP TO:
Name:
Street Address:
City/State/Zip:
(City/Providence/postal code in Canada)
Form Of Payment: Check Discover MasterCard VISA
Card Number
Expiration Date
Print name (as it appears on card)
Cardholders Signature
  • Page 1 1
  • Page 2 2
  • Page 3 3
  • Page 4 4
  • Page 5 5
  • Page 6 6
  • Page 7 7
  • Page 8 8
  • Page 9 9
  • Page 10 10
  • Page 11 11
  • Page 12 12
  • Page 13 13
  • Page 14 14
  • Page 15 15
  • Page 16 16
  • Page 17 17
  • Page 18 18
  • Page 19 19
  • Page 20 20
  • Page 21 21
  • Page 22 22
  • Page 23 23
  • Page 24 24
  • Page 25 25
  • Page 26 26
  • Page 27 27
  • Page 28 28
  • Page 29 29
  • Page 30 30
  • Page 31 31

Kaz V790 Owner's manual

Category
Humidifiers
Type
Owner's manual
This manual is also suitable for

Ask a question and I''ll find the answer in the document

Finding information in a document is now easier with AI