Medium EasyFixx Comfort, 160 x 90 cm User manual
- Category
- Projection screens
- Type
- User manual
This manual is also suitable for
Page is loading ...

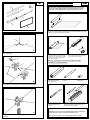
MONTAGE
Stecken Sie die Füße (2) in das untere Kunststoffkreuz auf
dem Stativ (1)ein.
A
2
1
Teileliste.
D
1
S
B
3
4
Den oberen Spannkreuz mit Stange in die Strebe
stecken.
C
2
4
5
3
1
Important !
Projection screen can be damaged without using protective
foam material or when stored in a different way !
Do not put any objects on the packing with the screen !
I
II
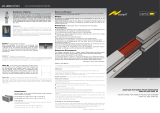
Screen packing and storage instructions
Projection screen with
foam material rolled up
on a paper tube.
Roll up carefully the screen with foam
material on the tube to avoid deformations
and unevenness. When rolling up slightly
stretch the screen both lengthwise and
transversely (see Fig.2).
After rolling the screen up fold the black
screen hem back and wrap the roll with
the rest of foam material (Fig.3).
Put the screen on an even surface (table or clean floor) white side up and cover it
with a sheet of foam material of the same size - edges aligned together. Put paper
tube (Fig.1) on the screen with foam material.
Bag (I) with components
1, 2 and 4.
Bag (II) with
component 3.
Please be careful when packing the projection screen. The screen
material used is highly sensitive. Faulty rolling up of the screen
can result in deformations that can permanently remain visible
even after unrolling and stretching the screen on the frame !!
Warning - if the screen is not rolled up properly, possible
deformations can be permanent !!
A
A
GB
III
I
III
II
Put the rolled-up screen with
the foam material into the
bag (III).
Put bags (I) and (II) under the seperation and
secure them with the Velcro-fastener. Put
bag (III) above the seperation.
6
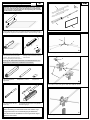
Beide Hälften des oberen Spannkreuzes (3) in Pfeilrichtung
auf die Stangen (4) aufsetzen und mit der Schraube anziehen.

Die Bildwand an den Stangenenden aufhängen - zuerst die Punkte (3)
und danach die Punkte (4). Die Bildwand beim Aufhängen am
schwarzen Rand anfassen !
Bei der Demontage zuerst die Punkte (4) und danach die
Punkte (3) entfernen.
Ende der Stange in Richtung des Videoprojektors schwenken (1).
D
2
3
4
3
4
1)
Füße
Draufsicht
Projektions-
richtung
Verbinden Sie die Randteile der Stange mit der Mittelstange.
Detailzeichnung der Befestigung
des letzten Punktes.
E
F
D
Hang the projection screen on the rod ends - first points (3) and
then points (4). During hanging hold the projection screen at the
black edge !
During dismantling first take down points (4) and then points (3).
Turn end of rods according to picture (1).
GB
5
3
4
3
4
1)
Feet
top view
Direction of
projection
Connect the outer parts of the rods with the centre parts.
Detail drawing of the fastening
of the last point.
E
F
D
Die Höhe der Fläche kann einfach mit einem Hebel verstellt werden.The screen height can be changed easily with a lever.
Page is loading ...
-
 1
1
-
 2
2
-
 3
3
-
 4
4


Medium EasyFixx Comfort, 160 x 90 cm User manual
- Category
- Projection screens
- Type
- User manual
- This manual is also suitable for
Ask a question and I''ll find the answer in the document
Finding information in a document is now easier with AI
in other languages
Related papers


Other documents
-
Kindermann 7434000001 User manual
-
 Avtek International 1EVF13 User manual
-
Vision TM-UST Owner's manual
-
 AV Stumpfl Vario32 400x300 FP 4:3 Operating instructions
-
 AV Stumpfl Vario 32 Operating instructions
-
 ORAY Orion HC 245 x 392cm Owner's manual
-
Bauer T3 super Owner's manual
-
Casio XJ-V10X, XJ-V100W, XJ-V110W Owner's manual
-
Casio XJ-F10X, XJ-F20XN, XJ-F100W, XJ-F200WN, XJ-F210WN Owner's manual
-


