Chicco 00.065408.200.000 Owner's manual
- Category
- Baby gyms & play mats
- Type
- Owner's manual
This manual is also suitable for

1
’
Page is loading ...
Page is loading ...
Page is loading ...
Page is loading ...
Page is loading ...
Page is loading ...

8
9
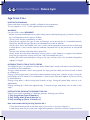
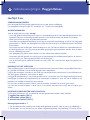
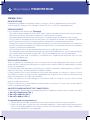
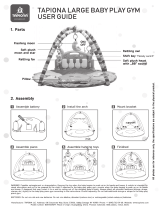
Instruction Manual Deluxe Gym
Age: From 3 m+
INSTRUCTION MANUAL
Please read these instructions carefully and keep for future reference.
This toy requires 3 x “AA” 1.5 Volt type batteries (not included).
WARNING
For your child’s safety: WARNING!
• Before use remove and dispose of any plastic bags and any other packaging (e.g. fasteners, xing ties,
etc.) and keep them out of reach of children.
• This toy must only be assembled by an adult.
• Check the toy regularly for signs of wear and damage, and to ensure that it is assembled correctly.
Should any part be damaged, do not use and keep out of reach of children.
• The toy must always be handled with care; it must not be exposed to sources of heat and/or kept
in damp places; it must not be repaired, modied, tampered with by the purchaser, or unqualied
persons.
• This toy must only be used under adult supervision.
• Always check that the central electronic activity panel is safely tted to its support frame before
using the gym and multi-activity panel (see “How to Assemble the Gym”).
• Prevent your child from climbing or sitting on the toy’s surface, since it has not been designed to
support its weight.
INTRODUCTION TO THE ACTIVITY CENTRE
This delightful gym is an important activity centre whose lights, sounds, and colours stimulate baby to
co-ordinate its first movements.
The gym, which becomes a multi-activity panel, has 3 play positions: baby can lie on its back, sit down
or standing up.
Playing in the lying position is particularly recommended starting from 3 months of age. During this
period, baby starts to make its rst movements: it tries to reach and touch objects and starts to raise
its head and torso.
Playing sitting down, is ideal starting from 9 months of age. During this period, baby starts to sit in-
dependently.
Playing standing up is ideal from approximately 12 months of age, when baby starts to take its rst
steps.
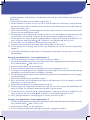
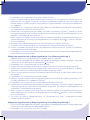
INSTRUCTIONS ON HOW TO ASSEMBLE THE GYM
Deluxe Gym can be assembled in 3 different positions, allowing your child to:
1. Play lying down (From 3 Months +)
2. Play sitting down (From 9 Months +)
3. Play standing up (From 12 Months +)
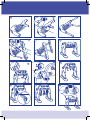
How to Assemble the Toy for Play Position No. 1
1. Place the electronic panel on the oor, onto a at surface, as shown in diagram A.
2. Hold the leg from the part where the single locking button is located, as shown in diagram B. Press
GB
USA

8
9
the locking button and t the leg of the electronic panel; a click is heard, indicating that it has
locked into position.
3. Repeat the operation with the other 3 legs (diag. C).
4. Hold the support base, as shown in diagram D (The curved part must remain in the external posi-
tion). Press the side buttons, located in the lower part of the leg, t the support base into slot A,
until a click is heard, indicating that it has locked into position.
5. Repeat the operation with the other leg. Take hold of the other support base and repeat the opera-
tion with the other 2 legs (diag. E).
6. Place the gym on the oor, onto the support bases (diag. F). Turn the xed electronic panel until the
arrow marked on the panel’s shoulder corresponds to symbol 1, located on the panel (F-1).
7. Once the panel has been inserted correctly into the slot, x it turning the side knob in a clockwise
direction, until the symbol has been reached (diag. G). A click will indicate that the panel is cor-
rectly locked into position.
8. Lower the fastening xtures, located on the lower part of the panel (diag. H).
9. Fasten the swinging toy by sliding the fabric fastener inside the fastening xture (diag. I).
10. Fasten the fabric fastener tightly, sliding it into the fastening xture, as shown in diagram I, and
adjust it according to the child’s height.
11. Repeat the operation with the other 2 swinging toys. The gym will look as shown in diagram L.
Changing the Play Position from No. 1 to No. 2
1. Remove the 3 swinging toys, taking off the fabric fastener from the fastening xture.
2. Press the safety button, located at the base of the knob, and, at the same time, turn the knob in an
anticlockwise direction, positioning it vertically on the symbol (diag. M).
3. Repeat the operation on the other side.
4. Turn the xed electronic panel to the initial position, as shown in diag. M;
5. Place the gym onto the oor, as shown in diagram N. Remove the support bases, by pressing the
side buttons located on the lower part of the legs.
6. Press the button, located at the side of the electronic panel’s shoulder, and remove the leg as shown
in diagram O.
7. Repeat the operation with the other 3 legs.
8. Fit the shoulders of the electronic panel into slots B of the support base; a click is heard, indicating
that they have locked into position (diag. P).
9. Repeat the operation with the other support base (diag. Q).
10. Place the gym on the oor, onto the support bases (diag. R). Turn the 2 panels externally, one at a
time, until the arrow marked on the shoulder corresponds to symbol 2, located on the panel.
11. Once the panel has been inserted correctly into the slot, x it turning the side knob in a clockwise
direction, until the symbol has been reached (diag. S). A click will indicate that the panel is cor-
rectly locked into position.
12. If the toy has been assembled correctly, the multi-activity panel in position 2 should look as shown
in diag. T.
Changing the Play Position from No. 2 to No. 3
1. Press the safety button, located at the base of the knob, and, at the same time, turn the knob in an
anticlockwise direction, positioning it vertically on the symbol (diag. M).
2. Repeat the operation on the other side.

10
11
3. Turn the electronic panel to the initial position, as shown in diag. M;
4. Take the panel and lay it down on the oor, as shown in diagram U. Remove the support base from
the panel.
5. Turn the xed electronic panel to the initial position, as shown in diag. M.
6. Hold the leg from the part where the single locking button is located, as shown in diagram B. Press
the locking button and t the leg of the electronic panel; a click is heard, indicating that it has
locked into position.
7. Repeat the operation with the other 3 legs (diag. C).
8. Hold the support base, as shown in diagram D (The curved part must remain in the external posi-
tion). Press the side buttons, located in the lower part of the leg, t the support base into slot A,
until a click is heard, indicating that it has locked into position.
9. Repeat the operation with the other leg. Take hold of the other support base and repeat the opera-
tion with the other 2 legs (diag. E).
10. Place the gym on the oor, onto the support bases (diag. R). Turn the 2 panels externally, one at a
time, until the arrow marked on the shoulder corresponds to symbol 2, located on the panel.
11. Once the panel has been inserted correctly into the slot, x it turning the side knob in a clockwise
direction, until the symbol has been reached (diag. S). A click will indicate that the panel is cor-
rectly locked into position.
12. If the toy has been assembled correctly, the multi-activity panel in position 3 should look as shown
in diag. V.
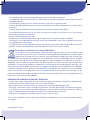
HOW TO USE THE ACTIVITY PANEL
• To switch the electronic activity panel ON, simply move the switch located near the keyboard keys
from the OFF to the <)) / <))) position, according to the desired volume (diagram 1). A fun light
display and a melody conrm that the activity panel has been activated.
• To avoid wasting battery power, it is recommended to always switch off the activity panel after use,
by moving the switch to the OFF position (diagram 1).
• The 3 musical swings with the 2 fun teddy bears and 1 dog character, encourage baby to move for-
ward to touch them, and activate fun melodies accompanied by an amusing light display. This activ-
ity helps baby to develop its manual/visual co-ordination skills and audio/visual abilities.
HOW TO USE THE MULTI-ACTIVITY PANEL
• After having removed the fabric fastener, the three swinging toys can be used separately,
in the area designed for the insert game, located on the multi-activity panel.
• The central panel has several activities, which stimulate baby’s co-ordination, musical and logical
associative skills:
• - A rst musical keyboard that features fun melodies.
• - A booklet to look at.
• - A spiral that turns when the frog moves.
• - A roller that turns when the lever is pressed.
• - Fun animal character inserts, which will help baby to recognise geometrical shapes.
• - Colourful spheres that rotate when the yellow disc is activated.
FITTING AND/OR REPLACING THE BATTERIES
• Batteries must only be tted by an adult.

10
11
• To replace spent batteries: Loosen the screw on the battery compartment cover with a screwdriver
and open the cover. Then remove the spent batteries and t new ones, ensuring that they have
been tted in the correct polarity (as shown on the product), close the battery cover, and tighten
the screw.
• Always keep batteries and tools out of reach of children.
• Always remove spent batteries from the toy, to avoid the danger of possible leakage from the battery
damaging the product.
• Always remove the batteries if the toy will not be used for a long period of time.
• Only use alkaline batteries of the same type or equivalent to the type recommended for the correct
function of this product.
• Never mix new and old batteries, or different types of batteries.
• Do not burn or dispose of spent batteries into the environment. Dispose of spent batteries at an
appropriate differentiated collection point (i.E. Designated rubbish bins or refuse site).
• Do not short-circuit the battery terminals.
• Do not attempt to recharge non-rechargeable batteries: they might explode.
• The use of rechargeable batteries is not recommended, since they could impair the toy’s functional-
ity.
• If rechargeable batteries are used, take them out of the toy before recharging them. Batteries must
always be recharged under adult supervision.
This product complies with EU Directive 2002/96/EC.
The crossed bin symbol on the appliance indicates that the product, at the end of its life,
must be disposed of separately from domestic waste, either by taking it to a separate waste
disposal site for electric and electronic appliances or by returning it to your dealer when you
buy another similar appliance. The user is responsible for taking the appliance to a special
waste disposal site at the end of its life. If the disused appliance is collected correctly as separate waste,
it can be recycled, treated and disposed of ecologically; this avoids a negative impact on both the
environment and health, and contributes towards the recycling of the product’s materials. For further
information regarding the waste disposal services available, contact your local waste disposal agency
or the shop where you bought the appliance.
CARE & MAINTENANCE
• Clean the electronic panel with a soft dry cloth; do not submerge the toy in water to prevent the risk
of damaging the electronic circuit.
• Clean the frame with a soft cloth slightly soaked in water.
• For maximum hygiene, clean the 3 swing toys with a soft cloth slightly soaked in a sterilising solution
diluted in water, as indicated for standard cold sterilisation. Do not use undiluted sterilising liquid.
Do not clean in the dishwasher.
• Protect the toy from heat, dust, sand, and water.
Artsana S.p.A. reserves the right to modify at any time the colours and decorations of the product.
Made in China.
EU 2002/96/EC
Page is loading ...
Page is loading ...
Page is loading ...
Page is loading ...
Page is loading ...
Page is loading ...
Page is loading ...
Page is loading ...
Page is loading ...
Page is loading ...
Page is loading ...
Page is loading ...
Page is loading ...
Page is loading ...
Page is loading ...
Page is loading ...
Page is loading ...
Page is loading ...
Page is loading ...
Page is loading ...
Page is loading ...
Page is loading ...
Page is loading ...
Page is loading ...
Page is loading ...
Page is loading ...
Page is loading ...
Page is loading ...
Page is loading ...
Page is loading ...
Page is loading ...
Page is loading ...
Page is loading ...
Page is loading ...
Page is loading ...
Page is loading ...
Page is loading ...
Page is loading ...
Page is loading ...
Page is loading ...
Page is loading ...
Page is loading ...
Page is loading ...
Page is loading ...
Page is loading ...
Page is loading ...
Page is loading ...
Page is loading ...
Page is loading ...
Page is loading ...
Page is loading ...
Page is loading ...

Artsana S.p.A. - Via Saldarini Catelli, 1 - Grandate - Como - Italy - Made in China
Playgym Deluxe
Monitoimikuntosali
MultilekGym
Multilekgym
Γυναστηριο Deluxe
Wielofunkcyjna Zabawka Gimnastyczna
Многофункциональный
Гимнастический Комплекс
www.chicco.com
83508_Z2_1
Cod. 065408
-
 1
1
-
 2
2
-
 3
3
-
 4
4
-
 5
5
-
 6
6
-
 7
7
-
 8
8
-
 9
9
-
 10
10
-
 11
11
-
 12
12
-
 13
13
-
 14
14
-
 15
15
-
 16
16
-
 17
17
-
 18
18
-
 19
19
-
 20
20
-
 21
21
-
 22
22
-
 23
23
-
 24
24
-
 25
25
-
 26
26
-
 27
27
-
 28
28
-
 29
29
-
 30
30
-
 31
31
-
 32
32
-
 33
33
-
 34
34
-
 35
35
-
 36
36
-
 37
37
-
 38
38
-
 39
39
-
 40
40
-
 41
41
-
 42
42
-
 43
43
-
 44
44
-
 45
45
-
 46
46
-
 47
47
-
 48
48
-
 49
49
-
 50
50
-
 51
51
-
 52
52
-
 53
53
-
 54
54
-
 55
55
-
 56
56
-
 57
57
-
 58
58
-
 59
59
-
 60
60
-
 61
61
-
 62
62
-
 63
63
-
 64
64


Chicco 00.065408.200.000 Owner's manual
- Category
- Baby gyms & play mats
- Type
- Owner's manual
- This manual is also suitable for
Ask a question and I''ll find the answer in the document
Finding information in a document is now easier with AI
in other languages
- italiano: Chicco 00.065408.200.000 Manuale del proprietario
- français: Chicco 00.065408.200.000 Le manuel du propriétaire
- español: Chicco 00.065408.200.000 El manual del propietario
- Deutsch: Chicco 00.065408.200.000 Bedienungsanleitung
- русский: Chicco 00.065408.200.000 Инструкция по применению
- Nederlands: Chicco 00.065408.200.000 de handleiding
- português: Chicco 00.065408.200.000 Manual do proprietário
- polski: Chicco 00.065408.200.000 Instrukcja obsługi
- Türkçe: Chicco 00.065408.200.000 El kitabı
- svenska: Chicco 00.065408.200.000 Bruksanvisning
- suomi: Chicco 00.065408.200.000 Omistajan opas
Related papers
-
Chicco Turbo Touch Owner's manual
-
-
-
-
-
-
-
-
Chicco Baby Piano Do Re Mi Owner's manual
-
Other documents
-
 Tapiona Large Baby Play Gym, Kick and Play Piano Infant Activity Mat for Babies 0 , 5 Baby Activity Toys, Kick Piano, Flashing Moon Toy User manual
-
 Baby Einstein Neptune's Discovery Reef Play Gym & Take-Along Toy Bar Owner's manual
-
BRIO Code & Go Bumblebee Operating instructions
-
Kayoba 019438 Owner's manual
-
 Enabling Devices 2319 User manual
-
-
CORNILLEAU COMPETITION 610 Owner's manual
-
mothercare Chicco_walker WALKY TALKY User guide
-
 Bright Starts 60368 User manual
-
Haba 4283 Owner's manual


