Samsung RF217ABWP/XAA-00 Owner's manual
- Category
- Fridges
- Type
- Owner's manual

_ the possibilities
Thank you for purchasing this Samsung product.
To receive more complete service,
please register your product at
www. samsu ng,com/reg ister
Free Standing Appliance

F atur of y©ur F ofrou r
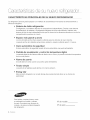
KEY FEATURES OF YOUR NEW REFRIGERATOR
Your Samsung Refrigerator comes equipped with various innovative storage and energy-efficient features.
o
o
o
o
o
o
o
Twin Cooling System
The Refrigerator and Freezer have separate evaporators. Due to this independent cooling system,
the Freezer and Refrigerator cool more efficiently.
Additionally, this separate air flow system prevents food odor of one compartment from seeping into
other compartments.
Bigger & Wider Space
The wide shelf area provides enough space for larger items.
The wide freezer drawer also provides enough space for 2-3 turkeys.
Secure Auto Close
The Secure Auto Close feature will automatically close a door that is slightly open.
Digital Display and Temperature Control
The easy-to-read Digital Display enhances the look of your kitchen and allows you precise
temperature control.
Door Alarm
A helpful beeper alerts you if a door is ajar.
Easy Handle
Freezer door can be opened with less effort.
Energy Star
This Energy star labeled product may save you money on your energy costs.
For easy future reference, write the model
and serial number down. You will find
your model number and serial number on
the left side of the refrigerator.
Model #
Serial #
2 Fea ures

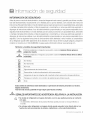
SAFETY INFORMATION
Before operating the appliance, please read this manual thoroughly and retain it for your reference.
Use this appliance only for its intended purpose as described in this instruction manual.
This appliance is not intended for use by persons (including children) with reduced physical, sensory
or mental capabilities, or lack of experience and knowledge, unless they have been given supervision
or instruction concerning use of the appliance by a person responsible for their safety.
This appliance is not intended for use by persons (including children) with reduced physical, sensory
or mental capabilities, or lack of experience and knowledge, unless they have been given supervision
or instruction concerning use of the appliance by a person responsible for their safety.
Because the following instruction covers various models, the characteristics of your Refrigerator may
differ slightly from the Refrigerator described in this manual. If you have any question, contact us at
1-800-SAMSUNG or find help and information online at www.samsung.com.
Important
WARNING
CAUTION
Do NOT attempt.
Do NOT disassemble.
Do NOT touch.
Follow directions carefully.
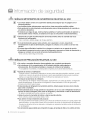
safety symbols and precautions:
Hazards or unsafe practices that may result in severe personal injury or death.
Hazards or unsafe practices that may result in minor personal injury or property
damage.
Unplug the power plug from the wall socket.
Make sure the machine is grounded to prevent electric shock.
Call the contact center for help.
Note.
These warning signs are here to prevent injury to you and others.
Please follow them carefully.
After reading this section, keep it in a safe place for future reference.
WARNINGSEVEREWARNING SIGNS FOR INSTALLATION
G
• Do not install the refrigerator in a damp place or place where it may come in contact with
water.
- Deteriorated insulation of electrical parts may cause an electric shock or fire.
• Do not place this refrigerator in direct sunlight or expose to the heat from stoves, room
heaters or other appliance.
Safety I-ffomr_aon 3

• Do not plug several appliances into the same multiple power board. The refrigerator
should always be plugged into its own individual electrical which has a voltage rating that
matched the rating plate.
- This provides the best performance and also prevents overloading house wiring circuits, which
could cause a fire hazard from overheated wires.
• If the wall socket is loose, do not insert the power plug.
- There is a risk of electric shock of fire.
• Do not use a cord that shows cracks or abrasion damage along its length or at either end.
• Do not bend the power cord excessively or place heavy articles on it.
• Never unplug your refrigerator by pulling on the power cord. Always grip plug firmly and
pull straight out from the outlet.
- Damage to the cord may cause a short-circuit, fire and/or electric shock.
• Do not use aerosols near the Refrigerator.
- Aerosols used near the Refrigerator may cause an explosion or fire.
This refrigerator must be properly installed and located in accordance with the manual
before it is used.
Connect the power plug in proper position with the cord hanging down.
- If you connect the power plug upside down, the wire can get cut off and cause a fire or electric
shock.
When moving the refrigerator, be careful not to roll over or damage the power cord.
- This constitutes a fire hazard.
Make sure that the power plug is not squashed or damaged by the back of the
refrigerator.
Keep the packing materials out of reach of children.
- There is a risk of death from suffocation if children put them on their head.
The appliance must be positioned so that the plug is accessible after installation.
The Refrigerator must be safely grounded
- Always make sure that you have grounded the Refrigerator before attempting to investigate or
repair any part of the appliance. Power leakages can cause severe electric shock.
Never use gas pipes, telephone lines or other potential lightning attractors as an electrical
ground.
WARNING
- Improper use of the grounding plug can result in a risk of electric shock.
If it is necessary to use an extension cord, use only a 3-wire extension cord that has a 3-blade
grounding plug and a 3-slot receptacle that will accept the plug on the appliance. The marked
rating of the extension cord should be AC115-120 V, 10 A, or more. If a grounding adapter is
used, make sure the receptacle box is fully ground
If the power cord is damaged, have it replaced immediately by the manufacturer or its
service agent.
4 Safety Iqformaton

CAUTIO.CAUTION SIGNS FOR INSTALLATION
®
• Allow sufficient space to install the refrigerator on a flat surface.
- If your refrigerator is not level, the internal cooling system may not work correctly.
• Keep ventilation opening in the appliance enclosure or mounting structure clear of
obstruction.
,, Allow the appliance to stand for 2 hours after installation.
WAR.I.GSEVEREWARNING SIGNS FOR USING
G
• Do not insert the power plug with wet hands.
• Do not store articles on the top of the appliance.
- When you open or close the door, the articles may fall and cause personal injury and/or
material damage.
• Do not put a container filled with water on the refrigerator.
- If spilled, there is a risk of fire or electric shock.
• Children should be supervised to ensure that they do not play with the appliance.
• Do not let children hang on the door. A serious injury may occur.
• Do not let children enter inside of the refrigerator. There is a risk of children entrapment.
• Do not insert your hands into the bottom area under the appliance.
- Any sharp edges may cause personal injury.
• Do not let children step on drawer's cover.
- The drawer may break and cause them to slip.
• Do not overfill the refrigerator with food.
- When you open the door, an item may fall out and cause personal injury or material damage.
• Do not touch the inside walls of the freezer or products stored in the freezer with wet
hands.
- This may cause frostbite.
,, Do not spray inflammable gas near the refrigerator.
- There is a risk of explosion or fire.
• Do not store volatile or flammable substances in the refrigerator.
- The storage of benzene, thinner, alcohol, ether, LP gas and other such products may cause
explosions.
• Do not store pharmaceuticals products, scientific materials or temperature sensitive
products in the refrigerator.
- Products that require strict temperature controls must not be stored in the refrigerator.
• Do not place or use an electrical appliance inside the refrigerator, unless it is of a type
recommended by the manufacturer.
• Do not use mechanical devices or any other means to accelerate the defrosting process,
other than those recommended by the manufacturer.
• Do not damage the refrigerant circuit.
,, Do not disassemble or repair the refrigerator by yourself.
- You run risk of causing a fire, malfunction and/or personal injury.
Safety Information r5

WARNINGSEVERE WARNING SIGNS FOR USING
®
• Children should be supervised to ensure that they do not play with the appliance.
• Bottles should be stored tightly together so that they do not fall out.
• This product is intended only for the storage of food in a domestic environment.
• if a gas leak is detected, avoid any naked flames or potential sources of ignition and air
the room in which the appliance is standing for several minutes.
,,Pull the power plug out of the socket before changing the interior lamps of the
refrigerator.
- Otherwise, there is a risk of electric shock.
,, If the appliance generates a strange noise, a burning smell or smoke, unplug the power
plug immediately and contact your nearest service center.
,, If you experience difficulty when changing the light, contact service agents.
,, If any dust or water is in Refrigerator, pull out power plug and contact your Samsung
Electronics service center.
- Otherwise there is a risk of fire
/k
CAUTIONCAUTION SIGNS FOR USING
o
o
Do not re-freeze frozen foods that have thawed completely.
Do not place carbonated or fizzy drinks in the freezer compartment. Do not put bottles or
glass containers in the freezer.
- When the contents freeze, the glass may break and cause personal injury.
,, Service warranty and Modification.
- Any changes or modifications performed by a 3rd party on this finished appliance is not
covered under Samsung warranty service, nor can Samsung be responsible for safety issues
that result from 3rd party modifications.
,, Do not block air holes.
- If the air holes are blocked, especially with a plastic bag, the refrigerator can be over cooled. If
this cooling period lasts too long, the water filter may break and cause water leakage.
• If the refrigerator is disconnected from the power supply, you should wait for at least five
minutes before plugging it back.
,, If you have a long vacation planned or the refrigerator is not to be used for a long period
of time, you must empty the refrigerator and pull out the power plug.
- Deterioration in the insulation may cause fire.
,, Wipe excess moisture from the inside and leave the doors open.
- Otherwise, door and mold may develop.
,, To get Best performance of product,
- Do not place foods too closely in front of the vents at the rear of the appliance as it can
obstruct free air circulation in the refrigerator compartment.
- Wrap the food up properly or place it in airtight containers before putting it into the refrigerator.
,, Fill water tank, ice tray, water cubes only with potable water.
6 safety iqfomqa on

cAu'no.CAUTION SIGNS FOR USING
• When the product is flooded, make sure to contact your nearest service center.
- There is a risk of electric shock or fire.
• Do not directly spray water inside or outside the
refrigerator.
- There is a risk of fire or electric shock.
®
,, Remove any foreign matter or dust from the power plug pins. Do not use a wet or damp
cloth when cleaning the plug, remove any foreign material or dust from the power plug
pins.
- Otherwise there is a risk of fire or electric shock.
• Unplug the refrigerator before cleaning and making repairs.
WAR.I.GSEVEREWARNING SIGNS FOR DISPOSAL
®
DANGER : Risk of child entrapment. Before you throw away your old refrigerator or freezer:
- Take off the doors.
- Leave the shelves in place so that children may not easily climb inside.
• Please dispose of the packaging material for this product in an environmentally friendly
manner.
,, Leave the shelves in place so that children may not easily climb inside. Ensure that none
of the pipes on the back of the appliance are damaged prior to disposal.
,, When disposing of this refrigerator, remove the door/door seals and door latch so that
small children or animals cannot become trapped inside.
Children should be supervised to ensure that they do not play with the appliance.
,, Cyclopentane is used as in the insulation. The gases in the insulation material require
a special disposal procedure. Please contact your local authorities in regard to the
environmentally safe disposal of this product. Ensure that none of the pipes on the back
of the refrigerator are damaged prior to disposal.
safetyiqfomqaon 7

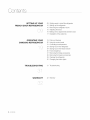
nt nts
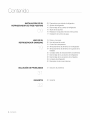
SETTING UP YOUR
FRENCH DOOR REFRIGERATOR
09 Getting ready to install the refrigerator
10 Setting up the refrigerator
10 Removing the refrigerator doors
15 Adjusting the doors
16 Making minor adjustments between doors
17 Installation of the water line
OPERATING YOUR
SAMSUNG REFRIGERATOR
_4
19 Parts and features
20 Using the control panel
21 Controlling the temperature
24 Storing food in the refrigerator
24 Storing food in the freezer drawer
25 Food storage tips
27 Removing the fridge accessories
28 Removing the freezer accessories
29 Cleaning the refrigerator
30 Changing the interior lights
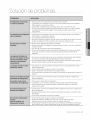
TROUBLESHOOTING 31 Troubleshooting
WARRANTY 32 Warranty
8_ contents

urFrenchDoorF efrger or
GETTING READY TO INSTALL THE REFRIGERATOR
Congratulations on your purchase of this Samsung French Door Refrigerator. We hope you enjoy the state-of-art
features and efficiencies that this new appliance offers.
Selecting the best location for the Refrigerator
• A location with easy access to the water supply.
• A location without direct exposure to sunlight.
• A location with level (or nearly level)flooring.
• A location with enough space for the Refrigerator doors to open easily.
• Allow sufficient space for air circulation of the internal cooling system. Ifthe
Refrigerator does not have enough space, the internal cooling system may not
work properly.
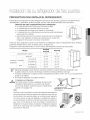
2 i ncl
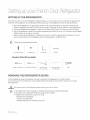
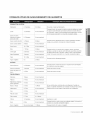
First thing! Make sure that you can easily move your Refrigerator to its final location by measuring doorways
(both width and height), thresholds, ceilings, stairways, etc.
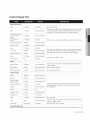
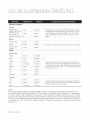
The following chart details the exact height and depth of Samsung French Door Refrigerator.
Dimension
(inch)
Model RF217AB
Capacity (cu.ft)
Width (A)
without door (B)
Depth
with door (C)
without hinge (D)
Height
with hinge (E)
RF195AB
RF197AB
17.8
32 1/4"
24 3/8"
30 1/2"
68 5/8"
69 3/4"
19.7
32 1/4"
26 1/4"
32 1/2"
68 5/8"
69 3/4"
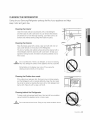
,, Allow clearance to the right, left, back and top when installing. This will help reduce power consumption
and keep your energy bills lower.
,, If you install the Refrigerator where is below 50°F (10°C), it may not function optimally.
,, Do not locate the refrigerator where the wet condition.
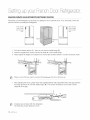
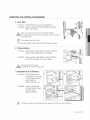
When moving your refrigerator
CAUT=ONTO prevent floor damage, be sure the front adjusting legs
are in the up position(above the floor).
Refer to 'Adjusting the doors' (on page 15).
FLOORI NG
Flat-blade Control Lever
screwdriver(-)
For proper installation, this refrigerator must be placed on a level
surface of hard material that is the same height as the rest of the
flooring. This surface should be strong enough to support a fully
loaded refrigerator, or approximately 2231bs(106kg). To protect
the finish of the flooring, cut a large section of the cardboard
carton and place under the refrigerator where you are working.
When moving the refrigerator, be sure to pull it straight out and
return it to position by pushing it straight in.
settng up 9

S tt upyourFron DoorRefr erator
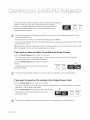
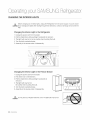
SETTING UP THE REFRIGERATOR
Now that you have your new Refrigerator installed in place, you are ready to set up and enjoy the features and
functions of the appliance. By completing the following steps, your Refrigerator should be fully operational.
1. Place the Refrigerator in an appropriate location with reasonable clearance between it and the wall.
Refer to installation instructions in this manual. (page 9, selecting the best location for the Refrigerator)
2. Once the Refrigerator is plugged in, make sure the interior light comes on when you open the doors.
3. Set the Temperature control to the coldest temperature and wait for an hour. The Freezer will get slightly
chilled and the motor will run smoothly.
4. After powering the Refrigerator, it will take a few hours to reach the appropriate temperature. You can
store food and drinks in the Refrigerator after the temperature is sufficiently cool.
®
Check the accessories listed below.
Compression fitting
83
Compression nut
Hex Wrench Fastener
Required Tools (Not provided)
Phillips screwdriver(+) Flat-blade screwdriver(-)
Socket Wrench
(10mm) (for bolts)
w
Hex Wrench (3/16")
(for Mid hinge)
Pliers
REMOVING THE REFRIGERATOR DOORS
Some installations require door/drawer removal to transport the Refrigerator to its final location.
Do not remove the door/drawer if it is not needed. Before removing the door/drawer make sure you read
following items.
zL
WARNING
®
Disconnect power to the Refrigerator before removing the door or drawer.
o
o
o
Be careful not to drop, damage or scratch the door/drawer while removing them.
Be careful not to get injured while removing the door/drawer.
Reattach the door/drawer properly to avoid:
- Moisture from air leakage.
- Uneven door alignment.
- Wasting energy due to improper door seal.
10 sett]g up

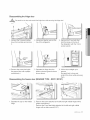
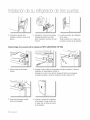
Disassembling the fridge door
A Be careful not to drop and scratch the fridge door while removing the fridge door!
WARNING
1. Remove the 3 screws holding
down the top table and remove
it.
2. Disconnect electric wire on the
top of the refrigerator.
Socket wrench
3. Remove the 3 hex bolts that
hold the hinge on the top of
the refrigerator with the 10mm
socket wrench,
ground
wire
4. Remove the screw that holds
the ground wire with a philips
screwdriver(+).
5. Separate the hinge from the
electric wire and ground wire as
shown above.
6. Lift the door straight up to
remove.
Be careful not to drop and
scratch the doors while removing
them.
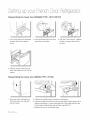
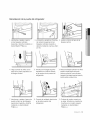
Disassembling the freezer door (DRAWER TYPE - RF217,RF197)
1. Separate the cap on the middle
hinge.
2. Remove the screw attached to the left and right middle hinges with a
philips screwdriver(+).
Remove the 2 hex head bolts attached to the left and right middle
hinges with an allen wrench(3!16").
settqg up 11

Door
3. After opening the Freezer door,
lift the drawer box.
4. Remove 4 hex head bolts
from both sides with a socket
wrench(10ram)
5. Lift up the freezer door from the
rails.
Be careful not to drop and
scratch the freezer door.
Disassembling the freezer door (SWING TYPE - RF195)
1. Separate the Cap on the Middle
Hinge.
2. Remove the screw attached to the left and right middle hinges with a
philips screwdriver(+).
Remove the 2 hex head bolts attached to the left and right middle
hinges with an allen wrench(3!16").
3. Remove the Middle Hinge
connected to the Freezer.
4. Lift up the freezer door from the
hinge.
Be careful not to drop and
scratch the freezer door.
12 setting up

Reassembling the fridge door
1. Insert and tighten the screw into
the left and right middle hinges
with a philips screwdriver(+).
2. Insert and tighten the 2 hex head 3. Replace the middle hinge cap.
bolts into the left and right middle
hinges with an allen wrench(3!16").
4. Place the hole in the bottom of
the left door over the middle
hinge.
5. Insert the left upper hinge shaft
into the hole on the corner of the
fridge door.
6. Insert the upper hinges into the holes
at the top of the door.
Insert and tighten the 3 hex head
bolts into the left and right upper
hinges with a socket wrench.
7. Insert and tighten the ground
screw into the left and right
upper hinges with a philips
screwdriver(+).
8. Connect the electronic wire on
the top of the refrigerator.
9. Position the top table in place.
Insert and tighten the 3 screws
into the top table with a philips
screwdriver(+).
settng up 13

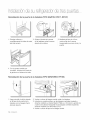
Reassembling the freezer door (DRAWER TYPE - RF217,RF197)
1. Pull out the rails to the full length
on each sidle of the cabinet
evenly.
2. Hang the freezer door front onto
open slot on the sides.
3. With the 10mm wrench, reattach
4 bolts to connect the rail with
the door.
4. With the drawer pulled out fully,
insert the drawer box into the rail
system.
Reassembling the freezer door (SWING TYPE - RF195)
1. Place the hole in the bottom of
the freezer door over the right
side low hinge.
2. Replace the middle hinge connected to the freezer.
3. Insert and tighten the screw into the left and right middle hinges with a
philips screwdriver(+). Insert and tighten the 2 hex head bolts into the
left and right middle hinges with an allen wrench(3!16").
4. Replace the cap on the middle hinge.
14 settiqg up

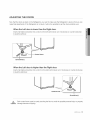
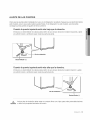
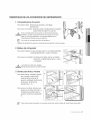
ADJUSTING THE DOORS
Now that the doors are back on the Refrigerator, you want to make sure the Refrigerator is level so that you can
make final adjustments. If the Refrigerator is not level, it will not be possible to get the doors perfectly even.
When the Left door is lower than the Right door,
Insert a flat-blade screwdriver into a notch on the left control lever, turn it clockwise or counter-clockwise
to level the left door.
r
I Lever
Screwdriver(-)
When the Left door is higher than the Right door.
Insert a flat-blade screwdriver into a notch on the right control lever, turn it clockwise or counter-clockwise
to level the right door.
Control
Screwdriver(-)
Z_ Both control levers must be surely touching the floor to avoid the possible personal injury or property
CAUTION damage because of tipping.
sett _g up 15

S tt upyourFror DoorRefr erator
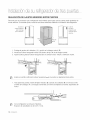
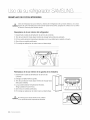
MAKING MINOR ADJUSTMENTS BETWEEN DOORS
Remember, a level Refrigerator is necessary for getting the doors perfectly even. If you need help, review the
previous section on leveling the Refrigerator.
When the left
door is lower
than the right
door.
When the left
door is higher
than the right
door.
1. Pull out the freezer drawer (1), then you can see the middle hinge (2).
2. Insert the supplied hex wrench ( 3 ) into the shaft (4) of the middle hinge.
3. Please adjust the height by turning the hex wrench (3) clockwise ( ) or counter-clockwise ( ).
®
o,....
When you turn the hex wrench counter-clockwise( ), the door will move up.
1. After adjusting the doors, please insert the supplied fastener ( 5 ) using Pliers ( 6 ) in the gap between
the hinge-grommet ( 7 ) and the middle hinge ( 8 ). The number of fasteners you'll need to insert
depends on the gap.
2 fastener are enclosed with the refrigerator.
The thickness of each fastener is 0.04".
16 sett]g up

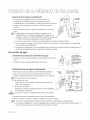
INSTALLATION OF THE WATER LINE
Before You Install the water line
• The water line installation is not warranted by the refrigerator manufacturer.
So before you install the water line, read the whole steps for installing and follow these instructions
carefully to minimize the risk of expensive water damage.
,, Banging pipes (water banging in the pipes) in house plumbing can cause damage to fridge parts and
lead to water leakage or flooding. Call a qualified plumber to correct the problem before installing the
water supply line to the fridge.
• To prevent burns and product damage, do not hook up the water line to the hot water line.
• Do not install the water line in areas where temperatures fall below freezing.
• When using any electrical device (such as a power drill) during installation, be sure the device is
insulated or wired in a manner to prevent electric shock.
• All installations must be in a accordance with local plumbing code requirements.
®
• Water line Kit and water filter are not covered by Samsung's Warranty. The manufacturer (or dealer,
installer) of them is responsible for any defects and all the loss caused by water filter & water line kit.
• The filter should be replaced according to manufacturer (or dealer)'s instruction.
• To order additional water filters, please contact the manufacturer (or dealer) of the filter.
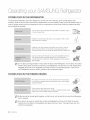
Using the water filter (not provided)
Connecting to water supply line
• Shut off the main water supply line and turn the Ice maker to
the off position.
• Locate the nearest cold drinking water line.
• Follow the instructions in the water filter installation kit.
• After connecting the water supply line to the Cartridge Holder
inlet (insert plastic line in fully), install the Filter Cartridge.
• Turn on water supply and Flush 3 gallons through filter before
use (flush approximately 6 minutes)
6 5 4
1.ColdWaterline
2.PipeClamp.
3.Plasticline
4.CompressionNut
5.CompressionSleeve
6.PackingNut
7.ShutOffValve
8.FilterCartridge
9.CartridgeHolder
®
o
o
If you want to install a water filter, it must be installed outside
the refrigerator.
It is not provided with your new refrigerator. The filter cartridge
(8) and holder (9) kit can be purchased from the retailer where
you purchased this refrigerator.
Do not use copper line.
Cut the tubing, making sure the ends are square and clean.
Incorrect Correct
sett qr#up 17

Sortr r
DoorR fr orator
Connect the water line to the fddge
,, Connect the plastic line on the back of your fridge to the cartridge
holder outlet (fully insert the plastic line to the cartridge holder
outlet).
, Insert plastic clip to the cartridge holder inlet and outlet.
, Turn water on and check for any leakage.
o
o
o
o
You can purchase the necessary filter cartridge at the retailer
where you purchased this refrigerator. Make sure you buy the
SAMSUNG filter cartridge (Replacement cartridge No • DA29-
00015A) to ensure the best performance.
The water line must be connected to drinkable water only
Cartridge
!H,_ : lao,der
""___ii I\'"" cl't.._l.[_i,'
\%1 "_ Filter
- "$-. I I.._a""ege
LC;;;s,;Zino
(Provided)
A compression fitting and nut kit is supplied with the unit and it is inside the fridge drawer.
When pushing the Refrigerator back, make sure you don't roll over the power cord or water
Iine(Icemaker supply line)
To use without the water filter
Connecting to the water supply line
, Shut off the main water supply line and turn the Ice maker to the
off position.
, Locate the nearest cold water drinking line.
1.ColdWaterline
2,PipeClamp.
I_ ---_1 3.P.astic.ine
7.._ _.-.._.'_2 4.CompressionNut
f..]---3 5.CompressionSleeve
q-_l /_-_J_ 6.PackingNut.
[ "_1 (k/_/))/i \____ShutOff Valve
6 5 4 ...L_j _G
Connect the water line to the fridge
1) Slip the compression nut through the plastic tubing.
2) After inserting the compression nut into plastic tubing, tighten
the compression nut onto 1/4" compression fitting(Provided).
Do not overtighten the compression nut.
,, Using Copper Tubing
- Slip the compression nut and ferrule on copper tubing as
shown.
, Using Plastic Tubing
- Insert the molded end(Bulb) of the plastic tubing into the
compression fitting.
A Do not use without the molded end(Bulb) of the plastic tubing.
CAUTION
\
Household water line
Copper tubing or Plastic tubing
(Not supplied) (Not supplied)
Compression Nut
(1t4")(Purchased)
(Purchased) _,
I_-_ Compression
Plastic
Tubing
fitting (Provided)
(Provided)
Compression Nut
(1/4)(Provided)
Refrigerator
3) Tighten the compression nut onto the compression fitting.
4) Turn water on and check for any leakage.
, Water line must be connected to drinkable water only.
, When pushing the Refrigerator back, make sure you don't roll over the power cord or water line
(Icemaker supply line).
18 settiqg up

©poratr
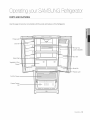
PARTSAND FEATURES
Use this page to become more familiar with the parts and features of the Refrigerator.
Fridge Light
Door Bin
Glass Shelf
Vegetable &Fruit
Drawer
Pull Out Drawer
Freezer Drawer
Bin
j
I
Moving Tray
(Locationisadjustable)
Door Bin
Bottle Bin
Freezer Light
Operati-_r#19

©porch
r
U
G Ro rcjor tor
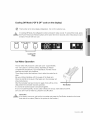
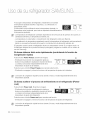
USING THE CONTROL PANEL
Temperature & Function select / control panel
(_) Ice Off Button
When the Ice Off Button is pressed, ice will not be produced.
Use this function only when it is needed.
(_} Power Freeze Button
Press this button to freeze food quickly.
(Power Freeze will last 2 and a half hours.)
(_) Freezer Button
(_) Fridge Button
Freezer temperature set button.
Press this button to set the Freezer temp between 8°F and -8°R
(At initial power on, the default setting is -2°R)
Fridge temperature set button.
Press this button to set the Fridge temperature in 2°F intervals between 46°F and 34°R
(At initial power on, the default setting is 38°R)
(_) Power Cool Button
Press this button to cool the food in the fridge quickly.
(Power Cool will shut off when 25°F is reached or after 2 and a half hours.
Press the Energy Saver button for better energy efficiency. Ifwater drops appear on the doors, turn
(_) E.Saver Button the Energy Saver function off.
Page is loading ...
Page is loading ...
Page is loading ...
Page is loading ...
Page is loading ...
Page is loading ...
Page is loading ...
Page is loading ...
Page is loading ...
Page is loading ...
Page is loading ...
Page is loading ...
Page is loading ...
Page is loading ...
Page is loading ...
Page is loading ...
Page is loading ...
Page is loading ...
Page is loading ...
Page is loading ...
Page is loading ...
Page is loading ...
Page is loading ...
Page is loading ...
Page is loading ...
Page is loading ...
Page is loading ...
Page is loading ...
Page is loading ...
Page is loading ...
Page is loading ...
Page is loading ...
Page is loading ...
Page is loading ...
Page is loading ...
Page is loading ...
Page is loading ...
Page is loading ...
Page is loading ...
Page is loading ...
Page is loading ...
Page is loading ...
Page is loading ...
Page is loading ...
Page is loading ...
Page is loading ...
Page is loading ...
Page is loading ...
-
 1
1
-
 2
2
-
 3
3
-
 4
4
-
 5
5
-
 6
6
-
 7
7
-
 8
8
-
 9
9
-
 10
10
-
 11
11
-
 12
12
-
 13
13
-
 14
14
-
 15
15
-
 16
16
-
 17
17
-
 18
18
-
 19
19
-
 20
20
-
 21
21
-
 22
22
-
 23
23
-
 24
24
-
 25
25
-
 26
26
-
 27
27
-
 28
28
-
 29
29
-
 30
30
-
 31
31
-
 32
32
-
 33
33
-
 34
34
-
 35
35
-
 36
36
-
 37
37
-
 38
38
-
 39
39
-
 40
40
-
 41
41
-
 42
42
-
 43
43
-
 44
44
-
 45
45
-
 46
46
-
 47
47
-
 48
48
-
 49
49
-
 50
50
-
 51
51
-
 52
52
-
 53
53
-
 54
54
-
 55
55
-
 56
56
-
 57
57
-
 58
58
-
 59
59
-
 60
60
-
 61
61
-
 62
62
-
 63
63
-
 64
64
-
 65
65
-
 66
66
-
 67
67
-
 68
68


Samsung RF217ABWP/XAA-00 Owner's manual
- Category
- Fridges
- Type
- Owner's manual
Ask a question and I''ll find the answer in the document
Finding information in a document is now easier with AI
in other languages
Related papers
-
Samsung RF221NCTASL User manual
-
Samsung RF268ABWP User manual
-
-
-
Samsung RF268ABRS/XAA-00 Owner's manual
-
-
-
-
Samsung RF220NCTAWW/AA User guide
-