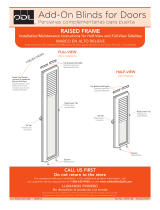
RAISED FRAME
INSTALLATION/MAINTENANCE INSTRUCTIONS
For Half-View and Full-View sizes
Half-View and For full-view sizes.
CALL US FIRST
Do not return to the store
For assistance with your installation, or for additional product information, call
our customer service department at 1-866-635-4968, or visit www.addonblindsodl.com.
Add-On Blinds for Doors
Add-On Blinds for Doors
LLÁMANOS PRIMERO
No devuelvas el producto a la tienda
Para asistencia con tu instalación o información adicional sobre el producto, llama a nuestro
Departamento de Servicio al Cliente: 1-866-635-4968, o visita www.addonblindsodl.com.
Persianas complementarias para puerta
Raise/Lower Tab
Pestaña para
levantar/bajar
Tilt Tab
Pestaña para
inclinación
Side Spacer
Espaciadores
laterales
HALF VIEW
VISTA PARCIAL
Tilt Tab
Pestaña para
inclinación
Top Brackets (left/right)
Soportes superiores
(izquierda/derecha)
Side Spacers
Espaciadores
laterales
Raise/Lower Tab
Pestaña para
levantar/bajar
Lock Clips
Presillas de
cierre
FULL VIEW
VISTA COMPLETA
Top Brackets (left/right)
Soportes superiores
(izquierda/derecha)
Lock Clips
Presillas de cierre
RAISED FRAME
Installation/Maintenance Instructions for Half-View and Full-View sizes
MARCO EN ALTO RELIEVE
Instrucciones De Instalación/Mantenimiento para tamaños de Vista Parcial y Completa
U.S. Patent 6,817,401
|
1805012 Part No. 16593-719
|
Revised 9/18

2
Questions? Please do not return to the store, call us first. For assistance with your Add-On Blind installation or for additional product
information, call our customer service team toll free at 1.866.635.4968, or visit our website at www.addonblindsodl.com.
2
1. GETTING STARTED
• If your door glass frame does not have screw holes please call
ODL Customer Service at 1-866-635-4968
• Unpack your Add-On Blind unit and inspect for damage
• Carefully lift Add-On Blind unit and place over door glass frame
u
Add-On Blind unit should t snugly over existing door glass frame
Tip: If the Add-On Blind frame does not t snugly over existing door glass
frame please call ODL Customer Service for assistance at 1-866-635-4968.
u
Add-On Blind unit should t ush against the door.
Tip: If the Add-On Blind frame interferes with your doorknob or deadbolt
escutcheon plate
(g. 1), remove the ller strip located on the side of the
Add-On Blind
(g. 2). The ller strip can be secured back into place if needed.
1. CÓMO EMPEZAR
• Si el marco del vidrio de la puerta no tiene oricios para tornillos, llama por favor al Servicio al
Cliente ODL: 1-866-635-4968
• Desempaca tu unidad de persiana complementaria e inspecciónala para ver si tiene daños
• Levanta con cuidado la unidad de persiana complementaria y colócala sobre el marco
del vidrio de la puerta
u
La unidad de persiana complementaria debe ajustarse perfectamente sobre el marco del vidrio de la
puerta preexistente.
Consejo: Si el marco de la persiana complementaria no se ajusta perfectamente al marco del vidrio
de la puerta preexistente, llama al Servicio al Cliente ODL (1-866-635-4968) para asistencia.
u
La unidad de persiana complementaria debe quedar ajustada al ras contra la puerta.
Consejo: Si el marco de la persiana complementaria interere con el picaporte o la placa protectora
del cerrojo de seguridad (g. 1), quita la tira de relleno ubicada en el lado de la persiana complementaria
(g. 2). La tira de relleno puede asegurarse de nuevo en su lugar si es necesario.
INSTALLATION INSTRUCTIONS
For your convenience, an installation video is available at www.addonblindsodl.com
* Please read the full instructions before attempting to install this product.
INSTRUCCIONES DE INSTALACIÓN
Para tu conveniencia, un video sobre cómo instalar está disponible en www.addonblindsodl.com
*Por favor, lee todas las instrucciones antes de intentar instalar este producto.
Filler Strip
Tira de relleno
g. 1
g. 2
g. 4
g. 3
Screw Plug Covers
Tapones que cubren
el tornillo
2. INSTALL SIDE SPACERS
• Loosen existing frame screws from bottom corners of door glass frame
Tip: Remove screw plug covers from the bottom corners of door glass frame
(g. 3). If screw plug covers do not come out easily, a wood screw can be used to
remove them. Turn the wood screw into the plug and pull out the cover.
• Slide spacers behind door glass frame
(g. 4)
u
Full View – spacers should be inserted approximately 11½” up from the bottom of
door glass frame
u
Half View – spacers should be inserted approximately 14” up from the bottom of
door glass frame
• Tighten screws on the bottom corners of door glass frame
• Replace screw plug covers (optional)
2. INSTALA ESPECIADORES LATERALES
• Aoja los tornillos del marco preexistente de las esquinas inferiores del marco del vidrio de la puerta
Consejo: Quitar el tapon cubre tornillo de las esquinas inferiores del marco del vidrio de la puerta
(g. 3). Si el tapon cubre tornillo no sale con facilidad, puede usarse un tornillo de madera para quitarlas.
Enrosca el tornillo de madera en el tapón y saca la cubierta.
• Desliza los espaciadores por detrás del marco del vidrio de la puerta (g. 4)
u
Vista completa – Los espaciadores deben insertarse a unas 11½” por encima de la parte inferior del marco
del vidrio de la puerta
u
Vista parcial – Los espaciadores deben insertarse a unas 14” por encima de la parte inferior del marco del
vidrio de la puerta
• Aprieta los tornillos en las esquina inferiores del marco del vidrio de la puerta
• Reemplaza el tapon cubre tornillo (opcional)
Escutcheon
Plate
Placa
protectora

¿Preguntas? No devuelvas a la tienda; llámanos primero. Para asistencia en la instalación de tu persiana complementaria o información
adicional del producto, llama gratis a nuestro equipo de atención al cliente: 1.866.635.4968, o visita nuestro sitio web: www.addonblindsodl.com.
3
4. PREPARE ADD-ON BLIND UNIT FOR INSTALL
• Stand Add-On Blind unit upright
u
It is important to only operate the blinds when unit is in the upright position
• Remove red travel clip (full-view size only) from Add-On Blind unit
(g. 8)
u
Blinds will not raise/lower until the travel clip is removed
• Clean Add-On Blind Unit
u
Remove any labels
u
Clean the inside door glass and Add-On Blind glass
Tip: Dry the glass completely to help prevent condensation
(see Add-On Blind Care/Maintenace section for more details)
4. PREPARA LA UNIDAD DE PERSIANA COMPLEMENTARIAS PARA INSTALACIÓN
• Coloca la persiana complementaria en posición vertical
u
Es importante operar las persianas sólo después que la unidad esté en posición vertical
• Retira la presilla roja de traslado de la unidad (sólo tamaño de vista completa)
de persiana complementarias (g. 8)
u
Las persiana no se levantará ni bajará hasta que la presilla de traslado se haya retirado
• Limpia la unidad de persiana complementaria
u
Quitar todas las etiquetas
u
Limpiar el vidrio interior de la puerta y el vidrio de la persiana complementaria
Consejo: Secar el vidrio por completo para ayudar a prevenir la condensación (Consultar la sección
de CUIDADO Y MANTENIMIENTO DE LA PERSIANA COMPLEMENTARIA para más detalles)
Left Bracket
Soporte izquierdo
Right Bracket
Soporte derecho
3. INSTALL TOP BRACKETS
Screw Plug
Covers
Tapones que
cobren el tornillo
g. 5
g. 6
g. 7
3. • Loosen existing frame screws from top corners of door glass frame
Tip: Remove screw plug covers from top corners of the door glass frame
(g. 5). If screw plug covers do not come out easily, a wood screw can be
used to remove them. Turn the wood screw into the plug and pull out the
cover.
• Install left/right top brackets behind door glass frame
u
Wings of the bracket should be ush with the outside edge of the
frame
(g. 6)
u
The lip on the top of the bracket will rest above door glass frame (g. 7)
• Tighten screws on the top corners of door glass frame
• Replace screw plug covers (optional)
3. INSTALA LOS SOPORTES SUPERIORES
• Aoja los tornillos del marco preexistente de las esquinas superiores del marco del vidrio de la puerta
Consejo: Quitar los tapones que cobren el tornillo de las esquinas superiores del marco del vidrio
de la puerta (g. 5). Si los tapones que cobren el tornillo no salen con facilidad,
puede usarse un tornillo de madera para quitarlas. Enrosca el tornillo de madera
en el tapón y saca la cubierta.
• Instala los soportes superiores izquierdo/derecho detrás del marco del vidrio
de la puerta
u
Los aleros del soporte deben quedar al ras con el borde exterior del marco (g. 6)
u
El reborde en la parte superior del soporte descansará sobre el marco del vidrio
de la puerta (g. 7)
• Aprieta los tornillos en las esquina superiores del marco del vidrio de la puerta
• Reemplaza los tapones que cubren el tornillo (opcional)
Red Clip
Presilla roja
g. 8

4
Questions? Please do not return to the store, call us first. For assistance with your Add-On Blind installation or for additional product
information, call our customer service team toll free at 1.866.635.4968, or visit our website at www.addonblindsodl.com.
4
5. INSTALL ADD-ON BLIND
• Hang top of Add-On Blind over the top brackets (g. 9)
Tip: Angle the bottom of the unit towards you while sliding
over the top brackets.
• Be certain the brackets are in the slots at the top, inside edge
of the Add-On Blind frame
• Move Add-On Blind unit side to side to ensure it is square
and tight
5. INSTALAR LA PERSIANA COMPLEMENTARIA
• Colgar la parte superior de la persiana complementaria sobre los
soportes superiores (g. 9)
Consejo: Pocisionar la parte inferior de la persiana complementaria en angulo,
en dirección suya facilitando, la insercción sobre los soportes superiores.
• Cerciórate de que los soportes están en las ranuras de la parte superior, dentro del
borde del marco de la persiana complementaria
• Desplaza la unidad de persiana complementaria de lado a lado para garantizar que
quede a escuadra y ajustada
6. LOCK BOTTOM CLIPS
• Rotate lock clips out
• Push bottom corners of unit against door
• Swing lock clips under door glass frame by pushing them up and inward
(g. 10)
Tip: Lock clips should t underneath existing door glass frame easily and stay in
place. If the clips do not reach your door glass frame, you may have the wrong
size unit. Please contact ODL Customer Service at 1-866-635-4968 for further
assistance.
6. PRESILLAS INFERIORES DE CIERRE
• Gira las presillas de cierre hacia afuera
• Empuja las esquinas inferiores de la unidad contra la puerta
• Lleva las presillas de cierre hacia arriba, asegurandose que queden debaja del marco del vidrio. (g. 10)
Consejo: Las presillas de cierre deben ajustarse con facilidad debajo del marco del vidrio de la puerta
preexistente y permanecer en su lugar. Si las presillas no llegan al marco del vidrio de la puerta, pudiera
ser que tuvieras la unidad de tamaño inadecuado. Comunícate por favor con el Servicio al Cliente ODL
(1-866-635-4968) para asistencia adicional.
7. ENSURE PRODUCT IS SECURE
• Check top, bottom, and sides of the Add-On Blind frame to be sure
it is ush to the door
• Ensure the Add-On Blind unit is secure to the top brackets
• Double check to ensure all lock clips are securely fastened
7. GARANTIZA QUE EL PRODUCTO ESTÉ SEGURO
• Revisa las partes inferiores, superiores y laterales del marco de la persiana complementaria para asegurar
que quedaron al ras con la puerta.
• Asegurate que la unidad de persiana complementaria quede bien asegurada al soportes superior
• Vuelve a revisar para garantizar que todas las presillas de cierre quedaron sujetas con plena seguridad
8. CHECK OPERATION
• Raise/Lower Blinds
u
Slide right hand tab up and down (g. 11)
• Tilt Blinds
u
Slide left hand tab up and down (g. 12)
8. COMPROBAR EL FUNCIONAMIENTO
• Levantar y bajar las persiana
u
Desliza la pestaña de la derecha hacia arriba y
hacia abajo (g. 11)
• Inclinar las persianas
u
Desliza la pestaña de la izquierda hacia arriba y
hacia abajo (g. 12)
Top
Bracket
Soporte
superior
g. 9
g. 10
g. 11
g. 12
Tilt Tab
Pestaña para
inclinación
Raise/Lower Tab
Pestaña para
levantar/bajar

¿Preguntas? No devuelvas a la tienda; llámanos primero. Para asistencia en la instalación de tu persiana complementaria o información
adicional del producto, llama gratis a nuestro equipo de atención al cliente: 1.866.635.4968, o visita nuestro sitio web: www.addonblindsodl.com.
5
Preventing Condensation
Interior condensation is caused by excess humidity in your home. Add-
On Blinds do not cause condensation but are a good indicator of humidity
levels that are too high. Keep in mind that new homes release moisture from
construction materials through several heating and cooling cycles.
Below is a quick guide to appropriate humidity levels:
Outside Temperature
F
Inside Humidity
20
F
to 40
F
Not over 40%
10
F
to 20
F
Not over 30%
0
F
to 10
F
Not over 25%
-20
F
to 0
F
Not over 20%
Below -20
F
Not over 15%
If your door glass has interior condensation, you should be able to control
it by reducing the humidity level in your home (for example you could
reduce or eliminate humidiers). You can also help limit the potential for
condensation between your door glass and the Add-On Blind glass by
removing the ller strips located on the sides of your Add-On Blind frame
(see step 1 for removal instructions). By removing these ller strips you will
increase the airow between the Add-On Blind unit and your door glass.
Condensation does not indicate a defect in an Add-On Blind unit and will
not damage your Add-On Blind unit.
CUIDADO Y MANTENIMIENTO DE LA PERSIANA COMPLEMENTARIA
Mantenimiento General
• El marco puede limpiarse con agua y jabón
• Limpia el vidrio con un limpiador de ventanas estándar
• El marco puede pintarse con pintura de esmalte látex acrílico
• Para retirar la unidad de persiana complementaria, procede a la inversa con los pasos de instalación
Cómo prevenir la condensación
La condensación interior trae su causa del exceso de humedad en el hogar. Las persianas complementarias no provocan condensación, pero son un buen
indicador de que los niveles de humedad son demasiado altos. Ten en cuenta que las casas nuevas liberan humedad de los materiales de construcción a través
de varios ciclos de calentamiento y enfriamiento.
Abajo se ofrece una guía rápida sobre niveles apropiados de humedad:
Temperatura
F
exterior Humedad interna
20
F
a 40
F
No más de 40%
10
F
a 20
F
No más de 30%
0
F
a 10
F
No más de 25%
-20
F
a 0
F
No más de 20%
Por debajo de -20
F
No más de 15%
Si el vidrio de la puerta tiene condensación interior, debes ser capaz de controlarlo mediante la reducción del nivel de humedad en el hogar (por ejemplo,
pudieras reducir o eliminar humidicadores). También puedes ayudar a limitar el potencial de condensación entre el vidrio de la puerta y el vidrio de la persiana
complementaria quitando las tiras de relleno ubicadas a ambos lados del marco de la persiana complementaria (Consultar en el paso 1 las instrucciones para
quitarlas). Al quitar estas tiras de relleno incrementarás el ujo de aire entre la unidad de persiana complementarias y el vidrio de tu puerta.
La condensación no indica defecto en la unidad de persiana complementaria ni llegará a dañarla.
ADD-ON BLIND CARE/MAINTENANCE
General Maintenance
• Frame can be washed with soap and water
• Clean glass with standard window cleaner
• Frame can be painted with acrylic latex enamel paint
• To remove Add-On Blind unit, reverse installation steps

6
Questions? Please do not return to the store, call us first. For assistance with your Add-On Blind installation or for additional product
information, call our customer service team toll free at 1.866.635.4968, or visit our website at www.addonblindsodl.com.
6
WARRANTY COVERAGE
Subject to the conditions, exclusions and limitations herein, ODL Incorporated (“ODL”) warrants that its Aluminum Blinds for Steel
and Fiberglass Entry Doors product is free from defects in material and workmanship that would render the Product unt for its
normal and recommended use. This warranty applies and extends only to the original consumer purchasing this product. The
duration of this warranty begins on the date of purchase by the consumer and extends for a period of ve years.
EXCLUSIONS FROM COVERAGE
This warranty does not cover:
• A Product that is not installed on a plastic window frame on a steel or berglass entry door.
• Defects or damages resulting in failure to install or operate the Product in accordance with ODL’s installation instructions.
• Defects or damages resulting from use of the Product for purposes other than those for which it was designed.
• Defects or damages resulting from modications or attachments to the Product.
• Glass breakage or other damage to the entry door.
• Defects or damages arising out of improper handling, cleaning, maintenance, operation, defective or improper installation
(including installation not in accordance with ODL’s installation instructions), improper storage, normal wear and tear, accident,
act of God, intentional human acts, misuse, abuses, or any circumstances beyond the control of ODL.
• Defects or damages resulting from shipment by common carriers, private transportation or other means of transportation.
INSPECTION AND DISCOVERY OF DEFECT
It is the Consumer’s responsibility to inspect the Product immediately upon receipt of the Product. If a defect covered under this
warranty is discovered upon inspection, the customer must follow the Warranty Claim Procedure set forth below. ODL shall have no
obligation under this warranty with respect to any defect reasonably discoverable upon immediate inspection once the product has
been installed. If a defect occurs after installation within the warranty period, then the customer must also follow the Warranty Claim
Procedure set forth as follows.
WARRANTY CLAIM PROCEDURE
1. The Consumer must present a written claim to ODL within 30 days after discovering the defect. The Consumer must submit its
claim to the following address: ODL Incorporated, Customer Service, 215 East Roosevelt Avenue, Zeeland, Michigan, 49464.
ODL must receive this written claim within the warranty period.
2. The Consumer must use reasonable diligence to include all of the following in the written claim:
a. An adequate description of the claimed defect(s);
b. The type and style of Product;
c. Exact Product size;
d. The date of the Consumer’s purchase, the place of purchase, and the purchase price.
3. The Consumer must, if requested by ODL, permit ODL or its representative to inspect the Product.
REMEDIES
After receiving a valid claim, ODL will, at ODL’s option either (a) repair the Product or provide a replacement Product of like kind and
design, or (b) upon the return of the Product to ODL, refund the Consumer the purchase price of the Product paid by the Consumer.
If ODL elects to provide a replacement Product, the limited warranty for the replacement product will last for the balance of the
warranty of the original Product.
ODL’S LIABILITY UNDER THIS WARRANTY IS LIMITED TO EITHER (A) OR (B) ABOVE, AND ODL WILL IN NO EVENT BE
RESPONSIBLE FOR SHIPPING, LABOR, REMOVAL OF ORIGINAL PRODUCT, INSTALLATION OF REPLACEMENT PRODUCT,
FINISHING EXPENSES, OR OTHER CHARGES, COSTS OR CLAIMS INCURRED BY THE CONSUMER.
DISCLAIMER OF WARRANTY
NO IMPLIED WARRANTY, INCLUDING A WARRANTY OF MERCHANTABILITY OR OF FITNESS FOR A PARTICULAR PURPOSE,
SHALL APPLY TO THE PRODUCT (OR ANY REPLACEMENT) BEYOND THE DURATION OF THIS WRITTEN WARRANTY. (Some
states do not allow limitations on how long an implied warranty lasts, so the above limitation may not apply to you.)
LIMITATIONS OF REMEDIES
The remedies set forth above are the consumer’s exclusive remedies for breach of warranty or negligence. In no case shall ODL be
liable to the consumer or another person for any general, special, incidental or consequential damages. (Some states do not allow
the exclusion or limitation of incidental or consequential damages, so the above limitations or exclusions may not apply to you.)
Unless modied in a later writing signed by both ODL and Consumer, this warranty is the complete and exclusive warranty related
to the Product, and it supersedes all earlier agreements and other communications relating to the Product. No employee of ODL
or any other party is authorized to make any warranty in addition to this warranty. Invalidation of any one or more of the provisions
of this warranty shall not invalidate or affect one of the other provisions. This warranty is not transferable. This warranty gives the
Consumer specic legal rights, and the Consumer may also have other legal rights which may vary from
state to state.
Page is loading ...
Page is loading ...
Page is loading ...
Page is loading ...
Page is loading ...
Page is loading ...
/
