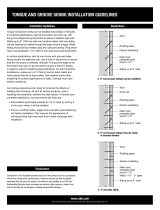
Foam Over Studs - Installing STYROFOAM* Residential Sheating, STYROFOAM Tongue
& Groove, STYROFOAM DURAMATE* Plus, STYROFOAM Square Edge, TUFF-R*, Super
TUFF-R*, or THERMAX* - Installation of Foam Sheathing as a Weather-Resistive barrier
1. Mark the Dow insulation boards by dragging the hook of a measuring tape along the surface of the board while
holding the other end of the tape at the desired measurement.
2. Dragging the hook will create a small mark to follow when cutting. Set the board on a flat, sturdy surface for ease
and safety in cutting. A pair of sawhorses is usually sufficient for waist-high work. Follow the mark left by the tape
edge, holding the knife low against the board. Don't cut all the way through; just make a deep impression with the
knife blade. Once the entire measured line has been scored, simply snap off the piece, over the edge of your work
surface.
3. Install a code-acceptable corner bracing such as diagonal metal strapping, let-in wood or wood structural sheathing
(wood sheathing should be covered by Dow insulation boards to provide full wall insulation). Note: Dow insulation
boards are not structural panels.
4. Install Dow 4’x8’ and 4’x9’ insulation boards vertically with long joints in contact with one another and bearing
directly on the framing members. Install Dow 2’x8’ insulation boards horizontally on the framing members.
5. Secure Dow insulation boards using 1 3/4" ring shank nails or staples with a 1” diameter plastic cap or equivalent
fastener long enough to penetrate framing a minimum of ¾”. Nails or staples should not be over-driven. Secure the
4’x 8’ and 4’x 9’ boards 12" o.c. around the perimeter and 16” o.c. in the field or as required by the code authority
having jurisdiction. Secure 2’x 8’ boards 12” o.c. on each stud (3 fasteners per stud) or as required by the code
authority having jurisdiction.
6. Tape all insulation joints and penetrations using nominal 3” STYROFOAM* All-Purpose Tape (ie. horizontal and
vertical seams as well as exterior penetrations from pipes, dryer vents etc.). In the case of exterior penetrations only,
seal around opening with an all-weather sealant (ie. silicone caulk, Dow GREAT STUFF™ Gaps & Cracks sealant)
prior to taping.

7. For window installation the nailing flange is set against a silicone bedding and fastened to the framing with 1½”
galvanized roofing nails, 3” from each corner and 8” on center. A 3” wide butyl flashing can be used to seal the sill of
the window and a 2” wide butyl flashing can be used to seal jambs and heads. Refer to window manufacturer’s
instructions for proper window installation.
8. Brick, wood, hardboard, aluminum or vinyl sidings are fastened to the wood frame construction through the
insulation in accordance with the siding manufacturer's instructions.
Helpful Hints:
Use a utility knife and straight edge to trim the insulation board to conform to irregular wall angles, projections or wall
surfaces less than board width or height.
In stick-built construction, consider using 4' x 9' Dow insulation boards to effectively cover the sill plates, floor/ceiling
junctures, band box and headers in one easy application.
Shakes or shingles can also be applied by installing furring strips or a plywood nailer base over the insulation and
attaching the shakes or shingles in accordance with the manufacturer's instructions.
-
 1
1
-
 2
2
Super TUFF-R 268426 Installation guide
- Type
- Installation guide
Ask a question and I''ll find the answer in the document
Finding information in a document is now easier with AI
Other documents
-
 UFP-Edge 177604-08 Installation guide
-
 Huber 777198 Operating instructions
-
Pella 818T0101 User manual
-
Pella 818L0100 User manual
-
Pella 818L0100 User manual
-
Georgia-Pacific 138950A Installation guide
-
 Dow 201549 User manual
-
Craftsman CTS205 User manual
-
GCP Applied Technologies 5003171 User manual
-
DIAMOND KOTE 127667-2 Installation guide


