JONATHAN Y JYL8024A Operating instructions
- Type
- Operating instructions
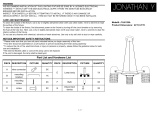
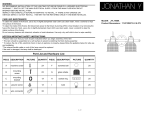
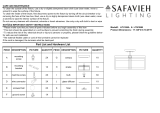
JONATHAN Y JYL8024A is a lighting fixture that provides both ambient and task lighting. It uses two 60-watt A-type bulbs or 13-watt CFL bulbs or 9-watt LED bulbs. It has a metal finish and a tiffany shade. It is easy to assemble and install, and it comes with all the necessary hardware.
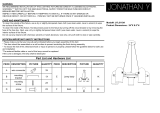
JONATHAN Y JYL8024A is a lighting fixture that provides both ambient and task lighting. It uses two 60-watt A-type bulbs or 13-watt CFL bulbs or 9-watt LED bulbs. It has a metal finish and a tiffany shade. It is easy to assemble and install, and it comes with all the necessary hardware.


-
 1
1
-
 2
2


JONATHAN Y JYL8024A Operating instructions
- Type
- Operating instructions
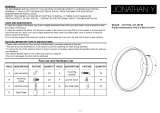
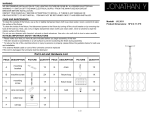
JONATHAN Y JYL8024A is a lighting fixture that provides both ambient and task lighting. It uses two 60-watt A-type bulbs or 13-watt CFL bulbs or 9-watt LED bulbs. It has a metal finish and a tiffany shade. It is easy to assemble and install, and it comes with all the necessary hardware.
Ask a question and I''ll find the answer in the document
Finding information in a document is now easier with AI
Related papers
-
 JONATHAN Y JYL9917B User manual
-
 JONATHAN Y JYL6128A Operating instructions
-
 JONATHAN Y JYL6119A Operating instructions
-
 JONATHAN Y JYL7013B Operating instructions
-
JONATHAN Y JYL7017A Operating instructions
-
JONATHAN Y JYL7128C User manual
-
 JONATHAN Y JYL7409A Operating instructions
-
 JONATHAN Y JYL7408A Operating instructions
-
 JONATHAN Y JYL7207B Operating instructions
-
 JONATHAN Y JYL9513A Operating instructions


Other documents
-
 Transglobe 70411 ABZ User manual
-
Warehouse of Tiffany RL7953/10 Operating instructions
-
-
 JONATHAN Y JYL3509A Installation guide
-
Bel Air Lighting PND-100 Operating instructions
-
 Safavieh LIT4186A Installation guide
-
Visual Comfort Studio ARN 4307BSL-FG Installation guide
-
 JONATHAN Y JYL3511B Installation guide
-
-
Warehouse of Tiffany RL1070B Installation guide


