
www.federalbrace.com (877) 353-8899
Wood Corbel Kits
Included Items
• Mounting base
• Mounting Sleeve
• Corbel
• Fasteners
• 3M VHB Tape
Install the Mounting Sleeve
1. Insert the Mounting Sleeve in the cavity in the top surface of
the corbel, ensuring that it is centered in the cavity.
2. Using your pencil, mark the corbel through the holes in the
Mounting Sleeve and remove the sleeve from the cavity.
3. Use the power drill and 1/16” drill bit to make two pilot
holes in the locations marked in step 2.
4. Insert the Mounting Sleeve back into the cavity, lining up the
holes in the sleeve with the new pilot holes.
5. Using the screwdriver or the power drill with a screwdriver
bit, fasten the Mounting Sleeve to the corbel with #5 x ½”
wood screws.
Install the Mounting base
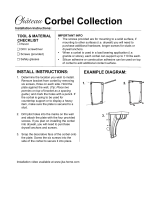
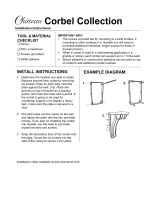
1. Insert the Mounting base partway into the Mounting Sleeve.
Leave enough space between the back ange of the
Mounting base and the corbel so that you can t your hand
between them.
2. Position the corbel where it is desired, and with your hand
between the corbel and the mounting base, push it against
the mounting surface, making sure that the top of the corbel
is touching the bottom of the countertop.
3. While holding the mounting base in place, remove the
corbel. The top ange of the mounting base should be
about 1/16” below the countertop surface. When installed,
that space will allow the
mounting sleeve to slide
onto the
mounting base unhindered.
4. Being careful not to shift
the mounting base, mark
the holes.
5. Drill pilot holes.
6. Attach your rst mounting
base to the substructure
using the screwdriver or
power drill with screw-
driver bit and #8 x 2.5”
wood screws. Make sure
that when you fasten the
mounting base that you
check for level in all directions. The mounting base should
be level horizontally and vertically.
7. Cut 3M VHB Tape into 1” squares and place on the 4 cor-
ners of the corbel for stability.
8. Repeat with all remaining corbels.
9. Final step is to enjoy your work and your new kitchen count-
er! We are thankful that you chose to support your beautiful
counters with Federal Brace corbels. We would be thankful
if you would send us images of your new kitchen and our
brackets under your counters. We enjoy seeing Federal
Brace corbels at work.
Also, know that the highest compliment Federal Brace can be
given is a reference from our customers to friends and family. If
you have enjoyed your buying experience with Federal Brace
please let someone know.
Corbel Mounting System Wood Corbel Kits
Installation Instructions

www.federalbrace.com (877) 353-8899
Included Items
• Corbel
• Support Bracket
• Mounting Sleeve
• 2x #8 x 2.5” Wood Screws per bracket
• 2x #8 x ½” Wood Screws per corbel
• 3M VHB Tape
Tools Needed
• Pencil
• Measuring Tape or Ruler
• Powered Routing Tool with Straight Bit
• Powered Drill with drill bit
• Screwdriver or screwdriving bit for the power drill
• Level
Install the Support Bracket
Insert the Mounting Sleeve in the cavity in the top surface
of the corbel, as far forward as possible.
Using your pencil, mark the corbel through the holes in
the Mounting Sleeve and remove the sleeve from the
cavity.
Use the power drill and drill bit to make two pilot holes.
Insert the Mounting Sleeve back into the cavity, lining up
the holes in the sleeve with the new pilot holes.
Using the screwdriver or the power drill with screwdriving
bit, fasten the Mounting Sleeve to the corbel with #8 x
½” wood screws. Install the Support Bracket. Whenever
installing the Support Bracket, make sure that you provide
the thickest possible substructure (at least ¾”) on which
to fasten the L bracket. You will want the fasteners to have
as much “biting” material as possible. This will provide a
secure fastening of the brackets. Also, the substructure
must be tied into the oor. Remember, a weak substruc-
ture makes for a weak installation.
With the substructure in place and sturdy, measure out
your bracket pattern. We suggest that you space the
Support Brackets no greater than 18” apart on a standard
application.
Place your rst Support Bracket in position and mark the
hole locations with your pencil.
Use the power drill and
drill bit to make two pilot holes.
Attach your rst Support Bracket to the substructure using
the screwdriver or power drill with screwdriving bit and 8
x 2.5” wood screws. Make sure that when you fasten the
Support Bracket that you check for level in all directions.
This will give the best possible support result to your
countertop.
Note: The top of your Support Bracket should not extend
over the top of your support structure but should meet
ush with the top. You will want to use a level to deter-
mine the positioning of the top of the bracket to the top
of your support structure.
When manufacturing the Support Brackets we attempt
to hit the angle break at 90 degrees 100% of the time.
However, sometimes we may be slightly off of that mark.
If this is the case with your Support Bracket you should
use shims in your installation to bring the bracket to level.
Shims can be placed directly behind the down ange or
you may need to slightly plain the support stud to allow
for the bracket to sit ush and level.
Once your rst Support Bracket is in place you can now
add the additional Support Brackets making sure that you
check the additional Support Brackets the same way you
checked the rst. Also, use a level to test each successive
Support Bracket installed to make sure that the whole in-
stallation is level. Placing the level from bracket top ange
to bracket top ange will help you read this aspect of the
installation.
Using the Corbel Converter
Once the Support Brackets have been installed, they will
provide support for the solid surface overhang. Wooden
corbels which have been routed and have the Mounting
Sleeve installed can be slid onto and off of the Support
Brackets by simply lining up the Corbel and sliding it into
place. Apply silicone to top of the L bracket. 3M VHB tape
can be cut into 1” squares and placed on the 4 corners of
the corbel for more stability.
Corbel Converter Wood Corbel Kit
Installation Instructions
For any questions or comments please to contact us by email at [email protected] or by phone at (877) 353-8899.
If you are a more of a visual learner check out our installation videos on our YouTube channel Don’t forget to share your projects
with your new Federal Brace brackets on Twitter and Instagram, just tag us @FederalBrace. Like us on Facebook, and check out our
boards on Pinterest for more home improvement/decor and DIY project ideas.

www.federalbrace.com (877) 353-8899
A fast and easy way to mount your corbels for a decorative touch. The
Mad Mount can be used with any corbel or as with one of our corbel
mounting systems. It is designed for light duty only. Made in galvanized
steel, 2.5” x 5” to work with most size corbels. Perfect the art of installing
corbels and install like mad!
• Plan the layout of your corbels.
• Mark a centerline on all the corbels.
• Line up the Mad Mount with your corbel and mark your holes.
• Drill a pilot hole into the mounting surface.
• Drill a pilot hole into your corbel.
• Screw the Mad Mount into your corbel.
• Line up your corbel to the desired mounting area.
• Screw the Mad Mount with your corbel onto the mounting surface.
• Step back two paces and admire your creation.
Mad Mount Corbel System
Installation Instructions
M
O
U
N
T
E
M
L
I
K
E
M
A
D
M
A
D
M
O
U
N
T
For any questions or comments please to contact us by email at [email protected] or by phone at (877) 353-8899.
If you are a visual learner, check out our installation videos on our YouTube channel Don’t forget to share your projects with your
new Federal Brace brackets on Twitter and Instagram, just tag us @FederalBrace. Like us on Facebook, and check out our boards
on Pinterest for more home improvement/decor and DIY project ideas.
Corbel Mounting System | Mad Mount
-
 1
1
-
 2
2
-
 3
3
Federal Brace 40158 Installation guide
- Type
- Installation guide
Ask a question and I''ll find the answer in the document
Finding information in a document is now easier with AI
Related papers
-
 Federal Brace FB-03199 Installation guide
-
 Federal Brace 31904 Installation guide
-
Federal Brace 40376 Installation guide
-
 Federal Brace 40359 Installation guide
-
Federal Brace 40376 Installation guide
-
 Federal Brace 40066 Installation guide
-
 Federal Brace 39430 Installation guide
-
 Federal Brace 35009 Installation guide
-
 Federal Brace 30060 Installation guide
-
 Federal Brace 40314 Installation guide
Other documents
-
Ekena Millwork BKTM02X05X08TNE Installation guide
-
 Chateau JCOR2 Installation guide
-
 Chateau JCOR12 Installation guide
-
 Chateau JCOR1 Installation guide
-
 Chateau JCOR10 Installation guide
-
 Chateau JCOR3 Installation guide
-
Ekena Millwork BKTB03X10X14TRPG Installation guide
-
Ekena Millwork BKTB03X10X10TRRD-CASE-6 Installation guide
-
Ekena Millwork CORW07X08X22TRCH User manual
-
Ekena Millwork BKTM03X12LOCRS Installation guide


