Base'N Bench WF4860R-RB48-KIT User manual
- Type
- User manual

Copyright © 2014. Tile Redi Sales, LLC. All Rights Reserved 1 Rev. 20140314
Tile Redi® Installation & Tiling Guide
WonderFall Trench™ Tileable Grate Assembly
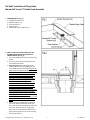
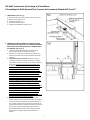
I. COMPONENTS: (See Fig. 1)
1. Tileable Drain Grate (x 1)
2. Rubber Bumpers (x 4)
3. Drain Strainer (x 1)
4. Trench Recess
5. WonderFall Trench™ Spacers (x 2)
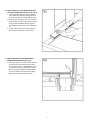
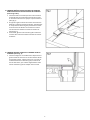
II. HOW TO TILE THE TILEABLE GRATE AND THE
SHOWER PAN FLOOR EDGES AROUND THE
TRENCH RECESS: (See Fig. 2)
1. Insert the Tileable Drain Grate into the Trench
Recess.
2. Dry fit the tiles to the shower pan floor and
the Tileable Drain Grate.
3. Note Tiling Tip: Before setting tile on the
shower pan floor and the tileable grate you
must comply with the following: tile up to the
edges of the recessed trench (A and B) and the
edges of the grate (C and D) so that neither
the shower pan floor nor the Tileable Drain
Grate is visible, while at the same time
insuring (i) none of the Tileable Drain Grate
tiles extend beyond the edges of the
WonderFall Trench™ grate, (ii) none of the
shower pan floor tiles extend beyond the
shower pan floor into the space above the
recessed trench, (iii) proper drainage is
achieved by having none of the tiles encroach
into the drainage space between the tiled
shower pan floor and the Tileable Drain Grate,
and (iv) neither the floor tile or the
WonderFall Trench™ grate tile will prevent the
removal of the tiled grate from the Trench
Recess.
4. Now, remove the Tileable Drain Grate from
the Trench Recess and tile the shower pan
floor. Then insert the Tileable Drain Grate into
the Trench Recess and tile it, lining up any
grout lines on the tiled WonderFall Trench™
grate with the grout lines on the surrounding
shower pan floor tile.

2
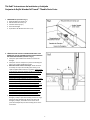
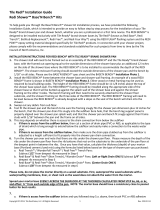
III. HOW TO INSERT THE TILED DRAIN GRATE INTO
THE TILED SHOWER PAN FLOOR: (See Figs. 1 & 3)
1. Insert the Rubber Bumpers into the Tileable
Drain Grate side holes by inserting them into
the holes until they are locked in place (Fig. 1).
2. Slide the tiled drain grate into the shower pan
Trench Recess, first by compressing the side of
the grate with the Rubber Bumpers against
the wall of the shower pan Trench Recess (Fig.
3).
3. Finally, slide the other side of the tiled drain
grate into the shower pan Trench Recess.
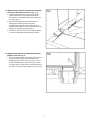
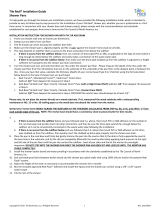
IV. HOW TO REMOVE THE TILED DRAIN GRATE
FROM THE TRENCH RECESS: (See Fig. 4)
1. Insert your fingers or an Allen wrench into the
space between the tiled drain grate and the
Trench Recess wall (i.e., either between E and
F or between G and H), carefully lift out one
side of the grate and grab it with both hands
and then carefully remove the other side by
lifting the entire grate with your hands.
Page is loading ...
Page is loading ...
Page is loading ...
Page is loading ...
-
 1
1
-
 2
2
-
 3
3
-
 4
4
-
 5
5
-
 6
6


Base'N Bench WF4860R-RB48-KIT User manual
- Type
- User manual
Ask a question and I''ll find the answer in the document
Finding information in a document is now easier with AI
in other languages
Related papers
-
Tile Redi WD3060C-RB30-KIT-2.5 User manual
-
Base'N Bench RT4260RDL-PVC-BN3 User manual
-
Base'N Bench RT4872B-PVC-PC User manual
-
Base'N Bench RT4260CTC-PVC-BN User manual
-
-
-
 Base'N Bench RT3448L-SQBN-RB34-KIT Installation guide

Other documents
-
Tile Redi WonderFall Trench Tillable Grate Installation guide
-
Tile Redi Tranch Designer Drain Grate Installation guide
-
Hansgrohe AXOR 56085800 Owner's manual
-
Tile Redi TRZF3460-BI Installation guide
-
 Redi Bench RB4812-KIT Installation guide
-
 Tile Redi RT3060L-PVC-BN3 Installation guide
-
Tile Redi 3060C-PVC Installation guide
-
 Tile Redi RN166S-BI Operating instructions
-
-
 wedi US4000010 Installation guide


