Barrette Outdoor Living 73013298 Installation guide

Type
Installation guide
Reducing Fence Panels & Gates
Reducing the Height of Ready-To-Assemble Panels & Gates:
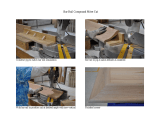
Cut boards and U-channels to desired height (Fig. 1).
To cut posts, measure the height of the new panel/picket (X). Add 3" to the panel/picket
height from the bottom of the bottom rail hole to the top of the post. Mark a line and cut
the post at the line (or as project requires) (Fig. 4).
NOTE:
For panels with 3 rails, reroute the bottom post hole to avoid having to
reroute both top holes instead.
Creating an Angled Panel:
a. Keep in mind the top rail will be longer than the bottom rail due to the angle.
Make sure it is long enough to cover the width of the panel once the angled cut is made
NOTE:
Cut the ends of the rails at an angle parallel with the post. (Fig. 2).
Scalloped panels are numbered on the bottom of the boards. Write the board
number in marker above the cut line to avoid losing track of the numerical order
after cutting (Fig. 3).
b. The top post holes my need to be elongated to accept the top rail (start with small
increments to ensure a tight  t without an open gap).
c. Mark the boards with a chalk line to guide the angled cut.
d. Secure rails into route holes with one of the methods below:
1.
2.
Boards
Post
Rail
U-Channel
Fig. 1
Fig. 2
Fig. 3
Fig. 4
3"
X"
3"
3"
3"
X"
3"
1
1
2
2
3
3
4
4
5
5
6
6
7
7
8
8
9
9
Rail Clips
Rail Clip
Notches
Rail
Rail
1/2" Drill Hole
Post
Post
2 or 2
1
1
1
2
2
"
Deck Screw
Custom Notches
Rail Notcher Tool
Top View
Rail
Rail Clips
#73014079
Rail
Screws
Screws
Screws
Screws
Screws
Screws
Reducing the Width of Ready-To-Assemble Panels & Gates:
Simply remove boards from panel and cut rails to desired length (make sure rails are 3" wider than the  nished panel
size, so that the rails can be inserted into the post routes (Fig. 1). For added security, add rail clips, notches, or screws to
the end of the cut rails.
NOTE:
If cutting one of the vertical boards is necessary to achieve the desired panel width, draw a line the length of the board
and slowly cut using a  ne tooth saw.
If reducing the width of a gate, be sure to take into consideration any inserts or channels inside the post uprights, and
cut the rail lengths as required (Fig. 2).
Finish assembling the rest of the fence or gate panel by following the respective installation instructions.
1.
2.
3.
Boards
Post
Rail
U-Channel
Fig. 1
Fig. 2
Gate Insert
Post Upright
Post Upright
Rail
Rail
P-Channel
a. Measure area for post route hole. Make route centered on
sides & square to post. Drill holes in corners of area to be
routed. Make sure you drill holes large enough for a jig saw
blade. Cut to line & clean opening. Use a jig saw to cut
opening and clean with a  le. Insert rail into route hole of post
and secure (Fig. 5).
b. Finish assembling the rest of the fence or gate panel by
following the respective installation instructions.
3.
Fig. 5
Rail Clips
Rail Clip
Notches
Rail
Rail
1/2" Drill Hole
Post
Post
2 or 2
1
1
1
2
2
"
Deck Screw
Custom Notches
Rail Notcher Tool
Top View
Rail
Rail Clips
#73014079
Rail
Screws
Screws
Screws
Screws
Screws
Screws
  • Page 1 1
  • Page 2 2

Barrette Outdoor Living 73013298 Installation guide

Type
Installation guide

Ask a question and I''ll find the answer in the document

Finding information in a document is now easier with AI