Sunco Lighting Vapor Installation guide

Type
Installation guide

Sunco Lighting Vapor is a versatile and durable lighting solution designed for various indoor and outdoor applications. With its vapor-tight construction, it can withstand harsh environments, making it ideal for use in warehouses, workshops, garages, and other industrial settings. This fixture offers selectable wattage and color temperature, allowing you to customize the lighting to suit your specific needs. Additionally, the 0-10V dimmable feature provides precise light control, enhancing the overall functionality of your space.

Sunco Lighting Vapor is a versatile and durable lighting solution designed for various indoor and outdoor applications. With its vapor-tight construction, it can withstand harsh environments, making it ideal for use in warehouses, workshops, garages, and other industrial settings. This fixture offers selectable wattage and color temperature, allowing you to customize the lighting to suit your specific needs. Additionally, the 0-10V dimmable feature provides precise light control, enhancing the overall functionality of your space.

`
Vapor Tight Installation Guide
SAFETY INSTRUCTIONS: Read instructions carefully before attempting to install fixture.
All wiring should be performed by a qualified electrician.
Disconnect power before installing or servicing. This fixture must be wired in accordance with the National Electrical
Code and applicable local codes and ordinances.
CAUTION: Risk of fire
WARNING: Make certain power is OFF before installing or maintaining fixture. No user serviceable parts inside.
WARNING: Do NOT handle energized fixture when hands are wet, when standing on wet or damp surfaces or in
water.
WARNING: Fixture to be independently supported to building structure.
CLEANING & MAINTENANCE:
CAUTION: Be sure the fixture temperature is cool enough to touch. Do NOT clean or maintain while the fixture is energized.
1. Clean lens with non-abrasive cleaning solution.
2. Do NOT open fixture to clean the LED. Do NOT touch the LED.
Note: These instructions do not cover all details or variation in equipment, nor do they provide for every possible situation during
installation, operation or maintenance.
TROUBLESHOOTING:
1. Check that the line voltage at fixture is correct. Refer to wiring directions.
2. Check that the fixture is grounded properly.
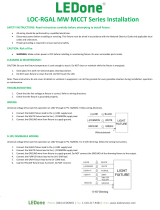
0-10V DIMMABLE WIRING:
Universal voltage driver permits operation at 120V through 277V, 50/60Hz.
1. Connect the BLACK fixture lead to the (+) LINE supply lead.
2. Connect the WHITE fixture lead to the (-) COMMON supply lead
3. Connect the GROUND wire from fixture to the supply ground. Do NOT connect the GROUND of the dimming fixture
to the output.
4. Connect the VIOLET fixture lead to the (V+) DIM lead.
5. Connect the GRAY fixture lead to the (V-) DIM lead.
`
INSTALLATION OPTION: Surface Mount
CAUTION: Turn off electrical power at fuse or circuit breaker box before wiring fixture to the
power supply.
SURFACE MOUNT
1. Install the mounting brackets to the installation surface. (Fig. 1)
2. Open the clips on the fixture. (Fig. 2)
3. Release the LED chip board inside the fixture by pinching the metal clips
together on the middle of the board. (Fig. 3)
4. Install the waterproof connector to the fixture. (Fig. 4)
5. Connect the wires. (Fig. 5)
6. Re-attach the lens to the housing. (Fig. 6)
7. Fasten the clips on the fixture. (Fig. 7)
8. Install the fixture to the mounting brackets. (Fig. 8)
Vapor Tight Installation Guide
Fig. 1
Fig. 2
Fig. 3
Fig. 4
Fig. 5
Fig. 8
Fig. 6
Fig. 7
`
SELECTABLE WATTAGE AND COLOR TEMPERATURE:
Selecting Wattage:
1. When you take the LED chip board up from the fixture, locate 2 black toggle switches inside the fixture. Each silver box is labeled with
options to select a wattage or options to select a color temperature.
2. To change the wattage, please select the silver box with wattage. The default wattage is the highest wattage option on the fixture (left
position). You can adjust this by pushing the switch to the middle or the right (lowest wattage).
Vapor Tight Installation Guide
2 FOOT MODEL NUMBER:
Default Wattage (Left)
Middle Wattage (Middle)
LO-LOC-2FTVT-MW-MCCT
30W
25W
4 FOOT MODEL NUMBER:
Default Wattage (Left)
Middle Wattage (Middle)
LO-LOC-4FTVT-MW-MCCT
50W
35W
8 FOOT MODEL NUMBER:
Default Wattage (Left)
Middle Wattage (Middle)
LO-LOC-8FTVT-MW-MCCT
90W
75W
Selecting Color Temperature:
1. When you take the LED chip board up from the fixture, locate 2 black toggle switches inside the fixture. Each silver box is labeled with
options to select a wattage or options to select a color temperature.
2. To change the color temperature, please select the silver box with CCT. The default color temperature is the highest temperature option on
the fixture left side 5,000K. You can adjust this by pushing the switch to the middle 4,000K or the right side 3,500K.
Default Color Temperature (Left)
Middle Color Temperature (Middle)
Lowest Color Temperature (Right)
5,000K
4,000K
3,500K
  • Page 1 1
  • Page 2 2
  • Page 3 3

Sunco Lighting Vapor Installation guide

Type
Installation guide

Sunco Lighting Vapor is a versatile and durable lighting solution designed for various indoor and outdoor applications. With its vapor-tight construction, it can withstand harsh environments, making it ideal for use in warehouses, workshops, garages, and other industrial settings. This fixture offers selectable wattage and color temperature, allowing you to customize the lighting to suit your specific needs. Additionally, the 0-10V dimmable feature provides precise light control, enhancing the overall functionality of your space.

Ask a question and I''ll find the answer in the document

Finding information in a document is now easier with AI