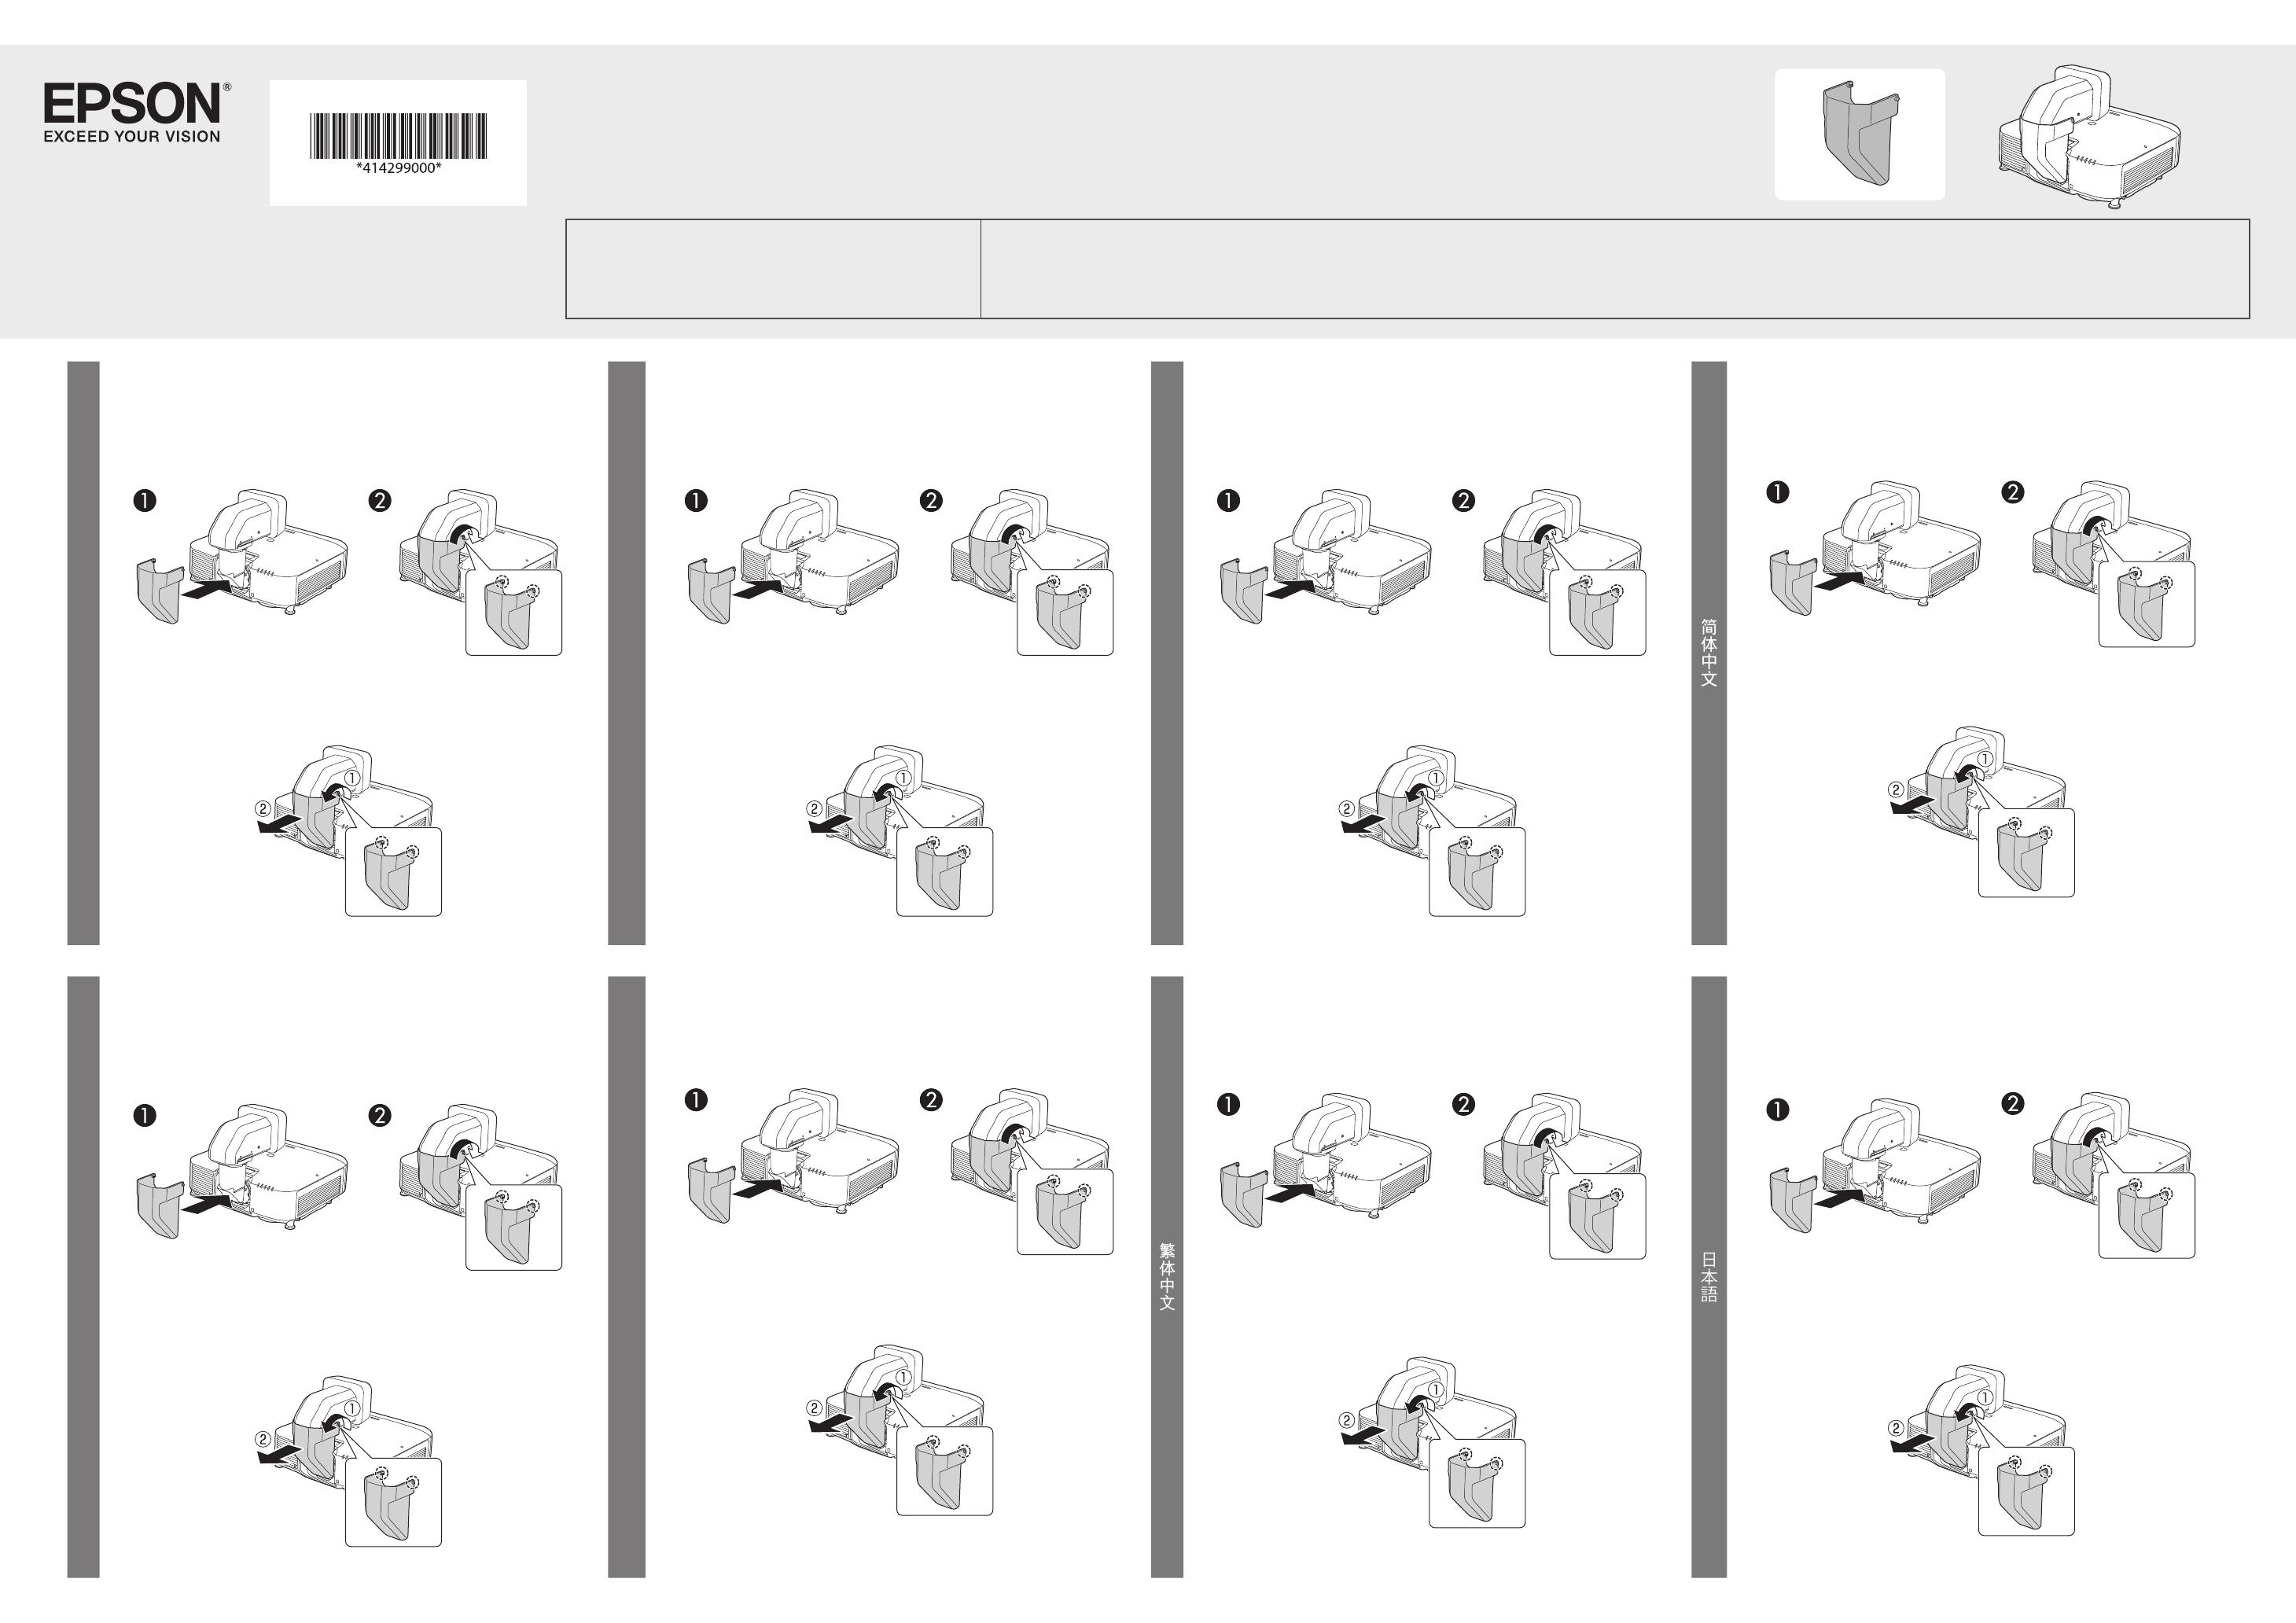
Epson ELPLX02WS User guide

Type
User guide

Epson ELPLX02WS offers bright, vivid color and amazing detail to enhance your presentations. This high-quality, ultra short-throw lens is ideal for applications with space constraints that require a large image in a confined space. Use it to project large, clear images in conference rooms, classrooms, and digital signage applications.

Epson ELPLX02WS offers bright, vivid color and amazing detail to enhance your presentations. This high-quality, ultra short-throw lens is ideal for applications with space constraints that require a large image in a confined space. Use it to project large, clear images in conference rooms, classrooms, and digital signage applications.

ELPLX02S
English
Attaching the Cover
A Attach the decorative cover to the projector.
B Secure the decorative cover.
Secure the cover by tightening the M4 screws (2 points) with a No. 2 cross-
head screwdriver.
Removing the Cover
Loosen the xing screws (2 points) for the decorative cover with a cross-head
screwdriver, and then remove the decorative cover.
Français
Fixation du couvercle
A Fixez le couvercle décoratif sur le projecteur.
B Fixez le couvercle décoratif.
Fixez le couvercle en serrant les vis M4 (2 points) avec un tournevis cruciforme
N°2.
Retrait du couvercle
Desserrez les vis de xation (2 points) du couvercle décoratif avec un tournevis
cruciforme, puis retirez le couvercle décoratif.
Deutsch
Abdeckung anbringen
A Bringen Sie die dekorative Abdeckung am Projektor an.
B Sichern Sie die dekorative Abdeckung.
Sichern Sie die Abdeckung, indem Sie die M4-Schrauben (2 Punkte) mit
einem Kreuzschraubendreher Nr. 2 festziehen.
Abdeckung entfernen
Lösen Sie die Befestigungsschrauben (2 Punkte) der dekorativen Abdeckung
mit einem Kreuzschraubendreher, entfernen Sie dann die dekorative
Abdeckung.
Italiano
Fissaggio della copertura
A Fissare la copertura decorativa al proiettore.
B Fissare la copertura decorativa.
Fissare la copertura stringendo le viti M4 (2 punti) con un cacciavite a croce n. 2.
Rimozione della copertura
Allentare le viti di ssaggio (2 punti) della copertura decorativa con un
cacciavite a croce, quindi rimuovere la copertura decorativa.
Español
Colocación de la tapa
A Coloque la tapa decorativa al proyector.
B Fije la tapa decorativa.
Fije la tapa apretando los tornillos M4 (2 puntos) con un destornillador de
punta de estrella del Nº 2.
Quitar la tapa
Aoje los tornillos de jación (2 puntos) de la tapa decorativa con un
destornillador de punta de estrella, y a continuación quite la tapa decorativa.
安装镜头盖
A 将装饰盖安装至投影机。
B 固定装饰盖。
使用 2 号十字头螺钉拧紧 M4 螺钉(2 处)固定装饰盖。
拆卸镜头盖
使用十字头螺钉拧松装饰盖的固定螺钉(2 处),然后拆下装饰盖。
安裝護蓋
A 將裝飾護蓋安裝至投影機。
B 鎖緊裝飾護蓋。
使用 2 號十字頭螺絲起子鎖緊 M4 螺絲 (2 處 ),以鎖緊護蓋。
拆卸護蓋
使用十字頭螺絲起子鬆開裝飾護蓋的固定螺絲 (2 處 ),然後取下裝飾
護蓋。
カバーの取り付け
A 化粧カバーをプロジェクターに取り付ける
B 化粧カバーを固定する
M4 ネジ (2 箇所)を No.2 プラスドライバーで締めて固定します。
カバーの取り外し
化粧カバーの固定ネジ(2 箇所)をプラスドライバーで緩めてから、
化粧カバーを外します。
ELPLX02WS EB-L1505U EB-L1500U CB-L1505U
CB-L1500U Pro L1505U Pro L1500U
To use this lens unit, you need to update the projector's firmware to version V140 or later. / Pour utiliser cette unité d'objectif, vous devez mettre à jour le firmware du projecteur à la version V140 ou ultérieure. / Zur
Verwendung dieses Objektivs müssen Sie die Firmware des Projektors auf Version V140 oder aktueller aktualisieren. / Per utilizzare questa unità obiettivo, occorre aggiornare il firmware del proiettore alla versione V140 o
superiore. / Para utilizar esta unidad de lente, debe actualizar la versión del firmware del proyector a la versión V140 o posterior. / 使用本镜头单元需要固件更新至 V140 或版本。 / 若 要 使 本 鏡 組 件, 需 將
投影機韌體更新至 V140 或更新版本 / V140
EB-PU2220B EB-PU2216B EB-PU2213B EB-PU2120W EB-PU2116W EB-PU2113W EB-PU2010W
CB-PU2220B CB-PU2216B CB-PU2213B CB-PU2120W CB-PU2116W CB-PU2113W CB-PU2010W
EB-L1755U EB-L1750U EB-L1505UH EB-L1500UH EB-L1715S EB-L1710S EB-L1515S EB-L1510S
CB-L1755U CB-L1750U CB-L1505UH CB-L1500UH CB-L1715S CB-L1515S CB-L1510S
Pro L1755U Pro L1750U Pro L1505UH Pro L1500UH Pro L1715S
© 2021 Seiko Epson Corporation.
EB-L20000U EB-L20002U CB-L20000U Pro L20000U Pro L20002U
EB-L12000Q EB-L12002Q CB-L12000Q Pro L12000Q Pro L12002Q
English
Attaching the Cover
A Attach the decorative cover to the projector.
B Secure the decorative cover.
Secure the cover by tightening the M4 screws (4 points) with a No. 2 cross-
head screwdriver.
Removing the Cover
Loosen the xing screws (4 points) for the decorative cover with a cross-head
screwdriver, and then remove the decorative cover.
Français
Fixation du couvercle
A Fixez le couvercle décoratif sur le projecteur.
B Fixez le couvercle décoratif.
Fixez le couvercle en serrant les vis M4 (4 points) avec un tournevis cruciforme
N°2.
Retrait du couvercle
Desserrez les vis de xation (4 points) du couvercle décoratif avec un tournevis
cruciforme, puis retirez le couvercle décoratif.
Deutsch
Abdeckung anbringen
A Bringen Sie die dekorative Abdeckung am Projektor an.
B Sichern Sie die dekorative Abdeckung.
Sichern Sie die Abdeckung, indem Sie die M4-Schrauben (4 Punkte) mit
einem Kreuzschraubendreher Nr. 2 festziehen.
Abdeckung entfernen
Lösen Sie die Befestigungsschrauben (4 Punkte) der dekorativen Abdeckung
mit einem Kreuzschraubendreher, entfernen Sie dann die dekorative
Abdeckung.
Italiano
Fissaggio della copertura
A Fissare la copertura decorativa al proiettore.
B Fissare la copertura decorativa.
Fissare la copertura stringendo le viti M4 (4 punti) con un cacciavite a croce n. 2.
Rimozione della copertura
Allentare le viti di ssaggio (4 punti) della copertura decorativa con un
cacciavite a croce, quindi rimuovere la copertura decorativa.
Español
Colocación de la tapa
A Coloque la tapa decorativa al proyector.
B Fije la tapa decorativa.
Fije la tapa apretando los tornillos M4 (4 puntos) con un destornillador de
punta de estrella del Nº 2.
Quitar la tapa
Aoje los tornillos de jación (4 puntos) de la tapa decorativa con un
destornillador de punta de estrella, y a continuación quite la tapa decorativa.
安装镜头盖
A 将装饰盖安装至投影机。
B 固定装饰盖。
使用 2 号十字头螺钉拧紧 M4 螺钉(4 处)固定装饰盖。
拆卸镜头盖
使用十字头螺钉拧松装饰盖的固定螺钉(4 处),然后拆下装饰盖。
安裝護蓋
A 將裝飾護蓋安裝至投影機。
B 鎖緊裝飾護蓋。
使用 2 號十字頭螺絲起子鎖緊 M4 螺絲 (4 處 ),以鎖緊護蓋。
拆卸護蓋
使用十字頭螺絲起子鬆開裝飾護蓋的固定螺絲 (4 處 ),然後取下裝飾
護蓋。
カバーの取り付け
A 化粧カバーをプロジェクターに取り付ける
B 化粧カバーを固定する
M4 ネジ (4 箇所)を No.2 プラスドライバーで締めて固定します。
カバーの取り外し
化粧カバーの固定ネジ(4 箇所)をプラスドライバーで緩めてから、
化粧カバーを外します。
  • Page 1 1
  • Page 2 2

Epson ELPLX02WS User guide

Type
User guide

Epson ELPLX02WS offers bright, vivid color and amazing detail to enhance your presentations. This high-quality, ultra short-throw lens is ideal for applications with space constraints that require a large image in a confined space. Use it to project large, clear images in conference rooms, classrooms, and digital signage applications.

Ask a question and I''ll find the answer in the document

Finding information in a document is now easier with AI

in other languages