
FACE FORWARD™
Recortador de nariz,
cejas y vello facial
Manual de instrucciones
Para su seguridad y para disfrutar plenamente
de este producto, siempre lea atentamente
las instrucciones antes del uso.
Modelo NPGBT01
MEDIDAS DE
SEGURIDAD
IMPORTANTES
LEA TODAS LAS
INSTRUCCIONES
ANTES DEL USO
PARA USO DOMÉSTICO
SOLAMENTE
ADVERTENCIA –
1. Supervise el uso de este aparato con cuidado
cuando sea usado por, en o cerca de niños o
personas con ciertas discapacidades.
2. Use este producto solo para el uso previsto
y como se describe en este manual. Solo use
accesorios recomendados por el fabricante.
3. Limpie el cabezal en agua fría o tibia
solamente. No use agua caliente, agua salina o
limpiadores ya que esto puede dañar los sellos de
impermeabilidad del cabezal.
4. No sumerja el aparato en agua por un tiempo
prolongado.
5. Para evitar las lesiones, no use este aparato
con guías o cuchillas rotas o dañadas, o si les
faltan dientes a las cuchillas. Compruebe que las
cuchillas están debidamente alineadas antes de
usarlo.GUARDE ESTAS
INSTRUCCIONES
RESOLUCIÓN DE PROBLEMAS
Si el aparato no funciona correctamente:
1. Compruebe que el aparato está encendido.
2. Compruebe que la pila está correctamente
instalada. Pruebe la pila para comprobar que
funciona.
3. Revise las cuchillas; de ser necesario,
límpielas, usando el cepillo de limpieza provisto.
4. Si esto el problema, devuelva el aparato a un
centro de servicio autorizado (véase la sección
“Garantía”).
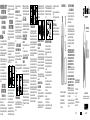
INSTRUCCIONES
DE OPERACIÓN
1. Para instalar la pila, gire la tapa del
compartimiento de la pila en sentido antihorario
para abrir este. Retire el compartimento tirando
hacia abajo (Fig. 1).
2. Inserte una pila alcalina AAA, el polo positivo
hacia abajo. Nota: Retire la pila si está agotada o
si no va a usar el aparato por un largo período de
tiempo; esto alargará su vida útil.
3. Después de instalar la pila, alinee la flecha con
la marca “I” en la tapa del compartimiento y gire
en sentido horario hasta que la flecha y la marca
“O” queden alineadas (Fig. 2).
Fig. 2 Fig. 1
4. No use pilas que no sean del tamaño ni de la
potencia indicados para uso con este aparato.
5. Limpie los contactos del aparato y los de la
pila antes de instalarla.
6. Cerciórese de instalar las pilas de acuerdo
con signos de polaridad (+/-) indicados en el
compartimiento de las pilas.
7. Guarde las pilas nuevas en su paquete
original, lejos de objetos metálicos, los cuales
pueden provocar un cortocircuito. Nunca
cortocircuite las pilas.
8. Este aparato no es un juguete; manténgalo
fuera del alcance de los niños.
INSTRUCCIONES DE USO
1. Gire la tapa del compartimiento de la pila en
sentido antihorario para abrir este.
2. Inserte una pila AAA, de acuerdo con los
signos de polaridad (+/-) indicados en el
compartimiento. Vuelva a colocar la tapa del
compartimiento de la pila, y gírela en sentido
horario hasta que las marcas “I” y “O” queden
alineadas. A continuación, gire en sentido horario
otra vez para bloquear. Una vez alineadas las dos
marcas “I”, el aparato se encenderá.
3. Después del uso, apague el aparato alineando
la marca “I” en la tapa del compartimiento de la
pila con la marca “O” (Fig.1).
FUNCIONAMIENTO
BÁSICO
CÓMO CAMBIAR EL CABEZAL
1. Compruebe que el aparato está apagado
2. Gire el cabezal en sentido horario hasta que
las flechas “▼” y “▲” queden alineadas
(Fig. 3), luego jale suavemente el cabezal.
3. Instale el cabezal deseado y gírelo en sentido
antihorario hasta que las marcas “▼” y “O”
queden alineadas (Fig. 4).
Fig. 4 Fig. 3
CÓMO CORTAR EL PELO EN LA
NARIZ/LAS OREJAS
Para acortar el pelo en la nariz y las orejas, use
el cabezal de corte biselado de 3 niveles. Inserte
suavemente la punta del cabezal en la nariz o la
oreja, y muévalo ligeramente de un lado para otro
para cortar el pelo.
NOTA: Para recortar el pelo en la nariz, introduzca
el recortador no más de ¼ in (0.5 cm) en el
orificio nasal, y corte el pelo de abajo hasta que
ya no sea visible. Para recortar el pelo en la
oreja, guíe el recortador alrededor de la superficie
externa de la oreja.
USO EN SECO/MOJADO
Este aparato es resistente al agua. Esto significa
que puede ser expuesto a salpicaduras de agua
en la ducha y que puede ser enjuagado en
agua corriente, pero nunca debe ser sumergido
completamente en agua.
MANTENIMIENTO DEL
RECORTADOR DE NARIZ/OREJAS
CUIDADO DE LAS CUCHILLAS
1. Limpie las cuchillas después de cada uso,
usando el cepillo de limpieza provisto.
2. Guarde el aparato en un lugar seguro.
3. Use solamente cuchillas Conair® con este
aparato.
LIMPIEZA DEL RECORTADOR DE
NARIZ/OREJAS
Compruebe que el aparato está apagado.
1. Para quitar el cabezal, gírelo en sentido
horario hasta que las flechas “▼” y “▲” queden
alineadas (Fig. 5), luego jale suavemente el
cabezal.
2. Enjuague el cabezal en agua (Fig. 6). No
permita que la carcasa del aparato tenga contacto
con agua.
3. Después de limpiar el cabezal, sacúdalo para
secarlo y vuelva a instalarlo.
4. Vuelva a instalar el cabezal, alineando las
flechas “▼” y “▲” , luego gire el cabezal en
sentido antihorario hasta que la flecha “▼” y la
marca “O” queden alineadas (Fig. 7).
Fig. 7
Fig. 5 Fig. 6
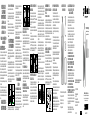
CÓMO RECORTAR LAS CEJAS Y
EL VELLO FACIAL
1. El aparato cuenta con un aditamento de dos
cuchillas que permite recortar el vello facial/
corporal y las cejas fácilmente. La cuchilla grande
es ideal para acortar las cejas; también puede
usarse para recortar el vello facial. La cuchilla
pequeña es ideal para dar el acabado. La guía de
dos lados para las cejas permite acortar las cejas
uniformemente, sin afeitarlas.
Ambos lados son excelentes para recortar las
cejas. Cuando se trate de recortar el vello facial/
corporal, el lado con dientes largos es mejor para
el vello corporal, y el lado con dientes cortos es
mejor para dar el acabado.
2. También cuenta con una guía que permite
cortar el vello uniformemente, sin afeitarlo. La
guía tiene dos lados: un lado con dientes largos,
ideal para cortar el vello corporal, y un lado con
dientes cortos, ideal para cortar las cejas. Alinear
el indicador con la marca “L” deja el vello más
largo; alinearlo con la marca “S” deja el vello más
corto (Fig. 8).
3. Antes de instalar la guía, compruebe que
el aparato está apagado y deslice la guía por
encima de las cuchillas (Fig. 9). Compruebe
que los dientes de la guía están en la misma
dirección que los dientes de la cuchilla y que la
parte superior de la guía está pareja con la parte
superior del recortador.
4. Si desea afeitar el vello, use la recortadora sin
la guía.
5. Después de terminar, apague el aparato,
girando la tapa del compartimiento de la pila de
manera que la marca “I” en la tapa quede
alineada con la marca “O”. Luego, guarde el
recortador con la guía puesta para proteger las
cuchillas.
Fig. 9
Fig. 8
Dientes
largos
Dientes
cortos
MANTENIMIENTO DEL
RECORTADOR DE CEJAS/VELLO
FACIAL
CUIDADO DE LAS CUCHILLAS
Las cuchillas del recortador han sido diseñadas
con precisión para un uso específico y deben
recibir un cuidado muy especial. Limpie las
cuchillas después de cada uso, usando el cepillo
de limpieza provisto, y luego enjuáguelas en agua
corriente y permita que se sequen al aire. Guarde
el aparato hasta el próximo uso.
Para seguir disfrutando de este aparato por
mucho tiempo, úselo solamente para el uso
previsto.
LIMPIEZA DEL RECORTADOR DE
CEJAS/VELLO FACIAL
Compruebe que el aparato está apagado.
1. Gire el cabezal en sentido horario hasta que
las flechas “▼” y “▲” queden alineadas (Fig. 5),
luego jale suavemente el cabezal.
2. Enjuague cabezal en agua corriente (Fig. 10).
3. Después de limpiar el cabezal, sacúdalo para
secarlo y vuelva a instalarlo.
4. Vuelva a instalar el cabezal, alineando las
flechas “▼” y “▲” , luego gire el cabezal en
sentido antihorario hasta que la flecha “▼” y la
marca “O” queden alineadas (Fig. 7).
Fig. 10
INFORMACIÓN DE SEGURIDAD
ACERCA DE LAS PILAS
1. Este producto requiere 1 pila AAA.
2. Guarde las pilas en un lugar fresco y seco, ya
que son sensibles a las altas temperaturas.
3. Limpie los contactos de la pila y los del aparato
antes de instalar la pila.
4. Retire la pila del aparato cuando no lo va
a usar por un largo período de tiempo (p. ej.,
meses).
5. No intente recargar pilas no recargables.
6. Use solamente el cable provisto con el aparato.
7. Cerciórese de instalar las pilas de acuerdo
con signos de polaridad (+/-) indicados en el
compartimiento de las pilas.
8. Reemplace todas las pilas al mismo tiempo. No
junte pilas nuevas con pilas usadas/gastadas.
9. Retire las pilas descargadas inmediatamente
para evitar fugas.
10. Nunca tire pilas al fuego.
11. Apague el aparato después del uso.
12. Mantenga las pilas fuera del alcance de los
niños de los niños, especialmente las que son
lo suficientemente pequeñas como para ser
ingeridas.
13. En caso de ingestión de una pila, busque
atención médica inmediata.
14. Nunca abra, aplaste, perfore ni desarme pilas.
15. Deseche las pilas de acuerdo con las
regulaciones estatales y locales.
ELIMINACIÓN DE LA PILA
La pila AAA usada por este aparato no contiene
materiales peligrosos y no requiere ser reciclada.
Puede eliminarse de forma segura con los
residuos domésticos normales.
CARACTERÍSTICAS DE
SU RECORTADOR
1. 3.
4.
2.
5.
1. Recortador de nariz/orejas removible
2. Mango con luz LED
3. Recortador de cejas
4. Guía para las cejas
5. Tapa protectora
GARANTÍA LIMITADA DE DOS AÑOS
(VÁLIDA EN LOS EE.UU. Y EN
CANADÁ SOLAMENTE)
Conair reparará o remplazará (a su opción) este
producto sin cargo por un período de 24 meses a
partir de la fecha de compra si presenta defectos
de fabricación o materiales.
Para obtener servicio técnico bajo esta garantía,
devuelva el producto defectuoso al Centro de
Servicio indicado en el reverso, junto con su recibo
de compra. Los residentes de California solo
necesitan dar una prueba de compra y deben
llamar al 1-800-3-CONAIR para recibir
instrucciones de envío. En ausencia del recibo de
compra, el período de garantía será de 24 meses
a partir de la fecha de fabricación.
CUALQUIER GARANTÍA, OBLIGACIÓN O
RESPONSABILIDAD IMPLÍCITAS, INCLUYENDO,
PERO NO LIMITADAS A LA GARANTÍA
IMPLÍCITA DE COMERCIABILIDAD Y APTITUD
PARA UN PROPÓSITO ESPECÍFICO, ESTARÁN
LIMITADAS POR LOS 24 MESES DE LA
PRESENTE GARANTÍA ESCRITA. Algunos Estados
no permiten limitaciones en la duración de una
garantía implícita, de modo que las limitaciones
mencionadas pueden no regir para usted.
CONAIR NO SERÁ RESPONSABLE, EN NINGÚN
CASO, POR NINGÚN DAÑO ESPECIAL,
INCIDENTAL O CONSECUENTE DEBIDO AL
INCUMPLIMIENTO DE ESTA O CUALQUIER OTRA
GARANTÍA, EXPRESA O IMPLÍCITA. Algunos
Estados no permiten la exclusión o limitación de
daños especiales, incidentales o consecuentes, de
modo que las limitaciones mencionadas pueden
no regir para usted.
Esta garantía le otorga derechos legales
específicos y usted puede tener otros derechos
que varían de un Estado a otro.
Para registrar este producto, visítenos en:
www.conair.com/registration
©2022 CONAIR LLC
Centro de servicio
Conair LLC
Service Department
7475 North Glen Harbor Blvd.
Glendale, AZ 85307
IB-17494
21NP081577


 1
1
 2
2


 CONAIR MAN PG7500 User manual
 maxcare vibrate massage User manual
Kmart 43264049 User manual
Philips HP6390/01 User manual
Wahl 9865-100 Pure Confidence Rechargeable Electric Trimmer User guide
Philips G270 User manual
Remington PG-300 User manual
Carrera 524 User manual
ViSAGE 95597 User manual

