Lexmark 642e - X MFP B/W Laser User manual

Category
Print & Scan
Type
User manual
Lexmark™ X642
Troubleshooting
Guide
Online technical support
Technical support is available on our Lexmark Web
site at www.lexmark.com.
Checking an unresponsive
printer
If the printer is not responding, first make sure:
The power cord is plugged into the printer and
a properly grounded electrical outlet.
The electrical outlet is not turned off by any
switch or breaker.
The printer is not plugged into any surge
protectors, uninterrupted power supplies, or
extension cords.
Other electrical equipment plugged into the
outlet is working.
The printer is turned on.
The printer cable is securely attached to the
printer and the host computer, print server,
option, or other network device.
Once you have checked each of these possibilities,
turn the printer off and back on. This often fixes the
problem.
Printing multi-language
PDFs
1 Open the document you want to print in Adobe
Acrobat.
2 Click the printer icon.
3 Check the Print as image box.
4 Click OK.
Solving printing problems
The operator panel display is blank
Turn the printer off, wait about 10 seconds, and turn
the printer back on.
If the Ready message does not appear, turn the
printer off and call for service.
The message USB device
unsupported appears when using
a USB device
For information regarding tested and approved USB
flash memory devices, see our Lexmark Web site at
http://support.lexmark.com and click on
KnowledgeBase to search for Direct USB printing.
Jobs do not print
The printer is not ready to receive data
Make sure Ready or Power Saver appears on the
display before sending a job to print.
The specified output bin is full
Remove the stack of paper from the output bin.
The specified tray is empty
Load paper in the tray.
You are using the wrong printer driver or
are printing to a file
Verify you are using the printer driver
associated with the printer.
If you are using a USB port, make sure you are
running Windows 98/Me, Windows 2000,
Windows XP, or Windows Server 2003 and
using a Windows 98/Me, Windows 2000,
Windows XP, or Windows Server 2003
compatible printer driver.
Your MarkNet N8000 series internal print
server is not set up properly or is not
connected properly
Verify that you have properly configured the printer
for network printing.
See the drivers CD or the Lexmark Web site for
information.
You are using the wrong interface cable,
or the cable is not securely connected
Make sure you are using a recommended interface
cable.
Make sure the connection is secure.
Held jobs do not print
A formatting error has occurred
Print the job. (Only part of the job may print.)
Delete the job.
Free up additional printer memory by scrolling
through the list of held jobs and deleting others
you have sent to the printer.
The printer has insufficient memory
Print the job. (Only part of the job may print.)
Delete the job.
Free up additional printer memory by scrolling
through the list of held jobs and deleting others
you have sent to the printer.
The printer has received invalid data
Delete the job.
Job takes longer than expected to
print
The job is too complex
Reduce the complexity of your print job by
eliminating the number and size of fonts, the number
and complexity of images, and the number of pages
in the job.
Page Protect is set to On
Set Page Protect to Off from the Setup Menu.
For more information, see the Menus and Messages
Guide.
Job prints from the wrong tray or
on the wrong paper or specialty
media
Make sure the Paper Size and Paper Type specified
in the printer driver match the paper size and type in
the tray.
Incorrect characters print
You are using an incompatible parallel
cable
If you are using a parallel interface, make sure you
are using an IEEE 1284-compliant parallel cable. We
recommend Lexmark part number 1329605 (10 ft) or
1427498 (20 ft) for the standard parallel port.
The printer is in Hex Trace mode.
If Ready Hex appears on the display, you must exit
Hex Trace mode before you can print your job. Turn
the printer off and back on to exit Hex Trace mode.
Tray linking does not work
Make sure both the size and type of media are
the same in both trays.
Make sure the paper guides in the trays are set
for the correct size media.
Make sure the menu values for both size and
type are set correctly in the Paper Menu.
See Menus and Messages Guide for more
information.
Large jobs do not collate
Collate is not set to On
Set Collation to On in the Finishing Menu or
through the printer driver.
Note: Setting Collation to Off in the
driver overrides the setting in the
Finishing Menu.
See the Menus and Messages Guide for more
information.
The job is too complex
Reduce the complexity of the print job by eliminating
the number and size of fonts, the number and
complexity of images, and the number of pages in
the job.
The printer does not have enough
memory
Add printer memory or an optional hard disk.
Unexpected page breaks occur
Set Print Timeout to a higher value from the Setup
Menu.
See the Menus and Messages Guide for more
information.
Solving option problems
If an option does not operate correctly after it is
installed or if it quits working:
Turn the printer off, wait for about 10 seconds,
and turn the printer on. If this does not fix the
problem, unplug the printer, and check the
connection between the option and printer.
Print the menu settings page and check to see
if the option is listed in the Installed Options list.
If the option is not listed, reinstall it. See the
User’s Guide for more information.
Make sure the option is selected in the software
application you are using.
If the suggested corrective action does not fix the
problem, call your service representative.
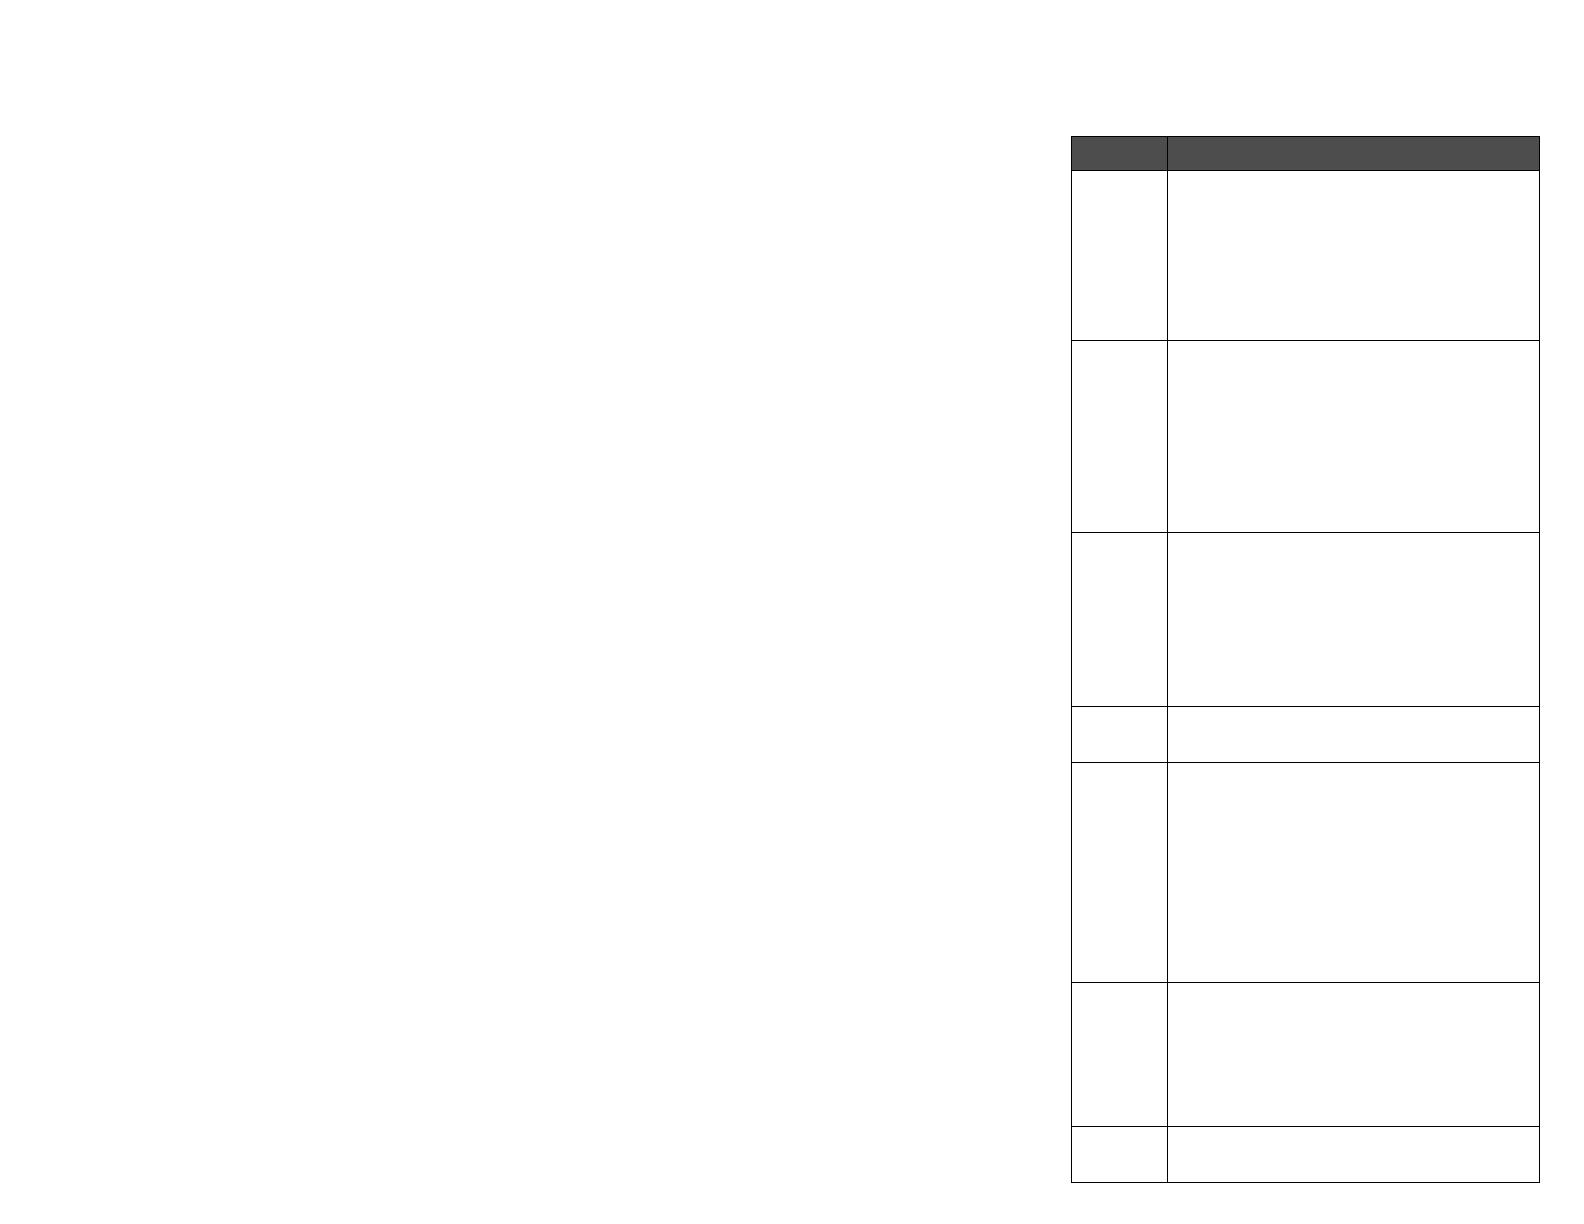
Option Action
Drawers Make sure the connection between
drawers (250-sheet drawer, 500-sheet
drawer, or 2000-sheet drawer) or the
connection between a drawer and a duplex
unit or the MFP is secure.
Make sure the print media is loaded
correctly.
Duplex
unit
Make sure the connection between the
duplex unit and the MFP is secure. If the
duplex unit is listed on the menu settings
page, but print media jams when it enters
or exits the duplex unit, the MFP and
duplex unit may not be properly aligned.
Make sure the duplex front access cover is
securely installed.
Envelope
feeder
Make sure the connection between the
envelope feeder and the MFP is secure.
Make sure the Paper Size setting is correct
in both the Paper menu and in the software
application.
Make sure the envelopes are loaded
correctly.
Flash
memory
Make sure flash memory is securely
connected to the MFP system board.
Internal
print
server
Make sure the internal print server (also
called an internal network adapter or INA)
is securely connected to the MFP system
board.
Make sure you are using the correct cable,
that it is securely connected, and the
network software is correctly set up.
See the drivers CD that shipped with the MFP
for more details.
Large
capacity
feeder
(2000-
sheet
drawer)
See
Solving 2000-sheet drawer
problems.
MFP
memory
Make sure MFP memory is securely
connected to the MFP system board.
Solving 2000-sheet drawer
problems
The elevator tray does not raise when
the loading door is closed, or the
elevator tray does not lower when the
door is opened and the elevator button is
pushed
Check the following:
The printer is properly attached to the 2000-
sheet drawer.
The printer is powered on.
The power cord is plugged firmly into the back
of the 2000-sheet drawer.
The power cord is plugged into an outlet.
The outlet has power.
The elevator tray lowers unexpectedly
Check to see if the printer is out of print media or has
a jam.
More than one sheet of print media is
fed, or a sheet is fed improperly
Remove the print media in the printer paper path,
and check the stack to ensure the print media has
been loaded properly. Be sure to remove the top and
bottom sheets of each ream of paper that is loaded.
A jam occurs
Remove the print media in the printer paper path,
and check the stack to ensure the print media has
been loaded properly. Be sure to remove the top and
bottom sheets of each ream of paper that is loaded.
Rubber feed rollers do not turn to
advance print media
Check the following:
The power cord is plugged firmly into the back
of the 2000-sheet drawer.
The power cord is plugged into an outlet.
The outlet has power.
Consistent misfeeds or jams in the
drawer
Try the following:
Flex the paper.
Turn the print media over.
Check the following:
Drawer is properly installed.
Print media is loaded correctly.
Print media is not damaged.
Print media meets specifications.
Guides are positioned correctly for the print
media size selected.
Service messages
A service message indicates printer failure that may
require service.
Turn the printer off, wait about 10 seconds, and then
turn the printer on.
If the error recurs, write down the error number, the
problem, and a detailed description. Call for service.
Solving paper feed
problems
Paper frequently jams
You are using paper that does not meet
the printer specifications.
Use recommended paper and other specialty media.
See the Card Stock & Label Guide available on the
Lexmark Web site at www.lexmark.com for detailed
specifications.
For information that can help prevent jams from
occurring, see the Clearing Jams Guide.
You have loaded too much paper or too
many envelopes.
Make sure the stack of paper you load does not
exceed the maximum stack height indicated at the
front of the tray or on the multipurpose feeder.
Guides in the selected tray are not set to
the appropriate position for the size
paper loaded.
Move the guides in the tray to the correct position.
The paper has absorbed moisture due to
high humidity.
Load paper from a fresh package.
Store paper in its original wrapper until you load it.
The Paper Jam message remains
after you remove the jammed
paper.
Clear paper from the entire paper path.
The page that jammed does not
reprint after you clear the jam.
Set Jam Recovery to Auto or On.
For more information, see the Menus and Messages
Guide
Blank pages feed into the output
bin
Load the correct type media for your print job, or
change the Paper Type to match the type of media
loaded.
For more information, see the Menus and Messages
Guide.
Original documents misfeed in the
ADF
Adjust the guides toward the media until they
lightly rest against the edge of the media.
If the pick pad is worn, replace the pick pad.
Print quality
troubleshooting
To help isolate print quality problems, print the “Print
defects guide” and check for repeating defects. If
repeating defects are not appearing, print the Print
Quality Test Pages.
Printing the print defects guide
1 Touch the help icon (?).
2 Touch Print Defects Guide.
Printing the print quality test
pages
3 Turn the MFP off.
4 Hold down the number 2 and number 6 keys on
the numeric pad.
5 Continue to hold the buttons, and turn the MFP
on.
Hold the buttons for about 10 seconds while the
MFP is powering up, then release the buttons.
The MFP enters the Configuration menu.
6 Touch Print Quality Pages.
7 Touch Exit Configuration Menu.
The printer restarts and returns to the home
page.
Solving print quality
problems
Print is too light.
The toner may be low. To utilize the remaining
toner, remove the cartridge by gripping the
handles with both hands. With the cartridge
arrows pointing downward, firmly shake the
print cartridge side-to-side and front-to-back
several times to redistribute the toner. Reinstall
the cartridge
. Repeat this procedure multiple
times until the print remains faded. When the
print remains faded, replace the print cartridge.
Change the Toner Darkness setting in the
Quality menu.
Change the Brightness setting in the Quality
menu.
Change the Contrast setting in the Quality
menu.
If you are printing on an uneven print surface,
change the Paper Weight and Paper Texture
settings in the Paper menu.
Verify the correct print media is being used.
Verify you are using the correct printer drivers.
Verify the environment is Class B.
Toner smears or print comes off
the page
If you are printing on an uneven print surface,
change the Paper Weight and Paper Texture
settings in the Paper menu.
Verify the print media is within the printer
specifications. See the User’s Guide for more
details.
Toner appears on the back of the
printed page
Toner is on the transfer roll. To help prevent this, do
not load print media that is smaller than the page
size of the job to be printed.
Open and close the printer top front cover to run the
printer setup cycle and clean the transfer roll.
Toner fog or background shading
appears on the page
Check the print cartridge to make sure it is
installed correctly.
The Toner Darkness setting may be too dark.
Change the Toner Darkness setting in the
Quality Menu.
Verify the environment is Class B.
Replace the charge rolls.
Replace the print cartridge.
Entire page is white
Make sure the packaging material is removed
from the print cartridge.
Check the print cartridge to be sure it is installed
correctly.
The toner may be low. To utilize the remaining
toner, remove the cartridge by gripping the
handles with both hands. With the cartridge
arrows pointing downward, firmly shake the
print cartridge side-to-side and front-to-back
several times to redistribute the toner. Reinstall
the cartridge
. Repeat this procedure multiple
times until the print remains faded. When the
print remains faded, replace the print cartridge.
Streaks appear on the page
The toner may be low. To utilize the remaining
toner, remove the cartridge by gripping the
handles with both hands. With the cartridge
arrows pointing downward, firmly shake the
print cartridge side-to-side and front-to-back
several times to redistribute the toner. Reinstall
the cartridge
. Repeat this procedure multiple
times until the print remains faded. When the
print remains faded, replace the print cartridge.
If you are using preprinted forms, make sure the
ink can withstand temperatures of 230°C
(446°F).
Printing is too dark
Change the Toner Darkness setting in the
Quality menu.
Change the Brightness setting in the Quality
menu.
Change the Contrast setting in the Quality
menu.
Verify the environment is Class B.
Characters have jagged or uneven
edges
Change the Print Resolution setting in the
Quality menu to 600 dpi, 1200 Image Q,
1200 dpi, or 2400 Image Q.
Enable Enhance Fine Lines.
If you are using downloaded fonts, verify the
fonts are supported by the printer, the host
computer, and the software application.
Verify the print media type and print tray type
settings match.
Verify you are using the correct printer drivers.
Verify the environment is Class B.
Part or all of the page is printed in
black
Check the print cartridge to see if it is installed
correctly.
The job prints, but the top and side
margins are incorrect
Make sure the Paper Size setting in the Paper
menu is correct.
Make sure the margins are set correctly in your
software application.
Ghost images appear
Make sure the Paper Type setting in the Paper
menu is correct.
Verify the environment is Class B.
Replace the charge rolls.
Replace the print cartridge.
Replace the photoconductor kit.
Some of the print is cut off on the
sides, top, or bottom of the media
Move the guides in the tray to the proper positions for
the size loaded.
Print is skewed or inappropriately
slanted
Move the guides in the tray to the proper positions for
the size loaded.
Transparency print quality is poor.
Use only transparencies recommended by the
printer manufacturer.
Make sure the Paper Type setting in the Paper
menu is set to Transparency.
Solving copy quality
problems
Unwanted background is visible
Adjust the Background Removal setting under
Copy Options Advanced Imaging. Touch the
right arrow to remove more background.
Unwanted patterns (Moire) appear
when a document is copied using
Photograph mode
Change the content mode to Printed Image under
Copy Options Content.
Vertical or horizontal lines are
noticed on copied pages
Clean the ADF scanner glass and backing material.
Black text is too light or
disappearing
Adjust the Darkness setting under the Copy
menu. Touch the right arrow to increase the
darkness setting.
Change the content mode to Text under
Copy Options Content.
Adjust the Background Removal setting under
Copy Options Advanced Imaging.
Touch the left arrow to remove less background.
Adjust the Contrast setting under Copy
Options Advanced Imaging. Touch the
right arrow to add more contrast.
Adjust the Shadow Detail setting under
Copy Options Advanced Imaging.
Touch the left arrow to decrease shadow detail.
The copy looks washed out or
overexposed
Adjust the Background Removal setting under
Copy Options Advanced Imaging.
Touch the left arrow to remove less background.
Adjust the Shadow Detail setting under
Copy Options Advanced Imaging.
Touch the left arrow to remove more shadow
detail.
Solving scan quality
problems
The file size is too big when I scan
a document to the network
Touch Options, then under Resolution,
decrease the output resolution.
Touch Options, then under Content, change
the Color option to black and white.
Touch Options, then under Content, change
the setting to Text.
Text characters do not look sharp
when I scan a document to the
network
Touch Options, then under Resolution,
increase the output resolution.
Touch Options, then under Content, change
the setting to Text.
Black text is too light or
disappearing
Adjust the Darkness setting. Touch the right
arrow to increase the darkness setting.
Change the content mode to Text.
Adjust the Background Removal setting under
Advanced Imaging. Touch the left arrow to
remove less background.
Adjust the Contrast setting under Advanced
Imaging. Touch the right arrow to add more
contrast.
Adjust the Shadow Detail setting under
Advanced Imaging. Touch the left arrow to
decrease shadow detail.
Unwanted background is visible
Adjust the Background Removal setting under
Advanced Imaging. Touch the right arrow to remove
more background.
Solving fax problems
The fax document takes a long
time to transmit
To uch Options, then under Content, change the
setting to Text, and then set the resolution to
Standard.
The images on the fax I sent are
not clear
To uch Options, then under Content, change the
setting to Text/Photo or Photo.
Increase the output resolution.
Note: This will increase the amount of
time required for the scan and will
increase the quality of the fax
output.
Caller ID is not shown
If your region supports caller ID, you may have to
change the default setting. There are two settings
available, FSK (pattern 1) and DTMF (pattern 2).
Contact your telecommunications company to
determine which pattern or switch setting to use.
  • Page 1 1
  • Page 2 2
  • Page 3 3
  • Page 4 4
  • Page 5 5
  • Page 6 6

Lexmark 642e - X MFP B/W Laser User manual

Category
Print & Scan
Type
User manual

Ask a question and I''ll find the answer in the document

Finding information in a document is now easier with AI