
MODEL : PVNP4CD
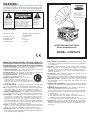
WARNING:
TO PREVENT FIRE OR SHOCK HAZARD, DO NOT EXPOSE THIS
APPLIANCE TO RAIN OR MOISTURE. DO NOT REMOVE COVER.
PILOT LAMPS SOLDERED IN PLACE. NO USER SERVICEABLE PARTS
INSIDE. REFER SERVICING TO QUALIFIED SERVICE PERSONNEL.
SPECIFICATION
Frequency Range : AM:540-1700kHz (AM = MW)
: FM 88-108MHz
POWER SOURCE :
120V AC
SPEAKER OUTPUT : 2W
SPEAKER SIZE : 4" 4Ohm x 2
SPEAKER WATT :
2 x 5W
CAUTION: TO REDUCE
THE RISK OF ELECTRIC
SHOCK, DO NOT REMOVE
COVER (OR BACK). NO
USER - SERVICEABLE
PARTS INSIDE. REFER
SERVICING TO QUALIFIED
SERVICE PERSONNEL.
The lighting flash with
arrowhead symbol, within
an equilateral triangle, is
intended to alert user to
the presence of uninsulated
"dangerous voltage" within
the product's enclosure
that may be of sufficient
magnitude to constitute
risk of electric shock
to persons.
The exclamation point
within an equilateral
triangle is intended to
alert user to the
presence of important
operating and
maintenance (servicing)
instruction in the
literature accompanying
the appliance.
CAUTION
RISK OF ELECTRIC SHOCK
DO NOT OPEN
AM/FM
LINE IN
F
.SKIP
B.SKIP
PROGRAM
REPE
AT
P
L
AY/
P
AUSE
STOP
OPEN/CLOSE
CD
T
APE/
LINE IN
PHONO
RADIO
IMPORTANT SAFEGUARDS FOR AUDIO PRODUCTS
PLEASE READ CAREFULLY THE FOLLOWING IMPORTANT
SAFEGUARDS THAT ARE APPLICABLE TO YOUR EQUIPMENT.
1.Read Instructions - All the safety and operating instructions
should be read before the appliance is operated.
2.Retain Instructions - The safety and operating instructions
should be retained for future reference.
3.Heed Warnings - All warnings on the appliance and in the
operating instructions should be adhered to.
4.Follow Instructions - All operating and use
instructions should be followed.
5.Water and Moisture - The appliance
should not be used near water-for
example,near a bathtub,washbowl,kitcken
sink,laundry tub, in a wet basement, or near swimming
pooland the like.
6.Carts and Stands - The appliance should be used only with
a cart or stan that is recommendedby the manufacturer.
6A.An appliance and cart combination should be moved with
care. Quick stops, excessive force, and uneven surfaces may
cause the appliance and cart combination to overturn.
7.Wall or Ceiling Mounting - The appliance should be mounted
to a wall or ceiling only as recommended by the manufacturer.
8.Ventilation - The appliance should be situated so that
its location or position does not interfere with-its proper
ventilation.For example, the appliance should not be
situated on a bed, sofa, rug,or similar surface that may
block the ventilation openings; or, placed in a built-in installation,
such as a bookcase or cabinet that may impede the flow
of air through the ventilation openings.
9.Heat - The appliance should be situated away from heat
sources such as radiators,heat registers, stoves,or other
appliances (including amplifiers) that produce heat.
10.Power Sources - The appliance should be connected to a
power supply only of the type described in the operating instructions
or as marked on the appliance.
11.Grounding or Polarization - Precautions should be taken
so that the grounding or polarization means of an appliance
is not impeded.
12.Power - Cord Protection - Power-supply cords should be
routed so that they are not likely to be walked on or pinched
by items placed upon or against them, paying particular
attention to cords at plugs, and the point where they exit
from the appliance.
13.Cleaning - The appliance should be cleaned only as
recommended by the manufacturer.
14.This product is designed for use with the antenna attached
and should not be connected to any other external antennas.
15.Nonuse Periods - The power cord of the appliance should
be unplugged from the outlet when left unused for a long
period of time.
16.Object and Liquid Entry - Care should be taken so objects
do not fall and liquids are not spilled into the enclosure through
openings
17.Damage Requiring Service - The appliance should be
serviced by qualified servicepersonnel when:
A.The power-supply cord of the plug has been damaged;or
B.Objects have fallen, or liquid has been spilled into the
appliance;or
C.The appliance has been exposed to rain;or
D.The appliance does not appear to operate normally or
exhibits a marked change inperformance; or
E.The appliance has been dropped, or the enclosure damaged.
18.Servicing - The user should not attempt to service the
appliance beyond that described in the operating instructions.
All other servicing should be referred to qualified service
personnel.
OPERATING INSTRUCTIONS
Please read before use

Power up the unit
Plug the 12V, 1A AC adaptor(not included) into the
AC adaptor Jack(26) at the rear of the unit. Turn
the Volume Knob (4) clock-wise to turn on the unit.
Radio/Tuner function
Turn the “Function” knob (1) to Radio, then select
Am/Fm channel by sliding the “Am/Fm” slide switch
(14). To select radio station, adjust the Tuning knob
(3) at the centre of the unit to select your favorite
station. In order to achieve better FM reception,
extend the FM antenna (27).
CD function
Turn the “Function” Knob (1) to CD, then press
“Open/Close” button (7) to place CD into CD tray.
Press again to close the CD door. Please
“Play/Pause” button (6) to start playing CD. Press
“Play/Pause” button one more time to select pause
mode. Press “B. Skip”(13) or “F. Skip”(15) to select
your ideal track. Press “Stop” button(8) to stop
playing. For repeat function, press “Repeat button”
(5) once to repeat one single track and press one
more time to repeat all tracks. Press again to cancel
repeat function. To program the tracks, press
“Program Button” (16), then press “B. Skip” (13)
or “F.Skip” (15) button to select your ideal track
and press “Program button”. The unit can program
up to 19 tracks.
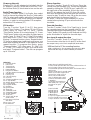
Main Unit
1. Function Knob
2. Dial Scale
3. Tuning Knob
4. Volume Knob
5. Repeat Button
6. Play/Pause Button
7. CD door Open/Close Button
8. Stop Button
9. Line-in Jack
10. CD Led Display
11. CD Door
12. 3.5mm Headphone Jack
13. B. Skip Button
14. Am/Fm Band Slide Switch
15. F. Skip Button
16. Program Button
17. Speaker
18. Eject Button
19. Tape Slot
20. Turntable Shaft
21. Turntable Platter
22. 45 rpm Adaptor
23. Tone Arm
24. 33, 45 and 78 rpm
Slide Switch
25.Tone Arm Lock/Tone
Arm Rest
26.AC Power Cord
27.FM Antenna
Phono function
Turn the “Function” Knob (1) to Phono. Place the
record onto the turntable (20). Select the turntable
speed by sliding the “33/45/78 rpm” switch(24) on
the right side of the turntable. Unlock the tone
arm(23) by release the lock(25), then lift up the
tone arm and gently place the tone arm onto the
record to play. If want to stop, lift up the tone arm
and place it back to the arm rest(25).
Re-mark : Place the 45rpm adaptor(22) at the
centre before placing 45 rpm record onto the
turntable.
Cassette function
Turn the “Function” Knob (1) to Tape/Line In. Insert
the cassette tape into the cassette slot(19), the
cassette tape will automatically play. Press the
“Inject” button(18) gently to skip forward and fully
press this button to inject the cassette tape
Aux input & output function
Turn the “Function” Knob (1) to Tape/Line In.
Connect wires into the Aux in jack(9) at the front
AM/FM
CD
TAPE/
LINE IN
PHONO VOLUME
ON
OFF
RADIO
PHONES LINE IN
F.SKIPB.SKIP PROGRAM REPEAT
PLAY/PAUSE
STOP OPEN/CLOSE
AM/FM
CD
IPOD/
LINE IN
PHONO VOLUME
ON
OFF
RADIO
PHONES LINE IN
F.SKIPB.SKIP PROGRAM REPEAT
PLAY/PAUSE
STOP OPEN/CLOSE
1 2 3 4
16
15
13
14
12
18 19
20 21 22
25 24 23
11 10 9
5
6
7
8
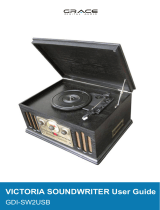
Instruction to install the metal horn
1.Place metal part A at the rear of the cabinet and use 3
pcs of copper color screws to secure it.
2.Insert metal part B into metal part A and secure with a
gold screw.
3.Place metal part C around metal
part A to increase support and
secure it by using 4 pcs of
black color screws at the
rear of cabinet and a gold
screw to hold metal A and
C together.
4.Connect the metal horn
with metal part C by use
two pieces of gold
screws
Parts included
A.Metal part A
B.Metal part B
C.Metal part C
D.Metal Horn
E.3 pcs of copper color screws
F.4 pcs of gold color screws
G.4 pcs of black color screws
A
B
D
C
17
(Screwdriver included)
27 26
Aux output is the Jack of "RCA output"(28) at the back.
USB host link to PC for recording function
28.RCA Out(Aux output)
29.USB Jack
USB Jack link to PC for converting vinyl into PC in MP3
format with the help of certain software pre-install in
PC
-
 1
1
-
 2
2


Ask a question and I''ll find the answer in the document
Finding information in a document is now easier with AI
Related papers
Other documents
-
Crosley Radio CR66 User manual
-
Crosley Rochester CR66 User manual
-
 Grace Digital SW2USB Soundwriter USB Recordable Turntable User manual
-
-
-
-
-
Crosley CR703 User manual
-
-
