SINGER DIVA 91 Owner's manual
- Category
- Sewing machines
- Type
- Owner's manual
Page is loading ...
Page is loading ...

3
11111111111111111111111111111111 ------------------------ 80 - 81
1. KNOWING YOUR SEWING MACHINE
Machine identification ------------------------------------------------ 6 - 7
Accessories ------------------------------------------------------------ 8 - 9
Setting up your machine ---------------------------------------- 10 - 11
Spool pins, Presser foot lifter---------------------------------- 12 - 13
Feed dogs control------------------------------------------------- 12 - 13
Converting to free-arm sewing -------------------------------- 14 - 15
Winding the bobbin ----------------------------------------------- 16 - 17
Threading the bobbin thread----------------------------------- 18 - 19
Threading the top thread ---------------------------------------- 20 - 23
Using automatic needle threader
Picking up bobbin thread --------------------------------------- 24 - 25
Needle, thread and fabric chart ------------------------------- 26 - 27
Adjusting top thread tension ----------------------------------- 28 - 29
Changing presser foot ------------------------------------------ 28 - 29
Control panel function ------------------------------------------- 30 - 35
Reverse Operation Switch -------------------------------------- 36 - 37
2. STARTING TO SEW
Quick reference table of stitch length and width ---------- 38 - 41
Straight stitching--------------------------------------------------- 42 - 45
Inserting zippers and piping
Hand-look quilt stitch -------------------------------------------- 44 - 45
Zigzag stitching ---------------------------------------------------- 46 - 47
Adjusting stitch width and length, Satin stitch
Placement of patterns
TABLE OF CONTENTS
Dimensions: 410 mm × 205 mm × 290 mm
Mass of the equipment: 7.5 kg
Rated Voltage: 230V ~
Rated Frequency: 50Hz
Rated input: 65W
Rated ambient temperature: 15 - 35°C
Acoustic noise level: less than 70db(A)
For European version
Blindhem stitch ---------------------------------------------------- 48 - 49
Multi-stitch zigzag, Shell stitch --------------------------------- 50 - 51
Faggoting ----------------------------------------------------------- 50 - 51
Stretch stitches ---------------------------------------------------- 52 - 61
Straight stretch stitch, Overedge stitch, Feather stitch,
Ric-rac stitch, Pin stitch, Blanket stitch, Honeycomb stitch,
Entredeux stitch, Ladder
stitch,
Double overlock stitch,
Criss-cross stitch, Crossed stitch, Slant overedge stitch,
Slant pin stitch,
Greek key stitch, Fishbone stitch,
Thorn stitch, Reinforced overedge stitch,
Wizard stitch, Chevron stitch
Decorative designs ----------------------------------------------- 62 - 63
Tips on design stitching
Continuous patterns --------------------------------------------- 64 - 65
Novelty patterns---------------------------------------------------- 66 - 67
Sewing on a button ----------------------------------------------- 66 - 67
Buttonhole making------------------------------------------------ 68 - 73
Automatic buttonhole, Corded buttonholes,
Manual buttonhole
3. CARING FOR YOUR MACHINE
Cleaning hook area and feed dogs -------------------------- 74 - 75
4. OTHER INFORMATION
Satin stitch foot, Twin needle----------------------------------- 76 - 77
Straight Stitch Needle Position -------------------------------- 78 - 79
5. PERFORMANCE CHECKLIST
Page is loading ...
Page is loading ...

6
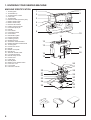
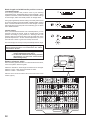
1. Thread guide
2. Thread take-up
3. Thread tension control
4. Face cover
5. Thread cutter
6. Extension table (Accessory box)
7. Bobbin winder shaft
8. Bobbin winder stop
9. Reverse stitch switch
10. Pattern reference guide
11. Horizontal spool pin
12. Handle
13. Hand wheel
14. Power/light switch
15. Cord socket
16. Identification plate
17. Presser foot lifter
18. Feed dog control
19. Buttonhole lever
20. Automatic needle threader
21. Needle threader Thread Guide
22. Thread guide
23. Presser foot screw
24. Needle
25. Bobbin cover plate
26. Needle bar
27. Alternate Thread Cutter
28. Foot release button
29. Needle clamp screw
30. Presser foot
31. Feed dogs
32. Needle plate
33. Bobbin cover release button
34. Power line cord
35. Foot control
36. Instruction manual
1. KNOWING YOUR SEWING MACHINE
MACHINE IDENTIFICATION
20
21
22
23
24
25
27
28
29
30
32
33
31
34 35 36
26
12
14
13
11
16
17
15
19
18
2
1
3
4
5
6
7
8
9
10
Page is loading ...

8
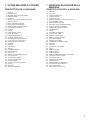
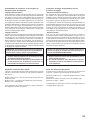
ACCESSORIES
FOR SEWING MACHINE
1. Needles
2. Bobbins (4 total - 1 in machine)
3. Auxiliary spool pin
4. Spool pin felt discs (2)
5. Spool pin cap (mini)
6. Spool pin cap (small)
7. Spool pin cap (large)
8. Buttonhole opener/Brush/Seam Ripper
9. Screwdriver for needle plate
10. Zipper foot
11. Satin stitch foot
12. Blind stitch foot
13. Buttonhole foot
The Foot that comes on your
Sewing machine is called the
General Purpose Foot and will be
used for the majority of your
sewing.
567
9
2
31
8
13
11 12
4
10
The Satin Foot (11) is another
very useful foot and should be
used for most decorative sewing.
Page is loading ...

10
Power/light switch “OFF”
Interrupteur moteur/lumière “OFF”
Interruptor corriente/luz “OFF”
Power/light switch “ON”
Interrupteur moteur/lumière “ON”
Interruptor corriente/luz “ON”
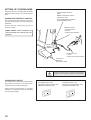
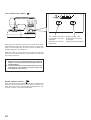
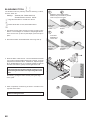
SETTING UP YOUR MACHINE
Be sure to wipe off any surplus oil from needle
plate area before using your machine the first
time.
POWER LINE CORD/FOOT CONTROL
Connect the plug of the power line cord into
the cord socket (1) and your wall outlet (2) as
illustrated.
Connect the foot control plug (3) into the
machine socket.
POWER/LIGHT SWITCH
Your machine will not operate until the power/
light switch is turned on. The same switch
controls both the power and the light.
When servicing the machine, or changing
needles, etc., machine must be disconnected
from the power supply.
Always disconnect the machine from power
supply by removing the plug from the wall-outlet.
Power line cord
Cordon
Cordón de la linea eléctrica
Set power/light switch at
“OFF”
1
3
Foot control
Rhéostat
Control por pedal
Machine socket
2
Mettez l’interrupteur moteur/
lumière sur “OFF”.
Poner el Interruptor de corriente/
luz de velocidad en “OFF”
Connecteur de la
machine
Conector de la máquina
Pin plug
Butée
Pasador
NOTE: When foot control is
disconnected, the machine will not
operate.
Page is loading ...

12
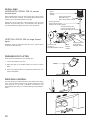
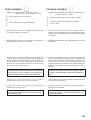
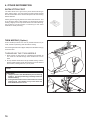
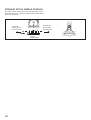
SPOOL PINS
HORIZONTAL SPOOL PIN for normal
thread spool
Place thread spool on the pin and secure with a spool cap to
ensure smooth flow of thread. If the thread spool has a thread
retaining slit, it should be placed to the right.
Select the correct spool pin cap according to the type and
diameter of spool being used. The diameter of the spool pin
cap should always be larger than that of the spool itself.
PRESSER FOOT LIFTER
There are three positions for your presser foot.
1. Lower the presser foot to sew.
2. Raise the lifter to the middle position to insert or remove
fabric.
3. Lift it to its highest position to change the presser foot or to
remove thick fabric.
FEED DOG CONTROL
The feed dogs control the movement of the fabric that is being
sewn. They should be raised for all general sewing purposes
and lowered for darning, freehand embroidery and
monogramming so that you, not the feed dogs, are guiding the
fabric.
VERTICAL SPOOL PIN for large thread
spool
Attach the spool pin and place a felt disc over it. Place a spool
of thread on the spool pin.
Spool pin cap
Couvre-fil
Tapa del pasador carrete
Spool
Bobine
Carrete
Spool pin
Porte-bobine
Pasador carrete
Spool pin felt discs
Rondelle feutre
Disco del pasador carrete
Vertical spool pin
Porte-bobine vertical
Pasador de carrete vertical
Spool
Bobine
Carrete
Thread retaining slot
Fente de retenue de fil
Ranura de retención de hilo
Page is loading ...

14
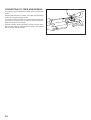
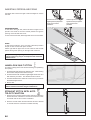
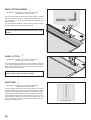
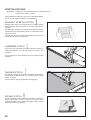
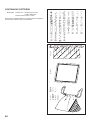
CONVERTING TO FREE-ARM SEWING
Your machine can be used either as a flat- bed or as a free-arm
model.
With the extension table in position, it provides a large working
surface as a standard flat-bed model.
To remove the extension table, hold it firmly with both hands and
pull it off to the left as shown. To replace, slide the extension
table back into place until it clicks.
With the extension table removed the machine converts into a
slim free-arm model for sewing children’s clothes, cuffs, trouser
legs, and other awkward places.
Page is loading ...

16
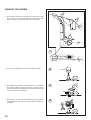
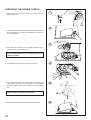
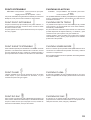
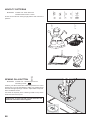
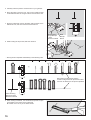
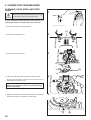
WINDING THE BOBBIN
1. Place a spool of thread on the spool pin, and secure it with
the spool pin cap. Pull the thread out from the spool and
place it through thread guides as shown in illustration.
2. Put end of thread through the hole in bobbin as shown.
3. Push bobbin winder shaft to far left position, if it is not already
there. Place bobbin onto shaft with end of thread coming
from top of bobbin. Push bobbin winder shaft to the right until
it clicks. Hold onto end of thread.
4. Start machine. Bobbin will automatically stop turning when
completely filled. Push shaft to the left to remove bobbin and
cut thread.
1
2
3
4
Page is loading ...

18
2
3
4
5
6
1
A
A
B
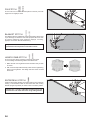
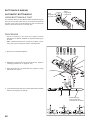
THREADING THE BOBBIN THREAD
1. Raise the needle to its highest position by rotating the hand
wheel toward you.
2. Remove the bobbin cover plate by pushing the release button
to the right. Bobbin cover will pop up sufficiently to allow you
to remove the cover.
3. Insert the bobbin making sure the bobbin rotates counter-
clockwise when you pull the thread.
4. Pull thread through the slot (A) and then to the left.
5. With a finger held gently on top of the bobbin, pull the thread
until it stops in slot (B). Then pull about 6" (15 cm) of thread
and lead it towards back of the machine under the presser
foot.
6. Replace the bobbin cover plate onto the needle plate.
NOTE: This is a very important step as the bobbin can
become unthreaded and cause sewing problems if it
rotates clockwise.
NOTE: This is also a very important step to assure the
bobbin thread does not slip out of position.
Page is loading ...

20
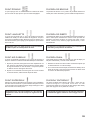
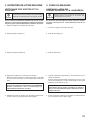
THREADING THE TOP THREAD
A. Raise the presser foot lifter. Always be sure to raise the
presser foot lifter before threading the top thread. (If the
presser foot lifter is not raised, correct thread tension cannot
be obtained.)
B. Turn the hand wheel toward you until the needle is in its
highest position and the thread take-up is visible.
C. Thread the machine with your left hand while firmly gripping
the thread with your right hand in the following order as
illustrated.
* Guide the thread through thread guide (1), and then pull it
into the pre-tension guide (2).
* Pull the thread into the tension discs, passing the thread to
the left of plate (2). Then guide the thread to the bottom of
the groove.
* Do a U-turn around the inside of the tab (3).
* Pass the thread through the thread take-up (4) from right
to left.
* Pull the thread into the inside of the take-up lever until it
reaches the eye of the lever.
* Guide the thread into the thread guide (5).
* Pass the thread through the eye of the needle (6) from
front to back. (See following page for instructions on
operation of the Automatic Needle Threader.)
IMPORTANT:
To verify that the machine is threaded properly in the
tension discs, do this simple check:
1.) With the presser foot raised, pull the thread towards the
back of the machine. You should detect only a slight
resistance and little or no deflection of the needle.
2.) Now lower the presser foot and again pull the thread
towards the the back of the machine. This time you
should detect a considerable amount of resistance and
much more deflection of the needle. If you do not detect
the resistance you have miss-threaded the machine and
need to re-thread it.
1
4
3
2
5
6
Page is loading ...

22
1 2 3
4 5 6
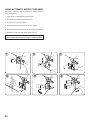
USING AUTOMATIC NEEDLE THREADER
Raise the needle to its highest position by rotating the hand
wheel towards you.
1. Hook thread to thread guide as illustrated.
2. Pull down lever holding the end of thread.
3. Turn the lever as far as it will go.
4. Guide thread into hooked end and pull it upward.
5. Return the lever and needle will be threaded automatically.
6. Release the lever and pull thread away from you.
NOTE: For smooth threading it is recommended you
select straight stitching when using the needle threader.
Page is loading ...

24
1
2
3
4
PICKING UP BOBBIN THREAD
1. Raise the presser foot lifter.
2. Holding needle thread loosely with your left hand, turn hand
wheel toward you with your right hand first lowering the needle
and continuing until the needle comes to its highest position.
3. Lightly pull up the top thread, and pick up bobbin thread,
which will appear through the needle plate slot.
4. Pull both top and bobbin threads together toward the back of
the machine under the presser foot, leaving about 6” (15 cm)
clear.
NOTE: A quick way to pick up the bobbin thread is, with
straight stitch selected, touch and release the reverse
switch.
Your machine will perform one down-up cycle and stop
with the needle up. Always stopping with the needle
“fully up” is one of the features of your computer sewing
machine.
Page is loading ...

26
Always disconnect the machine from power
supply by removing the plug from the wall-outlet.
* Do not use on stretch fabrics.
* For best sewing results, always use a Singer Branded Needle.
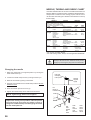
NEEDLE, THREAD AND FABRIC CHART
Your fabric will determine the choice of a needle and thread. The
following table is a practical guide to needle and thread selection.
Always refer to it before a new sewing project. And be sure to
use the same size and type of thread in the bobbin as in the top
thread supply.
FABRICS THREAD NEEDLES
The fabrics below can be of any
fiber: cotton, linen, silk, wool,
synthetic, rayon, blends. They
are listed as examples of weight.
Light-
Weight
Batiste
Chiffon
Crepe
Medium-
Weight
Corduroy
Flannel
Gabardine
Gingham
Linen
Muslin
Wool Crepe
Medium-
Heavy
Bonded Wovens
Canvas
Coating
Denim
Duck
Sailcloth
Knits Bonded Knits
Double Knit
Jersey
Tricot
Cotton-wrapped
Polyester
100% Polyester
* Mercerized Size 40
* "Heavy Duty"
Cotton-wrapped
Polyester
100% Polyester
* Mercerized Size 60
Cotton-wrapped
Polyester
100% Polyester
* Mercerized Size 50
Nylon
Cotton-
wrapped
Polyester
Polyester
Nylon
2020
red
shank
2020
red
shank
2020
red
shank
2020
Ball-Point 2045
(With yellow
band) Size
11/80,14/90,
16/100
11/80
orange
band
14/90
blue
band
16/100
purple
band
18/110
TYPE SIZE
Flat
side
toward
the
back
Flat side
Côté plat
Lado plano
Lado
plano
hacia
fuera
de Vd.
Côté
plat
orienté
vers
l’arrière
Pin
Butée
Pasador
Needle
Aiguille
Aguja
Changing the needle
1. Raise the needle bar to its highest position by turning the
hand wheel toward you.
2. Loosen the needle clamp screw by turning it toward you.
3. Remove the needle by pulling it downward.
4. Insert the new needle into the needle clamp with the
flat side
toward the back.
5. Push the needle up as far as it can go.
6. Tighten the needle clamp screw with the screw driver.
Helpful Hint: Placing a scrap of fabric under the presser
foot and lowering the presser foot makes it easier to
change the needle and will preclude dropping the needle
into the needle plate slot.
NOTE: Tighten snugly, but do not over tighten.
Page is loading ...

28
Under side
Côté de dessous
Reverso
Top side
Côté de dessus
Cara
Well balanced
Correct
Bien equilibrada
Top stitch too tight
Fil supérieur trop tendu
Puntada superior
demasiado apretada
Top stitch too loose
Fil supérieur trop lâche
Puntada superior
demasiado floja
Decrease tension
Diminuer la tension
Disminuir tensión
Increase tension
Augmenter la tension
Aumentar tensión
1
3
Foot release button
Presser foot lifter
Levier de verrouillage du pied
Palanca pie prensatelas
Foot holder
Support du pied
Sujetador prensatelas
Boton de desprendimiento
prensatelas
Touche de verrouillage du pied
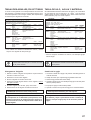
ADJUSTING TOP THREAD TENSION
90% of your sewing will be accomplished with the word “AUTO”
exposed on the tension control dial on top of the machine.
STRAIGHT STITCHING
The good looking appearance of your stitching is largely
determined by the balanced tension of both top and bobbin
threads. The tension is well balanced when these two threads
‘lock’ in the middle of layers of the fabric you are sewing.
If, when you start to sew, you find that the stitching is irregular,
you will need to adjust the tension control.
Make any adjustments with presser foot ‘down’.
A balanced tension (identical stitches both top and bottom) is
usually only desireable for straight stitch sewing.
ZIG ZAG and DECORATIVE SEWING
For zigzag sewing and decorative stitch functions, thread ten-
sion should be less than for straight stitch sewing.
You will always obtain a nicer stitch and less puckering when
the upper thread appears on the bottom side of your fabric.
BOBBIN TENSION
The bobbin tension has been correctly set at the factory, so
you do not need to adjust it.
CHANGING PRESSER FOOT
Be sure needle is in the up position. Raise presser foot lifter.
1. Push presser foot release button to remove the foot.
2. Place the desired foot on the needle plate aligning the
presser foot pin with the foot holder.
3. Lower the presser foot lifter so that the foot holder snaps on
the foot.
2
Helpful Hint: A slight adjustment to the + or - side of
AUTO will improve sewing appearance.
Page is loading ...

30
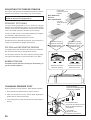
CONTROL PANEL FUNCTIONS
Direct selection buttons
Frequently used patterns are available by the direct selection
buttons. Turn on power switch and push a desired button until
it is lit.
Numerical selection buttons
Use the buttons located at left of number display to select left
digit and the buttons at right to select right digit, referring to the
pattern reference guide located at the bottom of machine.
*NOTE: The provided scales and numbers on the length and width controls are for reference only and
do not represent actual sewing parameters of length and width.
*REMARQUE: les échelles et les nombres sur les commandes de longueur et de largeur ne sont
fournis que pour référence et ne représentent pas les paramètres réels de longueur et de largeur.
*NOTA: Las escalas y números provistos en los controles de largo y ancho son sólo para referencia y
no representan los parámetros actuales de costura de largo y ancho.
Numerical selection buttons
Touches de sélection numérique
Botones de selección numérica
LED indicator
Témoin a diode
Indicador LED
Direct selection button
Touches de sélection directe
Botones de selección directa
Number display
Affichage numérique
Exhibición de número
Twin needle mode switch
Commutateur de mode d’aiguilles
Interruptor de modo de aguja doble
Stitch width/needle position control
Commande de largeur de point/position d’aiguille
Control de ancho de puntada/posición de aguja
Stitch length control
Longueur de point
Control longitud puntada
Needle up/down switch
Positionnement haut/bas de l’aiguille
Interruptor agja arriba/abajo
Page is loading ...

32
Stitch length and width/needle position controls
*Auto/Default settings
Your sewing machine will produce most of your stitching
requirements at an Auto/Default Stitch Length and Width. When
a pattern is selected, it will automatically sew at default settings
of stitch length, width and needle position for straight stitch.
Auto (preprogrammed) default settings are easily determined
by moving the Stitch Length and Width / Needle Position Control
Knob. The LED Indicator next to the Control will light in orange
without blinking and a beep will sound indicating you are at the
Auto / Default Position.
*Manual settings
Once you have determined the Auto / Default position you can
manually change the length, width or straight stitch needle
postition according to your preference. Starting at the Auto
position, slide the control knob left or right to locate each of the
potential adjustments. At each manual adjustment point, the
LED will blink 3 times in green and a beep will sound.
The LED will light in red beyond the potential adjustment range.
Pattern reference guide
When selecting patterns with the numerical selection buttons,
refer to the pattern reference guide.
Patterns in dark blue – stitch length and width can be changed.
Patterns in pink – stitch length and width are fixed.
Patterns in black – buttonholes.
Patterns with circled numbers cannot be sewn with a twin
needle (option).
NOTES: 1. Some patterns offer more opportunities for
manual adjustments than others.
2. An alternate method of determining available
adjustments is to move the control knobs
while sewing slowly.
NOTE: Instructions for manually changing the Straight
Stitch Needle Position are contained in the “Other
Information” Section.
Page is loading ...

34
Twin needle mode switch ( )
When using twin needles, push the twin needle mode switch
regardless of the stitch you selected. Doing so will reduce the
stitch width automatically and save broken needles and
possible damage to your machine.
While the switch is pushed and lit red, patterns with circled
numbers in the pattern reference guide cannot be selected
and a beep will sound.
Commutateur de mode
d’aiguilles
Interruptor de modo de
aguja doble
Twin needle mode switch
Helpful Hints:
1. Always select the Twin Needle Mode prior to selecting
a pattern. This will preclude any possibility of the twin
needle breaking.
2. Turning off the machine returns the machine to normal
sewing mode. Twin Needle is only active when the
Twin Needle Switch is lit red.
Needle up/down switch ( )
When the needle up/down switch is pushed, the needle moves
and stops at its lowest position. If the switch is pushed once
more, the needle moves and stops at its highest position. Use
for sewing curves, corners and topstitching.
Needle up/down switch
Interruptor agja arriba/abajo
Positionnement haut/bas
de l’aiguille
Page is loading ...

36
Reverse stitch switch
Interrupteur couture arrière
Interruptor de puntadas
hacia atrás
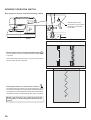
REVERSE OPERATION SWITCH
Dual purpose reverse and stitch/tacking switch
* Reverse stitch function for straight and zigzag stitches ( )
Reverse sewing is carried out while the reverse stitch switch
is pushed.
The machine will continue to sew in reverse as long as the
reverse switch button is pressed.
* Tacking stitch function for tie-off of other stitches ( )
The sewing machine makes 4 tiny tacking stitches to tie off
the sewing on all patterns except straight and zigzag stitches.
The position of the tacking stitches will be at the exact spot in
the pattern where the reverse/tacking stitch button is pushed.
NOTE: This function is very useful for tying off the
sewing pattern to avoid raveling at the start and end of
sewing.
Page is loading ...

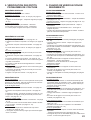
38
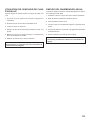
2. STARTING TO SEW
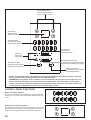
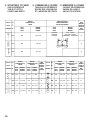
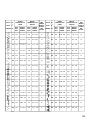
QUICK REFERENCE
TABLE OF STITCH
LENGTH AND WIDTH
2. COMMENCEZ À COUDRE
TABLEAU DE RÉFÉRENCE
RAPIDE DES LONGUEURS
ET LARGEURS DE POINTS
2. EMPEZER A COSER
CUADRO DE REFERENCIA
RAPIDA DE LARGO Y
ANCHO DE PUNTADA
|
|
|
|
±
|
|
±
|
|
|
STITCH
POINT
PUNTADA
No.
No.
No.
LENGTH
LONGUEUR (mm)
LARGO
NEEDLE POSITION
POSITION D'AIGUILLE
AGUJA POSICIONADA
TWIN
NEEDLE
AIGUILLE
DOUBLE
DOS
AGUJAS
AUTO
AUTO
AUTO
MANUAL
MANUEL
MANUAL
AUTO
AUTO
AUTO
MANUAL
MANUEL
MANUAL
00
2.5 0.5 - 4.75
CENTER
CENTRE
CENTRO
LEFT - RIGHT
GAUCHE - DROIT
IZQUIERDA - DERECHA
01
2.5 1.5 - 3.0
02
2.5 2.0 - 4.0 --
o
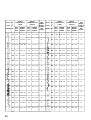
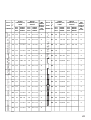
STITCH
POINT
PUNTADA
No.
No.
No.
LENGTH
LONGUEUR (mm)
LARGO
WIDTH
LARGEUR (mm)
ANCHO
TWIN
NEEDLE
AIGUILLE
DOUBLE
DOS
AGUJAS
STITCH
POINT
PUNTADA
No.
No.
No.
LENGTH
LONGUEUR (mm)
LARGO
WIDTH
LARGEUR (mm)
ANCHO
TWIN
NEEDLE
AIGUILLE
DOUBLE
DOS
AGUJAS
AUTO
AUTO
AUTO
MANUAL
MANUEL
MANUAL
AUTO
AUTO
AUTO
MANUAL
MANUEL
MANUAL
AUTO
AUTO
AUTO
MANUAL
MANUEL
MANUAL
AUTO
AUTO
AUTO
MANUAL
MANUEL
MANUAL
03
2.0 0 - 3.0 5.0 0 - 6.0
07
2.5 1.5 - 3.0 7.0 3.5 - 7.0
04
2.0 1.0 - 3.0 3.0 2.0 - 7.0
08
2.5 1.5 - 3.0 5.5 3.5 - 7.0
05
1.5 0 - 2.5 6.0 2.5 - 6.0
09
0.5 0.25 - 1.5 7.0 3.5 - 7.0
06
2.0 1.0 - 3.0 3.0 1.0 - 6.0
10
0 -- 3.0 2.0 - 4.5
oo
Page is loading ...
Page is loading ...
Page is loading ...

42
STRAIGHT STITCHING
Straight stitch is most frequently used for every aspect of
sewing. Let’s learn how to sew following the steps below.
1. SETTINGS
Presser foot - General Purpose Foot
Thread tension control - AUTO
A. Thread tension control
B. Reverse stitch switch
C. Presser foot lifter
D. Twin needle mode switch
E. Needle up/down switch
F. Stitch length control
G.Stitch width control
2. Pull both threads under the presser foot toward the back of
the machine, leaving about 6” (15cm) clear.
3. Place the fabric under the presser foot and lower the presser
foot lifter.
4. Turn the hand wheel toward you until the needle enters the
fabric.
5. Start the machine. Guide the fabric gently with your hands.
When reaching the edge of the material, stop the sewing
machine.
6. First turn the handwheel toward you until the needle is at its
highest position, then raise the presser foot, draw materials
to the rear and cut off excess thread with the thread cutter
located on the bottom of face cover as shown.
6
5
C
A
1
F
G
B
2
3
4
D E
NOTE: Based upon the weight of the fabric, slight “fine
tuning” of the tension may be desired.
NOTE: To secure the stitching and avoid raveling, press
the reverse stitch switch and sew a few stitches at the
start and end of the seam.
NOTE: The Needle Plate has both Metric and Inch
Markings as an aid for guiding your fabric when sewing
a seam.
Page is loading ...

44
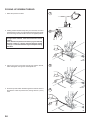
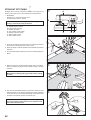
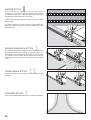
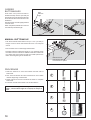
INSERTING ZIPPERS AND PIPING
Use zipper foot to sew to the right or left of the zipper or close to
the cord.
INSERTING ZIPPERS
To sew down the right side, attach left side of zipper foot to
presser foot holder so that the needle passes through the
opening on the left side of the foot.
To sew down the left side, attach right side of foot to foot holder.
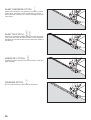
HAND-LOOK QUILT STITCH
This stitch is designed to look like hand sewing for topstitching
and quilting.
1. Thread bobbin with desired top stitching color. When sewing
the machine will pull this thread to the top.
2. Thread machine with invisible or lightweight thread the color
that matches your fabric. This thread should not show.
3. Increase thread tension a little bit at a time until you acheive
the desired appearance..
4. Start to sew.
PIPING
To pipe soft furnishings, cover cord with a bias strip of fabric
and pin or tack it to the main piece of fabric.
Attach right side of zipper foot to foot holder so that needle
passes through the opening on the right side of the foot.
Helpful Hint: Slight adjusting of the needle position to sew
closer to the piping may be accomplished with the Stitch
Width Control.
Needle to left of foot
Aiguille à gauche du pied presseur
Aguja a la izquierda del
prensatelas
Needle to right of foot
Aiguille à droite du pied presseur
Aguja a la derecha del
prensatelas
STRAIGHT STITCH WITH AUTO
TIE-OFF FUNCTION
1. Press the foot control and the machine will sew 4 stitches in
forward and then 4 stitches in reverse and continue to sew
in forward until the foot control is released.
2. Push the reverse switch and the machine will sew 4 stitches
in reverse and then 4 stitches in forward and stop.
NOTE: For a dramatic appearance, experiment with
different tension and stitch length combinations.
Page is loading ...
Page is loading ...
Page is loading ...
Page is loading ...
Page is loading ...
Page is loading ...
Page is loading ...
Page is loading ...
Page is loading ...
Page is loading ...
Page is loading ...
Page is loading ...
Page is loading ...
Page is loading ...
Page is loading ...
Page is loading ...
Page is loading ...
Page is loading ...
Page is loading ...
Page is loading ...
Page is loading ...
Page is loading ...
Page is loading ...
Page is loading ...
Page is loading ...
Page is loading ...
Page is loading ...
Page is loading ...
Page is loading ...
Page is loading ...
Page is loading ...
Page is loading ...
Page is loading ...
Page is loading ...
Page is loading ...
Page is loading ...
Page is loading ...
Page is loading ...
Page is loading ...
Page is loading ...
-
 1
1
-
 2
2
-
 3
3
-
 4
4
-
 5
5
-
 6
6
-
 7
7
-
 8
8
-
 9
9
-
 10
10
-
 11
11
-
 12
12
-
 13
13
-
 14
14
-
 15
15
-
 16
16
-
 17
17
-
 18
18
-
 19
19
-
 20
20
-
 21
21
-
 22
22
-
 23
23
-
 24
24
-
 25
25
-
 26
26
-
 27
27
-
 28
28
-
 29
29
-
 30
30
-
 31
31
-
 32
32
-
 33
33
-
 34
34
-
 35
35
-
 36
36
-
 37
37
-
 38
38
-
 39
39
-
 40
40
-
 41
41
-
 42
42
-
 43
43
-
 44
44
-
 45
45
-
 46
46
-
 47
47
-
 48
48
-
 49
49
-
 50
50
-
 51
51
-
 52
52
-
 53
53
-
 54
54
-
 55
55
-
 56
56
-
 57
57
-
 58
58
-
 59
59
-
 60
60
-
 61
61
-
 62
62
-
 63
63
-
 64
64
-
 65
65
-
 66
66
-
 67
67
-
 68
68
-
 69
69
-
 70
70
-
 71
71
-
 72
72
-
 73
73
-
 74
74
-
 75
75
-
 76
76
-
 77
77
-
 78
78
-
 79
79
-
 80
80
-
 81
81
-
 82
82
-
 83
83
-
 84
84


SINGER DIVA 91 Owner's manual
- Category
- Sewing machines
- Type
- Owner's manual
Ask a question and I''ll find the answer in the document
Finding information in a document is now easier with AI
in other languages
- français: SINGER DIVA 91 Le manuel du propriétaire
- español: SINGER DIVA 91 El manual del propietario
Related papers
Other documents
-
JANOME Sew Precise Owner's manual
-
-
JANOME DC4030P User manual
-
JANOME Hello Kitty 18750 Owner's manual
-
-
 Baby Lock Anna - BL20A Owner's manual
-
-
-
Brother XL-6562 User manual
-
