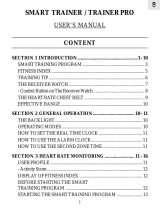
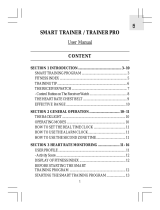
Omron Healthcare Automatic Blood Pressure Monitor User manual

Category
Heart rate monitors
Type
User manual

This manual is also suitable for

Heart Rate Monitor
Model: HR-310
INSTRUCTION MANUAL
HR-310_B_M03_110516.pdf
P
H
R
S
T
/
S
/
+
M
O
D
E
S
E
T
2
CONTENTS
Before Using the Unit
Introduction .................................................................3
Important Safety Information ......................................4
Know Your Unit ...........................................................6
Main Unit .................................................................6
LCD ..........................................................................7
Getting Started .............................................................8
Operating Instructions
Clock / Alarm / Keypad Tone / Tap On Lens ............10
Heart Rate Limits / Alert ...........................................13
User Data ...................................................................16
Wearing the Chest Belt .............................................. 19
Stopwatch ..................................................................21
Backlight / Keypad Lock ...........................................23
Batteries ..................................................................... 24
Care and Maintenance
Use in the Water .........................................................26
Speci cations .............................................................27
FCC Statement ...........................................................28
Limited Warranty .......................................................29
3
Before Using the Unit
INTRODUCTION
Thank you for purchasing the OMRON
®
HR-310 Heart Rate Monitor.
Fill-in for future reference
DATE PURCHASED: ___________
Staple your purchase receipt here
Register your product online at
www.register-omron.com
The heart rate monitor can help ensure you receive the maximum
bene t from your exercise program. You can increase the effectiveness
of your exercise program by monitoring and quantifying your results
every step of the way.
Your HR-310 Heart Rate Monitor comes with the following components:
• Heart Rate Monitor Watch
• Chest Belt
• Chest Belt Strap
2 Lithium CR2032 Batteries
(1 Monitor Watch, 1 Chest Belt - installed)
• Instruction Manual
SAVE THESE INSTRUCTIONS
4
IMPORTANT SAFETY INFORMATION
To assure the correct use of the product basic safety measures should
always be followed including the warnings and cautions listed in this
instruction manual.
SAFETY SYMBOLS USED IN THIS INSTRUCTION MANUAL
CAUTION
Indicates a potentially hazardous situation
which, if not avoided, may result in minor
or moderate injury to the user or patient or
damage to the equipment or other property.
OPERATING THE DEVICE
Do not bend or stretch the transmitter part of the chest belt.
Do not scratch hard objects against the LCD display as this may
cause damage.
When using this unit near any electronic devices, keep the devices
at least 8 inches (20 cm) away from the unit in order to avoid the
possibility of display errors occurring.
Do not throw the batteries into the re. The batteries may explode.
Do not use batteries not speci ed for this unit. Do not insert the
batteries with the polarities in the wrong direction.
Do not touch the exposed electronic circuitry, as there is a danger
of electric shock.
Check all major functions if the device has not been used for a long
time. Maintain regular internal testing and cleaning of your device.
Dispose of the device, batteries and components according to
applicable local regulations. Unlawful disposal may cause
environmental pollution.
Due to printing limitations, the displays shown in this manual may
differ from the actual display.
The contents of this manual may not be reproduced without the
permission of the manufacturer.
5
IMPORTANT SAFETY INFORMATION
CARE AND MAINTENANCE
Use a soft, slightly moistened cloth. Do not use abrasive or
corrosive cleaning agents, as these may cause damage. Use
lukewarm water and mild soap to clean the watch and chest belt
thoroughly after each training session. Never use the products in
hot water or store them when wet.
Do not disassemble or modify the unit. Changes or modi cations
not approved by Omron Healthcare will void the user warranty.
Do not subject the unit to strong shocks, such as dropping the unit
on the oor.
Do not submerge the unit or any of the components in water.
NOTES:
This product is not to be used for diagnostic purposes or to
prescribe medication.
Consult your doctor before beginning any exercise program.
The technical speci cations for this product and the contents of the
user manual are subject to change without notice.
Features and accessories will not be available in all countries.
For more information, please visit our web site at www.
omronhealthcare.com.
6
KNOW YOUR UNIT
Main Unit
1. Tap on lens screen (patent pending): Tap on it to view a
display mode
2. HR: Enter HR mode; toggle heart rate displays
3. MODE: Switch to another display mode
4. ST / SP / +: Start / stop stopwatch; change setting
5.
/ : Turn on backlight; lock / unlock keypad
6. SET: Enter setting mode; clock setting displays
P
H
R
S
T
/
S
/
+
M
O
D
E
S
E
T
2
1
3
4
5
6
7
KNOW YOUR UNIT
LCD
1. walking / jogging / running activity level
2.
: Alarm is set; ashes when alarm is active
3. AM / PM: 12-hour clock
4.
/ : ashes when surpassed heart rate limit
5. Time / heart rate
6.
: Indicates battery power is low
7.
: Stopwatch is shown or running
8.
: Keypad tone is turned off
9. AVG: Average heart rate reading
10. KCAL: Calorie unit
11. % : Percentage heart rate reading
12.
/ : Imperial height units (feet and inches)
13. KGLB: Body weight unit
14. CM: Metric height unit (centimeters)
15. YR: Year of user’s birth
16.
: Keypad lock is turned on
17.
: Tap on lens function is active
18. : Heart rate is outside the set limits
19.
: Flashes when receiving heart rate signal
1
7
8
13
12
14
15
16
17
19
18
9
10
1 1
2
3
4
6
5
8
GETTING STARTED
IMPORTANT:
To effectively use the watch when exercising i.e. to calculate your
calories burned and tness index, you
MUST
set the heart rate limits
and user data as shown in the relevant sections.
TURNING ON THE WATCH (1ST TIME USE ONLY)
Press any key for 2 seconds to activate the LCD screen.
SWITCH OPERATION MODES
Press MODE to switch between the 4 operation modes. Each main
mode displays a banner screen telling you which mode you are
entering. After 1 second the banner screen is automatically replaced
by the main mode screen.
9
GETTING STARTED
MODE BANNER MAIN MODE
CLOCK
STOPWATCH
USER
PROFILE
HEART RATE LIMIT
10
CLOCK / ALARM / KEYPAD TONE / TAP ON LENS
CLOCK
To set the clock:
1. Press MODE to switch to clock
mode.
2. Press and hold SET until the rst
setting ashes.
3. Press
+
to change the setting. Hold to speed through the options.
4. Press SET to con rm and move onto the next setting. The setting
sequence is: 12/24-hour format, hour, minute, year, day-month
format, month and day.
To toggle between the 4 different clock displays:
1. Press MODE to navigate to clock mode.
2. Press SET to scroll through the different screens.
Operating Instructions
11
CLOCK / ALARM / KEYPAD TONE / TAP ON LENS
ALARM
To set the daily alarm:
1. Press MODE to navigate to clock
mode.
2. Press SET until you reach the alarm
display.
3. Press and hold SET until the rst setting ashes.
4. Press
+
to change the setting. Hold to speed through the options.
5. Press SET to con rm and move onto the next setting. The setting
sequence is hours and minutes.
To turn the alarm sound OFF and reset it for the next day:
Press any key.
To activate / deactivate the alarm:
1. Press MODE to navigate to clock mode.
2. Press SET until you reach the alarm display.
3. Press
+
to toggle between alarm on or off. appears when the
alarm is activated.
12
CLOCK / ALARM / KEYPAD TONE / TAP ON LENS
KEYPAD TONE
To turn the keypad tone ON or OFF:
1. Press MODE to navigate to the clock
mode.
2. Press SET until you reach the keypad tone
display.
3. Press
+
to change the setting.
4. Press SET to con rm.
TAP ON LENS
The tap on lens feature gives you easy access to 1 of 6 preset modes:
• Clock (TIME)
• Instant percentage
heart rate, i.e., how hard the heart is working (%HR)
Stopwatch and current heart rate (STW HR)
Average heart rate (Avg HR)
Calories burned (kCAL)
• Stopwatch (CHRONO)
To set the tap on lens preset mode:
1. Press MODE to navigate to the clock mode.
2. Press SET until you reach the tap on lens display and use
+
to
select TOUCH ON.
3. Press and hold SET.
4. Press
+
to select 1 of the 6 modes and SET
twice to con rm.
13
CLOCK / ALARM / KEYPAD TONE / TAP ON LENS
To use the tap on lens:
Simply tap with ngernail on the lens and your preset mode will
display for 10 seconds before returning to the previous screen.
appears when the tap on lens feature is activated and ashes when
the preset display is shown.
HEART RATE LIMITS / ALERT
To set lower and upper heart rate limits / alert:
1. Press MODE to switch to heart rate limit
mode.
NOTE: To enter the user data setting mode,
the stopwatch must be stopped.
2. Press and hold SET until the rst setting
ashes.
3. Press
+
to change the setting. Hold to speed through the options.
4. Press SET to con rm and move onto the next setting. The setting
sequence is: Target activity (Walk, Jog or Run), lower heart rate
limit, upper heart rate limit and alert ON / OFF.
NOTE: You need to set the target activity for automatic calculation of
the lower and upper heart rate limit. If you change the target
activity level, your upper / lower heart rate will automatically
be updated.
14
HEART RATE LIMITS / ALERT
TARGET ACTIVITY
TARGET
ACTIVITY
MHR % DESCRIPTION
WALK 65 - 78%
Health Maintenance: Low
intensity training level. Good for
those who want to strengthen
their cardiovascular systems
JOG 65 - 85%
Aerobic Exercise: Increases
strength and endurance. Works
within body’s oxygen intake
capability, burns more calories,
can be maintained for a long
period of time
RUN 78 - 90%
Anaerobic: Generates speed and
power. Works at or above body’s
oxygen intake capability,
builds muscle, and cannot be
maintained for a long period of
time
MAXIMUM / LOWER / UPPER HEART RATE
Before you begin any exercise program and to achieve maximum
health bene ts from your workout, it is important to know your:
Maximum heart rate (MHR)
Lower heart rate limit
Upper heart rate limit
15
HEART RATE LIMITS / ALERT
To manually calculate your own heart rate limits:
MHR
MHR = 220-age
LOWER LIMIT
MHR x lower target activity %.
E.g. Target activity is WALK:
Lower limit = MHR x 65%
UPPER LIMIT
MHR x upper target activity %.
E.g. Target activity is WALK:
Upper limit = MHR x 78%
HEART RATE ALERT
You can set the heart rate alert in the heart rate mode to the following
settings:
ICON DESCRIPTION
Heart rate sound alert is OFF
Heart rate sound alert is ON
• 1 beep = you have gone below your lower
zone limit
• 2 beeps = you have gone above your upper
zone limit
or ash when you have surpassed your heart rate limit.
NOTES:
Sound alert will only be activated if alert setting is ON and during
exercise (when stopwatch is running).
If the watch is kept idle without receiving a heart rate signal for 5
minutes, the heart rate mode will quit and return to clock mode.
16
USER DATA
To access the full bene ts of this product, set up your user data
before you exercise. This will automatically generate a tness index,
and enable the watch to calculate the level of calories burned when
exercising. This information helps you track your progress over time.
To set the user data:
1. Press MODE to navigate to the user data
mode.
2. Press and hold SET until the rst setting
ashes.
3. Press
+
to change the setting. Hold to speed through the options.
4. Press SET to con rm and move onto the next setting. The setting
sequence is: Activity level (ATH / HOB / LIT), gender (M / F),
year of birth, month of birth, day of birth, height unit (feet or
meters), height, weight unit (lbs or kg) and weight. Once data has
been completed the tness index will display as FAIR, NORMAL
or GOOD.
NOTE: You must enter your user data to enable the calorie count and
fat burn features.
To view your tness index:
Press MODE until you reach the user data display.
17
USER DATA
ACTIVITY LEVEL
The activity level is based on your own self-assessment of the amount
of exercise you regularly perform.
ACTIVITY
LEVEL
DESCRIPTION
LITTLE
Low - You do not usually participate in programmed
recreation sports or exercise.
HOBBY
Medium - You are engaged in modest physical
activity (such as gol ng, horseback riding, table
tennis, calisthenics, bowling, weight lifting or
gymnastics) 2-3 times a week, totaling 1 hour per
week.
ATHLETE
High - You actively and regularly participate in
heavy physical exercise (such as running, jogging,
swimming, cycling, or skipping rope) or engage in
vigorous aerobic exercise (such as tennis, basketball
or handball).
NOTE: You must enter the activity level to calculate the calories
burned and tness index.
FITNESS INDEX
The watch will generate a tness index based on your aerobic tness.
This index is dependent and limited by the body’s ability to deliver
oxygen to the working muscles in training. It is often measured
by maximum oxygen uptake (VO2 Max), which is de ned as the
highest amount of oxygen that can be utilized when exercising at an
increasingly demanding level. The lungs, heart, blood, circulatory
system, and working muscles are all factors in determined VO2 Max.
The unit of VO2 Max is ml/kg min.
18
USER DATA
See the tables below for a rough guide to what your tness index
means:
FITNESS INDEX FOR MEN
Age
FAIR
NORMAL
GOOD
Fitness index
FITNESS INDEX FOR WOMEN
Age
FAIR
NORMAL
GOOD
Fitness index
19
WEARING THE CHEST BELT
CHEST BELT
The chest belt counts your heartbeat and transmits this data to the watch.
1. Wet the conductive pads on the
underside of the chest belt with a few
drops of water or conductive gel to
ensure solid contact.
2. Strap the chest belt across your chest
making sure the belt sits snugly
below your pectoral muscles.
TIPS
For accurate heart rate readings, make
sure the chest belt is placed above your heart.
Avoid areas with dense chest hair.
In dry, cold climates, it may take several minutes for the chest belt
to function steadily. This is normal and should improve with several
minutes of exercise.
NOTE: If the watch is kept idle without receiving a heart rate signal
for about 5 minutes, the heart rate mode will quit.
20
WEARING THE CHEST BELT
TRANSMISSION SIGNAL
The chest belt and watch have a maximum transmission range of about
25 inches (62.5 cm).
ICON DESCRIPTION
Flashes when signal has been found
Appears when heart rate alert is ON
In the event that you experience a weak signal or your signal is
disrupted by interference in the environment:
Shorten the distance between the chest belt and watch.
Re-adjust the position of the chest belt.
Check the conductive pads are moist enough to ensure solid
contact.
Check the batteries. If they are low the range may be less.
When two or more people use the units nearby at the same time,
ensure there is more than 45 inches (112.5 cm) between them.
NOTE: Signal interference in the environment can be due to
electromagnetic disturbances. These may occur near high
voltage power lines, traf c lights, overhead lines of electric
railways, electric bus lines or trams, televisions, car motors,
bike computers, some motor driven exercise equipment,
cellular phones or when you walk through electric security
gates. Under interference, the heart rate reading may become
unstable and inaccurate.
  • Page 1 1
  • Page 2 2
  • Page 3 3
  • Page 4 4
  • Page 5 5
  • Page 6 6
  • Page 7 7
  • Page 8 8
  • Page 9 9
  • Page 10 10
  • Page 11 11
  • Page 12 12
  • Page 13 13
  • Page 14 14
  • Page 15 15
  • Page 16 16
  • Page 17 17
  • Page 18 18
  • Page 19 19
  • Page 20 20
  • Page 21 21
  • Page 22 22
  • Page 23 23
  • Page 24 24
  • Page 25 25
  • Page 26 26
  • Page 27 27
  • Page 28 28
  • Page 29 29
  • Page 30 30
  • Page 31 31
  • Page 32 32

Omron Healthcare Automatic Blood Pressure Monitor User manual

Category
Heart rate monitors
Type
User manual
This manual is also suitable for

Ask a question and I''ll find the answer in the document

Finding information in a document is now easier with AI