GE ZDWT240 Owner's manual
- Category
- Wine coolers
- Type
- Owner's manual
This manual is also suitable for

Owner's
Manual
Privacy Glass
Wine Reserve
ZDWT240
www.monogram.com
Monogram:

Consumer Infi)rmation
I,lin e /¢eserve
Introduction Your new Monogram wine reserve makes an eloquent statement of style, convenience arm
kitchen planning flexibility. _4'hether you chose it fox its purity of design or tire assiduous
attention to detail, you will find that your Monogram wine reserve's superior blend of
form arm flmcfion will delight you fox years to come.
The irfformation on the following pages will help you operate arm maintain your wine
reserve properly.
If you haxe arty other questions, xisit our VVebsite at: www.monogram.com
Contents
Built-In Dimensions ................ 13
Care arm Cleaning .............. 11,12
Corrsumer Services ................. 19
Controls arm Features ............. 8-10
Model arm Serial Numbers ............ 2
Problem Soher . ................ 14-16
Product Registration ................. 9
Repair Serxice ................... 3, 19
Safety' Instructions ................. 4-7
_'arrantv .................. Back Coxer
Bq/ore
using your
wine reserve
Read this manual careflflly. It is irrtended
to help you operate and maintain your
new wine reserxe properly.
Kee I) it handy for answers to your
questions.
If you don't understand something or
need more help, there is a list of toll-free
consumer selMce numbers irwluded ira
the 1)ack section of this mannal.
OR
Visit our VVebsite at: www.monogram.com
Write
down the
model &
serial
n u ))'lbers
You will find them on a label on the ceiling
irrside the wine reserxe.
Please write these numbers here:
Model Number
Serial Number
Use these numbers in any correspondence
O 7
or service calls corrceming your x_irre reserxe.
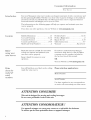
ATTENTION CONSUMER!
This unit is designed for storing and cooling beverages.
Do not store perishable foods in this unit.
ATTENTION CONSOMMATEUR !
Cet appareil m6nager est conqu pour conserver et rafraichir des boissons.
Ne mettez pas de biens perissables dans cet appareil m6nager.

Consumer Information
1,1i, e He.serve
If you received
a damaged
appliance
Tile warranty does not coxer damage
caused after delixerv.
hnmediatelv contact tile dealer (or builder)
that sold you the wine reserxe.
Save time
& monu
Before you request serxice, check tile
Problem Solxer in the back of this mannal.
It lists causes of minor operating problems
that you call correct yourself.
Before using, be sure all packing materials
and tape hme been remoxed.
To assure no damage is done to the finish
of the product, tile safest way to remoxe the
adhesixe left from packaging tape on new
appliances is all application of household
liquid detergent. Apply with a soft cloth
and allow m soak. Wipe d U and then apply
all appliance polish to thoroughly clean
and protect the surface.
If you need
service
To obtain service, see tile Consumer
Services page ill the back of this mannal.
_A,eare proud of our service and want you
to be pleased. If for some reason you are
not happy with the service you receive,
here are steps to tSllow for fllrther help.
For customers in the USA:
FIRST, contact the people who serviced
your appliance. Explain why you are not
pleased. Ill most cases, this will solve the
problem.
NEXT, if you are still not pleased, write
all tile details--including your phone
number--m:
Manager, Customer Relations
GE Appliances
Appliance Park
Louisville, KY 40925
For customers in Canada:
FIRST, contact the people who serviced
your appliance. Explain why you are not
pleased. Ill most cases, this will solve the
problem.
NEXT, if you are still not pleased, write
all the details--including your phone
number to:
Manager, Consumer Relations
Camco Inc.
1 Factory Lane, Suite 310
Moncton, N.B. El C 9M3
After
installation
is completed
The location should not be subject
to direct sunlight, heat or moisture.
Promptly inspect your new Monogram
wine reserve. If it has been damaged,
contact the Installer or Dealer
immediately.
This wine reserxe must be properly
lmeled to ensure correct door alignment
and door closure. Contact the Installer
if the unit is not lmel.
The unit should be centered ill tile
opening. The flont face of tile door
should be l" tbrward of adjacent
cabinet W. Contact tile installer if
clearance is not correct.
• Test the door swing. Carefidly open and
close the door. Tile door should not rub
or catch on adjacent cabinet W. Notiff' tile
installer if the door makes contact with
cabinetry.
Please Contact the Installer or Dealer if you
experience any of these problems.
Your wine reserve is shipped with a black
toekick on tile front of the unit. For
shipping purposes, all optional stainless
smel mekick is secured to tile back or on
tile inside of tile unit. That toekick should
have been removed and installed, or given
to you. Kee I) tile unused toekick and other
unused or removed parts for possible 3
flmne use.

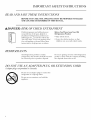
IMPORTANT SAFETY INSTRUCTIONS
READ AND SAVE THESE INSTRUCTIONS
BEFORE IT IS USED, THE APPLIANCE MUST BE PROPERLY INSTALLED
AND LOCATED AS DESCRIBED IN THIS MANUAL.
_,DANGER: I?ISK OF CHILD ENT'RAPMENT
Child entrapment and suflbcation are
not problems of tile past. Junked or
al)andoned refligeration products are
still dangerous...even if they will sit for
'_just a few days." If you are getting rid of
your old appliance, please follow these
instructions to hel I) prevent accidents.
Before You Throw Away Your Old
Refrigeration Product:
• Take off tile doors.
• I,eave tile shelves in place so that
children may not easily climl) inside.
REFRl(;ERANTS
All refligeration products contain
refrigerants, which under federal law must
be remoxed prior to product disposal.
If you are getting rid of an old refiigeration
product, check with tile company handling
the disposal al)out what to do.
DO NOT USE AN ADAPT_2R PLUG OR EXTT/,'NSION CORD
(Adapter plug:s not permitted in Canada)
Do not use an adapter plug to connect the
refligerator to a 9-prong outlet.
Do not use an extension cord with this
appliance.
Page is loading ...

IMPORTANT SAFETY INSTRUCTIONS
HOW TO CONNECT EI 2CTt CITY
Do not, under any circumstances, cut or
remove the third (ground) prong from
the power cord. For personal safety, this
appliance must be properly grounded.
The power cord of this appliance is
equipped with a 3-prong (grounding)
plug which mates with a standard 3-prong
(grounding) wall outlet to minimize tile
possibility of electric shock hazard flom
this appliance.
Haxe tile wall outlet and circuit checked
by a qualified electrician to make sure
the outlet is properly grounded.
Where a standard 2-prong wall outlet
is encountered, it is your personal
responsibility and obligation to have
it replaced with a properly grounded
3-prong wall outlet.
Tile appliance should always be plugg>d
into its own individual electrical outlet
which has a voltage rating that matches
the rating plate. This provides the best
performance and also prevents overloading
house wiring circuits which could cause
a fire hazard Dora overheated wires.
Nexer unplug an appliance by pulling on
tile power cord. Always grip the plug firmly
and pull straight out flom the outlet.
Repair or replace immediamly all power
cords that have become flayed or otherwise
damaged. Do not use a cord that shows
cracks or abrasion damage along its length
or at either end.
When moxing the appliance, be carefld not
to roll oxer or damage the power cord.
SAVE 7"HESE INS 7"RUC77ONS
Page is loading ...

Controls and Features
Wine ICeserve
7>mperature
control
The temperaune range of tile wine reserve
is flom 40°F to 65°E
Do not install tile wine reserve where tile
temperature will go below 55°F or above
90 °E
Tile mmperature display shows tile aculal
temperature of tile wine reserve. Tile actual
temperature may va_T slightly flom tile set
temperature based on t:actors such as door
openings, amount of wine and room
temperature. After making adjustments,
allow 19 to 24 hours for tile wine reserve
to reach tile mmperamre you have set and
before making ally finfiler adjnstments.
The facto_ T setting is tile RED WINE setting
(55°F).
Note: On all three temperature selections,
the light beside tile pad will remain lit,
indicating tile selection made.
Tile RED WINE setting will provide a
storage temperature of approximately
55°F, which is optimum t_r tile storage
of red wine. Press tile RED WINE pad to
display 55°E Several seconds after tile
RED WINE pad is pressed, tile actual
temperature will be displayed while tile
wine reserve tenlperature nloves toward
55°E
Tile WHITE WINE setting will provide a
storage mmperamre of approximately 45°F,
which is optimum tbr white wine. Press tile
WHITE WINE pad to display 45°E Several
seconds after tile WHITE WINE pad is
pressed, tile actual temperature will be
displayed while tile wine resevve
temperature moves toward 45°F.
Tile CUSTOM setting will provide a storage
temperature range of 40°F to 65°F. This
setting provides tile ability to customize tile
temperature to tile optinmm setting for tile
particular wine. To change tile temperature
setting, press and hold tile CUSTOM pad
until tile display begins to flash tile set
mmperamre. Then press tile + or- pads
until you reach the desired set temperature.
Once you reach tile desired temperature,
stop pressing tile pads. After several
seconds, tile display will return to tile
actual temperature. Tile actual temperature
will be displayed while tile wine reserve
moves toward tile set temperature.
In general, temperatures at tile bottom
of tile cabinet will be cooler than
temperatures at tile top of tile cabinet.
Position yonr wine invento_ T accordingly
(i.e., white wines ill tile cooler zones and
red wines ill tile warmer zones).
Child contrvl
lockout
This child control lockout feature prevents
unwanted changes to your temperature
settings.
After tile desired tenlperatuie is set tile
mmperature call be locked. To lock, press
both tile + and - pads at tile same time for
five seconds. To unlock, press both + and -
pads for five seconds.

Controls and Features
1,1i, e /¢eserve
lnto ior
lighting
and ,glass
activation
Tile interior light makes it easy to view
your wine labels and enhances tile display
of your collection. Tile privacy glass allows
you to view your wine with a simple press
of a button, without opening the doon
These two features work jointly to display
your wine.
Normal operation
When tile door is opened, tile light will
come on and the door will become clear.
Special features
Tile light and glass activation button,
located at tile top of tile handle, will switch
the glass flom opaque to clear and will, at
the same time, turn on the light. Tile light
will stay on and tile glass will remain (:lear
tbr one hour flom the last time the button
was pressed. To tnrn the ligilt off and make
tile glass opaque, press tile button again.
Tile opaque setting conceals the contents
fiom view. The light will come on only
when tile door is opened or tile button is
pressed. If you choose to activate the light
and door while the door is open, you may
notice that the word ON is displayed. If you
press tile light button a second time, while
tile door is open the word OH? will be
displayed.
For best viewing, do not store a bottle
on tile top shelf directly under tile light.
Remember to turn off the light when it
is no longer needed.
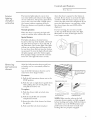
Pu?moving
full extension
d_'a_o_s
All of the flfll extension drawers pull out
so bottles carl be conveniently added or
removed.
Any of tile fldl extension drawers carl be
removed to store larger bottles.
To remove:
1. Pull tile fldl exmnsion drawer out to the
STOP position.
2. Push tile tab on right drawer guide down
while pulling tile tab on left guide up,
and pull the drawer ont.
To replace:
1. Push tile drawer slide arm back into
the unit.
2. Pull tile small slide sub assembly
completely forward.
3. Insert tile sides of the drawer back into
the guides.
4. Push until the tabs lock into place.
)ush tab down on
right drawer guide, pull
tab up on left drawer
guide)
Appearance may vary
Toreplace, pushdrawer slide
armback into unit
Pullsmall slidesub assembly
completely forward
NOTE: Make sure tlle tabs on the flfll
extension drawer guides are fidly engaged
before loading any bottles. Pull tile drawers
out all tile way m tile STOP position and
push back in several times to make sure
locking tabs are properly engaged.

Controls and Features
I,lin e ICe,serve
Insert wine
bottles
The top five fllll extension drawers each
hold eight bottles, two deep with the necks
alternating flont to back or nine bottles,
alternating with necks pointing inward.
8 bottle arrangement 9 bottle arrangement
The bottom two fllll extension drawers
hold six bottles each and are loaded with
necks facing the rear. Tall bottles should
not be loaded on the bottom drawer
because they may prment the door from
closing.
Bottom drawer
Loading
tips and
suggestions
The bottles on the top flfll extension
drawer, directly under the light, will be
exposed m a slightly higher mmperature
when the light is on. Position your wines
accordingly and remember to turn off
the light when it is no longer needed.
Kee I) wines that you plan to use for
everyday drinking and entertaining on
the flont half of the fifll extension
drawers where labels are completely
visible. Place wines for aging or longer
term storag> in the rear.
Do not allow children to climb, stand or
hang on the wine reserve flfll extension
drawers. They could seriously i,_jnre
themselves and possibly cause damage
to the wine reserve.
In general, temperatures at the bottom
of the cabinet will be cooler than
temperatnres at the top of the cabinet.
Position yonr wine imento, y accordingly
(i.e., white wines in the cooler zones and
red wines in the warmer zones).
Wood drawo
fronts
The flfll extension drawer flonts on the
wine reserxe are unfinished cher U wood.
During use, oil flom hands may accumu]ate
and stain the wood.
• The drawer fionts may be stained and
sealed to match adjacent cabineu T. The
tinted glass will make the stained wood
appear darken A true color match can be
seen only when the door is opened.
• Apply tim stain and sealer according to
the manufacturer's instructions. To avoid
unpleasant odor, kee I) the door open to
ventilate and allow the stain/sealer to dry
completely before using the product.
NOTE: Natural wood may xa, T slightly in
grain and color.
10

re and (;leaning
I,lir_e /¢eserve
Unplug the wine reserve before cleaning. If the unit is in a built-in location,
remove power at the circuit breaker.
Cleaning
the inside
Unplug the wine reserve before cleaning.
If the unit is in a built-in location, remove
power at the circuit breaker. Use a slightly
damp cloth or sponge when cleaning
around switches, lights or controls.
Use warm water and baking soda solution--
about a tablespoon (15 ml) of baking soda
m a quart (1 liter) ofwaten This both
cleans and neutralizes odors. Thoroughly
rinse and wipe day.
Other parts of the wine reserve center
unit--including the door gaskets, and
fldl extension drawers--can be cleaned
the same way.
Drain hole
Periodically check the drain hole and
channel for any debris. If the drain is
blocked, condensation will not drain
properly.
To check and clean the drain hole,
remove the third and fourth drawers
(see instructions on I¢emovingfull exh'r*siorl
drawo:s). Sweep a damp cloth along the
channel in the back of the wine reserve.
Use a fing_r to sweep away any debris
fiom the drain hole.
Drain hole
Appearance mayvary
Cleaning
the outside
The exterior surfaces can be washed with
mild soap and water.
Rinse thoroughly with cleat water. Nmer
O z
use abrasixe scouring po_sders.
Do not use scouring pads, powdered
cleaners, bleach or cleaners containing bleach
because these products can scratch and
damage the finish.
Warranty does not cover damage due to
improper cleaning methods.
Glass door
Use a glass cleaner or mild soap and water
and a soft cloth to clean the glass door.
Do not nse any abrasixe powders.
Avoid cleaning cold glass with hot water
because the extreme temperature
difference may cause it to break. Rough
handling of tempered glass can cause it
to shatter.
Do not place magnets on or near the
glass door. Magnets may cause permanent
damage to the door.
Door gasher
The xinyl gasket may be cleaned with mild
soap and water, a baking soda solution or
a mild scouring powder. Rinse well.
After cleaning the door gasket, apply a thin
layer of paraffin wax or petrolemn jelly to
the door gasket at the hinge side. This
helps kee I) the gasket fiom socking and
bending ont of sh ape. 11

Care and Cleaning
Wine Reserve
Unplug the wine reserve before cleaning. If the unit is in a built-in location,
remove power at the circuit breaker.
Light bul!)
_zq)lacement
Unplug the wine reserve before replacing To remove tire light shield, push in the tab
the light bulb. If the unit is in a built-in on the left side of the shield and lower it.
location, remove power at the circuit breaker. Replace with a 15 watt appliance bulb.
In the event
o/apowe
failure
If the power fails, open the door as
infrequently as possible to maintain
the mmperamre. A gradual rise ill
temperature should not have any
adverse eff>ct on the wine.
If it is extremely hot, you may want to move
the wine to the coolest location you carl
find until power is restored.
Do not store or ttse gasoline or other
flammable vapors and liquids in the
vicinity of this or any other appliance.
Secure all loose items such as drawers by
taping them securely ill place to prevent
damage.
Be sure the wine reserve stays in an upright
position during moving.
12

Built-In Dimensions
I,lir_e /¢eserve
Installation
dimensions
The wine reserxe can be a flee-standing
model or can be buih in using tile cut-out
dimensions below.
When building in the wine reserxe, be sure
to allow for a flfll door swino so you haxe
flfll access to tile pull-out drawers.
See the Installation Instructions (Pub. No.
49-60910) tbr complete directions.
23a/d, 23a/d'
(603mm) _ _ (603mm)
341/2"
(876mm)
Product dimensions:
Height: 34/2 (876 ram)
Width: z:/4 tou: ram)
_,J t/ -
Depth: 2, ,'/4 (603 ram)
NOTE:
Handle and
handle standoff
depth is 1:4/4"
.......2=_..__ .-
.j_ -... j j/
Cut-out dimensions:
34/_2-3a (876-889 ram)
Height: _ _"
Width: z:.'/4 (603 ram) nainimum
Depth: 94" (610 ram)
Product
€l(?(Irgl_l CgS
The wine reserxe is t:actorv set for a l l 0 °
door swing.
When installed in a corner:
• Allow 4" minimum clearance on the
hinge side for tile 90 ° door swing and
to allow racks to slide out.
t!
Allow l0 minimum clearance on the
hinge side %r a fldl l l0° door swing.
Tile door swing is rmersible on all models.
If desired, change tile door swing before
installation.
Choose the location:
These products may be closed in on the
top and three sides as long as the front
is unobstructed tbr air circulation and
proper access to tile door.
Do not install these products where the
(l: (,)
temperature will go below 55°F 3° •
or aboxe 90°F (, 2 C)
Do not install where it will be subject to
direct sunlight, heat or naoisture.
10"Minimum
toWall
I • t'
",,
110° ..
........ 4v', __,
90° DoorSwing
'l
[__
i i 23-5/8"
90° 1
........ .,., ,,,_
4" Minimum
to Wall
Black or Stainless Steel Toekick Options
These products are shii)ped with a black
toekick installed. An optional stainless steel
toekick is also supplied with each product.
For shii)ping i)uiposes, the stainless steel
mekick is secured m tile back or on tile
inside of tile unit.
13

The Problem Solver
Withe ICeserve
NorlT_l(ll
oDerating
SO_172(1S
Newer appliances sound difl>rent flom older appliances. Modern appliances have more
t_atures and use newer technolog-y.
Do you hear what I hear? These sounds are normal.
HUMMM...
-- WHOOSH...
Tile new high efficiency compressor
may run fasmr and longer than your
old appliance and you may hear a
high-pitched hum or pulsating sounds
while it is operating.
Sometimes the appliance runs for an
extended period, especially when the
doors are opened fleqnently.
You may hear a whooshing sound when
the doors close. This is due to pressure
equalizing within the appliance.
CLICKS, POPS,
CRACKS and CHIRPS
You may hear cracking or popping sounds
when tile appliance is first plugged ill.
This happens as tile appliance cools to
the correct temperature.
Expansion and contraction of cooling
coils dnring and after deflost call cause
cracking or i)oi)ping sounds.
Tile electronic control board may cause
a clicking sound when relays activate to
control appliance components.
WHIRl
You may hear the fans spinning at
high speeds. This happens when tile
appliance is first plugged in, when the
door is opened fleqnently or when large
amounts of beverages are added to
the appliance. The fans help maintain
desired temperatures.
If tile door is open tbr over 3 minums,
you may hear a fail come on ill order to
cool the appliance.
Tile fans change speeds ill order to
provide optimal cooling and energy
savings.
WATERSOUNDS
6
Tile flow of refligerant through tile
appliance cooling coils may make a
gurgling noise like boiling water.
A water dripping noise may occur as
wamr flom tile evaporator flows into
the drain pan.
Closing tile door may cause a gurgling
sound due to pressure equalization.
14

The Problem Solver
I,lin e ICe,serve
Questions ?
Use this
prob&m
solver/
PROBLEM
APPLIANCE
DOES NOT OPERATE
VIBRATION OR
RATTLING (Slight
vibration is normal.)
COMPRESSOR
MOTOR OPERATES
FOR LONG PERIODS
OR CYCLES ON AND
OFF FREQUENTLY
COMPARTMENT
TOO WARM
APPLIANCE
HAS ODOR
DOOR NOT
CLOSING
PROPERLY
MOISTURE FORMS
ON OUTSIDE OF
APPLIANCE
FROST OR MOISTURE
COLLECTS INSIDE
INTERIOR LIGHT
DOES NOT WORK
POSSIBLE CAUSE
• Appliance is so quiet that most of the time w)u will hear low or no
operating noise.
• Appliance may be in defl'ost cycle when compressor motor does not
operate fi)r up to 2 hours.
• If interior light is not on, appliance mav not be plugged in at
wall outlet. Push the plug completely into the wall outlet.
• The fllse is blown/circuit breaker is tripped. Replace fllse or reset
the breaker.
• At!just the lexeling legs as shown in the Installation Instructions.
• Normal when appliance is fi_t plugged in. Wait 24 hours fin" the
appliance to completely cool down.
• Often occtu_ when large amounts of beverages are placed in appliance.
This is nom_al.
• Door leti open or package holding door open.
• Hot weather or fl'equent door openings. This is nom_al.
• Temperature control set at the coldest setting.
See Temperature Control. Allow 24 hours tot temperature to change.
• Temperature control not set cold enough.
See Temperature Control. Allow 24 hours tot temperature to change.
• Warm weather or fl'equent door openings.
• Door lett open tor long time.
• Package may be holding door open.
• Interior needs cleaning. See Care and Clealfing.
• Kee I) open box of baking soda in appliai_ce; replace evelw 3 n_onths.
• Door gasket is sticking or tolding ove_: Apply petroleum ,jelly
or parattin wax to the tace of the gasket.
• The door is hitting an internal component inside the appliance.
Adilist interior components to prevent interference.
• Not unustlal during periods of high humidim If bothersome,
wipe surtace chT; otherwise, moisture will evaporate in time.
• Door leti open or package holding door open.
• Too fl'equent or too long door openings.
• In humid weather, air carries moisture into appliance when door
is opened. Unit will dissipate moisture in time. If bothersome,
wipe surtace dry.
• Temperature control set at coldest setting.
• No power at outlet.
• I,ight bulb needs replacing. See Care and Cleaning.
15

The Problem Solver
1,1i, e He,serve
Questions ?
Use this
problem
solveN
PROBLEM
HOT AIR FROM
BOTTOM OF
APPLIANCE
POSSIBLE CAUSE
APPLIANCE
NEVER SHUTS OFF
BUT TEMPERATURES
ARE OK
TEMPERATURE
WILL NOT ADJUST
LIGHT REMAINS ON
AND DOOR IS CLEAR
WHILE DOOR IS
CLOSED
OPAQUE GLASS
BECOMES CLI_R
WHEN THE DOOR
IS OPEN
• Normal air flow cools the motoI; In the reflJgeration process,
it is normal that heat be expelled in the area under the appliance.
S()me floor coverings are sensitive and will discolor even at these
safe and nornml temi)eratures.
• Adaptive defl'ost keeps compressor running during door openings.
This is mwmal. The appliance will cycle off atter the door remains
closed fi)r two hours.
• Normal operation ill extreme teml)eratures.
• Telnl)erature Inav be ill lockout inode. Press both + and - pads ti)r
5 seconds to unlock the teml)erature.
• Norlnal operation. The light and door can be actiw_ted by pressing
the button at the top of the handle. The light will remain on for one
houI: Press the button to turn the door to opaque and turn the light off.
Nomml oi)erati(m. The light and glass features workjointl) at all
times. See lnh<rior l_'hling" and g'la,ss aHivalion ill Conlro[,s a_d
Fealure,s section for more details.
16
Page is loading ...
Page is loading ...

Consumer Services
I,lin e ICeserve
With the purchase of your new Monogram appliance, receive the
assurance that if you ever need information or assistance from GE,
we will be there. All you have to do is call---toll-free, t
GE Answer
Center _
In the USA:
800.626.2000
Whatever your question about any Monogram major appliance, GE Answer Center _':
iutormatiou service is awfilable to hell). Your call--and your question--will be answered
promptly and courteously: And w)u can call any time. GE Answer (:enter _':service is open
24 hom_ a da> 7 days a week.
OR
Visit our X'_ebsite at: www.monograma.com
ht Canada, call 1.888.880..3030.
In-Home
Repair Service
In the USA:
800. 444.1845
In Canada:
1.888.880.3030
AGE consumer service protessioual will provide expert repair service, scheduled at a time that's
convenient fi)r you. Many GE Consumer Service company-operated locations ottiq" vou service
today or tomorro_, or at your convenience (7:00 a.m. to 7:00 p.m. weekdays, 9:00 a.m. to 2:00 p.m.
Saturdays). Our tactorv-traiued technicians know w)ur appliance inside and out--so most repairs
can be handled in just one visit.
For Customers
With Special
Needs...
In the USA:
800.626.2000
............11 I /I I
GE otters Braille controls fi)r a wH_ietv of GE appliances, and a brochure to
assist in I)lanning, a battle>free kitchen for persons with limited mobility.
Consumers xsith impaired hearing or speech xslt{, haxe access to a TDD or
a comentional teletypewriter may call 800.TDD.GEAC (800.833.4322)
to request iuforulatiou or set\ice.
Service
Contracts
In the USA:
800. 626. 2224
M Canada:
1.888.880.3030
You can haxe the secure feeling that (;E Consumer Set\ice will still be there after your warranty
expires. Purchase a GE contract while your warrant) is still in effect and )ou'll receixe a substantial
discount. _ith a multiple-year contract, you are assured of fltture serxice at today's prices.
Parts and
Accessories
ln the USA:
800.626.2002
ln Canada:
1.888.880.3030
Individuals quafified to service their own applimlces can have parts or accessories sent directly
to their home. The GE parts s)stem proxides access to oxer 47,000 parts...and all GE (;enuine
Renewal Parts are fltll_ warranted. VISA MasterCard and Discoxer cards are accepted.
User maintenance instructions contained in this manual cover procedures intended to be
performed by may user. Other servicing generally should be referred to qualified service
persomael. Caution must be exercised, since improper servicing may cause unsafe operation.
19

YOUR MONOGRAM WINE RESERVE WARRANTY
Staple sales slip or canceled check here. Proof of original purchase date
is needed to obtain service under warranty.
WHATIS
COVERED
P)vm the Date
of the O'_ginal
Puwhase
FULL ONE-Y_R WARRANTY
For one year fl'oln date tff original purchase, we will prtMde, free of charge, parts and serxice labor in
your holne to repair or replace any/)arl o/lhe wine re,se*wethat tidls because of a inalmlhcturii_g detect.
FULL FIVE-YEAR WARRANTY
For fixe )ears from date of original pro'chase, we will proxide, free of charge, parts and set\ice labor
in _our holne to repair or replace an)parl of, the ,sealed rejJri_.'eralin_',, ,,s>lem (the comi)ressor,
condenser, exaporator aim all COlmecting tubing) that tails because of a u_almthcturing detect.
This warranty is extended to the original imrchaser and any succeeding owner fi)i" products
imrchased fl)r ordinary home use in the 48 mainland states, Hawaii, Washington, D.C. or Canada,
In Alaska the warran W is the salne except that it is I,IMITED because vou umst pay to ship the
product to the service shop or tot the service technician's travel costs to wmr home.
All warrant)' service will be provided by ore" Factory Service Centers or bv ore" authorized Customer
Care': servicers (hu'ing nom_al working horn's.
Should vom" appliance need service, (hu'ing warranty period or beyond, in the USA call
800,444.1845, In Canada: 888,880,3030,
WHAT IS NOT
COVERED
• Service trips to your home to teach you
how to use the product,
• Replacement of house fuses or resetting of
circuit breakers,
• Dmnage to the product caused by accident,
fire, floods or acts of God.
• Failure of the product if it is used for
other thm_ its intended purpose or used
commercially.
• Replacement of the light bulbs.
• Improper installation, delivery or
mahltenmlce.
If you have an installation problem, contact
your dealer or installer. You are responsible
for providing adequate electrical, plumbing
and other connecting facilities.
• Loss of food due to spoilage (in the USA only).
• Incidental or consequential damage caused by
possible defects with this applimlce.
• Dmnage caused after delivery.
Some states/provinces do not allow the exclusion or limitation of incidental or consequential
dalnages, so the above liufitation or exchlsion inay not apply to you. This warranty gives you
specific legal rights, aim wm inay also have other rights which wn'y fl'oln state to state/i)rovince
to i)rovince. To know what wmr legal rights are in wmr state/province, consult your local or
state/i)rovincial coi_sulner attairs office or vour state's Attornev General.
WaJcrantor in USA: General Electric Company,
Louisville, KY 40225
Waxrantor ha Canada: Camco Inc.
197D5891PO07
49-60310
11-04 JR
Printed in Slovenia
Monogram:
GEConsumer & Industrial
LouJsvilJe,KY40225
@2004GE Company
-
 1
1
-
 2
2
-
 3
3
-
 4
4
-
 5
5
-
 6
6
-
 7
7
-
 8
8
-
 9
9
-
 10
10
-
 11
11
-
 12
12
-
 13
13
-
 14
14
-
 15
15
-
 16
16
-
 17
17
-
 18
18
-
 19
19
-
 20
20


GE ZDWT240 Owner's manual
- Category
- Wine coolers
- Type
- Owner's manual
- This manual is also suitable for
Ask a question and I''ll find the answer in the document
Finding information in a document is now easier with AI
Related papers
Other documents
-
Oatey DLS4280R2 Specification
-
GE Monogram ZDWR240 User manual
-
Monogram ZDWI240HII Owner's manual
-
 GE Monogram ZDBC240 User manual
-
Alaterre Furniture ARVA3120 Installation guide
-
Asko R2303 User manual
-
Motorola MaxTrac FMR-1626-1 User manual
-
 De Dietrich DWS860XC Owner's manual
-
AMERICANA A3316ABSHRWW Owner's manual
-
AMERICANA A3316ABSBRWW Owner's manual

